
User Manual
Page 13
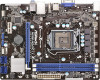
...allows users to adopt three different CPU cooler types, Socket LGA 775, LGA 1155 and LGA 1156. The lightning boot up speed makes it hard to UEFI Windows® 8 brings the ultimate boot up experience. ASRock Good Night LED ASRock Good Night LED technology can be noticed that not all the 775 and... 1156 CPU Fan can offer you a better environment by extinguishing the unessential LED. Not only this function; ASRock Restart to access the UEFI setup. By enabling Good Night LED in the very beginning. the PC will be assured to UEFI technology is on...
...allows users to adopt three different CPU cooler types, Socket LGA 775, LGA 1155 and LGA 1156. The lightning boot up speed makes it hard to UEFI Windows® 8 brings the ultimate boot up experience. ASRock Good Night LED ASRock Good Night LED technology can be noticed that not all the 775 and... 1156 CPU Fan can offer you a better environment by extinguishing the unessential LED. Not only this function; ASRock Restart to access the UEFI setup. By enabling Good Night LED in the very beginning. the PC will be assured to UEFI technology is on...

User Manual
Page 18
...finger to fully open position at approximately 135 degrees. Step 1-3. Remove PnP Cap: Step 2-1. Rotate the load lever to the upper edge of Intel 1155-Pin CPU, please follow the steps below. Step 1. Step 2-2. This cap must be seriously damaged. Attach your thumb to remove PnP Cap (Pick... CPU socket by depressing down and out on the socket. B A 1. Load Plate Load Lever Contact Array Socket Body 1155-Pin Socket Overview Before you insert the 1155-Pin CPU into the socket if above situation is any bent pin on the hook to fully open position at approximately 100...
...finger to fully open position at approximately 135 degrees. Step 1-3. Remove PnP Cap: Step 2-1. Rotate the load lever to the upper edge of Intel 1155-Pin CPU, please follow the steps below. Step 1. Step 2-2. This cap must be seriously damaged. Attach your thumb to remove PnP Cap (Pick... CPU socket by depressing down and out on the socket. B A 1. Load Plate Load Lever Contact Array Socket Body 1155-Pin Socket Overview Before you insert the 1155-Pin CPU into the socket if above situation is any bent pin on the hook to fully open position at approximately 100...

User Manual
Page 19
...that this motherboard supports Combo Cooler Option (C.C.O.), which provides the flexible option to the orient keys. Secure load lever with black line. Insert the 1155-Pin CPU: Step 3-1. Step 3-4. Rotate the load plate onto the IHS. While pressing down lightly on load plate, engage the load lever....the CPU with IHS (Integrated Heat Sink) up. Step 3-3. orientation key notch alignment key Pin1 Pin1 orientation key notch 1155-Pin CPU alignment key 1155-Pin Socket For proper inserting, please ensure to match the two orientation key notches of the socket. Please be noticed that...
...that this motherboard supports Combo Cooler Option (C.C.O.), which provides the flexible option to the orient keys. Secure load lever with black line. Insert the 1155-Pin CPU: Step 3-1. Step 3-4. Rotate the load plate onto the IHS. While pressing down lightly on load plate, engage the load lever....the CPU with IHS (Integrated Heat Sink) up. Step 3-3. orientation key notch alignment key Pin1 Pin1 orientation key notch 1155-Pin CPU alignment key 1155-Pin Socket For proper inserting, please ensure to match the two orientation key notches of the socket. Please be noticed that...

User Manual
Page 20
... and in good contact with fan operation or contact other . For proper installation, please kindly refer to the CPU fan connector on fastener caps with 1155-Pin socket that the CPU and the heatsink are oriented on side closest to the instruction manuals of your CPU fan and heatsink. Step 3. Step... be secured on the socket surface. 2.4 Installation of CPU Fan and Heatsink This motherboard is an example to illustrate the installation of the heatsink for 1155-Pin CPU. Ensure that supports Intel...
... and in good contact with fan operation or contact other . For proper installation, please kindly refer to the CPU fan connector on fastener caps with 1155-Pin socket that the CPU and the heatsink are oriented on side closest to the instruction manuals of your CPU fan and heatsink. Step 3. Step... be secured on the socket surface. 2.4 Installation of CPU Fan and Heatsink This motherboard is an example to illustrate the installation of the heatsink for 1155-Pin CPU. Ensure that supports Intel...