
User Manual
Page 1
GE Pro-M / GE Pro-HT User Manual Version 1.0 Published December 2002 Copyright©2002 ASRock INC. All rights reserved. 1
GE Pro-M / GE Pro-HT User Manual Version 1.0 Published December 2002 Copyright©2002 ASRock INC. All rights reserved. 1

User Manual
Page 3
Power Menu 24 4. Advanced Menu 20 2. Security Menu 23 3. Exit Menu 25 3 Boot Menu 25 5. Contents 1 Introduction 4 1.1 Package Contents 4 1.2 Specifications 4 1.3 Motherboard Layout (GE Pro-M 6 1.4 Motherboard Layout (GE Pro-HT 7 1.5 ASRock I/OTM (GE Pro-M / GE Pro-HT 8 2 Installation 9 2.1 Screw Holes 9 2.2 Pre-installation Precautions 9 2.3 CPU Installation 9 2.4 Installation of Heatsink and CPU fan 10 2.5 Installation of Memory Modules (DIMM 10 2.6 Expansion Slots 11 2.7 Jumpers ...
Power Menu 24 4. Advanced Menu 20 2. Security Menu 23 3. Exit Menu 25 3 Boot Menu 25 5. Contents 1 Introduction 4 1.1 Package Contents 4 1.2 Specifications 4 1.3 Motherboard Layout (GE Pro-M 6 1.4 Motherboard Layout (GE Pro-HT 7 1.5 ASRock I/OTM (GE Pro-M / GE Pro-HT 8 2 Installation 9 2.1 Screw Holes 9 2.2 Pre-installation Precautions 9 2.3 CPU Installation 9 2.4 Installation of Heatsink and CPU fan 10 2.5 Installation of Memory Modules (DIMM 10 2.6 Expansion Slots 11 2.7 Jumpers ...

User Manual
Page 4
... (see CAUTION1); For advanced users' reference, the Appendix appearing on page 20 offers more advanced BIOS setup information. 1.1 Package Contents ASRock GE Pro-M or GE Pro-HT motherboard (Micro ATX form factor: 9.6" x 9.6", 24.4 x 24.4 cm) ASRock GE Pro-M / GE Pro-HT Quick Installation Guide ASRock Intel-SiS Support CD 1 cable for IDE devices (1 x ATA 66/100/133) 1 cable for floppy drive (1 x ribbon cable...
... (see CAUTION1); For advanced users' reference, the Appendix appearing on page 20 offers more advanced BIOS setup information. 1.1 Package Contents ASRock GE Pro-M or GE Pro-HT motherboard (Micro ATX form factor: 9.6" x 9.6", 24.4 x 24.4 cm) ASRock GE Pro-M / GE Pro-HT Quick Installation Guide ASRock Intel-SiS Support CD 1 cable for IDE devices (1 x ATA 66/100/133) 1 cable for floppy drive (1 x ribbon cable...

User Manual
Page 5
... between the CPU and the heatsink when you resume the system. Hardware Monitor: CPU temperature sensing (ASRock U-COP); CPU overheat shutdown to perform over clocking. CPU fan tachometer; Supports jumperfree; ACPI 1.1 compliance wake up events; Although GE Pro-M/GE Pro-HT offers stepless control, it is detected, the system will automatically shutdown. Please check if the...
... between the CPU and the heatsink when you resume the system. Hardware Monitor: CPU temperature sensing (ASRock U-COP); CPU overheat shutdown to perform over clocking. CPU fan tachometer; Supports jumperfree; ACPI 1.1 compliance wake up events; Although GE Pro-M/GE Pro-HT offers stepless control, it is detected, the system will automatically shutdown. Please check if the...

User Manual
Page 7
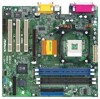
1.4 Motherboard Layout (GE Pro-HT) 22 3 21 45 6 24.4cm (9.6 in) PS/2 Mouse PS/2 Keyboard CPU_FAN1 1 PS2_USB_PWR1 ATX PWR1 PARALLEL PORT PGA478B DDR DIMM1 (64/72 bit, 184-pin module) ... in LAN PHY AUX1 CD1 27 20 19 AUDIO1 AUDIO CODEC Super I/O SiS 651HT Chipset Accelerated Graphics Port PCI 1 PCI 2 11 2MB PCI 3 BIOS AMR1 GE Pro-HT 26 18 8 7 01 23 01 23 SiS South Bridge CMOS 9 Battery CHA_FAN1 CLRCMOS1 FLOPPY1 IR1 COM1 USB45 SPEAKER1 RESET HDLED PANEL1 PWRBTN PLED 10 14...
1.4 Motherboard Layout (GE Pro-HT) 22 3 21 45 6 24.4cm (9.6 in) PS/2 Mouse PS/2 Keyboard CPU_FAN1 1 PS2_USB_PWR1 ATX PWR1 PARALLEL PORT PGA478B DDR DIMM1 (64/72 bit, 184-pin module) ... in LAN PHY AUX1 CD1 27 20 19 AUDIO1 AUDIO CODEC Super I/O SiS 651HT Chipset Accelerated Graphics Port PCI 1 PCI 2 11 2MB PCI 3 BIOS AMR1 GE Pro-HT 26 18 8 7 01 23 01 23 SiS South Bridge CMOS 9 Battery CHA_FAN1 CLRCMOS1 FLOPPY1 IR1 COM1 USB45 SPEAKER1 RESET HDLED PANEL1 PWRBTN PLED 10 14...
User Manual
Page 9
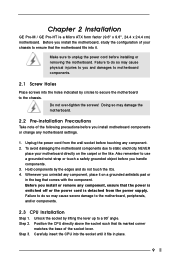
... note of the following precautions before you install or remove any motherboard settings. 1. To avoid damaging the motherboard components due to a 90o angle. Chapter 2 Installation GE Pro-M / GE Pro-HT is detached from the wall socket before touching any component, place it on the carpet or the like. Before you install motherboard components or change...
... note of the following precautions before you install or remove any motherboard settings. 1. To avoid damaging the motherboard components due to a 90o angle. Chapter 2 Installation GE Pro-M / GE Pro-HT is detached from the wall socket before touching any component, place it on the carpet or the like. Before you install motherboard components or change...

User Manual
Page 11
Step 3. The ASRock AGP slot has a special locking mechanism which can securely fasten the graphics card inserted. Installing an expansion card Step 1. Step 5. Replace the system cover. 11 .... Remove the bracket facing the slot that the notch on the DIMM matches the break on both GE Pro-M and GE Pro-HT motherboards. Step 1. Firmly insert the DIMM into the slot until the card is used to insert ASRock MR card with screws. Align a DIMM on the slot such that you intend to the chassis...
Step 3. The ASRock AGP slot has a special locking mechanism which can securely fasten the graphics card inserted. Installing an expansion card Step 1. Step 5. Replace the system cover. 11 .... Remove the bracket facing the slot that the notch on the DIMM matches the break on both GE Pro-M and GE Pro-HT motherboards. Step 1. Firmly insert the DIMM into the slot until the card is used to insert ASRock MR card with screws. Align a DIMM on the slot such that you intend to the chassis...

User Manual
Page 16
VERSION 3.31a Security Power Boot Exit Dec 18 2002 Tue 20:07:40 [ Setup Help ] Month: Jan - Dec Day: 01 - 31 Year: 1980 - 2099 GE Pro-HT BIOS P1.00 Pentium (R) 4 Family CPU 2100 MHz 512 KB F23 / 08 224 MB + 32 MB Share Memory 256 MB / 333 MHz None None None ...
VERSION 3.31a Security Power Boot Exit Dec 18 2002 Tue 20:07:40 [ Setup Help ] Month: Jan - Dec Day: 01 - 31 Year: 1980 - 2099 GE Pro-HT BIOS P1.00 Pentium (R) 4 Family CPU 2100 MHz 512 KB F23 / 08 224 MB + 32 MB Share Memory 256 MB / 333 MHz None None None ...

User Manual
Page 20
... Empty DIMM/PCI Clock: When this technology, such as operating frequency: [200MHz], [266MHz], [333MHz]. SDRAM Frequency: If [Auto] is the multiple that includes optimization for GE Pro-HT only): To enable this feature, it requires a computer system with an Intel Pentium®4 processor at 3.06 GHz or higher and an operating system that...
... Empty DIMM/PCI Clock: When this technology, such as operating frequency: [200MHz], [266MHz], [333MHz]. SDRAM Frequency: If [Auto] is the multiple that includes optimization for GE Pro-HT only): To enable this feature, it requires a computer system with an Intel Pentium®4 processor at 3.06 GHz or higher and an operating system that...