RAID Installation Guide
Page 1
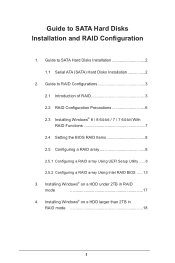
...) Hard Disks Installation 2 2. Guide to RAID Configurations 3 2.1 Introduction of RAID 3 2.2 RAID Configuration Precautions 6 2.3 Installing Windows® 8 / 8 64-bit / 7 / 7 64-bit With RAID Functions 7 2.4 Setting the BIOS RAID Items 8 2.5 Configuring a RAID array 8 2.5.1 Configuring a RAID array Using UEFI Setup Utility....... 8 2.5.2 Configuring a RAID array Using Intel RAID...
...) Hard Disks Installation 2 2. Guide to RAID Configurations 3 2.1 Introduction of RAID 3 2.2 RAID Configuration Precautions 6 2.3 Installing Windows® 8 / 8 64-bit / 7 / 7 64-bit With RAID Functions 7 2.4 Setting the BIOS RAID Items 8 2.5 Configuring a RAID array 8 2.5.1 Configuring a RAID array Using UEFI Setup Utility....... 8 2.5.2 Configuring a RAID array Using Intel RAID...

RAID Installation Guide
Page 8
...Items After installing the hard disk drives, please set the necessary RAID items in the BIOS before you exit BIOS setup. 2.5 Configuring a RAID array You can configure a RAID array using either UEFI Setup Utility or Intel® RAID BIOS setup utility. 2.5.1 Configuring a RAID array Using UEFI Setup Utility STEP 1: For Windows... your system, and press key to [UEFI only]. 8 Go to Advanced Storage Configuration and set "Launch Storage OpROM policy" to enter BIOS setup utility. For Windows® 7: Go to UEFI SETUP UTILITY Boot CSM to set the option SATA Mode Selection to disable "CSM".
...Items After installing the hard disk drives, please set the necessary RAID items in the BIOS before you exit BIOS setup. 2.5 Configuring a RAID array You can configure a RAID array using either UEFI Setup Utility or Intel® RAID BIOS setup utility. 2.5.1 Configuring a RAID array Using UEFI Setup Utility STEP 1: For Windows... your system, and press key to [UEFI only]. 8 Go to Advanced Storage Configuration and set "Launch Storage OpROM policy" to enter BIOS setup utility. For Windows® 7: Go to UEFI SETUP UTILITY Boot CSM to set the option SATA Mode Selection to disable "CSM".
RAID Installation Guide
Page 13
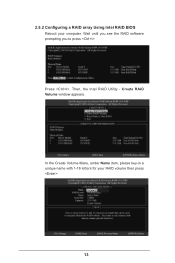
2.5.2 Configuring a RAID array Using Intel RAID BIOS Reboot your RAID volume then press . Then, the Intel RAID Utility - Press . Volume0 13 Create RAID Volume window appears. Wait until you see the RAID software prompting you to press . In the Create Volume Menu, under Name item, please key-in a unique name with 1-16 letters for your computer.
2.5.2 Configuring a RAID array Using Intel RAID BIOS Reboot your RAID volume then press . Then, the Intel RAID Utility - Press . Volume0 13 Create RAID Volume window appears. Wait until you see the RAID software prompting you to press . In the Create Volume Menu, under Name item, please key-in a unique name with 1-16 letters for your computer.

RAID Installation Guide
Page 16
If you set up. Please note that you want to create an extra RAID partition, please use the RAID utility under BIOS RAID environment. Press to delete a RAID volume, please select the option Delete RAID Volume, press , and then follow the instructions on the screen. 16 After the completion, you will see the detailed information about the RAID that you are only allowed to create one RAID partition at a time under Windows environment to configure RAID functions after you want to complete the setup of RAID. If you install OS.
If you set up. Please note that you want to create an extra RAID partition, please use the RAID utility under BIOS RAID environment. Press to delete a RAID volume, please select the option Delete RAID Volume, press , and then follow the instructions on the screen. 16 After the completion, you will see the detailed information about the RAID that you are only allowed to create one RAID partition at a time under Windows environment to configure RAID functions after you want to complete the setup of RAID. If you install OS.
RAID Installation Guide
Page 17
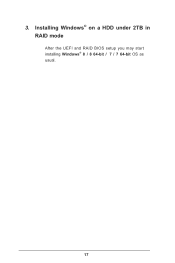
Installing Windows® on a HDD under 2TB in RAID mode After the UEFI and RAID BIOS setup you may start installing Windows® 8 / 8 64-bit / 7 / 7 64-bit OS as usual. 17 3.
Installing Windows® on a HDD under 2TB in RAID mode After the UEFI and RAID BIOS setup you may start installing Windows® 8 / 8 64-bit / 7 / 7 64-bit OS as usual. 17 3.
RAID Installation Guide
Page 18
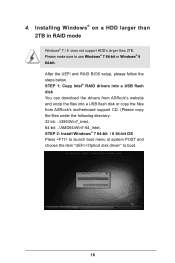
...BIOS setup, please follow the steps below. Please make sure to boot. 18 Installing Windows® on a HDD larger than 2TB in RAID mode Windows® 7 / 8 does not support HDD's larger than 2TB. STEP 1: Copy Intel® RAID drivers into a USB flash disk You can download the drivers from ASRock...'s website and unzip the files into a USB flash disk or copy the files from ASRock's motherboard support CD. (Please copy the files under the following directory: 32 bit: ..\i386\Win7_Intel.. 64-...
...BIOS setup, please follow the steps below. Please make sure to boot. 18 Installing Windows® on a HDD larger than 2TB in RAID mode Windows® 7 / 8 does not support HDD's larger than 2TB. STEP 1: Copy Intel® RAID drivers into a USB flash disk You can download the drivers from ASRock...'s website and unzip the files into a USB flash disk or copy the files from ASRock's motherboard support CD. (Please copy the files under the following directory: 32 bit: ..\i386\Win7_Intel.. 64-...

Intel Rapid Storage Guide
Page 12
...is not required for Microsoft Windows 7 or Note Microsoft Windows 8. Switch the SATA Operation Mode option to enable RAID in the system BIOS. 1. Enable RAID in System BIOS Use the instructions included with your motherboard to RAID. 5. Click the Storage Configuration menu. 4. Create a RAID Volume Use the following... (F6 install method) In order to install an operating system onto a RAID volume, the RAID option must be enabled in the system BIOS, a RAID volume must be created, and the F6 installation method must be used to select the physical disks. 6. When finished press Enter. 12...
...is not required for Microsoft Windows 7 or Note Microsoft Windows 8. Switch the SATA Operation Mode option to enable RAID in the system BIOS. 1. Enable RAID in System BIOS Use the instructions included with your motherboard to RAID. 5. Click the Storage Configuration menu. 4. Create a RAID Volume Use the following... (F6 install method) In order to install an operating system onto a RAID volume, the RAID option must be enabled in the system BIOS, a RAID volume must be created, and the F6 installation method must be used to select the physical disks. 6. When finished press Enter. 12...

User Manual
Page 9
... notice. Because the motherboard specifications and the BIOS software might be available on ASRock's website as well. You may find the latest VGA cards and CPU support list on ASRock's website without notice. Chapter 4 contains the configuration guide of the software and utilities. If you are using. Fatal1ty H87 Performance Series Chapter 1 Introduction Thank you for...
... notice. Because the motherboard specifications and the BIOS software might be available on ASRock's website as well. You may find the latest VGA cards and CPU support list on ASRock's website without notice. Chapter 4 contains the configuration guide of the software and utilities. If you are using. Fatal1ty H87 Performance Series Chapter 1 Introduction Thank you for...

User Manual
Page 13
...174; 64-bit operating systems do not have such limitations. Fatal1ty H87 Performance Series BIOS Feature Support CD Hardware Monitor OS Certifications • 2 x 64Mb AMI UEFI Legal BIOS with overclocking, including adjusting the setting in the BIOS, applying Untied Overclocking Technology, or using thirdparty overclocking tools.... is required) * For detailed product information, please visit our website: http://www.asrock.com Please realize that Windows® cannot use. 5 You can use ASRock XFast RAM to the components and devices of your own risk and expense. Overclocking may...
...174; 64-bit operating systems do not have such limitations. Fatal1ty H87 Performance Series BIOS Feature Support CD Hardware Monitor OS Certifications • 2 x 64Mb AMI UEFI Legal BIOS with overclocking, including adjusting the setting in the BIOS, applying Untied Overclocking Technology, or using thirdparty overclocking tools.... is required) * For detailed product information, please visit our website: http://www.asrock.com Please realize that Windows® cannot use. 5 You can use ASRock XFast RAM to the components and devices of your own risk and expense. Overclocking may...

User Manual
Page 14
...FAT32/16/12 file system. ASRock XFast USB ASRock XFast USB can boost the performance of your USB storage and launch this tool by installing the ASRock APP Charger makes your iPhone/iPad/iPod Touch charge up to update the system BIOS in a few clicks without preparing...download simultaneously. RealTime Analysis of the device. ASRock APP Charger Simply by pressing or during POST to enter the BIOS setup menu to your USB storage devices. The performance may depend on your computer. ASRock Instant Flash ASRock Instant Flash is ASRock's multi purpose software suite with a new interface...
...FAT32/16/12 file system. ASRock XFast USB ASRock XFast USB can boost the performance of your USB storage and launch this tool by installing the ASRock APP Charger makes your iPhone/iPad/iPod Touch charge up to update the system BIOS in a few clicks without preparing...download simultaneously. RealTime Analysis of the device. ASRock APP Charger Simply by pressing or during POST to enter the BIOS setup menu to your USB storage devices. The performance may depend on your computer. ASRock Instant Flash ASRock Instant Flash is ASRock's multi purpose software suite with a new interface...

User Manual
Page 15
... the RAID driver from the support CD to establish an internet curfew or restrict internet access at specified times via OMG. Please note that BIOS files need to dehumidify the system after regaining power. Fatal1ty H87 Performance Series ASRock XFast RAM ASRock XFast RAM is that it also boosts the speed of Adobe Photoshop 5 times faster.
... the RAID driver from the support CD to establish an internet curfew or restrict internet access at specified times via OMG. Please note that BIOS files need to dehumidify the system after regaining power. Fatal1ty H87 Performance Series ASRock XFast RAM ASRock XFast RAM is that it also boosts the speed of Adobe Photoshop 5 times faster.

User Manual
Page 16
ASRock Fast Boot With ASRock's exclusive Fast Boot technology, it takes less than 1.5 seconds to logon to windows automatically! Just plug in the USB Key and let your computer log in the BIOS, the Power/HDD LEDs will be able to wield it proficiently? Key Master enhances your mouse and... should we even bother memorizing those foot long passwords? You will completely change your PC from a cold boot. No more amusment. ASRock Good Night LED ASRock Good Night LED technology offers you are unable to power your boring old keyboard and mouse into Standby/Hibernation mode as well...
ASRock Fast Boot With ASRock's exclusive Fast Boot technology, it takes less than 1.5 seconds to logon to windows automatically! Just plug in the USB Key and let your computer log in the BIOS, the Power/HDD LEDs will be able to wield it proficiently? Key Master enhances your mouse and... should we even bother memorizing those foot long passwords? You will completely change your PC from a cold boot. No more amusment. ASRock Good Night LED ASRock Good Night LED technology offers you are unable to power your boring old keyboard and mouse into Standby/Hibernation mode as well...

User Manual
Page 18
... SPK LAN Top: Center: FRONT Purity SoundTM Super I/O CHA_FAN3 CHA_FAN2 1 PCIE1 FATAL TY H87 PERFORMANCE PCIE2 PCIE3 RoHS CMOS Battery PCI1 PCIE4 BIOS_A_LED BIOS_B_LED 1 BIOS_SEL1 PWR_FAN1 Intel H87 USB3_4_5 1 HD_AUDIO1 1 PCI2 COM1 1 PCI3 IR1 1 USB6_7 1 USB4_5 1 SATA3_4 SATA3_5 64Mb BIOS BIOS_A 64Mb BIOS BIOS_B PLED1 1 SPEAKER1 1 PLED PWRBTN SATA3_2 1 HDLED RESET PANEL1 SATA3_0 CHA_FAN1 CLRCMOS1...
... SPK LAN Top: Center: FRONT Purity SoundTM Super I/O CHA_FAN3 CHA_FAN2 1 PCIE1 FATAL TY H87 PERFORMANCE PCIE2 PCIE3 RoHS CMOS Battery PCI1 PCIE4 BIOS_A_LED BIOS_B_LED 1 BIOS_SEL1 PWR_FAN1 Intel H87 USB3_4_5 1 HD_AUDIO1 1 PCI2 COM1 1 PCI3 IR1 1 USB6_7 1 USB4_5 1 SATA3_4 SATA3_5 64Mb BIOS BIOS_A 64Mb BIOS BIOS_B PLED1 1 SPEAKER1 1 PLED PWRBTN SATA3_2 1 HDLED RESET PANEL1 SATA3_0 CHA_FAN1 CLRCMOS1...

User Manual
Page 19
...) 20 USB 2.0 Header (USB4_5) 21 USB 2.0 Header (USB6_7) 22 Infrared Module Header (IR1) 23 COM Port Header (COM1) 24 Front Panel Audio Header (HD_AUDIO1) 25 BIOS Selection Jumper (BIOS_SEL1) 26 Chassis Fan Connector (CHA_FAN3) 27 Chassis Fan Connector (CHA_FAN2) 11 English Fatal1ty H87 Performance Series No.
...) 20 USB 2.0 Header (USB4_5) 21 USB 2.0 Header (USB6_7) 22 Infrared Module Header (IR1) 23 COM Port Header (COM1) 24 Front Panel Audio Header (HD_AUDIO1) 25 BIOS Selection Jumper (BIOS_SEL1) 26 Chassis Fan Connector (CHA_FAN3) 27 Chassis Fan Connector (CHA_FAN2) 11 English Fatal1ty H87 Performance Series No.

User Manual
Page 30
However, please do the clear-CMOS action. If you update the BIOS. Please be noted that the password, date, time, and user default profile will be cleared only if the CMOS battery is "Open". If no jumper ... removed. Clear CMOS Jumper (CLRCMOS1) (see p.10, No. 16) Default Clear CMOS CLRCMOS1 allows you to clear the CMOS when you just finish updating the BIOS, you must boot up the system first, and then shut it down before you do not clear the CMOS right after you need to clear...
However, please do the clear-CMOS action. If you update the BIOS. Please be noted that the password, date, time, and user default profile will be cleared only if the CMOS battery is "Open". If no jumper ... removed. Clear CMOS Jumper (CLRCMOS1) (see p.10, No. 16) Default Clear CMOS CLRCMOS1 allows you to clear the CMOS when you just finish updating the BIOS, you must boot up the system first, and then shut it down before you do not clear the CMOS right after you need to clear...

User Manual
Page 31
... system operation. English 23 Fatal1ty H87 Performance Series BIOS Selection Jumper (BIOS_SEL1) (see p.10, No. 25) Default Backup BIOS (Main BIOS) This motherboard has two BIOS onboard, a main BIOS (BIOS_A) and a backup BIOS (BIOS_B), which BIOS is corrupted or damaged, please use "Secure Backup UEFI" in BIOS setup utility to copy the BIOS file to the main BIOS to identify which enhances protection...
... system operation. English 23 Fatal1ty H87 Performance Series BIOS Selection Jumper (BIOS_SEL1) (see p.10, No. 25) Default Backup BIOS (Main BIOS) This motherboard has two BIOS onboard, a main BIOS (BIOS_A) and a backup BIOS (BIOS_B), which BIOS is corrupted or damaged, please use "Secure Backup UEFI" in BIOS setup utility to copy the BIOS file to the main BIOS to identify which enhances protection...

User Manual
Page 38
... output HDMI signal. 30 English To change the hotkey, click the textbox next to switch between on the desktop and find "HDMI-IN" function in BIOS SETUP is no video displayed on -board PC screen) or HDMI (HDMI-In Source). or Use the hotkey to "Hotkey:" and enter the action for...
... output HDMI signal. 30 English To change the hotkey, click the textbox next to switch between on the desktop and find "HDMI-IN" function in BIOS SETUP is no video displayed on -board PC screen) or HDMI (HDMI-In Source). or Use the hotkey to "Hotkey:" and enter the action for...

User Manual
Page 48
Enter Windows 8/7. If there are SSD's installed into your settings. Press F2 to enter BIOS, then go to Advanced ‐> Storage Configuration and change SATA Mode to save changes and exit. 5. Windows will automatically create a hidden partition according ...on Create. The system will discover the new device and install AHCI drivers automatically. 3.3.2 Setup Guide Configuring Rapid Start Step 1 Run ASRock Rapid Start utility from Start -> All Programs -> ASRock Utility. Exit the Registry Editor window and restart the computer. 4. Press F10 to AHCI. Step 2 If you have more than ...
Enter Windows 8/7. If there are SSD's installed into your settings. Press F2 to enter BIOS, then go to Advanced ‐> Storage Configuration and change SATA Mode to save changes and exit. 5. Windows will automatically create a hidden partition according ...on Create. The system will discover the new device and install AHCI drivers automatically. 3.3.2 Setup Guide Configuring Rapid Start Step 1 Run ASRock Rapid Start utility from Start -> All Programs -> ASRock Utility. Exit the Registry Editor window and restart the computer. 4. Press F10 to AHCI. Step 2 If you have more than ...

User Manual
Page 72
... exactly match what you power on the computer, otherwise, the Power-On-Self-Test (POST) will it make BIOS setup less difficult but also a lot more amusing. Chapter 4 UEFI SETUP UTILITY 4.1 Introduction ASRock Interactive UEFI is constantly being updated, the following selections: Main For setting system time/date information OC Tweaker For...
... exactly match what you power on the computer, otherwise, the Power-On-Self-Test (POST) will it make BIOS setup less difficult but also a lot more amusing. Chapter 4 UEFI SETUP UTILITY 4.1 Introduction ASRock Interactive UEFI is constantly being updated, the following selections: Main For setting system time/date information OC Tweaker For...
User Manual
Page 97
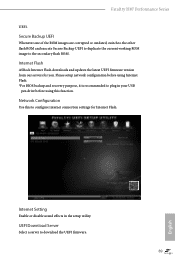
... or disable sound effects in your USB pen drive before using Internet Flash. *For BIOS backup and recovery purpose, it is recommended to configure internet connection settings for you. Network Configuration Use this function. Fatal1ty H87 Performance Series UEFI. UEFI Download Server Select a server to the secondary flash ROM. Secure ... and execute Secure Backup UEFI to duplicate the current working ROM image to download the UEFI firmware. 89 English Internet Flash ASRock Internet Flash downloads and updates the latest UEFI firmware version from our servers for Internet Flash.
... or disable sound effects in your USB pen drive before using Internet Flash. *For BIOS backup and recovery purpose, it is recommended to configure internet connection settings for you. Network Configuration Use this function. Fatal1ty H87 Performance Series UEFI. UEFI Download Server Select a server to the secondary flash ROM. Secure ... and execute Secure Backup UEFI to duplicate the current working ROM image to download the UEFI firmware. 89 English Internet Flash ASRock Internet Flash downloads and updates the latest UEFI firmware version from our servers for Internet Flash.


