
User Manual
Page 2
...their respective companies, and are used only for identification or explanation and to infringe. Products and corporate names appearing in this motherboard contains Perchlorate, a toxic substance controlled in the United States and other countries. CALIFORNIA, USA ONLY The Lithium battery adopted... or by any errors or omissions that may apply, see www.dtsc.ca.gov/hazardouswaste/ perchlorate" ASRock Website: http://www.asrock.com ASRock assumes no event shall ASRock, its directors, officers, employees, or agents be constructed as a commitment by the California Legislature. In...
...their respective companies, and are used only for identification or explanation and to infringe. Products and corporate names appearing in this motherboard contains Perchlorate, a toxic substance controlled in the United States and other countries. CALIFORNIA, USA ONLY The Lithium battery adopted... or by any errors or omissions that may apply, see www.dtsc.ca.gov/hazardouswaste/ perchlorate" ASRock Website: http://www.asrock.com ASRock assumes no event shall ASRock, its directors, officers, employees, or agents be constructed as a commitment by the California Legislature. In...

User Manual
Page 3
Contents Chapter 1 Introduction 1 1.1 Package Contents 1 1.2 Specifications 2 1.3 Unique Features 5 1.4 Motherboard Layout 7 1.5 I/O Panel 9 Chapter 2 Installation 10 2.1 Installing Memory Modules (SO-DIMM) 11 2.2 Expansion Slot (PCI Express Slot) 13 2.3 Jumpers Setup 14 2.4 Onboard Headers and Connectors 15 ...
Contents Chapter 1 Introduction 1 1.1 Package Contents 1 1.2 Specifications 2 1.3 Unique Features 5 1.4 Motherboard Layout 7 1.5 I/O Panel 9 Chapter 2 Installation 10 2.1 Installing Memory Modules (SO-DIMM) 11 2.2 Expansion Slot (PCI Express Slot) 13 2.3 Jumpers Setup 14 2.4 Onboard Headers and Connectors 15 ...

User Manual
Page 5
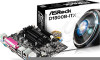
... the introduction of this motherboard, please visit our website for purchasing ASRock Q1900B-ITX/D1800B-ITX motherboard, a reliable motherboard produced under ASRock's consistently stringent quality control. If you for specific information about the model you are using. ASRock website http://www.asrock.com. 1.1 Package Contents • ASRock Q1900B-ITX/D1800B-ITX Motherboard (Mini-ITX Form Factor) • ASRock Q1900B-ITX/D1800B-ITX Quick Installation Guide • ASRock Q1900B-ITX/D1800B-ITX Support CD •...
... the introduction of this motherboard, please visit our website for purchasing ASRock Q1900B-ITX/D1800B-ITX motherboard, a reliable motherboard produced under ASRock's consistently stringent quality control. If you for specific information about the model you are using. ASRock website http://www.asrock.com. 1.1 Package Contents • ASRock Q1900B-ITX/D1800B-ITX Motherboard (Mini-ITX Form Factor) • ASRock Q1900B-ITX/D1800B-ITX Quick Installation Guide • ASRock Q1900B-ITX/D1800B-ITX Support CD •...

User Manual
Page 11
1.4 Motherboard Layout 1 2 Q1900B-ITX/D1800B-ITX PS2 Mouse PS2 Keyboard COM1 VGA1 HDMI CPU_FAN1 64Mb BIOS DDR3_A1 3 TPMS1 1 Super I/O PARALLEL PORT AT X P W R 1 DDR3_B1 4 RoHS D1800B-ITX USB 2.0 T: USB0 B: USB1 Top: RJ-45 USB4_5 5 1 USB 3.0 SATA2_1 HD_AUDIO1 1 CMOS Battery SATA2_2 SPEAKER1 1 6 SPEAKER2 1 AUDIO CODEC PCIE1 COM2 PLED PWRBTN CLRCMOS1 CI1 1 1 1 7 1 HDLED RESET PANEL1 15 14 13 12 11 10 9 8 USB 2.0 USB2 USB 3.0 USB3 Top: LINE IN Center: FRONT Bottom: MIC IN English 7
1.4 Motherboard Layout 1 2 Q1900B-ITX/D1800B-ITX PS2 Mouse PS2 Keyboard COM1 VGA1 HDMI CPU_FAN1 64Mb BIOS DDR3_A1 3 TPMS1 1 Super I/O PARALLEL PORT AT X P W R 1 DDR3_B1 4 RoHS D1800B-ITX USB 2.0 T: USB0 B: USB1 Top: RJ-45 USB4_5 5 1 USB 3.0 SATA2_1 HD_AUDIO1 1 CMOS Battery SATA2_2 SPEAKER1 1 6 SPEAKER2 1 AUDIO CODEC PCIE1 COM2 PLED PWRBTN CLRCMOS1 CI1 1 1 1 7 1 HDLED RESET PANEL1 15 14 13 12 11 10 9 8 USB 2.0 USB2 USB 3.0 USB3 Top: LINE IN Center: FRONT Bottom: MIC IN English 7
User Manual
Page 14
...from static electricity to unplug the power cord before you install the motherboard, study the configuration of the following precautions before installing or removing the motherboard. Pre-installation Precautions Take note of your motherboard directly on a grounded anti-static pad or in the bag ...that comes with the components. • When placing screws to secure the motherboard to ensure that the motherboard fits into it. Chapter 2 Installation This is an Mini-ITX form factor motherboard. Failure to...
...from static electricity to unplug the power cord before you install the motherboard, study the configuration of the following precautions before installing or removing the motherboard. Pre-installation Precautions Take note of your motherboard directly on a grounded anti-static pad or in the bag ...that comes with the components. • When placing screws to secure the motherboard to ensure that the motherboard fits into it. Chapter 2 Installation This is an Mini-ITX form factor motherboard. Failure to...

User Manual
Page 15
The DIMM only fits in one SO-DIMM module is not allowed to the motherboard and the DIMM if you force the DIMM into the slot at incorrect orientation. 11 English It is installed, please install it into a DDR3 slot; otherwise, this motherboard and SO-DIMM may be damaged. Q1900B-ITX/D1800B-ITX 2.1 Installing Memory Modules (SO-DIMM) This motherboard provides two 204-pin DDR3 (Double Data Rate 3) SO-DIMM slots. It will cause permanent damage to install a DDR or DDR2 memory module into DDR3_A1. If only one correct orientation.
The DIMM only fits in one SO-DIMM module is not allowed to the motherboard and the DIMM if you force the DIMM into the slot at incorrect orientation. 11 English It is installed, please install it into a DDR3 slot; otherwise, this motherboard and SO-DIMM may be damaged. Q1900B-ITX/D1800B-ITX 2.1 Installing Memory Modules (SO-DIMM) This motherboard provides two 204-pin DDR3 (Double Data Rate 3) SO-DIMM slots. It will cause permanent damage to install a DDR or DDR2 memory module into DDR3_A1. If only one correct orientation.

User Manual
Page 17
Before installing an expansion card, please make necessary hardware settings for PCI Express cards with x1 lane width cards. 13 English Please read the documentation of the expansion card and make sure that the power supply is switched off or the power cord is unplugged. PCIe slots: PCIE1 (PCIe 2.0 x1 slot) is 1 PCI Express slot on this motherboard. Q1900B-ITX/D1800B-ITX 2.2 Expansion Slot (PCI Express Slot) There is used for the card before you start the installation.
Before installing an expansion card, please make necessary hardware settings for PCI Express cards with x1 lane width cards. 13 English Please read the documentation of the expansion card and make sure that the power supply is switched off or the power cord is unplugged. PCIe slots: PCIE1 (PCIe 2.0 x1 slot) is 1 PCI Express slot on this motherboard. Q1900B-ITX/D1800B-ITX 2.2 Expansion Slot (PCI Express Slot) There is used for the card before you start the installation.

User Manual
Page 19
...the positive and negative pins before connecting the cables. The LED is off when the system is in S1/S3 sleep state. Q1900B-ITX/D1800B-ITX 2.4 Onboard Headers and Connectors Onboard headers and connectors are matched correctly. PLED (System Power LED): Connect to the power status indicator on...may configure the way to perform a normal restart. When connecting your system using the power switch. RESET (Reset Switch): Connect to the motherboard. The LED is on when the system is reading or writing data. Placing jumper caps over these headers and connectors. Do NOT place ...
...the positive and negative pins before connecting the cables. The LED is off when the system is in S1/S3 sleep state. Q1900B-ITX/D1800B-ITX 2.4 Onboard Headers and Connectors Onboard headers and connectors are matched correctly. PLED (System Power LED): Connect to the power status indicator on...may configure the way to perform a normal restart. When connecting your system using the power switch. RESET (Reset Switch): Connect to the motherboard. The LED is on when the system is reading or writing data. Placing jumper caps over these headers and connectors. Do NOT place ...

User Manual
Page 20
... to 3.0 Gb/s data transfer rate. E. Front Panel Audio Header (9-pin HD_AUDIO1) (see p.7, No. 15) 16 Front_RFront_R+ Front_L+ Front_L- 1 Please connect the chassis speaker to this motherboard. If you use an AC'97 audio panel, please install it to connect them for the AC'97 audio panel. Serial ATA2 Connectors (SATA2_1: see...
... to 3.0 Gb/s data transfer rate. E. Front Panel Audio Header (9-pin HD_AUDIO1) (see p.7, No. 15) 16 Front_RFront_R+ Front_L+ Front_L- 1 Please connect the chassis speaker to this motherboard. If you use an AC'97 audio panel, please install it to connect them for the AC'97 audio panel. Serial ATA2 Connectors (SATA2_1: see...

User Manual
Page 21
... enhance network security, protects digital identities, and ensures platform integrity. GND +3VSB LAD0_L +3V LAD3_L TPM_RST# LFRAME#_L CK_33M_TPM 17 English This motherboard provides a 24-pin ATX power connector. Q1900B-ITX/D1800B-ITX Chassis Speaker Header (4-pin SPEAKER1) (see p.7, No. 6) DUMMY SPEAKER 1 +5V DUMMY Chassis Fan Connector (3-pin CHA_FAN1) (see p.7, ... speaker to this header. To use a 20-pin ATX power supply, please plug it along Pin 1 and Pin 13. This motherboard supports CASE OPEN detection feature that detects if the chassis cove has been removed.
... enhance network security, protects digital identities, and ensures platform integrity. GND +3VSB LAD0_L +3V LAD3_L TPM_RST# LFRAME#_L CK_33M_TPM 17 English This motherboard provides a 24-pin ATX power connector. Q1900B-ITX/D1800B-ITX Chassis Speaker Header (4-pin SPEAKER1) (see p.7, No. 6) DUMMY SPEAKER 1 +5V DUMMY Chassis Fan Connector (3-pin CHA_FAN1) (see p.7, ... speaker to this header. To use a 20-pin ATX power supply, please plug it along Pin 1 and Pin 13. This motherboard supports CASE OPEN detection feature that detects if the chassis cove has been removed.
User Manual
Page 23
Q1900B-ITX/D1800B-ITX Chapter 3 Software and Utilities Operation 3.1 Installing Drivers The Support CD that comes with the motherboard contains necessary drivers and useful utilities that the motherboard supports. To improve Windows 7 compatibility, please download and install the following hot fix provided by ...follow the installation wizard to your CD-ROM drive. Utilities Menu The Utilities Menu shows the application software that enhance the motherboard's features. Drivers Menu The drivers compatible to install it. "KB2720599": http://support.microsoft.com/kb/2720599/en-us ...
Q1900B-ITX/D1800B-ITX Chapter 3 Software and Utilities Operation 3.1 Installing Drivers The Support CD that comes with the motherboard contains necessary drivers and useful utilities that the motherboard supports. To improve Windows 7 compatibility, please download and install the following hot fix provided by ...follow the installation wizard to your CD-ROM drive. Utilities Menu The Utilities Menu shows the application software that enhance the motherboard's features. Drivers Menu The drivers compatible to install it. "KB2720599": http://support.microsoft.com/kb/2720599/en-us ...

User Manual
Page 26
... 8/7 is not in AHCI mode, please follow the instructions below. Please backup any important data before operating to -date. 3.3.1 System Requirements • Confirm whether your motherboard supports this feature. • Operating system: Microsoft Windows 8/7 (32- Press Win + R simultaneously in Windows Registry Editor. or 64-bit edition) • Set the SATA mode...
... 8/7 is not in AHCI mode, please follow the instructions below. Please backup any important data before operating to -date. 3.3.1 System Requirements • Confirm whether your motherboard supports this feature. • Operating system: Microsoft Windows 8/7 (32- Press Win + R simultaneously in Windows Registry Editor. or 64-bit edition) • Set the SATA mode...

User Manual
Page 49
... temperature. Q1900B-ITX/D1800B-ITX 4.5 Hardware Health Event Monitoring Screen This section allows you to detect whether the chassis cover has been removed. 45 English Case Open Feature Enable or disable Case Open Feature to monitor the status of the hardware on your system, including the parameters of the CPU temperature, motherboard temperature, fan...
... temperature. Q1900B-ITX/D1800B-ITX 4.5 Hardware Health Event Monitoring Screen This section allows you to detect whether the chassis cover has been removed. 45 English Case Open Feature Enable or disable Case Open Feature to monitor the status of the hardware on your system, including the parameters of the CPU temperature, motherboard temperature, fan...

Quick Installation Guide
Page 1
...conditions of merchantability or fitness for a particular purpose. Version 1.0 Published March 2014 Copyright©2014 ASRock INC. Disclaimer: Specifications and information contained in this motherboard contains Perchlorate, a toxic substance controlled in Perchlorate Best Management Practices (BMP) regulations passed by the...except duplication of HDMI Licensing LLC in this documentation may apply, see www.dtsc.ca.gov/hazardouswaste/ perchlorate" ASRock Website: http://www.asrock.com Operation is subject to infringe. All rights reserved. Copyright Notice: No part of the FCC Rules....
...conditions of merchantability or fitness for a particular purpose. Version 1.0 Published March 2014 Copyright©2014 ASRock INC. Disclaimer: Specifications and information contained in this motherboard contains Perchlorate, a toxic substance controlled in Perchlorate Best Management Practices (BMP) regulations passed by the...except duplication of HDMI Licensing LLC in this documentation may apply, see www.dtsc.ca.gov/hazardouswaste/ perchlorate" ASRock Website: http://www.asrock.com Operation is subject to infringe. All rights reserved. Copyright Notice: No part of the FCC Rules....

Quick Installation Guide
Page 2
Motherboard Layout 1 2 Q1900B-ITX/D1800B-ITX PS2 Mouse PS2 Keyboard COM1 VGA1 HDMI CPU_FAN1 64Mb BIOS DDR3_A1 3 TPMS1 1 Super I/O PARALLEL PORT AT X P W R 1 DDR3_B1 4 RoHS D1800B-ITX USB 2.0 T: USB0 B: USB1 Top: RJ-45 USB4_5 5 1 USB 3.0 SATA2_1 HD_AUDIO1 1 CMOS Battery SATA2_2 SPEAKER1 1 6 SPEAKER2 1 AUDIO CODEC PCIE1 COM2 PLED PWRBTN CLRCMOS1 CI1 1 1 1 7 1 HDLED RESET PANEL1 15 14 13 12 11 10 9 8 USB 2.0 USB2 USB 3.0 USB3 Top: LINE IN Center: FRONT Bottom: MIC IN English 1
Motherboard Layout 1 2 Q1900B-ITX/D1800B-ITX PS2 Mouse PS2 Keyboard COM1 VGA1 HDMI CPU_FAN1 64Mb BIOS DDR3_A1 3 TPMS1 1 Super I/O PARALLEL PORT AT X P W R 1 DDR3_B1 4 RoHS D1800B-ITX USB 2.0 T: USB0 B: USB1 Top: RJ-45 USB4_5 5 1 USB 3.0 SATA2_1 HD_AUDIO1 1 CMOS Battery SATA2_2 SPEAKER1 1 6 SPEAKER2 1 AUDIO CODEC PCIE1 COM2 PLED PWRBTN CLRCMOS1 CI1 1 1 1 7 1 HDLED RESET PANEL1 15 14 13 12 11 10 9 8 USB 2.0 USB2 USB 3.0 USB3 Top: LINE IN Center: FRONT Bottom: MIC IN English 1

Quick Installation Guide
Page 5
... might be updated, the content of this documentation will be subject to change without further notice. ASRock website http://www.asrock.com. 1.1 Package Contents • ASRock Q1900B-ITX/D1800B-ITX Motherboard (Mini-ITX Form Factor) • ASRock Q1900B-ITX/D1800B-ITX Quick Installation Guide • ASRock Q1900B-ITX/D1800B-ITX Support CD • 2 x Serial ATA (SATA) Data Cables (Optional) • 1 x I/O Panel Shield 4 English Chapter 1 Introduction Thank...
... might be updated, the content of this documentation will be subject to change without further notice. ASRock website http://www.asrock.com. 1.1 Package Contents • ASRock Q1900B-ITX/D1800B-ITX Motherboard (Mini-ITX Form Factor) • ASRock Q1900B-ITX/D1800B-ITX Quick Installation Guide • ASRock Q1900B-ITX/D1800B-ITX Support CD • 2 x Serial ATA (SATA) Data Cables (Optional) • 1 x I/O Panel Shield 4 English Chapter 1 Introduction Thank...
Quick Installation Guide
Page 11
...motherboard components. • In order to avoid damage from static electricity to the motherboard's components, NEVER place your chassis to ensure that comes with the components. • When placing screws to secure the motherboard...any motherboard settings. • Make sure to unplug the power cord before installing or removing the motherboard. Also remember to do so may damage the motherboard. ...overtighten the screws! Before you install the motherboard, study the configuration of the following precautions before you install motherboard components or change any components, place ...
...motherboard components. • In order to avoid damage from static electricity to the motherboard's components, NEVER place your chassis to ensure that comes with the components. • When placing screws to secure the motherboard...any motherboard settings. • Make sure to unplug the power cord before installing or removing the motherboard. Also remember to do so may damage the motherboard. ...overtighten the screws! Before you install the motherboard, study the configuration of the following precautions before you install motherboard components or change any components, place ...

Quick Installation Guide
Page 12
The DIMM only fits in one correct orientation. It will cause permanent damage to install a DDR or DDR2 memory module into the slot at incorrect orientation. 11 English otherwise, this motherboard and SO-DIMM may be damaged. Q1900B-ITX/D1800B-ITX 2.1 Installing Memory Modules (SO-DIMM) This motherboard provides two 204-pin DDR3 (Double Data Rate 3) SO-DIMM slots. It is not allowed to the motherboard and the DIMM if you force the DIMM into a DDR3 slot;
The DIMM only fits in one correct orientation. It will cause permanent damage to install a DDR or DDR2 memory module into the slot at incorrect orientation. 11 English otherwise, this motherboard and SO-DIMM may be damaged. Q1900B-ITX/D1800B-ITX 2.1 Installing Memory Modules (SO-DIMM) This motherboard provides two 204-pin DDR3 (Double Data Rate 3) SO-DIMM slots. It is not allowed to the motherboard and the DIMM if you force the DIMM into a DDR3 slot;

Quick Installation Guide
Page 14
PCIe slots: PCIE1 (PCIe 2.0 x1 slot) is 1 PCI Express slot on this motherboard. Q1900B-ITX/D1800B-ITX 2.2 Expansion Slot (PCI Express Slot) There is used for the card before you start the installation. Please read the documentation of the expansion card and make sure that the power supply is switched off or the power cord is unplugged. Before installing an expansion card, please make necessary hardware settings for PCI Express cards with x1 lane width cards. 13 English
PCIe slots: PCIE1 (PCIe 2.0 x1 slot) is 1 PCI Express slot on this motherboard. Q1900B-ITX/D1800B-ITX 2.2 Expansion Slot (PCI Express Slot) There is used for the card before you start the installation. Please read the documentation of the expansion card and make sure that the power supply is switched off or the power cord is unplugged. Before installing an expansion card, please make necessary hardware settings for PCI Express cards with x1 lane width cards. 13 English

Quick Installation Guide
Page 16
... wire assignments and the pin assignments are NOT jumpers. Q1900B-ITX/D1800B-ITX 2.4 Onboard Headers and Connectors Onboard headers and connectors are matched correctly. You may differ by chassis. The LED keeps blinking when the system is operating. RESET (Reset Switch): Connect to the motherboard. Do NOT place jumper caps over the headers and...
... wire assignments and the pin assignments are NOT jumpers. Q1900B-ITX/D1800B-ITX 2.4 Onboard Headers and Connectors Onboard headers and connectors are matched correctly. You may differ by chassis. The LED keeps blinking when the system is operating. RESET (Reset Switch): Connect to the motherboard. Do NOT place jumper caps over the headers and...

