User Manual
Page 3
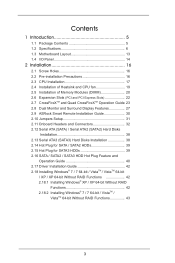
... and Quad CrossFireXTM Operation Guide. 23 2.8 Dual Monitor and Surround Display Features 27 2.9 ASRock Smart Remote Installation Guide 30 2.10 Jumpers Setup 31 2.11 Onboard Headers and Connectors 32 2.12 Serial ATA (SATA) / Serial ATA2 (SATA2) Hard Disks Installation 38 2.13 Serial ATA3 (SATA3) Hard... Disks Installation 38 2.14 Hot Plug for SATA / SATA2 HDDs 39 2.15 Hot Plug for SATA3 HDDs 39 2.16 SATA / SATA2 / SATA3 HDD Hot Plug Feature and Operation Guide 40 2.17 Driver Installation Guide 42 2.18 Installing ...
... and Quad CrossFireXTM Operation Guide. 23 2.8 Dual Monitor and Surround Display Features 27 2.9 ASRock Smart Remote Installation Guide 30 2.10 Jumpers Setup 31 2.11 Onboard Headers and Connectors 32 2.12 Serial ATA (SATA) / Serial ATA2 (SATA2) Hard Disks Installation 38 2.13 Serial ATA3 (SATA3) Hard... Disks Installation 38 2.14 Hot Plug for SATA / SATA2 HDDs 39 2.15 Hot Plug for SATA3 HDDs 39 2.16 SATA / SATA2 / SATA3 HDD Hot Plug Feature and Operation Guide 40 2.17 Driver Installation Guide 42 2.18 Installing ...
User Manual
Page 5
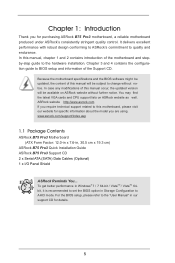
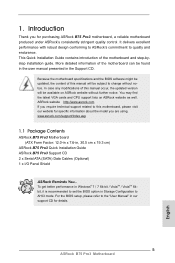
...BIOS setup, please refer to the "User Manual" in our support CD for purchasing ASRock B75 Pro3 motherboard, a reliable motherboard produced under ASRock's consistently stringent quality control. Because the motherboard specifications and the BIOS software might be ... without further notice. www.asrock.com/support/index.asp 1.1 Package Contents ASRock B75 Pro3 Motherboard (ATX Form Factor: 12.0-in x 7.6-in Storage Configuration to set the BIOS option in , 30.5 cm x 19.3 cm) ASRock B75 Pro3 Quick Installation Guide ASRock B75 Pro3 Support CD 2 x Serial ATA (SATA) Data Cables (Optional) ...
...BIOS setup, please refer to the "User Manual" in our support CD for purchasing ASRock B75 Pro3 motherboard, a reliable motherboard produced under ASRock's consistently stringent quality control. Because the motherboard specifications and the BIOS software might be ... without further notice. www.asrock.com/support/index.asp 1.1 Package Contents ASRock B75 Pro3 Motherboard (ATX Form Factor: 12.0-in x 7.6-in Storage Configuration to set the BIOS option in , 30.5 cm x 19.3 cm) ASRock B75 Pro3 Quick Installation Guide ASRock B75 Pro3 Support CD 2 x Serial ATA (SATA) Data Cables (Optional) ...

User Manual
Page 32
...GND P+4 P-4 USB_PWR Besides four default USB 2.0 ports on the I/O panel, there are NOT jumpers. Each USB 2.0 header can be connected to the SATA / SATA2 / SATA3 hard disk or the SATA2 / SATA3 connector on this motherboard. Do NOT place jumper caps over the headers and connectors will cause ...permanent damage of the SATA data cable can support two USB 2.0 ports. 32 2.11 Onboard Headers and Connectors Onboard headers and connectors are two USB 2.0 headers...
...GND P+4 P-4 USB_PWR Besides four default USB 2.0 ports on the I/O panel, there are NOT jumpers. Each USB 2.0 header can be connected to the SATA / SATA2 / SATA3 hard disk or the SATA2 / SATA3 connector on this motherboard. Do NOT place jumper caps over the headers and connectors will cause ...permanent damage of the SATA data cable can support two USB 2.0 ports. 32 2.11 Onboard Headers and Connectors Onboard headers and connectors are two USB 2.0 headers...

User Manual
Page 38
... hard disks into the drive bays of the SATA data cable to the SATA / SATA2 hard disk. 2.13 Serial ATA3 (SATA3) Hard Disks Installation This motherboard adopts Intel® B75 chipset that supports Serial ATA3 (SATA3) hard disks for SATA3_0 connector. It also adopts ASMedia ...devices. STEP 2: Connect the SATA power cable to the SATA3 hard disk. STEP 2: Connect the SATA power cable to the SATA / SATA2 hard disk. 2.12 Serial ATA (SATA) / Serial ATA2 (SATA2) Hard Disks Installation This motherboard adopts Intel® B75 chipset that supports Serial ATA (SATA) / Serial ATA2 (SATA2) ...
... hard disks into the drive bays of the SATA data cable to the SATA / SATA2 hard disk. 2.13 Serial ATA3 (SATA3) Hard Disks Installation This motherboard adopts Intel® B75 chipset that supports Serial ATA3 (SATA3) hard disks for SATA3_0 connector. It also adopts ASMedia ...devices. STEP 2: Connect the SATA power cable to the SATA3 hard disk. STEP 2: Connect the SATA power cable to the SATA / SATA2 hard disk. 2.12 Serial ATA (SATA) / Serial ATA2 (SATA2) Hard Disks Installation This motherboard adopts Intel® B75 chipset that supports Serial ATA (SATA) / Serial ATA2 (SATA2) ...

User Manual
Page 39
...it is called "Hot Plug" for the action to insert and remove the SATA / SATA2 HDDs while the system is still power-on and in AHCI mode. Intel® B75 and ASMedia ASM1061 chipsets provide hardware support for Advanced Host controller Interface (AHCI), ...a new programming interface for SATA host controllers developed through a joint industry effort. Intel® B75 chipset provides hardware support for Advanced Host controller Interface (AHCI), a new programming interface for SATA host controllers developed through a joint industry effort. If ...
...it is called "Hot Plug" for the action to insert and remove the SATA / SATA2 HDDs while the system is still power-on and in AHCI mode. Intel® B75 and ASMedia ASM1061 chipsets provide hardware support for Advanced Host controller Interface (AHCI), ...a new programming interface for SATA host controllers developed through a joint industry effort. Intel® B75 chipset provides hardware support for Advanced Host controller Interface (AHCI), a new programming interface for SATA host controllers developed through a joint industry effort. If ...
User Manual
Page 40
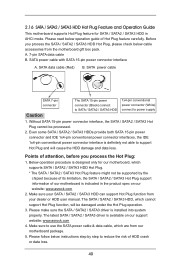
... driver is definitely not able to power supply Caution 1. Points of our motherboard is available on our website: www.asrock.com 2. The latest SATA / SATA2 / SATA3 driver is indicated in AHCI mode. The SATA / SATA2 / SATA3 HDD, which cannot support Hot Plug function, will cause the HDD damage and data loss. Please follow...
... driver is definitely not able to power supply Caution 1. Points of our motherboard is available on our website: www.asrock.com 2. The latest SATA / SATA2 / SATA3 driver is indicated in AHCI mode. The SATA / SATA2 / SATA3 HDD, which cannot support Hot Plug function, will cause the HDD damage and data loss. Please follow...

User Manual
Page 41
... SATA3 connector. Step 1 Unplug SATA data cable from SATA / SATA2 / SATA3 HDD side. 41 Step 2 Connect SATA data cable to the power supply's 1x4-pin cable. Step 2 Unplug SATA 15-pin power cable connector (Black) from SATA / SATA2 / SATA3 HDD side. How to Hot Plug a SATA / SATA2 / SATA3 HDD:..., improper procedure will cause the SATA / SATA2 / SATA3 HDD damage and data loss. SATA power cable 1x4-pin power connector (White) Step 3 Connect SATA 15-pin power cable connector (Black) end to the SATA / SATA2 / SATA3 HDD. Step 4 Connect SATA data cable to SATA / SATA2 / SATA3 HDD....
... SATA3 connector. Step 1 Unplug SATA data cable from SATA / SATA2 / SATA3 HDD side. 41 Step 2 Connect SATA data cable to the power supply's 1x4-pin cable. Step 2 Unplug SATA 15-pin power cable connector (Black) from SATA / SATA2 / SATA3 HDD side. How to Hot Plug a SATA / SATA2 / SATA3 HDD:..., improper procedure will cause the SATA / SATA2 / SATA3 HDD damage and data loss. SATA power cable 1x4-pin power connector (White) Step 3 Connect SATA 15-pin power cable connector (Black) end to the SATA / SATA2 / SATA3 HDD. Step 4 Connect SATA data cable to SATA / SATA2 / SATA3 HDD....
User Manual
Page 42
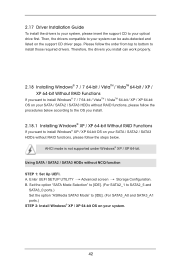
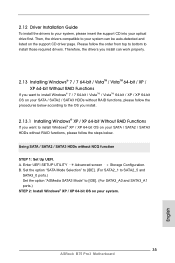
...For SATA2_1 to SATA2_5 and SATA3_0 ports.) Set the option "ASMedia SATA3 Mode" to install Windows® XP / XP 64-bit OS on your SATA / SATA2 / SATA3 HDDs without RAID functions, please follow the steps below according to the OS you install. 2.18.1 Installing Windows® XP ...listed on your system. 42 Enter UEFI SETUP UTILITY Advanced screen Storage Configuration. Then, the drivers compatible to install those required drivers. B. Using SATA / SATA2 / SATA3 HDDs without RAID functions, please follow the order from top to bottom to your optical drive first. A. Please follow the ...
...For SATA2_1 to SATA2_5 and SATA3_0 ports.) Set the option "ASMedia SATA3 Mode" to install Windows® XP / XP 64-bit OS on your SATA / SATA2 / SATA3 HDDs without RAID functions, please follow the steps below according to the OS you install. 2.18.1 Installing Windows® XP ...listed on your system. 42 Enter UEFI SETUP UTILITY Advanced screen Storage Configuration. Then, the drivers compatible to install those required drivers. B. Using SATA / SATA2 / SATA3 HDDs without RAID functions, please follow the order from top to bottom to your optical drive first. A. Please follow the ...

User Manual
Page 43
...43 A. Enter UEFI SETUP UTILITY Advanced screen Storage Configuration. Using SATA / SATA2 / SATA3 HDDs without RAID functions, please follow the steps below. Using SATA / SATA2 / SATA3 HDDs with NCQ function STEP 1: Set Up UEFI. Set the option "SATA Mode Selection" to [IDE]. (For SATA2_1 to SATA2_5 and ...VistaTM / VistaTM 64-bit Without RAID Functions If you want to install Windows® 7 / 7 64-bit / VistaTM / VistaTM 64-bit OS on your SATA / SATA2 / SATA3 HDDs without NCQ function STEP 1: Set Up UEFI. Enter UEFI SETUP UTILITY Advanced screen Storage Configuration. A. B.
...43 A. Enter UEFI SETUP UTILITY Advanced screen Storage Configuration. Using SATA / SATA2 / SATA3 HDDs without RAID functions, please follow the steps below. Using SATA / SATA2 / SATA3 HDDs with NCQ function STEP 1: Set Up UEFI. Set the option "SATA Mode Selection" to [IDE]. (For SATA2_1 to SATA2_5 and ...VistaTM / VistaTM 64-bit Without RAID Functions If you want to install Windows® 7 / 7 64-bit / VistaTM / VistaTM 64-bit OS on your SATA / SATA2 / SATA3 HDDs without NCQ function STEP 1: Set Up UEFI. Enter UEFI SETUP UTILITY Advanced screen Storage Configuration. A. B.

User Manual
Page 55
... Configuration options: [Disabled] and [Enabled]. ASMedia SATA3 Mode This item is for SATA3_0 and SATA2_1 to select SATA mode. SATA Boot ROM Use this to enable or disable ASMedia SATA Boot ROM. Use this to select ASMedia SATA3 mode. Use this item to enable or disable the S.M.A.R.T. (Self.... Configuration options: [IDE Mode], [AHCI Mode] and [Disabled]. The default value is [AHCI Mode]. The default value is [Disabled]. 55 SATA Aggressive Link Power Management Use this item to configure Aggressive Link Power Management. Use this item to enable or disable the...
... Configuration options: [Disabled] and [Enabled]. ASMedia SATA3 Mode This item is for SATA3_0 and SATA2_1 to select SATA mode. SATA Boot ROM Use this to enable or disable ASMedia SATA Boot ROM. Use this to select ASMedia SATA3 mode. Use this item to enable or disable the S.M.A.R.T. (Self.... Configuration options: [IDE Mode], [AHCI Mode] and [Disabled]. The default value is [AHCI Mode]. The default value is [Disabled]. 55 SATA Aggressive Link Power Management Use this item to configure Aggressive Link Power Management. Use this item to enable or disable the...
User Manual
Page 56
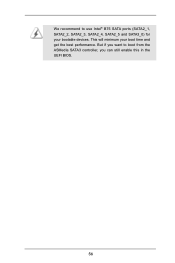
We recommend to boot from the ASMedia SATA3 controller, you can still enable this in the UEFI BIOS. 56 But if you want to use Intel® B75 SATA ports (SATA2_1, SATA2_2, SATA2_3, SATA2_4, SATA2_5 and SATA3_0) for your boot time and get the best performance. This will minimum your bootable devices.
We recommend to boot from the ASMedia SATA3 controller, you can still enable this in the UEFI BIOS. 56 But if you want to use Intel® B75 SATA ports (SATA2_1, SATA2_2, SATA2_3, SATA2_4, SATA2_5 and SATA3_0) for your boot time and get the best performance. This will minimum your bootable devices.
User Manual
Page 68
... follow the procedures below to launch boot menu at system POST. Choose the item "UEFI:xxx" to boot in UEFI Setup Utility > Advanced > Storage Configuration > SATA Mode. 3. Start Windows® installation. 68
... follow the procedures below to launch boot menu at system POST. Choose the item "UEFI:xxx" to boot in UEFI Setup Utility > Advanced > Storage Configuration > SATA Mode. 3. Start Windows® installation. 68
Quick Installation Guide
Page 5
... can be found in the user manual presented in our support CD for details. 5 ASRock B75 Pro3 Motherboard English www.asrock.com/support/index.asp 1.1 Package Contents ASRock B75 Pro3 Motherboard (ATX Form Factor: 12.0-in x 7.6-in Storage Configuration to quality and endurance...., it is recommended to set the BIOS option in , 30.5 cm x 19.3 cm) ASRock B75 Pro3 Quick Installation Guide ASRock B75 Pro3 Support CD 2 x Serial ATA (SATA) Data Cables (Optional) 1 x I/O Panel Shield ASRock Reminds You... 1. In case any modifications of this manual occur, the updated version will be available...
... can be found in the user manual presented in our support CD for details. 5 ASRock B75 Pro3 Motherboard English www.asrock.com/support/index.asp 1.1 Package Contents ASRock B75 Pro3 Motherboard (ATX Form Factor: 12.0-in x 7.6-in Storage Configuration to quality and endurance...., it is recommended to set the BIOS option in , 30.5 cm x 19.3 cm) ASRock B75 Pro3 Quick Installation Guide ASRock B75 Pro3 Support CD 2 x Serial ATA (SATA) Data Cables (Optional) 1 x I/O Panel Shield ASRock Reminds You... 1. In case any modifications of this manual occur, the updated version will be available...

Quick Installation Guide
Page 29
.... 14) (SATA2_4: see p.2, No. 12) (SATA2_5: see p.2, No. 18) SATA3_A1 SATA3_A0 SATA3_0 These three Serial ATA3 (SATA3) connectors support SATA data cables for internal storage devices. English 29 ASRock B75 Pro3 Motherboard Serial ATA (SATA) Data Cable (Optional) Either end of the motherboard! The current SATA2 interface allows up to 3.0 Gb/s data transfer rate. Do...
.... 14) (SATA2_4: see p.2, No. 12) (SATA2_5: see p.2, No. 18) SATA3_A1 SATA3_A0 SATA3_0 These three Serial ATA3 (SATA3) connectors support SATA data cables for internal storage devices. English 29 ASRock B75 Pro3 Motherboard Serial ATA (SATA) Data Cable (Optional) Either end of the motherboard! The current SATA2 interface allows up to 3.0 Gb/s data transfer rate. Do...
Quick Installation Guide
Page 35
...SATA / SATA2 / SATA3 HDDs without RAID functions, please follow the steps below according to the OS you install. 2.13.1 Installing Windows® XP / XP 64-bit Without RAID Functions If you want to install Windows® 7 / 7 64-bit / VistaTM / VistaTM 64-bit / XP / XP 64-bit OS on your system. 35 ASRock B75 Pro3...64-bit Without RAID Functions If you want to install Windows® XP / XP 64-bit OS on your SATA / SATA2 / SATA3 HDDs without NCQ function STEP 1: Set Up UEFI. Using SATA / SATA2 / SATA3 HDDs without RAID functions, please follow the order from top to bottom to install those ...
...SATA / SATA2 / SATA3 HDDs without RAID functions, please follow the steps below according to the OS you install. 2.13.1 Installing Windows® XP / XP 64-bit Without RAID Functions If you want to install Windows® 7 / 7 64-bit / VistaTM / VistaTM 64-bit / XP / XP 64-bit OS on your system. 35 ASRock B75 Pro3...64-bit Without RAID Functions If you want to install Windows® XP / XP 64-bit OS on your SATA / SATA2 / SATA3 HDDs without NCQ function STEP 1: Set Up UEFI. Using SATA / SATA2 / SATA3 HDDs without RAID functions, please follow the order from top to bottom to install those ...

Quick Installation Guide
Page 36
... SATA3_A1 ports.) STEP 2: Install Windows® 7 / 7 64-bit / VistaTM / VistaTM 64-bit OS on your system. 36 ASRock B75 Pro3 Motherboard English A. Set the option "SATA Mode Selection" to [IDE]. (For SATA2_1 to SATA2_5 and SATA3_0 ports.) Set the option "ASMedia SATA3 Mode" to [AHCI]. (For... SATA3_A0 and SATA3_A1 ports.) STEP 2: Install Windows® 7 / 7 64-bit / VistaTM / VistaTM 64-bit OS on your SATA / SATA2 / SATA3 HDDs without NCQ function STEP 1: Set Up UEFI. Enter UEFI SETUP UTILITY Advanced screen Storage Configuration. 2.13.2 Installing Windows® 7 /...
... SATA3_A1 ports.) STEP 2: Install Windows® 7 / 7 64-bit / VistaTM / VistaTM 64-bit OS on your system. 36 ASRock B75 Pro3 Motherboard English A. Set the option "SATA Mode Selection" to [IDE]. (For SATA2_1 to SATA2_5 and SATA3_0 ports.) Set the option "ASMedia SATA3 Mode" to [AHCI]. (For... SATA3_A0 and SATA3_A1 ports.) STEP 2: Install Windows® 7 / 7 64-bit / VistaTM / VistaTM 64-bit OS on your SATA / SATA2 / SATA3 HDDs without NCQ function STEP 1: Set Up UEFI. Enter UEFI SETUP UTILITY Advanced screen Storage Configuration. 2.13.2 Installing Windows® 7 /...

Quick Installation Guide
Page 148
1.4 시리얼 ATA2 커넥터 (SATA2_1: 2 17 SATA2_2: 2 15 SATA2_3: 2 14 SATA2_4: 2 12 SATA2_5: 2 13 SATA2_4 SATA2_5 SATA2_1 SATA2_2 SATA2_3 5 ATA2 (SATA SATA SATA SATA2 3.0 Gb/s 시리얼 ATA3 커넥터 (SATA3_A0: 2 19 SATA3_A1: 2 20 SATA3_0: 2 18 SATA3_A1 SATA3_A0 SATA3_0 3 ATA3 (SATA3 SATA SATA SATA3 6.0 Gb/s 시리얼 ATA(SATA SATA SATA / SATA2 / SATA3 SATA2 / SATA3 한 국 어 148 ASRock B75 Pro3 Motherboard
1.4 시리얼 ATA2 커넥터 (SATA2_1: 2 17 SATA2_2: 2 15 SATA2_3: 2 14 SATA2_4: 2 12 SATA2_5: 2 13 SATA2_4 SATA2_5 SATA2_1 SATA2_2 SATA2_3 5 ATA2 (SATA SATA SATA SATA2 3.0 Gb/s 시리얼 ATA3 커넥터 (SATA3_A0: 2 19 SATA3_A1: 2 20 SATA3_0: 2 18 SATA3_A1 SATA3_A0 SATA3_0 3 ATA3 (SATA3 SATA SATA SATA3 6.0 Gb/s 시리얼 ATA(SATA SATA SATA / SATA2 / SATA3 SATA2 / SATA3 한 국 어 148 ASRock B75 Pro3 Motherboard

Quick Installation Guide
Page 171
1 B75 Pro3 BIOS CPU http://www.asrock.com www.asrock.com/support/index.asp 1.1 華擎 B75 Pro3 主板 (ATX 規格 : 12.0 英吋 X 7.6 英吋 , 30.5 厘米 X 19.3 厘米 ) 華擎 B75 Pro3 B75 Pro3 Serial ATA(SATA I/O 擋板 ASRock 為了在 Windows® 7 / 7 64-bit / VistaTM / VistaTM 64-bit BIOS中將Storage Configuration AHCI BIOS User Manual 171 ASRock B75 Pro3 Motherboard 簡體中文
1 B75 Pro3 BIOS CPU http://www.asrock.com www.asrock.com/support/index.asp 1.1 華擎 B75 Pro3 主板 (ATX 規格 : 12.0 英吋 X 7.6 英吋 , 30.5 厘米 X 19.3 厘米 ) 華擎 B75 Pro3 B75 Pro3 Serial ATA(SATA I/O 擋板 ASRock 為了在 Windows® 7 / 7 64-bit / VistaTM / VistaTM 64-bit BIOS中將Storage Configuration AHCI BIOS User Manual 171 ASRock B75 Pro3 Motherboard 簡體中文

Quick Installation Guide
Page 205
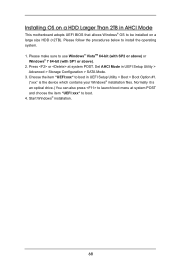
..." is an optical drive.) You can also press to boot. 4. Please make sure to boot in UEFI Setup Utility > Advanced > Storage Configuration > SATA Mode. 3. Press or at system POST and choose the item "UEFI:xxx" to launch boot menu at system POST. Choose the item "UEFI:xxx"... SP1 or above). 2. Please follow the procedures below to be installed on a large size HDD (>2TB). Start Windows® installation. 205 ASRock B75 Pro3 Motherboard English Installing OS on a HDD Larger Than 2TB This motherboard adopts UEFI BIOS that allows Windows® OS to install the operating system. 1....
..." is an optical drive.) You can also press to boot. 4. Please make sure to boot in UEFI Setup Utility > Advanced > Storage Configuration > SATA Mode. 3. Press or at system POST and choose the item "UEFI:xxx" to launch boot menu at system POST. Choose the item "UEFI:xxx"... SP1 or above). 2. Please follow the procedures below to be installed on a large size HDD (>2TB). Start Windows® installation. 205 ASRock B75 Pro3 Motherboard English Installing OS on a HDD Larger Than 2TB This motherboard adopts UEFI BIOS that allows Windows® OS to install the operating system. 1....
