User Manual
Page 2
...subject to the following two conditions: (1) this device may be constructed as a commitment by the California Legislature. ASRock assumes no event shall ASRock, its directors, officers, employees, or agents be registered trademarks or copyrights of their respective companies, and are ...data, interruption of business and the like), even if ASRock has been advised of the possibility of ASRock Inc. Copyright Notice: No part of this motherboard contains Perchlorate, a toxic substance controlled in this documentation, ASRock does not provide warranty of any kind, either expressed ...
...subject to the following two conditions: (1) this device may be constructed as a commitment by the California Legislature. ASRock assumes no event shall ASRock, its directors, officers, employees, or agents be registered trademarks or copyrights of their respective companies, and are ...data, interruption of business and the like), even if ASRock has been advised of the possibility of ASRock Inc. Copyright Notice: No part of this motherboard contains Perchlorate, a toxic substance controlled in this documentation, ASRock does not provide warranty of any kind, either expressed ...
User Manual
Page 4
Contents Chapter 1 Introduction 1 1.1 Package Contents 1 1.2 Specifications 2 1.3 Motherboard Layout 6 1.4 I/O Panel 8 Chapter 2 Installation 10 2.1 Installing the CPU 11 2.2 Installing the CPU Fan and Heatsink 13 2.3 Installing Memory Modules (DIMM) 21 2.4 Expansion Slots (... 2.7 M.2_SSD (NGFF) Module Installation Guide 30 Chapter 3 Software and Utilities Operation 34 3.1 Installing Drivers 34 3.2 A-Tuning 35 3.2.1 Installing A-Tuning 35 3.2.2 Using A-Tuning 35 3.3 ASRock Live Update & APP Shop 38 3.3.1 UI Overview 38 3.3.2 Apps 39 3.3.3 BIOS & Drivers 42
Contents Chapter 1 Introduction 1 1.1 Package Contents 1 1.2 Specifications 2 1.3 Motherboard Layout 6 1.4 I/O Panel 8 Chapter 2 Installation 10 2.1 Installing the CPU 11 2.2 Installing the CPU Fan and Heatsink 13 2.3 Installing Memory Modules (DIMM) 21 2.4 Expansion Slots (... 2.7 M.2_SSD (NGFF) Module Installation Guide 30 Chapter 3 Software and Utilities Operation 34 3.1 Installing Drivers 34 3.2 A-Tuning 35 3.2.1 Installing A-Tuning 35 3.2.2 Using A-Tuning 35 3.3 ASRock Live Update & APP Shop 38 3.3.1 UI Overview 38 3.3.2 Apps 39 3.3.3 BIOS & Drivers 42
User Manual
Page 6
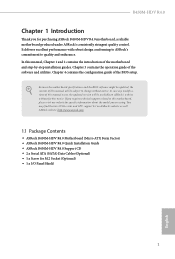
..., the content of the motherboard and step-by-step installation guides. ASRock website http://www.asrock.com. 1.1 Package Contents • ASRock B450M-HDV R4.0 Motherboard (Micro ATX Form Factor) • ASRock B450M-HDV R4.0 Quick Installation Guide • ASRock B450M-HDV R4.0 Support CD • 2 x Serial ATA (SATA) Data Cables (Optional) • 1 x Screw for purchasing ASRock B450M-HDV R4.0 motherboard, a reliable motherboard produced under ASRock's consistently stringent quality control. B450M-HDV R4.0 Chapter 1 Introduction Thank you...
..., the content of the motherboard and step-by-step installation guides. ASRock website http://www.asrock.com. 1.1 Package Contents • ASRock B450M-HDV R4.0 Motherboard (Micro ATX Form Factor) • ASRock B450M-HDV R4.0 Quick Installation Guide • ASRock B450M-HDV R4.0 Support CD • 2 x Serial ATA (SATA) Data Cables (Optional) • 1 x Screw for purchasing ASRock B450M-HDV R4.0 motherboard, a reliable motherboard produced under ASRock's consistently stringent quality control. B450M-HDV R4.0 Chapter 1 Introduction Thank you...
User Manual
Page 11
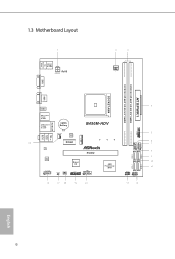
1.3 Motherboard Layout PS2 Keyboard/ Mouse USB 2.0 T: USB1 B: USB2 RoHS ATX12V CPU_FAN1 DDR4_A1 (64 bit, 288-FpinSBmo8d0ul0e) DDR4_A2 (64 bit, 288-pin module) USB3_5_6 ATXPWR1 SOCKET AM4 HDMI1 USB 3.1 Gen1 T: USB1 B: USB2 USB 3.1 Gen1 T: USB3 B: USB4 RJ-45 LAN CMOS Battery CHA_FAN1 BIOS ROM B450M-HDV Top: LINE IN Center: FRONT Bottom: MIC IN M2_1 19 PCIE1 LAN AUDIO CODEC HD_AUDIO1 1 CLRMOS1 1 CHA_FAN2 PCIE2 Super I/O TPMS1 1 1 COM1 AMD Promontory B450 16 1 SPK_CI1 1 PLED PWRBTN 1 HDLED RESET PANEL1 USB_3_4 USB_5_6 SATA3_3 SATA3_4 SATA3_1 SATA3_2 English 6
1.3 Motherboard Layout PS2 Keyboard/ Mouse USB 2.0 T: USB1 B: USB2 RoHS ATX12V CPU_FAN1 DDR4_A1 (64 bit, 288-FpinSBmo8d0ul0e) DDR4_A2 (64 bit, 288-pin module) USB3_5_6 ATXPWR1 SOCKET AM4 HDMI1 USB 3.1 Gen1 T: USB1 B: USB2 USB 3.1 Gen1 T: USB3 B: USB4 RJ-45 LAN CMOS Battery CHA_FAN1 BIOS ROM B450M-HDV Top: LINE IN Center: FRONT Bottom: MIC IN M2_1 19 PCIE1 LAN AUDIO CODEC HD_AUDIO1 1 CLRMOS1 1 CHA_FAN2 PCIE2 Super I/O TPMS1 1 1 COM1 AMD Promontory B450 16 1 SPK_CI1 1 PLED PWRBTN 1 HDLED RESET PANEL1 USB_3_4 USB_5_6 SATA3_3 SATA3_4 SATA3_1 SATA3_2 English 6
User Manual
Page 15
...! Doing so may cause physical injuries to you uninstall any motherboard settings. • Make sure to ensure that comes with the components. • When placing screws to secure the motherboard to the motherboard's components, NEVER place your chassis to unplug the power cord... before installing or removing the motherboard. Also remember to use a grounded wrist strap or touch a safety grounded object ...
...! Doing so may cause physical injuries to you uninstall any motherboard settings. • Make sure to ensure that comes with the components. • When placing screws to secure the motherboard to the motherboard's components, NEVER place your chassis to unplug the power cord... before installing or removing the motherboard. Also remember to use a grounded wrist strap or touch a safety grounded object ...
User Manual
Page 18
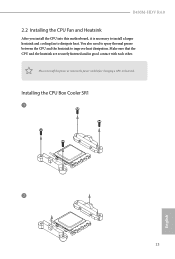
Make sure that the CPU and the heatsink are securely fastened and in good contact with each other. B450M-HDV R4.0 2.2 Installing the CPU Fan and Heatsink After you install the CPU into this motherboard, it is necessary to install a larger heatsink and cooling fan to improve heat dissipation. Installing the CPU Box Cooler SR1 1 2 13 English Please turn off the power or remove the power cord before changing a CPU or heatsink. You also need to spray thermal grease between the CPU and the heatsink to dissipate heat.
Make sure that the CPU and the heatsink are securely fastened and in good contact with each other. B450M-HDV R4.0 2.2 Installing the CPU Fan and Heatsink After you install the CPU into this motherboard, it is necessary to install a larger heatsink and cooling fan to improve heat dissipation. Installing the CPU Box Cooler SR1 1 2 13 English Please turn off the power or remove the power cord before changing a CPU or heatsink. You also need to spray thermal grease between the CPU and the heatsink to dissipate heat.
User Manual
Page 26
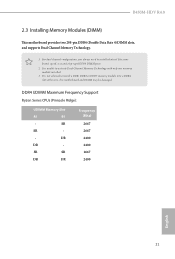
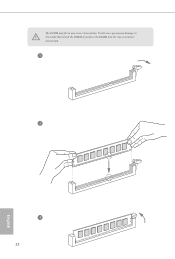
... with only one memory module installed. 3. SR SR - - It is unable to install a DDR, DDR2 or DDR3 memory module into a DDR4 slot; B450M-HDV R4.0 2.3 Installing Memory Modules (DIMM) This motherboard provides two 288-pin DDR4 (Double Data Rate 4) DIMM slots, and supports Dual Channel Memory Technology. 1. SR SR DR DR Frequency (Mhz) 2667...
... with only one memory module installed. 3. SR SR - - It is unable to install a DDR, DDR2 or DDR3 memory module into a DDR4 slot; B450M-HDV R4.0 2.3 Installing Memory Modules (DIMM) This motherboard provides two 288-pin DDR4 (Double Data Rate 4) DIMM slots, and supports Dual Channel Memory Technology. 1. SR SR DR DR Frequency (Mhz) 2667...
User Manual
Page 28
It will cause permanent damage to the motherboard and the DIMM if you force the DIMM into the slot at incorrect orientation. 1 2 3 23 English The DIMM only fits in one correct orientation.
It will cause permanent damage to the motherboard and the DIMM if you force the DIMM into the slot at incorrect orientation. 1 2 3 23 English The DIMM only fits in one correct orientation.

User Manual
Page 29
... CPUs (Raven Ridge) x1 x8 Athlon 2xxGE series APU x1 x4 English 24 2.4 Expansion Slots (PCI Express Slots) There are 2 PCI Express slots on the motherboard. PCIE2 (PCIe 3.0 x16 slot) is used for the card before you start the installation. Before installing an expansion card, please make necessary hardware settings for...
... CPUs (Raven Ridge) x1 x8 Athlon 2xxGE series APU x1 x4 English 24 2.4 Expansion Slots (PCI Express Slots) There are 2 PCI Express slots on the motherboard. PCIE2 (PCIe 3.0 x16 slot) is used for the card before you start the installation. Before installing an expansion card, please make necessary hardware settings for...
User Manual
Page 31
... computer if the computer freezes and fails to the hard drive activity LED on the chassis front panel. PLED (System Power LED): Connect to the motherboard. The LED is on the chassis to the pin assignments below. The LED is off when the system is reading or writing data. The front...
... computer if the computer freezes and fails to the hard drive activity LED on the chassis front panel. PLED (System Power LED): Connect to the motherboard. The LED is on the chassis to the pin assignments below. The LED is off when the system is reading or writing data. The front...

User Manual
Page 32
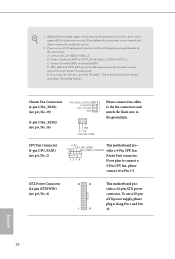
...No. 6) (9-pin USB_5_6) (see p.6, No. 7) DUMMY GND +B -B USB_PWR GND +A -A USB_PWR 1 There are two headers on this motherboard. Each USB 2.0 header can support two ports. USB 3.1 Gen1 Header (19-pin USB3_5_6) (see p.6, No. 5) Vbus IntA_PA_SSRXIntA_PA_SSRX+ GND ...(9-pin HD_AUDIO1) (see p.6, No. 18) GND PRESENCE# MIC_RET OUT_RET 1 OUT2_L J_SENSE OUT2_R MIC2_R MIC2_L This header is one header on this motherboard. B450M-HDV R4.0 Chassis Intrusion and Speaker Header (7-pin SPK_CI1) (see p.6, No. 13) Serial ATA3 Connectors (SATA3_1: see p.6, No. 10) (SATA3_2: ...
...No. 6) (9-pin USB_5_6) (see p.6, No. 7) DUMMY GND +B -B USB_PWR GND +A -A USB_PWR 1 There are two headers on this motherboard. Each USB 2.0 header can support two ports. USB 3.1 Gen1 Header (19-pin USB3_5_6) (see p.6, No. 5) Vbus IntA_PA_SSRXIntA_PA_SSRX+ GND ...(9-pin HD_AUDIO1) (see p.6, No. 18) GND PRESENCE# MIC_RET OUT_RET 1 OUT2_L J_SENSE OUT2_R MIC2_R MIC2_L This header is one header on this motherboard. B450M-HDV R4.0 Chassis Intrusion and Speaker Header (7-pin SPK_CI1) (see p.6, No. 13) Serial ATA3 Connectors (SATA3_1: see p.6, No. 10) (SATA3_2: ...
User Manual
Page 33
... OUT2_L. C. Chassis Fan Connectors (4-pin CHA_FAN1) (see p.6, No. 19) (3-pin CHA_FAN2) (see p.6, No. 2) +12V CPU_FAN_SPEED This motherboard pro- English 28 If you plan to connect a 3-Pin CPU fan, please connect it to the front panel audio header by the steps below... on the chassis must support HDA to Pin 1-3. 1. ATX Power Connector (24-pin ATXPWR1) (see p.6, No. 4) 12 24 1 13 This motherboard provides a 24-pin ATX power connector. Please follow the instructions in the Realtek Control panel and adjust "Recording Volume". E. GND FAN_SPEED_CONTROL vides a 4-Pin...
... OUT2_L. C. Chassis Fan Connectors (4-pin CHA_FAN1) (see p.6, No. 19) (3-pin CHA_FAN2) (see p.6, No. 2) +12V CPU_FAN_SPEED This motherboard pro- English 28 If you plan to connect a 3-Pin CPU fan, please connect it to the front panel audio header by the steps below... on the chassis must support HDA to Pin 1-3. 1. ATX Power Connector (24-pin ATXPWR1) (see p.6, No. 4) 12 24 1 13 This motherboard provides a 24-pin ATX power connector. Please follow the instructions in the Realtek Control panel and adjust "Recording Volume". E. GND FAN_SPEED_CONTROL vides a 4-Pin...
User Manual
Page 34
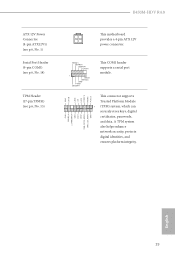
.... 14) TPM Header (17-pin TPMS1) (see p.6, No. 15) GND SERIRQ # S_PWRDWN # GN D LAD1 LAD2 SMB_DATA_MAIN SMB_CLK_MAIN GN D +3VS B LAD0 +3V LAD3 PCIRST # FRAM E PCICLK B450M-HDV R4.0 This motherboard provides a 4-pin ATX 12V power connector. English 29 RRXD1 DDTR#1 DDSR#1 CCTS#1 1 RRI#1 RRTS#1 GND TTXD1 DDCD#1 This COM1 header supports a serial port module.
.... 14) TPM Header (17-pin TPMS1) (see p.6, No. 15) GND SERIRQ # S_PWRDWN # GN D LAD1 LAD2 SMB_DATA_MAIN SMB_CLK_MAIN GN D +3VS B LAD0 +3V LAD3 PCIRST # FRAM E PCICLK B450M-HDV R4.0 This motherboard provides a 4-pin ATX 12V power connector. English 29 RRXD1 DDTR#1 DDSR#1 CCTS#1 1 RRI#1 RRTS#1 GND TTXD1 DDCD#1 This COM1 header supports a serial port module.
User Manual
Page 36
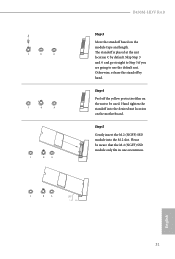
... module into the desired nut location on the module type and length. C B A 20o English 31 The standoff is placed at the nut location C by hand. C B A C B A C B A B450M-HDV R4.0 Step 3 Move the standoff based on the motherboard.
... module into the desired nut location on the module type and length. C B A 20o English 31 The standoff is placed at the nut location C by hand. C B A C B A C B A B450M-HDV R4.0 Step 3 Move the standoff based on the motherboard.
User Manual
Page 39
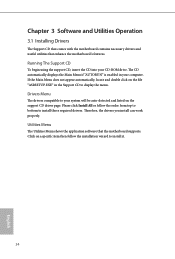
... those required drivers. Click on the support CD driver page. Utilities Menu The Utilities Menu shows the application software that enhance the motherboard's features. Running The Support CD To begin using the support CD, insert the CD into your computer. Chapter 3 Software and ...Utilities Operation 3.1 Installing Drivers The Support CD that comes with the motherboard contains necessary drivers and useful utilities that the motherboard supports. The CD automatically displays the Main Menu if "AUTORUN" is enabled in the Support CD to your...
... those required drivers. Click on the support CD driver page. Utilities Menu The Utilities Menu shows the application software that enhance the motherboard's features. Running The Support CD To begin using the support CD, insert the CD into your computer. Chapter 3 Software and ...Utilities Operation 3.1 Installing Drivers The Support CD that comes with the motherboard contains necessary drivers and useful utilities that the motherboard supports. The CD automatically displays the Main Menu if "AUTORUN" is enabled in the Support CD to your...
User Manual
Page 43
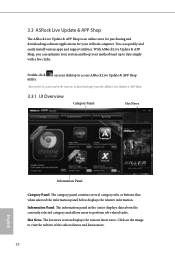
You can optimize your system and keep your motherboard up to visit the website of the selected news and know more... panel in the center displays data about the currently selected category and allows users to download apps from the ASRock Live Update & APP Shop. 3.3.1 UI Overview Category Panel Hot News Information Panel Category Panel: The category... or buttons that when selected the information panel below displays the relative information. 3.3 ASRock Live Update & APP Shop The ASRock Live Update & APP Shop is an online store for purchasing and downloading software applications for...
You can optimize your system and keep your motherboard up to visit the website of the selected news and know more... panel in the center displays data about the currently selected category and allows users to download apps from the ASRock Live Update & APP Shop. 3.3.1 UI Overview Category Panel Hot News Information Panel Category Panel: The category... or buttons that when selected the information panel below displays the relative information. 3.3 ASRock Live Update & APP Shop The ASRock Live Update & APP Shop is an online store for purchasing and downloading software applications for...
User Manual
Page 53
... you to save your settings as an user profile to disable symmetric multithreading. Warning: S3 is not supported on systems where SMT is selected, the motherboard will detect the memory module(s) inserted and assign the appropriate frequency automatically. AM4 Advance Boot Training Set TR4 Advance boot training to [Auto] to select...
... you to save your settings as an user profile to disable symmetric multithreading. Warning: S3 is not supported on systems where SMT is selected, the motherboard will detect the memory module(s) inserted and assign the appropriate frequency automatically. AM4 Advance Boot Training Set TR4 Advance boot training to [Auto] to select...
User Manual
Page 73
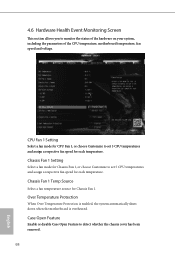
... fan temperature source for each temperature. Over Temperature Protection When Over Temperature Protection is enabled, the system automatically shuts down when the motherboard is overheated. 4.6 Hardware Health Event Monitoring Screen This section allows you to detect whether the chassis cover has been removed. 68... Enable or disable Case Open Feature to monitor the status of the hardware on your system, including the parameters of the CPU temperature, motherboard temperature, fan speed and voltage. Chassis Fan 1 Setting Select a fan mode for Chassis Fan 1, or choose Customize to set 5...
... fan temperature source for each temperature. Over Temperature Protection When Over Temperature Protection is enabled, the system automatically shuts down when the motherboard is overheated. 4.6 Hardware Health Event Monitoring Screen This section allows you to detect whether the chassis cover has been removed. 68... Enable or disable Case Open Feature to monitor the status of the hardware on your system, including the parameters of the CPU temperature, motherboard temperature, fan speed and voltage. Chassis Fan 1 Setting Select a fan mode for Chassis Fan 1, or choose Customize to set 5...
User Manual
Page 79
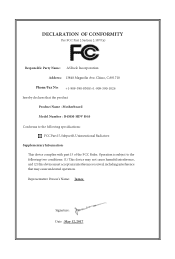
... accept any interference received, including interference that the product Product Name : Motherboard Model Number : B450M-HDV R4.0 Conforms to the following two conditions: (1) is device complies with part 15 of the FCC Rules. DECLARATION OF CONFORMITY Per FCC Part 2 Section 2.1077(a) Responsible Party Name: ASRock Incorporation Address: 13848 Magnolia Ave, Chino, CA91710 Phone/Fax No...
... accept any interference received, including interference that the product Product Name : Motherboard Model Number : B450M-HDV R4.0 Conforms to the following two conditions: (1) is device complies with part 15 of the FCC Rules. DECLARATION OF CONFORMITY Per FCC Part 2 Section 2.1077(a) Responsible Party Name: ASRock Incorporation Address: 13848 Magnolia Ave, Chino, CA91710 Phone/Fax No...
User Manual
Page 80
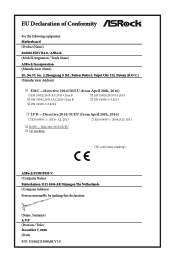
Directive 2011/65/EU ڛCE marking (EU conformity marking) ASRock EUROPE B.V. (Company Name) Bijsterhuizen 1111 6546 AR Nijmegen The Netherlands (Company Address) Person responsible for making this declaration: (Name, Surname) A.V.P (Position / Title) December ...EN 60950-1 : 2011+ A2: 2013 ☐ EN 60950-1 : 2006/A12: 2011 ڛRoHS - EU Declaration of Conformity For the following equipment: Motherboard (Product Name) B450M-HDV R4.0 / ASRock (Model Designation / Trade Name) ASRock Incorporation (Manufacturer Name) 2F., No.37, Sec. 2, Jhongyang S.
Directive 2011/65/EU ڛCE marking (EU conformity marking) ASRock EUROPE B.V. (Company Name) Bijsterhuizen 1111 6546 AR Nijmegen The Netherlands (Company Address) Person responsible for making this declaration: (Name, Surname) A.V.P (Position / Title) December ...EN 60950-1 : 2011+ A2: 2013 ☐ EN 60950-1 : 2006/A12: 2011 ڛRoHS - EU Declaration of Conformity For the following equipment: Motherboard (Product Name) B450M-HDV R4.0 / ASRock (Model Designation / Trade Name) ASRock Incorporation (Manufacturer Name) 2F., No.37, Sec. 2, Jhongyang S.


