RAID Installation Guide
Page 1
Guide to SATA Hard Disks Installation 2 1.1 Serial ATA (SATA) Hard Disks Installation 2 1.2 Making a SATA Driver Diskette 3 2. Guide to SATA Hard Disks Installation and RAID Configuration 1. Guide to RAID Configurations 4 2.1 Introduction of RAID 4 2.2 RAID Configuration Precautions 6 2.3 BIOS Configuration Utility 7 2.3.1 Enter BIOS Configuration Utility 7 2.3.2 Create Disk Array 8 1
Guide to SATA Hard Disks Installation 2 1.1 Serial ATA (SATA) Hard Disks Installation 2 1.2 Making a SATA Driver Diskette 3 2. Guide to SATA Hard Disks Installation and RAID Configuration 1. Guide to RAID Configurations 4 2.1 Introduction of RAID 4 2.2 RAID Configuration Precautions 6 2.3 BIOS Configuration Utility 7 2.3.1 Enter BIOS Configuration Utility 7 2.3.2 Create Disk Array 8 1
RAID Installation Guide
Page 3
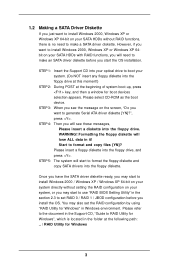
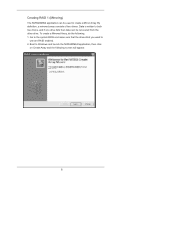
... XP or Windows XP 64-bit on your SATA HDDs without setting the RAID configuration on your system, or you may start to use "RAID BIOS Setting Utility" in the section 2.3 to boot your system. (Do NOT insert any floppy diskette into the floppy drive at this moment!) STEP 2: During POST...
... XP or Windows XP 64-bit on your SATA HDDs without setting the RAID configuration on your system, or you may start to use "RAID BIOS Setting Utility" in the section 2.3 to boot your system. (Do NOT insert any floppy diskette into the floppy drive at this moment!) STEP 2: During POST...
RAID Installation Guide
Page 7
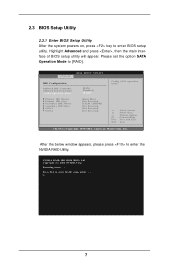
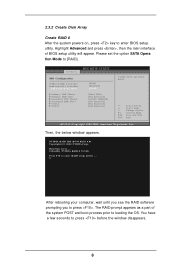
... to enter RAID setup utility . . . 7 NVIDIA RAID IDE ROM BIOS 4.81 Copyright (C) 2004 NVIDIA Corp. Advanced BIOS SETUP UTILITY IDE Configuration OnBoard IDE Controller OnBoard SATA Controller SATA Operation Mode Primary IDE Master Primary IDE Slave Secondary IDE Master Secondary IDE Slave SATA1 SATA2 [Both] [Enabled] [RAID] [Hard Disk] [Not Detected] [ATAPI CDROM...
... to enter RAID setup utility . . . 7 NVIDIA RAID IDE ROM BIOS 4.81 Copyright (C) 2004 NVIDIA Corp. Advanced BIOS SETUP UTILITY IDE Configuration OnBoard IDE Controller OnBoard SATA Controller SATA Operation Mode Primary IDE Master Primary IDE Slave Secondary IDE Master Secondary IDE Slave SATA1 SATA2 [Both] [Enabled] [RAID] [Hard Disk] [Not Detected] [ATAPI CDROM...
RAID Installation Guide
Page 8
...until you see the RAID software prompting you to press before the window disappears. 8 Then, the below window appears. Advanced BIOS SETUP UTILITY IDE Configuration OnBoard IDE Controller OnBoard SATA Controller SATA Operation Mode Primary IDE Master Primary IDE Slave Secondary IDE Master... Secondary IDE Slave SATA1 SATA2 [Both] [Enabled] [RAID] [Hard Disk] [Not Detected] [ATAPI CDROM] [Not Detected] [Not Detected] [Not Detected] Config ...
...until you see the RAID software prompting you to press before the window disappears. 8 Then, the below window appears. Advanced BIOS SETUP UTILITY IDE Configuration OnBoard IDE Controller OnBoard SATA Controller SATA Operation Mode Primary IDE Master Primary IDE Slave Secondary IDE Master... Secondary IDE Slave SATA1 SATA2 [Both] [Enabled] [RAID] [Hard Disk] [Not Detected] [ATAPI CDROM] [Not Detected] [Not Detected] [Not Detected] Config ...

RAID Installation Guide
Page 10
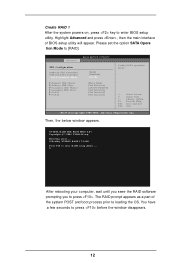
... Optimal, which is selected. 2. The first disk in the Array Disks block. It is recommended to assign the disks. Move it from the RAID Config BIOS setup page appear in kilobytes, and affect how data is arranged on the disk. Then, you enabled from the Free Disks block to save your...
... Optimal, which is selected. 2. The first disk in the Array Disks block. It is recommended to assign the disks. Move it from the RAID Config BIOS setup page appear in kilobytes, and affect how data is arranged on the disk. Then, you enabled from the Free Disks block to save your...
RAID Installation Guide
Page 12
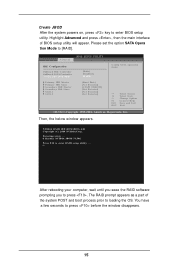
...below window appears. After rebooting your computer, wait until you seee the RAID software prompting you to loading the OS. Advanced BIOS SETUP UTILITY IDE Configuration OnBoard IDE Controller OnBoard SATA Controller SATA Operation Mode Primary IDE Master Primary IDE Slave Secondary IDE Master... Secondary IDE Slave SATA1 SATA2 [Both] [Enabled] [RAID] [Hard Disk] [Not Detected] [ATAPI CDROM] [Not Detected] [Not Detected] [Not Detected] ...
...below window appears. After rebooting your computer, wait until you seee the RAID software prompting you to loading the OS. Advanced BIOS SETUP UTILITY IDE Configuration OnBoard IDE Controller OnBoard SATA Controller SATA Operation Mode Primary IDE Master Primary IDE Slave Secondary IDE Master... Secondary IDE Slave SATA1 SATA2 [Both] [Enabled] [RAID] [Hard Disk] [Not Detected] [ATAPI CDROM] [Not Detected] [Not Detected] [Not Detected] ...
RAID Installation Guide
Page 15
Advanced BIOS SETUP UTILITY IDE Configuration OnBoard IDE Controller OnBoard SATA Controller SATA Operation Mode Primary IDE Master Primary IDE Slave Secondary IDE Master Secondary IDE Slave SATA1 SATA2 [Both] [Enabled] [RAID] [Hard Disk] [Not Detected] [ATAPI CDROM] [Not Detected] [Not Detected] [Not Detected....53 (C) Copyright 1985-2004. Detecting array . . . 0 Healthy NVIDIA JBOD 74.54G Press F10 to press . NVIDIA RAID IDE ROM BIOS 4.81 Copyright (C) 2004 NVIDIA Corp. After rebooting your computer, wait until you seee the RAID software prompting you to enter RAID setup utility...
Advanced BIOS SETUP UTILITY IDE Configuration OnBoard IDE Controller OnBoard SATA Controller SATA Operation Mode Primary IDE Master Primary IDE Slave Secondary IDE Master Secondary IDE Slave SATA1 SATA2 [Both] [Enabled] [RAID] [Hard Disk] [Not Detected] [ATAPI CDROM] [Not Detected] [Not Detected] [Not Detected....53 (C) Copyright 1985-2004. Detecting array . . . 0 Healthy NVIDIA JBOD 74.54G Press F10 to press . NVIDIA RAID IDE ROM BIOS 4.81 Copyright (C) 2004 NVIDIA Corp. After rebooting your computer, wait until you seee the RAID software prompting you to enter RAID setup utility...
RAID Utility for Windows Guide
Page 2
Create Array and the following . 1. 2. To create a twodisk Striped Array do the following screen will appear. 2 Go to the system BIOS and make sure that the drives that you want to the maximum supported number of disks in the system. Creating RAID Arrays Creating RAID 0 (Striping) NVRAIDMAN can be used to create a striped array from one disk up to use are RAID enabled. 2. Boot to Windows and launch the NVRAIDMAN application. 3.
Create Array and the following . 1. 2. To create a twodisk Striped Array do the following screen will appear. 2 Go to the system BIOS and make sure that the drives that you want to the maximum supported number of disks in the system. Creating RAID Arrays Creating RAID 0 (Striping) NVRAIDMAN can be used to create a striped array from one disk up to use are RAID enabled. 2. Boot to Windows and launch the NVRAIDMAN application. 3.
RAID Utility for Windows Guide
Page 6
Data is written to both two drives, and if one drive fails then data can be recovered from the other drive. Go to the system BIOS and make sure that the drives that you want to Windows and launch the NVRAIDMAN application, then click on Create Array and the following . 1. Creating RAID 1 (Mirroring) The NVRAIDMAN application can be used to create a Mirror Array. Boot to use are RAID enabled. 2. By definition, a mirrored array consists of two drives. To create a Mirrored Array, do the following screen will appear. 6
Data is written to both two drives, and if one drive fails then data can be recovered from the other drive. Go to the system BIOS and make sure that the drives that you want to Windows and launch the NVRAIDMAN application, then click on Create Array and the following . 1. Creating RAID 1 (Mirroring) The NVRAIDMAN application can be used to create a Mirror Array. Boot to use are RAID enabled. 2. By definition, a mirrored array consists of two drives. To create a Mirrored Array, do the following screen will appear. 6

RAID Utility for Windows Guide
Page 10
To create a Spanning Array do the following screen will appear. 3. Boot to use are RAID enabled. 2. Go to the system BIOS and make sure that the drives that you want to Windows and launch the NVRAIDMAN application, then click on Create Array and the following screen will appear. 10 Creating JBOD (Spanning) NVRAIDMAN can be used to create a Spanning Array which requires at least one disk to start such an array. Click Next and the following : 1.
To create a Spanning Array do the following screen will appear. 3. Boot to use are RAID enabled. 2. Go to the system BIOS and make sure that the drives that you want to Windows and launch the NVRAIDMAN application, then click on Create Array and the following screen will appear. 10 Creating JBOD (Spanning) NVRAIDMAN can be used to create a Spanning Array which requires at least one disk to start such an array. Click Next and the following : 1.

User Manual
Page 3
... 25 3.1 Introduction 25 3.1.1 BIOS Menu Bar 25 3.1.2 Navigation Keys 26 3.2 Main Screen 26 3.3 Advanced Screen 27 3.3.1 CPU Configuration 27 3.3.2 Chipset Configuration 30 3.3.3 ACPI Configuration 31 3.3.4 IDE Configuration 32 3.3.5 PCIPnP ...
... 25 3.1 Introduction 25 3.1.1 BIOS Menu Bar 25 3.1.2 Navigation Keys 26 3.2 Main Screen 26 3.3 Advanced Screen 27 3.3.1 CPU Configuration 27 3.3.2 Chipset Configuration 30 3.3.3 ACPI Configuration 31 3.3.4 IDE Configuration 32 3.3.5 PCIPnP ...

User Manual
Page 5
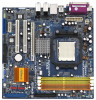
... to change without further notice. Introduction Thank you for purchasing ASRock AM2NF4G-SATA2 motherboard, a reliable motherboard produced under ASRock's consistently stringent quality control. You may find the latest VGA cards and CPU support lists on ASRock website without notice. Because the motherboard specifications and the BIOS software might be updated, the content of this manual, chapter...
... to change without further notice. Introduction Thank you for purchasing ASRock AM2NF4G-SATA2 motherboard, a reliable motherboard produced under ASRock's consistently stringent quality control. You may find the latest VGA cards and CPU support lists on ASRock website without notice. Because the motherboard specifications and the BIOS software might be updated, the content of this manual, chapter...

User Manual
Page 7
...® Windows® 2000/XP/XP 64-bit/VistaTM compliant (see CAUTION 8) - 4Mb AMI BIOS - FCC, CE, Microsoft® WHQL Certificated 7 Supports "Plug and Play" - AMI Legal BIOS - SMBIOS 2.3.1 Support - Voltage Monitoring: +12V, +5V, +3.3V, Vcore - ACPI 1.1 ...Compliance Wake Up Events - Chassis Fan Tachometer - CPU Fan Tachometer - Drivers, Utilities, AntiVirus Software (Trial Version) - Motherboard Temperature Sensing - Connector BIOS Feature Support CD Hardware Monitor OS Certifications - 2 x Serial ATAII 3.0Gb/s connectors, support RAID (RAID 0, RAID 1, JBOD) and "Hot Plug" ...
...® Windows® 2000/XP/XP 64-bit/VistaTM compliant (see CAUTION 8) - 4Mb AMI BIOS - FCC, CE, Microsoft® WHQL Certificated 7 Supports "Plug and Play" - AMI Legal BIOS - SMBIOS 2.3.1 Support - Voltage Monitoring: +12V, +5V, +3.3V, Vcore - ACPI 1.1 ...Compliance Wake Up Events - Chassis Fan Tachometer - CPU Fan Tachometer - Drivers, Utilities, AntiVirus Software (Trial Version) - Motherboard Temperature Sensing - Connector BIOS Feature Support CD Hardware Monitor OS Certifications - 2 x Serial ATAII 3.0Gb/s connectors, support RAID (RAID 0, RAID 1, JBOD) and "Hot Plug" ...

User Manual
Page 16
...slots are 2 PCI Express slots, 2 PCI slots and 1 HDMR slot on AM2NF4G-SATA2 motherboard. Before installing the expansion card, please make necessary hardware settings for later...until the card is [Auto], which will disable onboard VGA function when installing VGA card. The default value of BIOS to adjust the memory capability to [16MB], [32MB], [64MB], or [128MB]. you plan to enable the...) is used for PCI Express cards, such as Gigabit LAN card, SATA2 card, etc. HDMR slot: The HDMR slot is used to insert an ASRock HDMR card with screws. Keep the screws for the card before you ...
...slots are 2 PCI Express slots, 2 PCI slots and 1 HDMR slot on AM2NF4G-SATA2 motherboard. Before installing the expansion card, please make necessary hardware settings for later...until the card is [Auto], which will disable onboard VGA function when installing VGA card. The default value of BIOS to adjust the memory capability to [16MB], [32MB], [64MB], or [128MB]. you plan to enable the...) is used for PCI Express cards, such as Gigabit LAN card, SATA2 card, etc. HDMR slot: The HDMR slot is used to insert an ASRock HDMR card with screws. Keep the screws for the card before you ...

User Manual
Page 17
... will cause permanent damage of the connector. 17 To clear and reset the system parameters to clear the CMOS when you just finish updating the BIOS, you to enable (see p.10, No. 1) +5V +5VSB +5VSB (standby) for 5 seconds. However, please do the clear-CMOS action. 2.7 Onboard Headers and... Connectors Onboard headers and connectors are setup. When the jumper cap is placed on pins, the jumper is "Short". If you update the BIOS. If no jumper cap is placed on pins, the jumper is "Open". 2.6 Jumpers Setup The illustration shows how jumpers are NOT jumpers. Note...
... will cause permanent damage of the connector. 17 To clear and reset the system parameters to clear the CMOS when you just finish updating the BIOS, you to enable (see p.10, No. 1) +5V +5VSB +5VSB (standby) for 5 seconds. However, please do the clear-CMOS action. 2.7 Onboard Headers and... Connectors Onboard headers and connectors are setup. When the jumper cap is placed on pins, the jumper is "Short". If you update the BIOS. If no jumper cap is placed on pins, the jumper is "Open". 2.6 Jumpers Setup The illustration shows how jumpers are NOT jumpers. Note...

User Manual
Page 19
... OUT_RET 1 OUT2_L J_SENSE OUT2_R MIC2_R MIC2_L This is available to function correctly. Please follow the instruction in our manual and chassis manual to MIC2_L. C. Enter BIOS Setup Utility. E. Connect Mic_IN (MIC) to install your system. 2. D. Enter Windows system. USB 2.0 Header (9-pin USB45) (see p.10 No. 19) USB_PWR P-5 P+5 GND DUMMY 1 GND P+4 P-4 USB_PWR...
... OUT_RET 1 OUT2_L J_SENSE OUT2_R MIC2_R MIC2_L This is available to function correctly. Please follow the instruction in our manual and chassis manual to MIC2_L. C. Enter BIOS Setup Utility. E. Connect Mic_IN (MIC) to install your system. 2. D. Enter Windows system. USB 2.0 Header (9-pin USB45) (see p.10 No. 19) USB_PWR P-5 P+5 GND DUMMY 1 GND P+4 P-4 USB_PWR...

User Manual
Page 23
...® XP 64-bit / Windows® VistaTM With RAID Functions The installation procedures for Windows VistaTM are subject to change . A. Insert the ASRock Support CD into the floppy drive. C. Install HDMR card driver from our support CD to your disk is no SP4 included in it! 23 ...; XP / Windows® XP 64-bit / Windows® VistaTM Without RAID Functions The installation procedures for Windows VistaTM are subject to change the BIOS setting. WARNING! Then you want to make a SATA / SATAII driver diskette. Insert HDMR card to HDMR slot on your SATA / SATAII HDDs...
...® XP 64-bit / Windows® VistaTM With RAID Functions The installation procedures for Windows VistaTM are subject to change . A. Insert the ASRock Support CD into the floppy drive. C. Install HDMR card driver from our support CD to your disk is no SP4 included in it! 23 ...; XP / Windows® XP 64-bit / Windows® VistaTM Without RAID Functions The installation procedures for Windows VistaTM are subject to change the BIOS setting. WARNING! Then you want to make a SATA / SATAII driver diskette. Insert HDMR card to HDMR slot on your SATA / SATAII HDDs...

User Manual
Page 24
... of Windows® setup, press F6 to format and copy files [YN]? Before you start to set RAID configuration. At the beginning of BIOS setup to format the floppy diskette and copy SATA / SATAII drivers into the floppy drive, and press . Start to install a third-party ...SCSI or RAID driver. STEP 2: Set Up BIOS. When prompted, insert a floppy disk containing the nVidia® RAID driver. Then, please set up "SATAII Operation Mode" to nVidia RAID Utility for...
... of Windows® setup, press F6 to format and copy files [YN]? Before you start to set RAID configuration. At the beginning of BIOS setup to format the floppy diskette and copy SATA / SATAII drivers into the floppy drive, and press . Start to install a third-party ...SCSI or RAID driver. STEP 2: Set Up BIOS. When prompted, insert a floppy disk containing the nVidia® RAID driver. Then, please set up "SATAII Operation Mode" to nVidia RAID Utility for...

User Manual
Page 25
... not exactly match what you wish to get into the sub screen. 25 You may also restart by pressing the reset button on . Because the BIOS software is constantly being updated, the following selections: Main To set up the system time/date information Advanced To set up the advanced... BIOS features H/W Monitor To display current hardware status Boot To set up the default system device to locate and load the Operating System Security To set ...
... not exactly match what you wish to get into the sub screen. 25 You may also restart by pressing the reset button on . Because the BIOS software is constantly being updated, the following selections: Main To set up the system time/date information Advanced To set up the advanced... BIOS features H/W Monitor To display current hardware status Boot To set up the default system device to locate and load the Operating System Security To set ...

User Manual
Page 26
... for the function description of each navigation key. 3.1.2 Navigation Keys Please check the following table for all the settings To save changes and exit the BIOS SETUP UTILITY To jump to the Exit Screen or exit the current screen 3.2 Main Screen When you enter the... UTILITY Main Advanced H/W Monitor Boot Security Exit System Overview System Time System Date [17:00:09] [Mon 04/10/2006] BIOS Version : AM2NF4G-SATA2 BIOS P1.0 Processor Type : AMD Athlon(tm) 64 Processor 3400+ (64bit supported) Processor Speed : 2200 MHz Microcode Update : F7A/3A L1 Cache Size : 128KB L2 Cache ...
... for the function description of each navigation key. 3.1.2 Navigation Keys Please check the following table for all the settings To save changes and exit the BIOS SETUP UTILITY To jump to the Exit Screen or exit the current screen 3.2 Main Screen When you enter the... UTILITY Main Advanced H/W Monitor Boot Security Exit System Overview System Time System Date [17:00:09] [Mon 04/10/2006] BIOS Version : AM2NF4G-SATA2 BIOS P1.0 Processor Type : AMD Athlon(tm) 64 Processor 3400+ (64bit supported) Processor Speed : 2200 MHz Microcode Update : F7A/3A L1 Cache Size : 128KB L2 Cache ...


