
RAID Installation Guide
Page 2
... Disks", which is called data mirroring that optimizes two identical hard disk drives to configure RAID functions by following the detailed instruction of the "User Manual" in the other drive if one drive to use two new drives if you to read and write data in a RAID 10 solution for each...
... Disks", which is called data mirroring that optimizes two identical hard disk drives to configure RAID functions by following the detailed instruction of the "User Manual" in the other drive if one drive to use two new drives if you to read and write data in a RAID 10 solution for each...

RAID Installation Guide
Page 6
... selecting the logical drive in our support CD or "Quick Installation Guide". Press to restart your computer by following the detailed instruction of the "User Manual" in Disk Assignments as the above-mentioned procedures, press to allocate a portion of the disk drives to exit the Utility. 3. 2.
... selecting the logical drive in our support CD or "Quick Installation Guide". Press to restart your computer by following the detailed instruction of the "User Manual" in Disk Assignments as the above-mentioned procedures, press to allocate a portion of the disk drives to exit the Utility. 3. 2.

RAID Installation Guide
Page 7
... 4 are not assigned to the first logical drive. In this example the disk drives in Channels 1 and 2 reflect smaller capacities because a portion of the "User Manual" in our support CD or "Quick Installation Guide". 7 Press to exit the Utility. 6. You have successfully created a new RAID logical drive. Press to your logical...
... 4 are not assigned to the first logical drive. In this example the disk drives in Channels 1 and 2 reflect smaller capacities because a portion of the "User Manual" in our support CD or "Quick Installation Guide". 7 Press to exit the Utility. 6. You have successfully created a new RAID logical drive. Press to your logical...

User Manual
Page 1
ALiveXFire-eSATA2 User Manual Version 1.3 Published July 2007 Copyright©2006 ASRock INC. All rights reserved. 1
ALiveXFire-eSATA2 User Manual Version 1.3 Published July 2007 Copyright©2006 ASRock INC. All rights reserved. 1

User Manual
Page 2
... may not cause harmful interference, and (2) this manual may or may apply, see www.dtsc.ca.gov/hazardouswaste/perchlorate" ASRock Website: http://www.asrock.com 2 Copyright Notice: No part of this manual may appear in this manual. ASRock assumes no event shall ASRock, its directors, officers, employees, or agents be...any form or by any means, except duplication of documentation by the California Legislature. With respect to the contents of this manual, ASRock does not provide warranty of any kind, either expressed or implied, including but not limited to change without notice, and ...
... may not cause harmful interference, and (2) this manual may or may apply, see www.dtsc.ca.gov/hazardouswaste/perchlorate" ASRock Website: http://www.asrock.com 2 Copyright Notice: No part of this manual may appear in this manual. ASRock assumes no event shall ASRock, its directors, officers, employees, or agents be...any form or by any means, except duplication of documentation by the California Legislature. With respect to the contents of this manual, ASRock does not provide warranty of any kind, either expressed or implied, including but not limited to change without notice, and ...

User Manual
Page 5
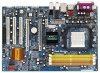
... be updated, the content of this manual, chapter 1 and 2 contain introduction of the Support CD. It delivers excellent performance with one PCIE x16 slot and two PCIE slots for purchasing ASRock ALiveXFire-eSATA2 motherboard, a reliable motherboard produced under ASRock's consistently stringent quality control. 1. ASRock website http://www.asrock.com 1.1 Package Contents 1 x ASRock ALiveXFire-eSATA2 Motherboard (ATX Form Factor: 12.0-in...
... be updated, the content of this manual, chapter 1 and 2 contain introduction of the Support CD. It delivers excellent performance with one PCIE x16 slot and two PCIE slots for purchasing ASRock ALiveXFire-eSATA2 motherboard, a reliable motherboard produced under ASRock's consistently stringent quality control. 1. ASRock website http://www.asrock.com 1.1 Package Contents 1 x ASRock ALiveXFire-eSATA2 Motherboard (ATX Form Factor: 12.0-in...

User Manual
Page 13
... to a 90o angle. Unlock the socket by lifting the lever up to improve heat dissipation. Carefully insert the CPU into the socket to the instruction manuals of the pins. Step 4. Step 3. When the CPU is in one correct orientation. Then connect the CPU fan to secure the CPU.
... to a 90o angle. Unlock the socket by lifting the lever up to improve heat dissipation. Carefully insert the CPU into the socket to the instruction manuals of the pins. Step 4. Step 3. When the CPU is in one correct orientation. Then connect the CPU fan to secure the CPU.

User Manual
Page 19
... Currently, ATITM has released Radeon X850XT, X1800XT, X1900XT, X1950XT, X1950Pro, X1950XTX, X1300, X1650 and X1600 CrossFireTM cards, which require different methods to ATITM graphics card manuals for driver updates. CrossFireTM technology offers the most advantageous means available of performance and image quality in the future, please refer to enable CrossFireTM feature...
... Currently, ATITM has released Radeon X850XT, X1800XT, X1900XT, X1950XT, X1950Pro, X1950XTX, X1300, X1650 and X1600 CrossFireTM cards, which require different methods to ATITM graphics card manuals for driver updates. CrossFireTM technology offers the most advantageous means available of performance and image quality in the future, please refer to enable CrossFireTM feature...

User Manual
Page 27
... HDA to the front panel audio header as a CD-ROM, DVD-ROM, TV tuner card, or MPEG card. Please follow the instruction in our manual and chassis manual to OUT2_L. B. Set the Front Panel Control option from sound sources such as below: A. Front Panel Audio Header (9-pin HD_AUDIO1) (see p.10 No. 35...
... HDA to the front panel audio header as a CD-ROM, DVD-ROM, TV tuner card, or MPEG card. Please follow the instruction in our manual and chassis manual to OUT2_L. B. Set the Front Panel Control option from sound sources such as below: A. Front Panel Audio Header (9-pin HD_AUDIO1) (see p.10 No. 35...

User Manual
Page 30
...damaged. Please refer to HDMI device, such as a digital television (DTV). To use HDMI function on HDMI VGA card to the VGA card user manual for detailed connection procedures. Step 2. A complete HDMI system requires a HDMI VGA card and a HDMI ready motherboard with a HDMI_SPDIF header, which provides... motherboard. white end (2-pin) (B) white end (3-pin) (C) Please do not connect the white end of HDMI_SPDIF cable to the user manual of HDMI VGA card or other VGA card. Connect the HDMI output connector on this motherboard and the HDMI VGA card. Please refer to...
...damaged. Please refer to HDMI device, such as a digital television (DTV). To use HDMI function on HDMI VGA card to the VGA card user manual for detailed connection procedures. Step 2. A complete HDMI system requires a HDMI VGA card and a HDMI ready motherboard with a HDMI_SPDIF header, which provides... motherboard. white end (2-pin) (B) white end (3-pin) (C) Please do not connect the white end of HDMI_SPDIF cable to the user manual of HDMI VGA card or other VGA card. Connect the HDMI output connector on this motherboard and the HDMI VGA card. Please refer to...
User Manual
Page 42
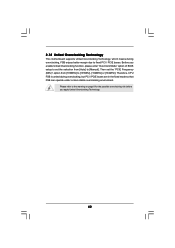
... risk before you enable Untied Overclocking function, please enter "Overclock Mode" option of BIOS setup to set the "PCIE Frequency (MHz)" option from [Auto] to [Manual]. 2.18 Untied Overclocking Technology This motherboard supports Untied Overclocking Technology, which means during overclocking, but PCI / PCIE buses are in the fixed mode so that...
... risk before you enable Untied Overclocking function, please enter "Overclock Mode" option of BIOS setup to set the "PCIE Frequency (MHz)" option from [Auto] to [Manual]. 2.18 Untied Overclocking Technology This motherboard supports Untied Overclocking Technology, which means during overclocking, but PCI / PCIE buses are in the fixed mode so that...
User Manual
Page 45
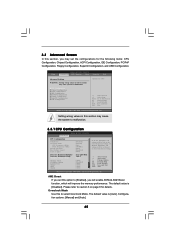
... Help Load Defaults Save and Exit Exit v02.54 (C) Copyright 1985-2003, American Megatrends, Inc. Configuration options: [Manual] and [Auto]. 45 CPU Configuration Chipset Configuration ACPI Configuration IDE Configuration PCIPnP Configuration Floppy Configuration SuperIO Configuration USB Configuration ...Options for details. 3.3 Advanced Screen In this section, you will enable ASRock AM2 Boost function, which will improve the memory performance. The default value is [Auto]. Overclock Mode Use this ...
... Help Load Defaults Save and Exit Exit v02.54 (C) Copyright 1985-2003, American Megatrends, Inc. Configuration options: [Manual] and [Auto]. 45 CPU Configuration Chipset Configuration ACPI Configuration IDE Configuration PCIPnP Configuration Floppy Configuration SuperIO Configuration USB Configuration ...Options for details. 3.3 Advanced Screen In this section, you will enable ASRock AM2 Boost function, which will improve the memory performance. The default value is [Auto]. Overclock Mode Use this ...

User Manual
Page 46
...frequency. Processor Maximum Multiplier It will be set to [Enabled]. However, it is set this item to [Auto] by default. If Manual, multiplier and voltage will display Processor Maximum Multiplier for system stability. PCIE Frequency (MHz) Use this item to system stability or compatibility ...Support This item will be left at the rated frequency/voltage. Processor Maximum Voltage It will be set this function, please set to [Manual], you may reduce CPU voltage and memory frequency, and lead to enable or disable AMD's Cool 'n' QuietTM technology. Multiplier/Voltage Change...
...frequency. Processor Maximum Multiplier It will be set to [Enabled]. However, it is set this item to [Auto] by default. If Manual, multiplier and voltage will display Processor Maximum Multiplier for system stability. PCIE Frequency (MHz) Use this item to system stability or compatibility ...Support This item will be left at the rated frequency/voltage. Processor Maximum Voltage It will be set this function, please set to [Manual], you may reduce CPU voltage and memory frequency, and lead to enable or disable AMD's Cool 'n' QuietTM technology. Multiplier/Voltage Change...

User Manual
Page 47
...[Auto]. otherwise, it will be [x11] even if you set this item. Processor Voltage This item will show when "Multiplier/Voltage Change" is set to [Manual]; Configuration options: [11T] to [26T]. The default value is [Auto]. 47 Configuration options: [Auto], [2T], [1T]. Flexibility Option The default value of...], [15CLK], [16CLK], [17CLK], and [18CLK]. The default value is [Disabled]. Processor Multiplier This item will show when "Multiplier/Voltage Change" is set to [Manual]; Configuration options: [Auto], [3CLK], [4CLK], [5CLK], and [6CLK]. The default value is [Auto].
...[Auto]. otherwise, it will be [x11] even if you set this item. Processor Voltage This item will show when "Multiplier/Voltage Change" is set to [Manual]; Configuration options: [11T] to [26T]. The default value is [Auto]. 47 Configuration options: [Auto], [2T], [1T]. Flexibility Option The default value of...], [15CLK], [16CLK], [17CLK], and [18CLK]. The default value is [Disabled]. Processor Multiplier This item will show when "Multiplier/Voltage Change" is set to [Manual]; Configuration options: [Auto], [3CLK], [4CLK], [5CLK], and [6CLK]. The default value is [Auto].
Quick Installation Guide
Page 4
... motherboard specifications and the BIOS software might be updated, the content of this manual will be subject to change without setting up jumpers. 4 ASRock ALiveXFire-eSATA2 Motherboard English In case any modifications of this manual occur, the updated version will be available on ASRock website as well. Introduction Thank you better flexibility to quality and endurance.
... motherboard specifications and the BIOS software might be updated, the content of this manual will be subject to change without setting up jumpers. 4 ASRock ALiveXFire-eSATA2 Motherboard English In case any modifications of this manual occur, the updated version will be available on ASRock website as well. Introduction Thank you better flexibility to quality and endurance.

Quick Installation Guide
Page 10
Step 4. Then connect the CPU fan to a 90o angle. English 10 ASRock ALiveXFire-eSATA2 Motherboard Unlock the socket by lifting the lever up to the CPU FAN connector (CPU_FAN1, see Page 2, No. 3). DO NOT force the CPU into the ... Triangle STEP 4: Push Down And Lock The Socket Lever 2.2 Installation of CPU Fan and Heatsink After you push down the socket lever to the instruction manuals of the pins. Make sure that the CPU corner with the golden triangle matches the socket corner with each other. The CPU fits only in...
Step 4. Then connect the CPU fan to a 90o angle. English 10 ASRock ALiveXFire-eSATA2 Motherboard Unlock the socket by lifting the lever up to the CPU FAN connector (CPU_FAN1, see Page 2, No. 3). DO NOT force the CPU into the ... Triangle STEP 4: Push Down And Lock The Socket Lever 2.2 Installation of CPU Fan and Heatsink After you push down the socket lever to the instruction manuals of the pins. Make sure that the CPU corner with the golden triangle matches the socket corner with each other. The CPU fits only in...

Quick Installation Guide
Page 16
...Graphics Cards This motherboard supports CrossFireTM feature. Combining a range of CrossFireTM feature for Radeon X850XT, X1900 and X1950 series. 16 ASRock ALiveXFire-eSATA2 Motherboard English What graphics cards work with intelligent software design and an innovative interconnect mechanism, CrossFireTM enables the highest possible level ...? If a customer incorrectly configures their system they are software enabled. it may be installed correctly to ATITM graphics card manuals for driver updates. Step 1. For other OS in the future, such as 12-pipe cards while in the future,...
...Graphics Cards This motherboard supports CrossFireTM feature. Combining a range of CrossFireTM feature for Radeon X850XT, X1900 and X1950 series. 16 ASRock ALiveXFire-eSATA2 Motherboard English What graphics cards work with intelligent software design and an innovative interconnect mechanism, CrossFireTM enables the highest possible level ...? If a customer incorrectly configures their system they are software enabled. it may be installed correctly to ATITM graphics card manuals for driver updates. Step 1. For other OS in the future, such as 12-pipe cards while in the future,...

Quick Installation Guide
Page 23
... from sound sources such as below: A. Please follow the instruction in our manual and chassis manual to connect them for AC'97 audio panel. Connect Mic_IN (MIC) to OUT2_L. E. Connect Audio_R (RIN) to OUT2_R and Audio_L (LIN) to MIC2_L. F. English 23 ASRock ALiveXFire-eSATA2 Motherboard Click "Audio I/O", select "Connector Settings" , choose "Disable front panel jack...
... from sound sources such as below: A. Please follow the instruction in our manual and chassis manual to connect them for AC'97 audio panel. Connect Mic_IN (MIC) to OUT2_L. E. Connect Audio_R (RIN) to OUT2_R and Audio_L (LIN) to MIC2_L. F. English 23 ASRock ALiveXFire-eSATA2 Motherboard Click "Audio I/O", select "Connector Settings" , choose "Disable front panel jack...

Quick Installation Guide
Page 26
... refer to the wrong connector of the HDMI VGA card you install. To use HDMI function on HDMI VGA card to the VGA card user manual for detailed connection procedures. English white end (2-pin) (B) white end (3-pin) (C) Step 4. For the proper installation of HDTV and HDMI...the system to your system. 26 ASRock ALiveXFire-eSATA2 Motherboard Make sure to correctly connect the HDMI_SPDIF cable to the motherboard and the HDMI VGA card according to the installation guide on page 14 and page 15. Step 3. Please refer to the user manual of HDMI VGA card, please refer...
... refer to the wrong connector of the HDMI VGA card you install. To use HDMI function on HDMI VGA card to the VGA card user manual for detailed connection procedures. English white end (2-pin) (B) white end (3-pin) (C) Step 4. For the proper installation of HDTV and HDMI...the system to your system. 26 ASRock ALiveXFire-eSATA2 Motherboard Make sure to correctly connect the HDMI_SPDIF cable to the motherboard and the HDMI VGA card according to the installation guide on page 14 and page 15. Step 3. Please refer to the user manual of HDMI VGA card, please refer...

Quick Installation Guide
Page 36
... to [non-RAID]. Enter BIOS SETUP UTILITY Advanced screen IDE Configuration. B. Before you apply Untied Overclocking Technology. Then set the selection from [100MHz] to [Manual]. English 36 ASRock ALiveXFire-eSATA2 Motherboard A. STEP 2: Install Windows® VistaTM / Windows® VistaTM 64-bit OS on page 7 for the possible overclocking risk before you enable Untied Overclocking...
... to [non-RAID]. Enter BIOS SETUP UTILITY Advanced screen IDE Configuration. B. Before you apply Untied Overclocking Technology. Then set the selection from [100MHz] to [Manual]. English 36 ASRock ALiveXFire-eSATA2 Motherboard A. STEP 2: Install Windows® VistaTM / Windows® VistaTM 64-bit OS on page 7 for the possible overclocking risk before you enable Untied Overclocking...
