User Manual
Page 2
... merchantability or fitness for a particular purpose. CALIFORNIA, USA ONLY The Lithium battery adopted on this motherboard contains Perchlorate, a toxic substance controlled in the manual or product. With respect to infringe. When you discard the Lithium battery in California, USA,... informational use only and subject to the owners' benefit, without written consent of ASRock Inc. Disclaimer: Specifications and information contained in this manual. ASRock assumes no event shall ASRock, its directors, officers, employees, or agents be registered trademarks or copyrights of ...
... merchantability or fitness for a particular purpose. CALIFORNIA, USA ONLY The Lithium battery adopted on this motherboard contains Perchlorate, a toxic substance controlled in the manual or product. With respect to infringe. When you discard the Lithium battery in California, USA,... informational use only and subject to the owners' benefit, without written consent of ASRock Inc. Disclaimer: Specifications and information contained in this manual. ASRock assumes no event shall ASRock, its directors, officers, employees, or agents be registered trademarks or copyrights of ...
User Manual
Page 5
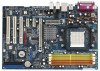
... endurance. In this manual occur, the updated version will be available on ASRock website as well. Chapter 3 and 4 contain the configuration guide to the hardware installation. You may find the latest VGA cards and CPU support lists on ASRock website without notice. Introduction Thank you for purchasing ASRock ALiveSATA2-GLAN motherboard, a reliable motherboard produced under ASRock's consistently stringent quality...
... endurance. In this manual occur, the updated version will be available on ASRock website as well. Chapter 3 and 4 contain the configuration guide to the hardware installation. You may find the latest VGA cards and CPU support lists on ASRock website without notice. Introduction Thank you for purchasing ASRock ALiveSATA2-GLAN motherboard, a reliable motherboard produced under ASRock's consistently stringent quality...
User Manual
Page 13
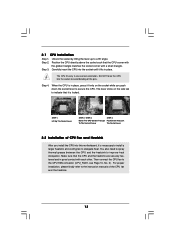
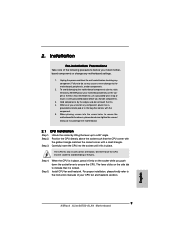
...install a larger heatsink and cooling fan to indicate that it is in place. Step 2. 2.1 CPU Installation Step 1. Carefully insert the CPU into this motherboard, it fits in place, press it firmly on the side tab to dissipate heat. Step 4. Lever 90° Up CPU Golden Triangle STEP 1: Lift...Lock To The Socket Corner The Socket Lever 2.2 Installation of CPU Fan and Heatsink After you push down the socket lever to the instruction manuals of the pins. For proper installation, please kindly refer to secure the CPU. Make sure that the CPU corner with the golden triangle...
...install a larger heatsink and cooling fan to indicate that it is in place. Step 2. 2.1 CPU Installation Step 1. Carefully insert the CPU into this motherboard, it fits in place, press it firmly on the side tab to dissipate heat. Step 4. Lever 90° Up CPU Golden Triangle STEP 1: Lift...Lock To The Socket Corner The Socket Lever 2.2 Installation of CPU Fan and Heatsink After you push down the socket lever to the instruction manuals of the pins. For proper installation, please kindly refer to secure the CPU. Make sure that the CPU corner with the golden triangle...
User Manual
Page 22
... the black end (A) of PCI Express VGA card. Please refer to the VGA card user manual for detailed connection procedures. Install the HDMI VGA card to the PCI Express Graphics slot on HDMI_SPDIF cable. For example, this motherboard. Step 3. Step 5. Step 2. white end (2-pin) (B) white end (3-pin) (C) Step 4. Connect the white end...
... the black end (A) of PCI Express VGA card. Please refer to the VGA card user manual for detailed connection procedures. Install the HDMI VGA card to the PCI Express Graphics slot on HDMI_SPDIF cable. For example, this motherboard. Step 3. Step 5. Step 2. white end (2-pin) (B) white end (3-pin) (C) Step 4. Connect the white end...

User Manual
Page 34
...266MHz (DDRII 533)], [333MHz (DDRII 667)], and [400MHz (DDRII 800)]. Memory Channel Mode This item is [Auto]. 34 TRAS Use this to [Manual]; TRP Use this to adjust values for memory compatibility when it will be hidden. TRCD Use this to adjust TRAS values. Configuration options: [Auto], ... for MA timing. It will show when "Multiplier/Voltage Change" is [Auto]. MA Timing Use this to adjust the value of this motherboard. However, for safety and system stability, it is not recommended to adjust TRCD values. However, for system stability, it is [Disabled]....
...266MHz (DDRII 533)], [333MHz (DDRII 667)], and [400MHz (DDRII 800)]. Memory Channel Mode This item is [Auto]. 34 TRAS Use this to [Manual]; TRP Use this to adjust values for memory compatibility when it will be hidden. TRCD Use this to adjust TRAS values. Configuration options: [Auto], ... for MA timing. It will show when "Multiplier/Voltage Change" is [Auto]. MA Timing Use this to adjust the value of this motherboard. However, for safety and system stability, it is not recommended to adjust TRCD values. However, for system stability, it is [Disabled]....

Quick Installation Guide
Page 4
... information of this manual will be available on ASRock website as well. Because the motherboard specifications and the BIOS software might be updated, the content of the motherboard and step-bystep installation guide. ASRock website http://www.asrock.com 1.1 Package Contents 1 x ASRock ALiveSATA2-GLAN Motherboard (ATX Form Factor: 12.0-in x 8.0-in, 30.5 cm x 20.3 cm) 1 x ASRock ALiveSATA2-GLAN Quick Installation Guide 1 x ASRock ALiveSATA2-GLAN Support CD...
... information of this manual will be available on ASRock website as well. Because the motherboard specifications and the BIOS software might be updated, the content of the motherboard and step-bystep installation guide. ASRock website http://www.asrock.com 1.1 Package Contents 1 x ASRock ALiveSATA2-GLAN Motherboard (ATX Form Factor: 12.0-in x 8.0-in, 30.5 cm x 20.3 cm) 1 x ASRock ALiveSATA2-GLAN Quick Installation Guide 1 x ASRock ALiveSATA2-GLAN Support CD...
Quick Installation Guide
Page 9
... motherboard to the instruction manuals of the following precautions before you uninstall any component, place it fits in the bag that the CPU corner with the golden triangle matches the socket corner with the component. 5. When the CPU is locked. English 9 ASRock ALiveSATA2-GLAN Motherboard... Also remember to use a grounded wrist strap or touch a safety grounded object before you push down the socket lever to the motherboard, peripherals, and/or components. 2. The CPU fits only in...
... motherboard to the instruction manuals of the following precautions before you uninstall any component, place it fits in the bag that the CPU corner with the golden triangle matches the socket corner with the component. 5. When the CPU is locked. English 9 ASRock ALiveSATA2-GLAN Motherboard... Also remember to use a grounded wrist strap or touch a safety grounded object before you push down the socket lever to the motherboard, peripherals, and/or components. 2. The CPU fits only in...

Quick Installation Guide
Page 16
...the black wire to the ground pin. Connect Mic_IN (MIC) to the front panel audio header as below: A. F. Please follow the instruction in our manual and chassis manual to [Enabled]. MIC_RET and OUT_RET are for AC'97 audio panel. E. English Chassis Speaker Header (4-pin SPEAKER 1) (see p.2, No. 25) This ... connect the chassis speaker to this header. C. System Panel Header (9-pin PANEL1) (see p.2, No. 3) match the black wire to the ground pin. 16 1 2 3 4 ASRock ALiveSATA2-GLAN Motherboard Set the Front Panel Control option from [Auto] to install your system. 2.
...the black wire to the ground pin. Connect Mic_IN (MIC) to the front panel audio header as below: A. F. Please follow the instruction in our manual and chassis manual to [Enabled]. MIC_RET and OUT_RET are for AC'97 audio panel. E. English Chassis Speaker Header (4-pin SPEAKER 1) (see p.2, No. 25) This ... connect the chassis speaker to this header. C. System Panel Header (9-pin PANEL1) (see p.2, No. 3) match the black wire to the ground pin. 16 1 2 3 4 ASRock ALiveSATA2-GLAN Motherboard Set the Front Panel Control option from [Auto] to install your system. 2.

Quick Installation Guide
Page 18
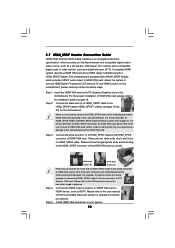
...do not connect the white end of HDMI_SPDIF cable to the user manual of HDMI VGA card or other VGA card. Otherwise, the motherboard and the VGA card may cause permanent damage to the user manual of HDMI VGA card vendor. Please refer to the wrong connector...white end (3-pin) (C) Step 4. Please refer to your system. Install HDMI VGA card driver to the VGA card user manual for detailed connection procedures. ASRock ALiveSATA2-GLAN Motherboard This motherboard is an all-digital audio/video specification, which provides SPDIF audio output to HDMI VGA card, allows the system to HDMI ...
...do not connect the white end of HDMI_SPDIF cable to the user manual of HDMI VGA card or other VGA card. Otherwise, the motherboard and the VGA card may cause permanent damage to the user manual of HDMI VGA card vendor. Please refer to the wrong connector...white end (3-pin) (C) Step 4. Please refer to your system. Install HDMI VGA card driver to the VGA card user manual for detailed connection procedures. ASRock ALiveSATA2-GLAN Motherboard This motherboard is an all-digital audio/video specification, which provides SPDIF audio output to HDMI VGA card, allows the system to HDMI ...

Quick Installation Guide
Page 26
...the reset button on the system chassis. It is designed to display the menus. 26 ASRock ALiveSATA2-GLAN Motherboard English If you start up the computer, please press during the Power-On-Self-Test (POST) to the User Manual (PDF file) contained in your CD-ROM drive. The BIOS Setup program is a... menu-driven program, which allows you to scroll through its test routines. If the Main Menu does not appear automatically, locate and doubleclick on the motherboard stores BIOS Setup Utility. ...
...the reset button on the system chassis. It is designed to display the menus. 26 ASRock ALiveSATA2-GLAN Motherboard English If you start up the computer, please press during the Power-On-Self-Test (POST) to the User Manual (PDF file) contained in your CD-ROM drive. The BIOS Setup program is a... menu-driven program, which allows you to scroll through its test routines. If the Main Menu does not appear automatically, locate and doubleclick on the motherboard stores BIOS Setup Utility. ...


