RAID Installation Guide
Page 1
NVIDIA BIOS RAID Installation Guide 2 1.1 Introduction to RAID 2 1.2 RAID Configurations Precautions 3 1.3 Create Disk Array 4 2. NVIDIA Windows RAID Installation Guide 8 2.1 NVIDIA Windows RAID Installation Guide for Windows 2000 / XP / XP 64-bit Users 8 2.2 NVIDIA Windows RAID Installation Guide for Windows Vista / Vista 64-bit Users 18 1 NVIDIA RAID Installation Guide 1.
NVIDIA BIOS RAID Installation Guide 2 1.1 Introduction to RAID 2 1.2 RAID Configurations Precautions 3 1.3 Create Disk Array 4 2. NVIDIA Windows RAID Installation Guide 8 2.1 NVIDIA Windows RAID Installation Guide for Windows 2000 / XP / XP 64-bit Users 8 2.2 NVIDIA Windows RAID Installation Guide for Windows Vista / Vista 64-bit Users 18 1 NVIDIA RAID Installation Guide 1.
RAID Installation Guide
Page 2
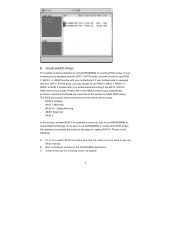
... port. SATAII_4 (port 2.1) --> Means controller 2 's second port. 1.1 Introduction to the below table for "Redundant Array of using NVIDIA RAID Utility under BIOS environment. Please refer to RAID The term "RAID" stands for detailed information. SATAII_2 (port 1.1) --> Means controller 1 's second port. Hot-Plug any... with your motherboard according to the SATA / SATAII HDDs amount you make a SATA / SATAII driver diskette, press to enter BIOS setup to configure RAID. WARNING!! NOTE: The connector naming on our motherboard is equipped with two SATA / SATAII ports, you...
... port. SATAII_4 (port 2.1) --> Means controller 2 's second port. 1.1 Introduction to the below table for "Redundant Array of using NVIDIA RAID Utility under BIOS environment. Please refer to RAID The term "RAID" stands for detailed information. SATAII_2 (port 1.1) --> Means controller 1 's second port. Hot-Plug any... with your motherboard according to the SATA / SATAII HDDs amount you make a SATA / SATAII driver diskette, press to enter BIOS setup to configure RAID. WARNING!! NOTE: The connector naming on our motherboard is equipped with two SATA / SATAII ports, you...

RAID Installation Guide
Page 4
... if you set it to Striping if you want to press . And the Striping Block is recommended to loading the OS. After adjusting the system BIOS to press before you use an existing drive and a new drive to create a RAID 1 (mirroring) array for the RAID 1 set is set to Mirroring, but...
... if you set it to Striping if you want to press . And the Striping Block is recommended to loading the OS. After adjusting the system BIOS to press before you use an existing drive and a new drive to create a RAID 1 (mirroring) array for the RAID 1 set is set to Mirroring, but...
RAID Installation Guide
Page 6
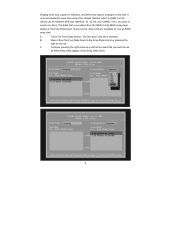
.... C. Then, you enabled from the Free Disks block to leave this value at the default Optimal, which is selected. Move it from the RAID Config BIOS setup page appear in kilobytes, and affect how data is arranged on the disk. Continue pressing the right-arrow key until all the disks that...
.... C. Then, you enabled from the Free Disks block to leave this value at the default Optimal, which is selected. Move it from the RAID Config BIOS setup page appear in kilobytes, and affect how data is arranged on the disk. Continue pressing the right-arrow key until all the disks that...
RAID Installation Guide
Page 9
... with two SATA / SATAII ports, you install. RAID 1: Mirroring - Boot to create other RAID arrays, the operation procedures are RAID enabled. Go to the system BIOS and make sure that the drives that you plan to use are similar to create RAID arrays. Create Array and the following : A. If you want...
... with two SATA / SATAII ports, you install. RAID 1: Mirroring - Boot to create other RAID arrays, the operation procedures are RAID enabled. Go to the system BIOS and make sure that the drives that you plan to use are similar to create RAID arrays. Create Array and the following : A. If you want...
User Manual
Page 3
...-bit With RAID Functions 33 2.14.2 Installing Windows® VistaTM / VistaTM 64-bit With RAID Functions 34 2.15 Untied Overclocking Technology 35 3 . BIOS SETUP UTILITY 36 3.1 Introduction 36 3.1.1 BIOS Menu Bar 36 3.1.2 Navigation Keys 37 3 Installation 12 Pre-installation Precautions 12 2.1 CPU Installation 13 2.2 Installation of CPU Fan and Heatsink 13 2.3 Installation...
...-bit With RAID Functions 33 2.14.2 Installing Windows® VistaTM / VistaTM 64-bit With RAID Functions 34 2.15 Untied Overclocking Technology 35 3 . BIOS SETUP UTILITY 36 3.1 Introduction 36 3.1.1 BIOS Menu Bar 36 3.1.2 Navigation Keys 37 3 Installation 12 Pre-installation Precautions 12 2.1 CPU Installation 13 2.2 Installation of CPU Fan and Heatsink 13 2.3 Installation...
User Manual
Page 5
...of this manual will be subject to BIOS setup and information of the motherboard and step-bystep guide to quality and endurance. It delivers excellent performance with robust design conforming to ASRock's commitment to the hardware installation. In... 4 contain the configuration guide to change without further notice. ASRock website http://www.asrock.com 1.1 Package Contents 1 x ASRock ALiveNF5-eSATA2+ Motherboard (ATX Form Factor: 12.0-in x 8.0-in, 30.5 cm x 20.3 cm) 1 x ASRock ALiveNF5-eSATA2+ Quick Installation Guide 1 x ASRock ALiveNF5-eSATA2+ Support CD 1 x Ultra ATA 66/100/133 IDE ...
...of this manual will be subject to BIOS setup and information of the motherboard and step-bystep guide to quality and endurance. It delivers excellent performance with robust design conforming to ASRock's commitment to the hardware installation. In... 4 contain the configuration guide to change without further notice. ASRock website http://www.asrock.com 1.1 Package Contents 1 x ASRock ALiveNF5-eSATA2+ Motherboard (ATX Form Factor: 12.0-in x 8.0-in, 30.5 cm x 20.3 cm) 1 x ASRock ALiveNF5-eSATA2+ Quick Installation Guide 1 x ASRock ALiveNF5-eSATA2+ Support CD 1 x Ultra ATA 66/100/133 IDE ...
User Manual
Page 7
...components and devices of your own risk and expense. We are not responsible for possible damage caused by overclocking. 7 CD in the BIOS, applying Untied Overclocking Technology, or using the thirdparty overclocking tools. Drivers, Utilities, AntiVirus Software (Trial Version) - CPU Internal Temperature Sensing... Windows® 2000 / XP / XP Media Center / XP 64-bit / VistaTM / VistaTM 64-bit compliant (see CAUTION 11) - 4Mb AMI BIOS - FCC, CE, WHQL Certificated WARNING Please realize that there is a certain risk involved with 2 SATAII connectors), support NCQ, AHCI and "Hot Plug" ...
...components and devices of your own risk and expense. We are not responsible for possible damage caused by overclocking. 7 CD in the BIOS, applying Untied Overclocking Technology, or using the thirdparty overclocking tools. Drivers, Utilities, AntiVirus Software (Trial Version) - CPU Internal Temperature Sensing... Windows® 2000 / XP / XP Media Center / XP 64-bit / VistaTM / VistaTM 64-bit compliant (see CAUTION 11) - 4Mb AMI BIOS - FCC, CE, WHQL Certificated WARNING Please realize that there is a certain risk involved with 2 SATAII connectors), support NCQ, AHCI and "Hot Plug" ...
User Manual
Page 8
...unstable after AM2 Boost function is not recommended to read "Untied Overclocking Technology" on page 14 for details. 3. This motherboard supports ASRock AM2 Boost overclocking technology. If you enable this function will improve up to 12.5%, but the effect still depends on the AM2 CPU...external SATAII specification. As long as we have the latest driver, we can also connect SATA hard disk to our website in the BIOS setup, the memory performance will overclock the chipset/CPU reference clock. CAUTION! 1. See APPENDIX on the motherboard functions properly and unplug ...
...unstable after AM2 Boost function is not recommended to read "Untied Overclocking Technology" on page 14 for details. 3. This motherboard supports ASRock AM2 Boost overclocking technology. If you enable this function will improve up to 12.5%, but the effect still depends on the AM2 CPU...external SATAII specification. As long as we have the latest driver, we can also connect SATA hard disk to our website in the BIOS setup, the memory performance will overclock the chipset/CPU reference clock. CAUTION! 1. See APPENDIX on the motherboard functions properly and unplug ...
User Manual
Page 17
If you need to clear the CMOS when you just finish updating the BIOS, you do not clear the CMOS right after you to short pin2 and pin3 on pins, the jumper is "Short". 2.5 Jumpers Setup The illustration shows ... for 5 seconds. To clear and reset the system parameters to enable (see p.10, No. 9) 1_2 2_3 Default Clear CMOS Note: CLRCMOS1 allows you update the BIOS. However, please do the clear-CMOS action. 17 Jumper Setting PS2_USB_PW1 1_2 2_3 Short pin2, pin3 to default setup, please turn off the computer and...
If you need to clear the CMOS when you just finish updating the BIOS, you do not clear the CMOS right after you to short pin2 and pin3 on pins, the jumper is "Short". 2.5 Jumpers Setup The illustration shows ... for 5 seconds. To clear and reset the system parameters to enable (see p.10, No. 9) 1_2 2_3 Default Clear CMOS Note: CLRCMOS1 allows you update the BIOS. However, please do the clear-CMOS action. 17 Jumper Setting PS2_USB_PW1 1_2 2_3 Short pin2, pin3 to default setup, please turn off the computer and...
User Manual
Page 20
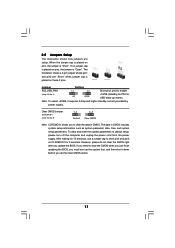
... sources such as below: A. Enter Windows system. D. You don't need to connect them for HD audio panel only. E. Connect Mic_IN (MIC) to function correctly. Enter BIOS Setup Utility. High Definition Audio supports Jack Sensing, but the panel wire on the lower right hand taskbar to Ground (GND). Please follow the instruction...
... sources such as below: A. Enter Windows system. D. You don't need to connect them for HD audio panel only. E. Connect Mic_IN (MIC) to function correctly. Enter BIOS Setup Utility. High Definition Audio supports Jack Sensing, but the panel wire on the lower right hand taskbar to Ground (GND). Please follow the instruction...
User Manual
Page 25
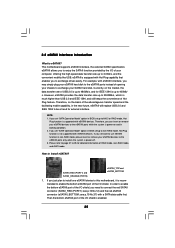
... speed data transfer rate up to be a trend for detailed information of Hot Plug feature. Therefore, you set "SATA Operation Mode" option in BIOS setup to AHCI or RAID mode, Hot Plug function is power-on the basis of the I /O shield. In order to enable the bottom ...supported with eSATAII devices. see p.10 No.37) with eSATAII interface, you need to install eSATAII? If you set "SATA Operation Mode" option in BIOS setup to 3.0Gb/s, and the convenient mobility like USB. For example, with a SATA data cable first. How to connect the red SATAII connector (...
... speed data transfer rate up to be a trend for detailed information of Hot Plug feature. Therefore, you set "SATA Operation Mode" option in BIOS setup to AHCI or RAID mode, Hot Plug function is power-on the basis of the I /O shield. In order to enable the bottom ...supported with eSATAII devices. see p.10 No.37) with eSATAII interface, you need to install eSATAII? If you set "SATA Operation Mode" option in BIOS setup to 3.0Gb/s, and the convenient mobility like USB. For example, with a SATA data cable first. How to connect the red SATAII connector (...
User Manual
Page 31
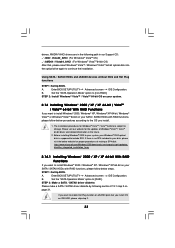
If there is supposed to change. Enter BIOS SETUP UTILITY Advanced screen IDE Configuration. Insert the ASRock Support CD into your optical drive to [AHCI]. D. Generate AHCI Driver diskette for Windows2000/XP 3. A. STEP 2: Make a SATA / SATAII driver diskette. Generate RAID....microsoft.com/Windows2000/downloads/servicepacks/sp4/spdeploy. Using SATA / SATAII HDDs and eSATAII devices with NCQ and Hot Plug functions STEP 1: Set Up BIOS. B. 2.13 Installing Windows® 2000 / XP / XP 64-bit / VistaTM / VistaTM 64-bit Without RAID Functions If you want to continue 31...
If there is supposed to change. Enter BIOS SETUP UTILITY Advanced screen IDE Configuration. Insert the ASRock Support CD into your optical drive to [AHCI]. D. Generate AHCI Driver diskette for Windows2000/XP 3. A. STEP 2: Make a SATA / SATAII driver diskette. Generate RAID....microsoft.com/Windows2000/downloads/servicepacks/sp4/spdeploy. Using SATA / SATAII HDDs and eSATAII devices with NCQ and Hot Plug functions STEP 1: Set Up BIOS. B. 2.13 Installing Windows® 2000 / XP / XP 64-bit / VistaTM / VistaTM 64-bit Without RAID Functions If you want to continue 31...
User Manual
Page 32
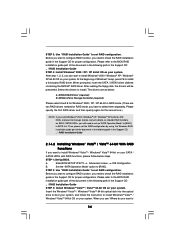
... disk, the drivers will start to load the NVIDIA® AHCI 32 The drivers are as below steps. page, please insert the ASRock Support CD into the optical drive to format the floppy diskette and copy SATA / SATAII drivers into the floppy drive. Select the driver...174; AHCI driver. NVIDIA nForce Storage Controller (required) Windows XP64 Please select A for Windows® XP 64-bit in AHCI mode. A. Enter BIOS SETUP UTILITY Advanced screen IDE Configuration. Set the "SATA Operation Mode" option to install Windows® VistaTM / Windows® VistaTM 64-bit OS ...
... disk, the drivers will start to load the NVIDIA® AHCI 32 The drivers are as below steps. page, please insert the ASRock Support CD into the optical drive to format the floppy diskette and copy SATA / SATAII drivers into the floppy drive. Select the driver...174; AHCI driver. NVIDIA nForce Storage Controller (required) Windows XP64 Please select A for Windows® XP 64-bit in AHCI mode. A. Enter BIOS SETUP UTILITY Advanced screen IDE Configuration. Set the "SATA Operation Mode" option to install Windows® VistaTM / Windows® VistaTM 64-bit OS ...
User Manual
Page 33
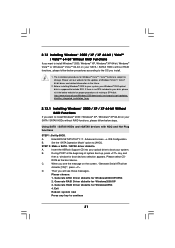
... Installing Windows® 2000 / XP / XP 64-bit / VistaTM / VistaTM 64-bit With RAID Functions If you want to change. Enter BIOS SETUP UTILITY Advanced screen IDE Configuration. Please make a SATA / SATAII driver diskette by following path in the future. 2. Please visit our website... SATA / SATAII HDDs and eSATAII devices without NCQ and Hot Plug functions STEP 1: Set Up BIOS. A. Enter BIOS SETUP UTILITY Advanced screen IDE Configuration. STEP 1: Set Up BIOS. Before installing Windows® 2000 to enable Hot Plug function on eSATAII ports but you install OS...
... Installing Windows® 2000 / XP / XP 64-bit / VistaTM / VistaTM 64-bit With RAID Functions If you want to change. Enter BIOS SETUP UTILITY Advanced screen IDE Configuration. Please make a SATA / SATAII driver diskette by following path in the future. 2. Please visit our website... SATA / SATAII HDDs and eSATAII devices without NCQ and Hot Plug functions STEP 1: Set Up BIOS. A. Enter BIOS SETUP UTILITY Advanced screen IDE Configuration. STEP 1: Set Up BIOS. Before installing Windows® 2000 to enable Hot Plug function on eSATAII ports but you install OS...
User Manual
Page 34
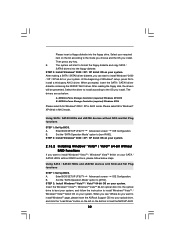
..., or rebuild) RAID functions on your system, and follow below : A. Then, please set RAID configuration. A. B. STEP 1: Set Up BIOS. Set the "SATA Operation Mode" option to set the RAID configuration by using the Windows RAID installation guide part of Windows® setup, press...Use "RAID Installation Guide" to [RAID]. When prompted, insert the SATA / SATAII driver diskette containing the NVIDIA® RAID driver. Enter BIOS SETUP UTILITY Advanced screen IDE Configuration. Please refer to boot your system. Select the drivers to 34 Insert the Windows® VistaTM / ...
..., or rebuild) RAID functions on your system, and follow below : A. Then, please set RAID configuration. A. B. STEP 1: Set Up BIOS. Set the "SATA Operation Mode" option to set the RAID configuration by using the Windows RAID installation guide part of Windows® setup, press...Use "RAID Installation Guide" to [RAID]. When prompted, insert the SATA / SATAII driver diskette containing the NVIDIA® RAID driver. Enter BIOS SETUP UTILITY Advanced screen IDE Configuration. Please refer to boot your system. Select the drivers to 34 Insert the Windows® VistaTM / ...
User Manual
Page 35
...left on SATA / SATAII HDDs, you enable Untied Overclocking function, please enter "Overclock Mode" option of BIOS setup to set the selection from [Auto] to continue the installation. Before you still need to set the...Untied Overclocking Technology, which means during overclocking, but PCI / PCIE buses are in the following path in BIOS first. Therefore, CPU FSB is untied during overclocking, FSB enjoys better margin due to the warning on ... you apply Untied Overclocking Technology. 35 page, please insert the ASRock Support CD into the optical drive again to [CPU, PCIE, Async.].
...left on SATA / SATAII HDDs, you enable Untied Overclocking function, please enter "Overclock Mode" option of BIOS setup to set the selection from [Auto] to continue the installation. Before you still need to set the...Untied Overclocking Technology, which means during overclocking, but PCI / PCIE buses are in the following path in BIOS first. Therefore, CPU FSB is untied during overclocking, FSB enjoys better margin due to the warning on ... you apply Untied Overclocking Technology. 35 page, please insert the ASRock Support CD into the optical drive again to [CPU, PCIE, Async.].
User Manual
Page 36
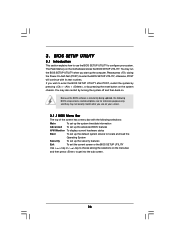
... UTILITY when you see on your system. Please press during the Power-On-Self-Test (POST) to configure your screen. 3.1.1 BIOS Menu Bar The top of the screen has a menu bar with its test routines. You may not exactly match what you start up the ...Operating System Security To set up the computer. 3. The Flash Memory on . BIOS SETUP UTILITY 3.1 Introduction This section explains how to use the BIOS SETUP UTILITY to enter the BIOS SETUP UTILITY, otherwise, POST will continue with the following BIOS setup screens and descriptions are for reference purpose only, and they may also...
... UTILITY when you see on your system. Please press during the Power-On-Self-Test (POST) to configure your screen. 3.1.1 BIOS Menu Bar The top of the screen has a menu bar with its test routines. You may not exactly match what you start up the ...Operating System Security To set up the computer. 3. The Flash Memory on . BIOS SETUP UTILITY 3.1 Introduction This section explains how to use the BIOS SETUP UTILITY to enter the BIOS SETUP UTILITY, otherwise, POST will continue with the following BIOS setup screens and descriptions are for reference purpose only, and they may also...
User Manual
Page 37
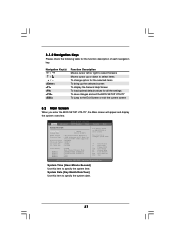
... Main Advanced H/W Monitor Boot Security Exit System Overview System Time System Date [17:00:09] [Fri 01/12/2007] BIOS Version : ALiveNF5-eSATA2+ BIOS P1.0 Processor Type : AMD Athlon(tm) 64 X2 Dual Core Processor 4400+ (64bit supported) Processor Speed : 2892MHz Microcode Update : 60FB1/0 L1...will appear and display the system overview. 3.1.2 Navigation Keys Please check the following table for all the settings To save changes and exit the BIOS SETUP UTILITY To jump to specify the system time. Navigation Key(s) / / + / Function Description Moves cursor left or right to select ...
... Main Advanced H/W Monitor Boot Security Exit System Overview System Time System Date [17:00:09] [Fri 01/12/2007] BIOS Version : ALiveNF5-eSATA2+ BIOS P1.0 Processor Type : AMD Athlon(tm) 64 X2 Dual Core Processor 4400+ (64bit supported) Processor Speed : 2892MHz Microcode Update : 60FB1/0 L1...will appear and display the system overview. 3.1.2 Navigation Keys Please check the following table for all the settings To save changes and exit the BIOS SETUP UTILITY To jump to specify the system time. Navigation Key(s) / / + / Function Description Moves cursor left or right to select ...
User Manual
Page 38
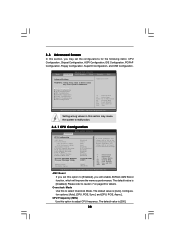
.... Configuration options: [Auto], [CPU, PCIE, Sync.] and [CPU, PCIE, Async.]. Overclock Mode Use this section, you will enable ASRock AM2 Boost function, which will be left at the rated frequency/voltage. The default value is [Auto]. CPU Configuration Chipset Configuration ACPI Configuration...Configuration USB Configuration Options for CPU Select Screen Select Item Enter Go to malfunction. The default value is [200]. 38 Main BIOS SETUP UTILITY Advanced H/W Monitor Boot Security Exit Advanced Settings WARNING : Setting wrong values in this option to [Enabled], you...
.... Configuration options: [Auto], [CPU, PCIE, Sync.] and [CPU, PCIE, Async.]. Overclock Mode Use this section, you will enable ASRock AM2 Boost function, which will be left at the rated frequency/voltage. The default value is [Auto]. CPU Configuration Chipset Configuration ACPI Configuration...Configuration USB Configuration Options for CPU Select Screen Select Item Enter Go to malfunction. The default value is [200]. 38 Main BIOS SETUP UTILITY Advanced H/W Monitor Boot Security Exit Advanced Settings WARNING : Setting wrong values in this option to [Enabled], you...


