
RAID Installation Guide
Page 2
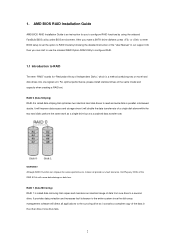
... two identical hard disk drives to configure RAID functions by following the detailed instruction of the data in our support CD, then you make a SATA driver diskette, press or to enter BIOS setup to set . It provides data protection and increases fault tolerance to the entire system since it contains a complete...
... two identical hard disk drives to configure RAID functions by following the detailed instruction of the data in our support CD, then you make a SATA driver diskette, press or to enter BIOS setup to set . It provides data protection and increases fault tolerance to the entire system since it contains a complete...
RAID Installation Guide
Page 8
During system boot, press or key to Tools Easy RAID Installer F. E. STEP 3.2: Download driver from ASRock's website and unzip the file into your USB flash drive. 8 B. Plug a USB drive into the DVD-ROM drive. During Windows installation ... 4: Windows installation A. Follow instructions to finish the configuration. Click to find the driver inside your USB flash disk. STEP 3.1: Copy RAID driver to a USB flash drive You can choose either STEP 3.1 or STEP 3.2 to finish the driver copy process. D. A. Insert the Support CD into one of the USB port....
During system boot, press or key to Tools Easy RAID Installer F. E. STEP 3.2: Download driver from ASRock's website and unzip the file into your USB flash drive. 8 B. Plug a USB drive into the DVD-ROM drive. During Windows installation ... 4: Windows installation A. Follow instructions to finish the configuration. Click to find the driver inside your USB flash disk. STEP 3.1: Copy RAID driver to a USB flash drive You can choose either STEP 3.1 or STEP 3.2 to finish the driver copy process. D. A. Insert the Support CD into one of the USB port....

RAID Installation Guide
Page 9
D. E. C. Click again to find the driver inside your USB flash drive. 9 Select "AMD-RAID Bottom Device" and then click . Click again to find the driver inside your Windows version (Windows 10). F. For 32bit OS, the driver is under /I386 directory. Please select the correct driver for your USB flash drive. Select "AMD-RAID Controller storport" and then click . G. For 64bit OS, the driver is under /AMD64 directly.
D. E. C. Click again to find the driver inside your USB flash drive. 9 Select "AMD-RAID Bottom Device" and then click . Click again to find the driver inside your Windows version (Windows 10). F. For 32bit OS, the driver is under /I386 directory. Please select the correct driver for your USB flash drive. Select "AMD-RAID Controller storport" and then click . G. For 64bit OS, the driver is under /AMD64 directly.

RAID Installation Guide
Page 10
H. J. I. After RAID driver is loaded, the RAID disk will show up. Select "AMD-RAID Config Device" and then click . Please follow Windows installation instruction to finish the process. 10
H. J. I. After RAID driver is loaded, the RAID disk will show up. Select "AMD-RAID Config Device" and then click . Please follow Windows installation instruction to finish the process. 10
RAID Installation Guide
Page 12
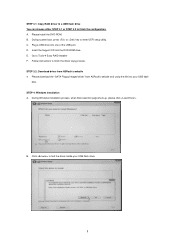
... You can choose either STEP2.1 or STEP2.2 to exit. During system boot, press or key to finish the driver copy process. Insert the Support CD into one of the USB port. STEP 2.2: Download driver from ASRock's website and unzip the file into your USB flash disk. 12 D. Please install the DVD-ROM. B. G. Plug... Physical DisksCheck AllApply ChangesCreate Array. *Be sure to Tools Easy RAID Installer F. Please download the "SATA Floppy Imaged driver" from ASRock's website A.
... You can choose either STEP2.1 or STEP2.2 to exit. During system boot, press or key to finish the driver copy process. Insert the Support CD into one of the USB port. STEP 2.2: Download driver from ASRock's website and unzip the file into your USB flash disk. 12 D. Please install the DVD-ROM. B. G. Plug... Physical DisksCheck AllApply ChangesCreate Array. *Be sure to Tools Easy RAID Installer F. Please download the "SATA Floppy Imaged driver" from ASRock's website A.

RAID Installation Guide
Page 13
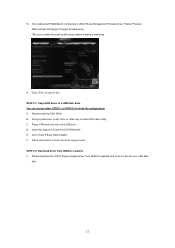
Please select the correct driver for your USB flash drive. During Windows installation process, when Disk selection page show up, please click . STEP 3: Windows installation A. For 32bit OS, the driver is under /I386 directory. C. Select "AMD-RAID Bottom Device" and then click . 13 B. For 64bit OS, the driver is under /AMD64 directly. Click to find the driver inside your Windows version (Windows 10). D.
Please select the correct driver for your USB flash drive. During Windows installation process, when Disk selection page show up, please click . STEP 3: Windows installation A. For 32bit OS, the driver is under /I386 directory. C. Select "AMD-RAID Bottom Device" and then click . 13 B. For 64bit OS, the driver is under /AMD64 directly. Click to find the driver inside your Windows version (Windows 10). D.

RAID Installation Guide
Page 14
Click again to find the driver inside your USB flash drive. Select "AMD-RAID Config Device" and then click . 14 G. F. H. E. Click again to find the driver inside your USB flash drive. Select "AMD-RAID Controller storport" and then click .
Click again to find the driver inside your USB flash drive. Select "AMD-RAID Config Device" and then click . 14 G. F. H. E. Click again to find the driver inside your USB flash drive. Select "AMD-RAID Controller storport" and then click .

RAID Installation Guide
Page 15
Please follow Windows installation instruction to finish the process. 15 J. After RAID driver is loaded, the RAID disk will show up. I.
Please follow Windows installation instruction to finish the process. 15 J. After RAID driver is loaded, the RAID disk will show up. I.

Quick Installation Guide
Page 8
** To configure 7.1 CH HD Audio, it is required to "7.1 Speaker"in 7.1-channel Configuration: Port Light Blue (Rear panel) Lime (Rear panel) Pink (Rear panel) Lime (Front panel) Function Rear Speaker Out Front Speaker Out Central /Subwoofer Speaker Out Side Speaker Out 6 English Function of the Audio Ports in the Realtek HD Audio Manager. Please set Speaker Configuration to use an HD front panel audio module and enable the multichannel audio feature through the audio driver.
** To configure 7.1 CH HD Audio, it is required to "7.1 Speaker"in 7.1-channel Configuration: Port Light Blue (Rear panel) Lime (Rear panel) Pink (Rear panel) Lime (Front panel) Function Rear Speaker Out Front Speaker Out Central /Subwoofer Speaker Out Side Speaker Out 6 English Function of the Audio Ports in the Realtek HD Audio Manager. Please set Speaker Configuration to use an HD front panel audio module and enable the multichannel audio feature through the audio driver.
Quick Installation Guide
Page 12
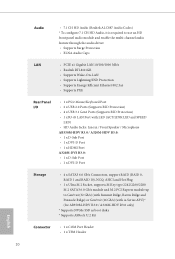
... configure 7.1 CH HD Audio, it is required to use an HD front panel audio module and enable the multi-channel audio feature through the audio driver. • Supports Surge Protection • ELNA Audio Caps LAN • PCIE x1 Gigabit LAN 10/100/1000 Mb/s • Realtek RTL8111GR • Supports... up to Gen3 x4 (32 Gb/s) (with Summit Ridge, Raven Ridge and Pinnacle Ridge) or Gen3 x2 (16 Gb/s) (with A-Series APU)* (for AB350M-HDV R3.0 / A320M-HDV R3.0 only) * Supports NVMe SSD as boot disks * Supports ASRock U.2 Kit Connector • 1 x COM Port Header • 1 x TPM Header English 10
... configure 7.1 CH HD Audio, it is required to use an HD front panel audio module and enable the multi-channel audio feature through the audio driver. • Supports Surge Protection • ELNA Audio Caps LAN • PCIE x1 Gigabit LAN 10/100/1000 Mb/s • Realtek RTL8111GR • Supports... up to Gen3 x4 (32 Gb/s) (with Summit Ridge, Raven Ridge and Pinnacle Ridge) or Gen3 x2 (16 Gb/s) (with A-Series APU)* (for AB350M-HDV R3.0 / A320M-HDV R3.0 only) * Supports NVMe SSD as boot disks * Supports ASRock U.2 Kit Connector • 1 x COM Port Header • 1 x TPM Header English 10
User Manual
Page 4
... 2.4 Expansion Slots (PCI Express Slots) 27 2.5 Jumpers Setup 28 2.6 Onboard Headers and Connectors 29 2.7 M.2_SSD (NGFF) Module Installation Guide (for AB350M-HDV R3.0 / A320M-HDV R3.0 only) 33 Chapter 3 Software and Utilities Operation 37 3.1 Installing Drivers 37 3.2 A-Tuning 38 3.2.1 Installing A-Tuning 38 3.2.2 Using A-Tuning 38 3.3 ASRock Live Update & APP Shop 41 3.3.1 UI Overview 41 3.3.2 Apps 42 3.3.3 BIOS...
... 2.4 Expansion Slots (PCI Express Slots) 27 2.5 Jumpers Setup 28 2.6 Onboard Headers and Connectors 29 2.7 M.2_SSD (NGFF) Module Installation Guide (for AB350M-HDV R3.0 / A320M-HDV R3.0 only) 33 Chapter 3 Software and Utilities Operation 37 3.1 Installing Drivers 37 3.2 A-Tuning 38 3.2.1 Installing A-Tuning 38 3.2.2 Using A-Tuning 38 3.3 ASRock Live Update & APP Shop 41 3.3.1 UI Overview 41 3.3.2 Apps 42 3.3.3 BIOS...

User Manual
Page 9
... • Supports D-Sub with max. resolution up to use an HD front panel audio module and enable the multi-channel audio feature through the audio driver. • Supports Surge Protection • ELNA Audio Caps LAN • PCIE x1 Gigabit LAN 10/100/1000 Mb/s • Realtek RTL8111GR • Supports Wake-On... (Supports ESD Protection) • 1 x RJ-45 LAN Port with LED (ACT/LINK LED and SPEED LED) • HD Audio Jacks: Line in / Front Speaker / Microphone AB350M-HDV R3.0 / A320M-HDV R3.0: • 1 x D-Sub Port • 1 x DVI-D Port • 1 x HDMI Port A320M-DVS...
... • Supports D-Sub with max. resolution up to use an HD front panel audio module and enable the multi-channel audio feature through the audio driver. • Supports Surge Protection • ELNA Audio Caps LAN • PCIE x1 Gigabit LAN 10/100/1000 Mb/s • Realtek RTL8111GR • Supports Wake-On... (Supports ESD Protection) • 1 x RJ-45 LAN Port with LED (ACT/LINK LED and SPEED LED) • HD Audio Jacks: Line in / Front Speaker / Microphone AB350M-HDV R3.0 / A320M-HDV R3.0: • 1 x D-Sub Port • 1 x DVI-D Port • 1 x HDMI Port A320M-DVS...

User Manual
Page 17
Please set Speaker Configuration to use an HD front panel audio module and enable the multichannel audio feature through the audio driver. Function of the Audio Ports in the Realtek HD Audio Manager. ** To configure 7.1 CH HD Audio, it is required to "7.1 Speaker"in 7.1-channel Configuration: Port Light Blue (Rear panel) Lime (Rear panel) Pink (Rear panel) Lime (Front panel) Function Rear Speaker Out Front Speaker Out Central /Subwoofer Speaker Out Side Speaker Out 12 English
Please set Speaker Configuration to use an HD front panel audio module and enable the multichannel audio feature through the audio driver. Function of the Audio Ports in the Realtek HD Audio Manager. ** To configure 7.1 CH HD Audio, it is required to "7.1 Speaker"in 7.1-channel Configuration: Port Light Blue (Rear panel) Lime (Rear panel) Pink (Rear panel) Lime (Front panel) Function Rear Speaker Out Front Speaker Out Central /Subwoofer Speaker Out Side Speaker Out 12 English
User Manual
Page 42
AB350M-HDV R3.0 / A320M-HDV R3.0 / A320M-DVS R3.0 Chapter 3 Software and Utilities Operation 3.1 Installing Drivers The Support CD that comes with the motherboard contains necessary drivers and useful utilities that the motherboard supports. Drivers Menu The drivers compatible to install those required drivers. Click on a specific item.... If the Main Menu does not appear automatically, locate and double click on the support CD driver page. Therefore, the drivers you install can work properly. Utilities Menu The Utilities Menu shows the application software that enhance the...
AB350M-HDV R3.0 / A320M-HDV R3.0 / A320M-DVS R3.0 Chapter 3 Software and Utilities Operation 3.1 Installing Drivers The Support CD that comes with the motherboard contains necessary drivers and useful utilities that the motherboard supports. Drivers Menu The drivers compatible to install those required drivers. Click on a specific item.... If the Main Menu does not appear automatically, locate and double click on the support CD driver page. Therefore, the drivers you install can work properly. Utilities Menu The Utilities Menu shows the application software that enhance the...
User Manual
Page 50
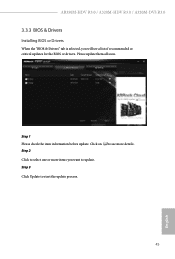
AB350M-HDV R3.0 / A320M-HDV R3.0 / A320M-DVS R3.0 3.3.3 BIOS & Drivers Installing BIOS or Drivers When the "BIOS & Drivers" tab is selected, you want to update. Click on Step 2 to see more items you will see a list of recommended or critical updates for the BIOS or drivers. Click to start the update process. 45 English Please update them all soon. Step 1 Please check the item information before update. Step 3 Click Update to select one or more details.
AB350M-HDV R3.0 / A320M-HDV R3.0 / A320M-DVS R3.0 3.3.3 BIOS & Drivers Installing BIOS or Drivers When the "BIOS & Drivers" tab is selected, you want to update. Click on Step 2 to see more items you will see a list of recommended or critical updates for the BIOS or drivers. Click to start the update process. 45 English Please update them all soon. Step 1 Please check the item information before update. Step 3 Click Update to select one or more details.
User Manual
Page 78
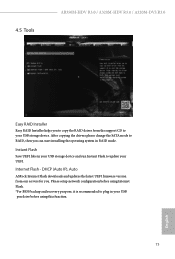
After copying the drivers please change the SATA mode to plug in your USB pen drive before using this function. 73 English Please setup network configuration before using Internet ... to your UEFI. DHCP (Auto IP), Auto ASRock Internet Flash downloads and updates the latest UEFI firmware version from the support CD to update your USB storage device. 4.5 Tools AB350M-HDV R3.0 / A320M-HDV R3.0 / A320M-DVS R3.0 Easy RAID Installer Easy RAID Installer helps you to copy the RAID driver from our servers for you. Internet Flash...
After copying the drivers please change the SATA mode to plug in your USB pen drive before using this function. 73 English Please setup network configuration before using Internet ... to your UEFI. DHCP (Auto IP), Auto ASRock Internet Flash downloads and updates the latest UEFI firmware version from the support CD to update your USB storage device. 4.5 Tools AB350M-HDV R3.0 / A320M-HDV R3.0 / A320M-DVS R3.0 Easy RAID Installer Easy RAID Installer helps you to copy the RAID driver from our servers for you. Internet Flash...


