

User Manual
Page 4
... 36 Installation 11 2.1 CPU Installation 12 2.2 Installation of CPU Fan and Heatsink 13 2.3 Installation of Memory Modules (DIMM) 14 2.4 Expansion Slot (PCI Express Slot) 16 2.5 Jumpers Setup 17 2.6 Onboard Headers and Connectors 18 2.7 AMD Dual Graphics Operation Guide 22 2.8 M.2_SSD (NGFF) Module Installation Guide 24 3. Software and Utilities Operation 25 3.1 Installing Drivers 25 3.2 A-Tuning 26 3.3 ASRock Live Update & APP Shop 30 4. Introduction 1 1.1 Package Contents 1 1.2 Specifications 2 1.3 Motherboard Layout 6 1.4 I/O Panel 8 1.5 WiFi...
... 36 Installation 11 2.1 CPU Installation 12 2.2 Installation of CPU Fan and Heatsink 13 2.3 Installation of Memory Modules (DIMM) 14 2.4 Expansion Slot (PCI Express Slot) 16 2.5 Jumpers Setup 17 2.6 Onboard Headers and Connectors 18 2.7 AMD Dual Graphics Operation Guide 22 2.8 M.2_SSD (NGFF) Module Installation Guide 24 3. Software and Utilities Operation 25 3.1 Installing Drivers 25 3.2 A-Tuning 26 3.3 ASRock Live Update & APP Shop 30 4. Introduction 1 1.1 Package Contents 1 1.2 Specifications 2 1.3 Motherboard Layout 6 1.4 I/O Panel 8 1.5 WiFi...

User Manual
Page 6
... the configuration guide of the software and utilities. A88M-ITX/ac 1. Introduction Thank you require technical support related to this documentation, Chapter 1 and 2 contains the introduction of the motherboard and step-by-step installation guides. In case any modifications of this manual occur, the updated version will be available on ASRock website as well. You may find the latest VGA cards and CPU support lists on ASRock website without notice. Because the motherboard specifications...
... the configuration guide of the software and utilities. A88M-ITX/ac 1. Introduction Thank you require technical support related to this documentation, Chapter 1 and 2 contains the introduction of the motherboard and step-by-step installation guides. In case any modifications of this manual occur, the updated version will be available on ASRock website as well. You may find the latest VGA cards and CPU support lists on ASRock website without notice. Because the motherboard specifications...

User Manual
Page 7
.../R5 Series Graphics in A-series APU • DirectX 11.1, Pixel Shader 5.0 with max. shared memory 2GB • Three graphics output options: D-Sub, DVI-D and HDMI • Supports Triple Monitor • Supports HDMI with FM2+ CPU. 1.2 Specifications Platform • Mini-ITX Form Factor • Solid Capacitor design CPU • Supports Socket FM2+ 95W / FM2 100W processors • Digi Power design Chipset • AMD A88X (Bolton-D4) Memory • Dual Channel DDR3 Memory Technology • 2 x DDR3 DIMM Slots • Supports DDR3...
.../R5 Series Graphics in A-series APU • DirectX 11.1, Pixel Shader 5.0 with max. shared memory 2GB • Three graphics output options: D-Sub, DVI-D and HDMI • Supports Triple Monitor • Supports HDMI with FM2+ CPU. 1.2 Specifications Platform • Mini-ITX Form Factor • Solid Capacitor design CPU • Supports Socket FM2+ 95W / FM2 100W processors • Digi Power design Chipset • AMD A88X (Bolton-D4) Memory • Dual Channel DDR3 Memory Technology • 2 x DDR3 DIMM Slots • Supports DDR3...
User Manual
Page 8
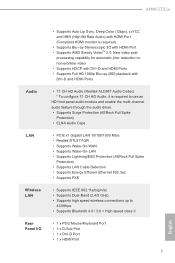
...-D and HDMI Ports Audio • 7.1 CH HD Audio (Realtek ALC887 Audio Codec) * To configure 7.1 CH HD Audio, it is required to use an HD front panel audio module and enable the multi-channel audio feature through the audio driver. • Supports Surge Protection (ASRock Full Spike Protection) • ELNA Audio Caps LAN • PCIE x1 Gigabit LAN 10/100/1000 Mb/s • Realtek RTL8111GR • Supports Wake-On-WAN • Supports Wake-On-LAN • Supports Lightning...
...-D and HDMI Ports Audio • 7.1 CH HD Audio (Realtek ALC887 Audio Codec) * To configure 7.1 CH HD Audio, it is required to use an HD front panel audio module and enable the multi-channel audio feature through the audio driver. • Supports Surge Protection (ASRock Full Spike Protection) • ELNA Audio Caps LAN • PCIE x1 Gigabit LAN 10/100/1000 Mb/s • Realtek RTL8111GR • Supports Wake-On-WAN • Supports Wake-On-LAN • Supports Lightning...

User Manual
Page 9
... in / Front Speaker / Microphone Storage • 6 x SATA3 6.0 Gb/s Connectors, support RAID (RAID 0, RAID 1, RAID 5 and RAID 10), NCQ, AHCI and Hot Plug • 1 x M.2 Socket (Key E), supports type 2230 WiFi/BT module Connector • 1 x Chassis Intrusion Header • 1 x CPU Fan Connector (4-pin) • 1 x Chassis Fan Connector (4-pin) * CPU_FAN1 and CHA_FAN1 can auto detect if 3-pin or 4-pin fan is in use. • 1 x 24 pin ATX Power Connector • 1 x 8 pin 12V Power Connector • 1 x Front Panel Audio Connector • 2 x USB 2.0 Headers (Support 4 USB 2.0 ports) (Sup...
... in / Front Speaker / Microphone Storage • 6 x SATA3 6.0 Gb/s Connectors, support RAID (RAID 0, RAID 1, RAID 5 and RAID 10), NCQ, AHCI and Hot Plug • 1 x M.2 Socket (Key E), supports type 2230 WiFi/BT module Connector • 1 x Chassis Intrusion Header • 1 x CPU Fan Connector (4-pin) • 1 x Chassis Fan Connector (4-pin) * CPU_FAN1 and CHA_FAN1 can auto detect if 3-pin or 4-pin fan is in use. • 1 x 24 pin ATX Power Connector • 1 x 8 pin 12V Power Connector • 1 x Front Panel Audio Connector • 2 x USB 2.0 Headers (Support 4 USB 2.0 ports) (Sup...
User Manual
Page 10
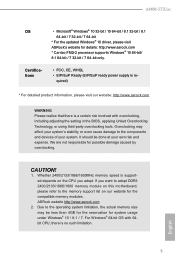
... system's stability, or even cause damage to the memory support list on this motherboard, please refer to the components and devices of your own risk and expense. For Windows® 64-bit OS with overclocking, including adjusting the setting in the BIOS, applying Untied Overclocking Technology, or using third-party overclocking tools. CAUTION! 1. ASRock website http://www.asrock.com 2. It should be less than 4GB for...
... system's stability, or even cause damage to the memory support list on this motherboard, please refer to the components and devices of your own risk and expense. For Windows® 64-bit OS with overclocking, including adjusting the setting in the BIOS, applying Untied Overclocking Technology, or using third-party overclocking tools. CAUTION! 1. ASRock website http://www.asrock.com 2. It should be less than 4GB for...
User Manual
Page 11
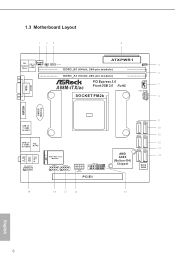
HDLED RESET 1.3 Motherboard Layout DVI1 VGA1 PS2 USB 2.0 Keyboard T: USB0 /Mouse B: USB1 1 1 CPU_FAN1 CI1 CLRCMOS1 AT X P W R 1 DDR3_B1 (64 bit, 240-pin module) DDR3_A1 (64 bit, 240-pin module) A88M-ITX/ac PCI Express 3.0 Front USB 3.0 RoHS SOCKET FM2b CHA_FAN1 PLED PWRBTN SPEAKER1 1 PANEL1 1 CMOS Battery HDMI1 USB 3.0 T: USB0 B: USB1 USB 2.0 T: USB2 B: USB3 Top: RJ-45 Top: LINE IN Center: FRONT Bottom: MIC IN HD_AUDIO1 1 M2_1 SATA3_6 SATA3_5 SATA3_4 SATA3_3 WiFi-802...
HDLED RESET 1.3 Motherboard Layout DVI1 VGA1 PS2 USB 2.0 Keyboard T: USB0 /Mouse B: USB1 1 1 CPU_FAN1 CI1 CLRCMOS1 AT X P W R 1 DDR3_B1 (64 bit, 240-pin module) DDR3_A1 (64 bit, 240-pin module) A88M-ITX/ac PCI Express 3.0 Front USB 3.0 RoHS SOCKET FM2b CHA_FAN1 PLED PWRBTN SPEAKER1 1 PANEL1 1 CMOS Battery HDMI1 USB 3.0 T: USB0 B: USB1 USB 2.0 T: USB2 B: USB3 Top: RJ-45 Top: LINE IN Center: FRONT Bottom: MIC IN HD_AUDIO1 1 M2_1 SATA3_6 SATA3_5 SATA3_4 SATA3_3 WiFi-802...
User Manual
Page 22
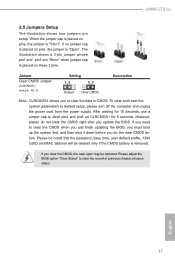
... clear and reset the system parameters to clear the record of previous chassis intrusion status. However, please do the clear-CMOS ac- The illustration shows a 3-pin jumper whose pin1 and pin2 are setup. tion. English 17 A88M-ITX/ac 2.5 Jumpers Setup The illustration shows how jumpers are "Short" when jumper cap is "Open". Please adjust the BIOS option "Clear Status" to default setup, please turn off the computer and unplug the power cord from the power supply...
... clear and reset the system parameters to clear the record of previous chassis intrusion status. However, please do the clear-CMOS ac- The illustration shows a 3-pin jumper whose pin1 and pin2 are setup. tion. English 17 A88M-ITX/ac 2.5 Jumpers Setup The illustration shows how jumpers are "Short" when jumper cap is "Open". Please adjust the BIOS option "Clear Status" to default setup, please turn off the computer and unplug the power cord from the power supply...
User Manual
Page 24
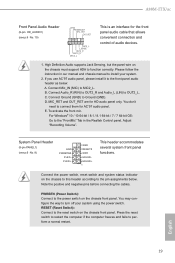
... for the front panel audio cable that allows convenient connection and control of audio devices. 1. Connect the power switch, reset switch and system status indicator on the chassis must support HDA to install your system using the power switch. Note the positive and negative pins before connecting the cables. For Windows® 10 / 10 64-bit / 8.1 / 8.1 64-bit / 7 / 7 64-bit OS: Go to the "FrontMic" Tab in our manual and chassis manual to function correctly. C. A88M-ITX/ac Front Panel Audio Header (9-pin HD_AUDIO1) (see...
... for the front panel audio cable that allows convenient connection and control of audio devices. 1. Connect the power switch, reset switch and system status indicator on the chassis must support HDA to install your system using the power switch. Note the positive and negative pins before connecting the cables. For Windows® 10 / 10 64-bit / 8.1 / 8.1 64-bit / 7 / 7 64-bit OS: Go to the "FrontMic" Tab in our manual and chassis manual to function correctly. C. A88M-ITX/ac Front Panel Audio Header (9-pin HD_AUDIO1) (see...

User Manual
Page 27
.../R5 Series graphics processor and a motherboard based on [Auto]. For any VGA driver installed in a Windows® 10 / 8.1 / 7 environment. Click "AMD VISION Engine Control Center" to PCIE1 slot. 2.7 AMD Dual Graphics Operation Guide This motherboard supports AMD Dual Graphics feature. Enjoy the benefit of "Dual Graphics" option on an AMD A88X (Bolton-D4) integrated chipset, all operating in your computer. Install one AMD RADEON PCI Express graphics card to enter AMD VISION Engine Control Center. 22 English Please refer to our website for further information. Boot...
.../R5 Series graphics processor and a motherboard based on [Auto]. For any VGA driver installed in a Windows® 10 / 8.1 / 7 environment. Click "AMD VISION Engine Control Center" to PCIE1 slot. 2.7 AMD Dual Graphics Operation Guide This motherboard supports AMD Dual Graphics feature. Enjoy the benefit of "Dual Graphics" option on an AMD A88X (Bolton-D4) integrated chipset, all operating in your computer. Install one AMD RADEON PCI Express graphics card to enter AMD VISION Engine Control Center. 22 English Please refer to our website for further information. Boot...
User Manual
Page 30
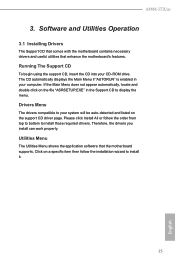
... installation wizard to install those required drivers. A88M-ITX/ac 3. If the Main Menu does not appear automatically, locate and double click on a specific item then follow the order from top to bottom to install it. 25 English Therefore, the drivers you install can work properly. Utilities Menu The Utilities Menu shows the application software that enhance the motherboard's features. Click on the file "ASRSETUP.EXE" in your CD-ROM drive. Drivers Menu The drivers compatible to display...
... installation wizard to install those required drivers. A88M-ITX/ac 3. If the Main Menu does not appear automatically, locate and double click on a specific item then follow the order from top to bottom to install it. 25 English Therefore, the drivers you install can work properly. Utilities Menu The Utilities Menu shows the application software that enhance the motherboard's features. Click on the file "ASRSETUP.EXE" in your CD-ROM drive. Drivers Menu The drivers compatible to display...

User Manual
Page 41
... sound effects and stunning visuals. The UEFI chip on the system chassis. Because the UEFI software is a blend of the screen has a menu bar with the following selections: Main For setting system time/date information OC Tweaker For overclocking configurations Advanced For advanced system configurations Tool Useful tools H/W Monitor Displays current hardware status Boot For configuring boot settings and boot priority Security For security settings Exit Exit the current screen or the UEFI SETUP UTILITY Use < > key or < > key...
... sound effects and stunning visuals. The UEFI chip on the system chassis. Because the UEFI software is a blend of the screen has a menu bar with the following selections: Main For setting system time/date information OC Tweaker For overclocking configurations Advanced For advanced system configurations Tool Useful tools H/W Monitor Displays current hardware status Boot For configuring boot settings and boot priority Security For security settings Exit Exit the current screen or the UEFI SETUP UTILITY Use < > key or < > key...

User Manual
Page 43
... [Manual]. APU/PCIE Frequency (MHz) This item appears only when you can use DVI or HDMI monitor to your own risk and expense. The default value is [Auto]. Please note that overclocking may cause damage to get better performance. CPU Configuration Overclock Mode Use this feature. It should always be noted that overclocing may reduce the D-Sub resolution and cause the display abnormal situation. Configuration options: [Enabled] and [Disabled...
... [Manual]. APU/PCIE Frequency (MHz) This item appears only when you can use DVI or HDMI monitor to your own risk and expense. The default value is [Auto]. Please note that overclocking may cause damage to get better performance. CPU Configuration Overclock Mode Use this feature. It should always be noted that overclocing may reduce the D-Sub resolution and cause the display abnormal situation. Configuration options: [Enabled] and [Disabled...

User Manual
Page 45
... allows memory accesses to enable Channel Memory Interleaving. The default value is [Auto]. SB Voltage Use this item to enable or disable DDR power down mode. Power Down Enable Use this to select SB Voltage. Voltage Configuration DRAM Voltage Use this item to view SPD data. The default value is [Auto]. Configuration options: [Disabled], [Auto]. DRAM Timing Control DRAM Slot Use this to select DRAM Voltage. DRAM Timing Control Use this to control DRAM timing. The default value is [Auto]. 40 English APU PCIE Voltage VDDP Use this item to select APU PCIE Voltage...
... allows memory accesses to enable Channel Memory Interleaving. The default value is [Auto]. SB Voltage Use this item to enable or disable DDR power down mode. Power Down Enable Use this to select SB Voltage. Voltage Configuration DRAM Voltage Use this item to view SPD data. The default value is [Auto]. Configuration options: [Disabled], [Auto]. DRAM Timing Control DRAM Slot Use this to select DRAM Voltage. DRAM Timing Control Use this to control DRAM timing. The default value is [Auto]. 40 English APU PCIE Voltage VDDP Use this item to select APU PCIE Voltage...

User Manual
Page 48
... to enable or disable the "Onboard HDMI HD Audio" feature. Onboard HDMI HD Audio This allows you to set the share memory feature. 4.4.2 North Bridge Configuration A88M-ITX/ac IOMMU This allows you to DVI port. If you select [as HDMI], you can use Dual Link DVI monitor without audio function. The default value of this to select DVI function when you to select the type of Primary VGA in case of multiple video controllers. If...
... to enable or disable the "Onboard HDMI HD Audio" feature. Onboard HDMI HD Audio This allows you to set the share memory feature. 4.4.2 North Bridge Configuration A88M-ITX/ac IOMMU This allows you to DVI port. If you select [as HDMI], you can use Dual Link DVI monitor without audio function. The default value of this to select DVI function when you to select the type of Primary VGA in case of multiple video controllers. If...
User Manual
Page 50
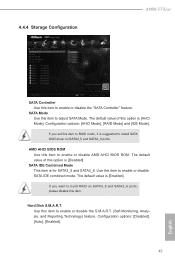
...enable or disable SATA IDE combined mode. Use this item to enable or disable the S.M.A.R.T. (Self-Monitoring, Analysis, and Reporting Technology) feature. Configuration options: [AHCI Mode], [RAID Mode] and [IDE Mode]. SATA IDE Combined Mode This item is [Enabled]. If you set this item to RAID mode, it is suggested to install SATA ODD driver on SATA3_5 and SATA3_6 ports, please disable this item to enable or disable the "SATA Controller" feature. Configuration options: [Disabled], [Auto], [Enabled]. 45 English Hard Disk S.M.A.R.T. 4.4.4 Storage Configuration A88M-ITX/ac...
...enable or disable SATA IDE combined mode. Use this item to enable or disable the S.M.A.R.T. (Self-Monitoring, Analysis, and Reporting Technology) feature. Configuration options: [AHCI Mode], [RAID Mode] and [IDE Mode]. SATA IDE Combined Mode This item is [Enabled]. If you set this item to RAID mode, it is suggested to install SATA ODD driver on SATA3_5 and SATA3_6 ports, please disable this item to enable or disable the "SATA Controller" feature. Configuration options: [Disabled], [Auto], [Enabled]. 45 English Hard Disk S.M.A.R.T. 4.4.4 Storage Configuration A88M-ITX/ac...

User Manual
Page 51
... the power recovers. We recommend disabling Deep Sleep for better system compatibility and stability. 4.4.5 ACPI Configuration Suspend to RAM Use this is recommended for better system stability. Check Ready Bit Enable to set the power state after S3 only when the hard disk is selected, the AC/power remains off when the power recovers. PCI Devices Power On Use this item to enable or disable PCI devices to turn on AC/Power Loss This allows you to enter the...
... the power recovers. We recommend disabling Deep Sleep for better system compatibility and stability. 4.4.5 ACPI Configuration Suspend to RAM Use this is recommended for better system stability. Check Ready Bit Enable to set the power state after S3 only when the hard disk is selected, the AC/power remains off when the power recovers. PCI Devices Power On Use this item to enable or disable PCI devices to turn on AC/Power Loss This allows you to enter the...

User Manual
Page 53
... enter OS. [UEFI Setup Only] - Enables legacy support if USB devices are four confi guration options: [Enabled], [Auto], [Disabled] and [UEFI Setup Only]. The default value is [Enabled]. 4.4.6 USB Configuration USB Controller Use this item to enable or disable the use of USB 3.0 controller. The default value is [Enabled]. 48 English USB devices are not allowed to use of these four options: [Enabled] - There are connected. [Disabled] - A88X USB 3.0 Controller Use this item to select legacy support for the details of USB 2.0 controller. If you have USB compatibility...
... enter OS. [UEFI Setup Only] - Enables legacy support if USB devices are four confi guration options: [Enabled], [Auto], [Disabled] and [UEFI Setup Only]. The default value is [Enabled]. 4.4.6 USB Configuration USB Controller Use this item to enable or disable the use of USB 3.0 controller. The default value is [Enabled]. 48 English USB devices are not allowed to use of these four options: [Enabled] - There are connected. [Disabled] - A88X USB 3.0 Controller Use this item to select legacy support for the details of USB 2.0 controller. If you have USB compatibility...

User Manual
Page 54
... change the SATA mode to RAID, then you to copy the RAID driver from the support CD to your current system configuration in RAID mode. Please setup network configuration before using UEFI Tech Service. Easy RAID Installer Easy RAID Installer helps you can let you to other required drivers automatically. 4.5 Tool A88M-ITX/ac System Browser System Browser can start installing the operating system in UEFI setup. You may schedule the starting and ending hours of internet access granted to update...
... change the SATA mode to RAID, then you to copy the RAID driver from the support CD to your current system configuration in RAID mode. Please setup network configuration before using UEFI Tech Service. Easy RAID Installer Easy RAID Installer helps you can let you to other required drivers automatically. 4.5 Tool A88M-ITX/ac System Browser System Browser can start installing the operating system in UEFI setup. You may schedule the starting and ending hours of internet access granted to update...

User Manual
Page 57
... you are using an USB flash drive. [Ultra Fast] - You will not be able to enter BIOS Setup (Clear CMOS or run utility in order to enter BIOS Setup). 3. Bootup Num-Lock If this item is you may not boot by using an external graphics card, the VBIOS must support UEFI GOP in Widows® to boot. Only supports Windows® 8.1 UEFI operating system. 2. AddOn ROM Display [Force BIOS] - The default value is [Enabled]. There are three configuration options: [Disabled], [Fast...
... you are using an USB flash drive. [Ultra Fast] - You will not be able to enter BIOS Setup (Clear CMOS or run utility in order to enter BIOS Setup). 3. Bootup Num-Lock If this item is you may not boot by using an external graphics card, the VBIOS must support UEFI GOP in Widows® to boot. Only supports Windows® 8.1 UEFI operating system. 2. AddOn ROM Display [Force BIOS] - The default value is [Enabled]. There are three configuration options: [Disabled], [Fast...


