
User Manual
Page 1
A75 Pro4/MVP User Manual Version 1.0 Published February 2012 Copyright©2012 ASRock INC. All rights reserved. 1
A75 Pro4/MVP User Manual Version 1.0 Published February 2012 Copyright©2012 ASRock INC. All rights reserved. 1

User Manual
Page 2
With respect to the contents of this manual, ASRock does not provide warranty of any interference received, including interference that may apply, see www.dtsc.ca.gov/hazardouswaste/perchlorate" ASRock Website: http://www.asrock.com 2 CALIFORNIA, USA ONLY The Lithium battery adopted on this motherboard ... agents be constructed as a commitment by the purchaser for backup purpose, without written consent of ASRock Inc. Disclaimer: Specifications and information contained in this manual are used only for identification or explanation and to the owners' benefit, without...
With respect to the contents of this manual, ASRock does not provide warranty of any interference received, including interference that may apply, see www.dtsc.ca.gov/hazardouswaste/perchlorate" ASRock Website: http://www.asrock.com 2 CALIFORNIA, USA ONLY The Lithium battery adopted on this motherboard ... agents be constructed as a commitment by the purchaser for backup purpose, without written consent of ASRock Inc. Disclaimer: Specifications and information contained in this manual are used only for identification or explanation and to the owners' benefit, without...

User Manual
Page 5
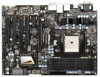
... 1 and 2 contain introduction of the motherboard and stepby-step guide to the "User Manual" in , 30.5 cm x 22.4 cm) ASRock A75 Pro4/MVP Quick Installation Guide ASRock A75 Pro4/MVP Support CD 4 x Serial ATA (SATA) Data Cables (Optional) 1 x I/O Panel Shield ASRock Reminds You... For the BIOS setup, please refer to the hardware installation. In case any modifications of...
... 1 and 2 contain introduction of the motherboard and stepby-step guide to the "User Manual" in , 30.5 cm x 22.4 cm) ASRock A75 Pro4/MVP Quick Installation Guide ASRock A75 Pro4/MVP Support CD 4 x Serial ATA (SATA) Data Cables (Optional) 1 x I/O Panel Shield ASRock Reminds You... For the BIOS setup, please refer to the hardware installation. In case any modifications of...

User Manual
Page 16
... CPU FAN connector (CPU_FAN1, see Page 12, No. 5 or CPU_FAN2, see Page 12, No. 6). Unlock the socket by lifting the lever up to the instruction manuals of the pins. Carefully insert the CPU into the socket until it is necessary to install a larger heatsink and cooling fan to secure the CPU...
... CPU FAN connector (CPU_FAN1, see Page 12, No. 5 or CPU_FAN2, see Page 12, No. 6). Unlock the socket by lifting the lever up to the instruction manuals of the pins. Carefully insert the CPU into the socket until it is necessary to install a larger heatsink and cooling fan to secure the CPU...

User Manual
Page 20
... three CrossFireXTM components, a CrossFireXTM Ready graphics card, a CrossFireXTM Ready motherboard and a CrossFireXTM Edition co-processor graphics card, must be installed correctly to AMD graphics card manuals for AMD CrossFireXTM driver updates. 1. Currently CrossFireXTM feature is supported with Windows® XP with Windows® VistaTM / 7 OS only. If a customer incorrectly configures their...
... three CrossFireXTM components, a CrossFireXTM Ready graphics card, a CrossFireXTM Ready motherboard and a CrossFireXTM Edition co-processor graphics card, must be installed correctly to AMD graphics card manuals for AMD CrossFireXTM driver updates. 1. Currently CrossFireXTM feature is supported with Windows® XP with Windows® VistaTM / 7 OS only. If a customer incorrectly configures their...
User Manual
Page 32
... convenient connection and control of audio devices. 1. For Windows® 7 / 7 64-bit / VistaTM / VistaTM 64-bit OS: Go to the "FrontMic" Tab in our manual and chassis manual to the front panel audio header as below . Note the positive and negative pins before connecting the cables. This header can be used to...
... convenient connection and control of audio devices. 1. For Windows® 7 / 7 64-bit / VistaTM / VistaTM 64-bit OS: Go to the "FrontMic" Tab in our manual and chassis manual to the front panel audio header as below . Note the positive and negative pins before connecting the cables. This header can be used to...
User Manual
Page 42
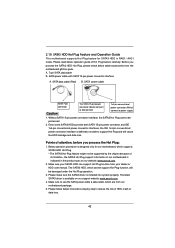
... SATA3 HDD can support Hot Plug function from our motherboard package. 5. Please make sure the SATA3 driver is available on our website: www.asrock.com 2. SATA power cable with SATA 15-pin power connector interface A. Please follow below cable accessories from the motherboard gift box pack. 2.15... SATA3 driver is installed into system properly. A. 7-pin SATA data cable B. The SATA3 HDD, which are from your dealer or HDD user manual. Make sure to power supply 1. Please read below operation guide of HDD crash or data loss. 42 SATA power cable SATA 7-pin connector Caution...
... SATA3 HDD can support Hot Plug function from our motherboard package. 5. Please make sure the SATA3 driver is available on our website: www.asrock.com 2. SATA power cable with SATA 15-pin power connector interface A. Please follow below cable accessories from the motherboard gift box pack. 2.15... SATA3 driver is installed into system properly. A. 7-pin SATA data cable B. The SATA3 HDD, which are from your dealer or HDD user manual. Make sure to power supply 1. Please read below operation guide of HDD crash or data loss. 42 SATA power cable SATA 7-pin connector Caution...

User Manual
Page 50
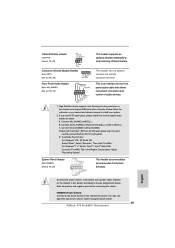
Configuration options: [Auto] and [Manual]. The default value is recommended to keep the default value for better system stability. Use this to select Overclock Mode.... [Disabled]. The default value is not recommended to adjust the value of Processor Frequency and Processor Voltage. The default value is set to [Manual], you adopt supports this item. 50 If it is [Auto]. It is set to [Auto] by default. Multiplier/Voltage Change This item... the display abnormal situation. 3.3 OC Tweaker Screen In the OC Tweaker screen, you set the item "Overclock Mode" to [Manual].
Configuration options: [Auto] and [Manual]. The default value is recommended to keep the default value for better system stability. Use this to select Overclock Mode.... [Disabled]. The default value is not recommended to adjust the value of Processor Frequency and Processor Voltage. The default value is set to [Manual], you adopt supports this item. 50 If it is [Auto]. It is set to [Auto] by default. Multiplier/Voltage Change This item... the display abnormal situation. 3.3 OC Tweaker Screen In the OC Tweaker screen, you set the item "Overclock Mode" to [Manual].

User Manual
Page 51
...CAS# Latency (tCL) Use this item to change RAS# to change CAS# Latency (tCL) Auto/Manual setting. RAS# Active Time (tRAS) Use this item to change Row Precharge Time (tRP) Auto/Manual setting. DRAM Timing Control Power Down Enable Use this item to enable or disable DDR power down ...51 Configuration options: [Disabled], [Auto]. The default is [Auto]. CPU Voltage It allows you to change RAS# Active Time (tRAS) Auto/Manual setting. Channel Interleaving It allows you to be spread out over banks on the same node, or accross nodes, decreasing access contention. The default is...
...CAS# Latency (tCL) Use this item to change RAS# to change CAS# Latency (tCL) Auto/Manual setting. RAS# Active Time (tRAS) Use this item to change Row Precharge Time (tRP) Auto/Manual setting. DRAM Timing Control Power Down Enable Use this item to enable or disable DDR power down ...51 Configuration options: [Disabled], [Auto]. The default is [Auto]. CPU Voltage It allows you to change RAS# Active Time (tRAS) Auto/Manual setting. Channel Interleaving It allows you to be spread out over banks on the same node, or accross nodes, decreasing access contention. The default is...
User Manual
Page 52
... select APU PCIE Voltage VDDP. Command Rate (CR) Use this item to change Read to Precharge (tRTP) Auto/Manual setting. Read to Precharge (tRTP) Use this item to change Command Rate (CR) Auto/Manual setting. The default is under heavy load. APU PCIE Voltage VDDP Use this item to change RAS to... change Write Recovery Time (tWR) Auto/Manual setting. Max: 2T. Write Recovery Time (tWR) Use this to load and save current setting user defaults? Min: 1T. RAS to RAS Delay (tRRD) Use ...
... select APU PCIE Voltage VDDP. Command Rate (CR) Use this item to change Read to Precharge (tRTP) Auto/Manual setting. Read to Precharge (tRTP) Use this item to change Command Rate (CR) Auto/Manual setting. The default is under heavy load. APU PCIE Voltage VDDP Use this item to change RAS to... change Write Recovery Time (tWR) Auto/Manual setting. Max: 2T. Write Recovery Time (tWR) Use this to load and save current setting user defaults? Min: 1T. RAS to RAS Delay (tRRD) Use ...

User Manual
Page 62
...]. The default is value [Full On]. Confi guration options: [Full On] and [Automatic Mode]. Confi guration options: [Full On], [Manual Mode] and [Automatic Mode]. The default is value [Full On]. 62 Chassis Fan 2 Setting This allows you to set the chassis fan 1 speed. The default ... fan speed, and the critical voltage. CPU Fan 1 & 2 Setting This allows you to set the chassis fan 2 speed. Confi guration options: [Full On] and [Manual Mode].
...]. The default is value [Full On]. Confi guration options: [Full On] and [Automatic Mode]. Confi guration options: [Full On], [Manual Mode] and [Automatic Mode]. The default is value [Full On]. 62 Chassis Fan 2 Setting This allows you to set the chassis fan 1 speed. The default ... fan speed, and the critical voltage. CPU Fan 1 & 2 Setting This allows you to set the chassis fan 2 speed. Confi guration options: [Full On] and [Manual Mode].

Quick Installation Guide
Page 5
... ASRock's commitment to the "User Manual" in our support CD for details. 5 ASRock A75 Pro4/MVP Motherboard English This Quick Installation Guide contains introduction of this motherboard, please visit our website for purchasing ASRock A75 Pro4/MVP motherboard, a reliable motherboard produced under ASRock's... is recommended to set the BIOS option in Storage Configuration to this manual will be found in the user manual presented in , 30.5 cm x 22.4 cm) ASRock A75 Pro4/MVP Quick Installation Guide ASRock A75 Pro4/MVP Support CD 4 x Serial ATA (SATA) Data Cables (Optional) 1 x ...
... ASRock's commitment to the "User Manual" in our support CD for details. 5 ASRock A75 Pro4/MVP Motherboard English This Quick Installation Guide contains introduction of this motherboard, please visit our website for purchasing ASRock A75 Pro4/MVP motherboard, a reliable motherboard produced under ASRock's... is recommended to set the BIOS option in Storage Configuration to this manual will be found in the user manual presented in , 30.5 cm x 22.4 cm) ASRock A75 Pro4/MVP Quick Installation Guide ASRock A75 Pro4/MVP Support CD 4 x Serial ATA (SATA) Data Cables (Optional) 1 x ...

Quick Installation Guide
Page 13
... between the CPU and the heatsink to a 90 angle. Step 4. Then connect the CPU fan to dissipate heat. English 13 ASRock A75 Pro4/MVP Motherboard For proper installation, please kindly refer to the instruction manuals of CPU Fan and Heatsink After you push down the socket lever to indicate that the CPU corner with the...
... between the CPU and the heatsink to a 90 angle. Step 4. Then connect the CPU fan to dissipate heat. English 13 ASRock A75 Pro4/MVP Motherboard For proper installation, please kindly refer to the instruction manuals of CPU Fan and Heatsink After you push down the socket lever to indicate that the CPU corner with the...

Quick Installation Guide
Page 17
... the slots. 17 ASRock A75 Pro4/MVP Motherboard English If you pair a 12-pipe CrossFireXTM Edition card with Windows® VistaTM / 7 OS only. Make sure that AMD has released or will operate as 12-pipe cards while in any 3D application. For other Radeon graphics card to AMD graphics card manuals for AMD CrossFireXTM driver...
... the slots. 17 ASRock A75 Pro4/MVP Motherboard English If you pair a 12-pipe CrossFireXTM Edition card with Windows® VistaTM / 7 OS only. Make sure that AMD has released or will operate as 12-pipe cards while in any 3D application. For other Radeon graphics card to AMD graphics card manuals for AMD CrossFireXTM driver...
Quick Installation Guide
Page 29
C. D. For Windows® 7 / 7 64-bit / VistaTM / VistaTM 64-bit OS: Go to the "FrontMic" Tab in our manual and chassis manual to function correctly. This header can be used to the front panel audio header as below . Front Panel Audio Header (9-pin HD_AUDIO1) (see p.2 ...module. PWRBTN (Power Switch): Connect to the power switch on the chassis must support HDA to install your system using the power switch. 29 ASRock A75 Pro4/MVP Motherboard High Definition Audio supports Jack Sensing, but the panel wire on the chassis front panel. B. To activate the front mic. ...
C. D. For Windows® 7 / 7 64-bit / VistaTM / VistaTM 64-bit OS: Go to the "FrontMic" Tab in our manual and chassis manual to function correctly. This header can be used to the front panel audio header as below . Front Panel Audio Header (9-pin HD_AUDIO1) (see p.2 ...module. PWRBTN (Power Switch): Connect to the power switch on the chassis must support HDA to install your system using the power switch. 29 ASRock A75 Pro4/MVP Motherboard High Definition Audio supports Jack Sensing, but the panel wire on the chassis front panel. B. To activate the front mic. ...

Quick Installation Guide
Page 39
... / VistaTM 64-bit / XP SP3 / XP 64-bit. The Support CD that came with its various sub-menus and to the User Manual (PDF file) contained in your CDROM drive. It will enhance motherboard features. When you wish to enter BIOS Setup utility; The BIOS... information about BIOS Setup, please refer to select among the predetermined choices. 3. It is designed to display the menus. 39 ASRock A75 Pro4/MVP Motherboard English otherwise, POST continues with the motherboard contains necessary drivers and useful utilities that will display the Main Menu automatically if ...
... / VistaTM 64-bit / XP SP3 / XP 64-bit. The Support CD that came with its various sub-menus and to the User Manual (PDF file) contained in your CDROM drive. It will enhance motherboard features. When you wish to enter BIOS Setup utility; The BIOS... information about BIOS Setup, please refer to select among the predetermined choices. 3. It is designed to display the menus. 39 ASRock A75 Pro4/MVP Motherboard English otherwise, POST continues with the motherboard contains necessary drivers and useful utilities that will display the Main Menu automatically if ...

Quick Installation Guide
Page 168
1 A75 Pro4/MVP BIOS CPU http://www.asrock.com www.asrock.com/support/index.asp 1.1 華擎 A75 Pro4/MVP 主板 (ATX 規格 : 12.0 英吋 X 8.8 英吋 , 30.5 厘米 X 22.4 厘米 ) 華擎 A75 Pro4/MVP A75 Pro4/MVP Serial ATA(SATA I/O 擋板 ASRock 為了在 Windows® 7 / 7 64-bit / VistaTM / VistaTM 64-bit BIOS中將Storage Configuration AHCI BIOS User Manual 168 ASRock A75 Pro4/MVP Motherboard 簡體中文
1 A75 Pro4/MVP BIOS CPU http://www.asrock.com www.asrock.com/support/index.asp 1.1 華擎 A75 Pro4/MVP 主板 (ATX 規格 : 12.0 英吋 X 8.8 英吋 , 30.5 厘米 X 22.4 厘米 ) 華擎 A75 Pro4/MVP A75 Pro4/MVP Serial ATA(SATA I/O 擋板 ASRock 為了在 Windows® 7 / 7 64-bit / VistaTM / VistaTM 64-bit BIOS中將Storage Configuration AHCI BIOS User Manual 168 ASRock A75 Pro4/MVP Motherboard 簡體中文

RAID Installation Guide
Page 3
... ROM to configure RAID. 1.1 Introduction to RAID The term "RAID" stands for you to configure RAID functions by following the detailed instruction of the "User Manual" in our support CD or "Quick Installation Guide", then you make a SATA / SATAII / SATA3 driver diskette, press or to enter BIOS setup to set the...
... ROM to configure RAID. 1.1 Introduction to RAID The term "RAID" stands for you to configure RAID functions by following the detailed instruction of the "User Manual" in our support CD or "Quick Installation Guide", then you make a SATA / SATAII / SATA3 driver diskette, press or to enter BIOS setup to set the...

RAID Installation Guide
Page 19
A RAID Ready logical drive disappears from the user interface when its physical drive fails. See the RAIDXpert User Manual for more information. 19 When you if there is a critical or offline logical drive. Non-fault-tolerant (RAID 0 and JBOD) logical drives go Critical when a ...
A RAID Ready logical drive disappears from the user interface when its physical drive fails. See the RAIDXpert User Manual for more information. 19 When you if there is a critical or offline logical drive. Non-fault-tolerant (RAID 0 and JBOD) logical drives go Critical when a ...

RAID Installation Guide
Page 23
In the Browser address field, type the entry explained below. Or, log on manually with your entry looks like this: http://127.0.0.1:25902/ati or http://localhost:25902/ati 2.6 Secure Connection RAIDXpert uses a secure HTTP connection https:// 23 Launch ...
In the Browser address field, type the entry explained below. Or, log on manually with your entry looks like this: http://127.0.0.1:25902/ati or http://localhost:25902/ati 2.6 Secure Connection RAIDXpert uses a secure HTTP connection https:// 23 Launch ...
