
User Manual
Page 6
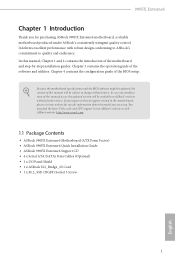
... BIOS setup. In case any modiications of this manual will be subject to change without further notice. Chapter 4 contains the coniguration guide of the sotware and utilities. ASRock website http://www.asrock.com. 1.1 Package Contents • ASRock 990FX Extreme6 Motherboard (ATX Form Factor) • ASRock 990FX Extreme6 Quick Installation Guide • ASRock 990FX Extreme6 Support CD • 4 x Serial ATA (SATA) Data Cables...
... BIOS setup. In case any modiications of this manual will be subject to change without further notice. Chapter 4 contains the coniguration guide of the sotware and utilities. ASRock website http://www.asrock.com. 1.1 Package Contents • ASRock 990FX Extreme6 Motherboard (ATX Form Factor) • ASRock 990FX Extreme6 Quick Installation Guide • ASRock 990FX Extreme6 Support CD • 4 x Serial ATA (SATA) Data Cables...
User Manual
Page 18
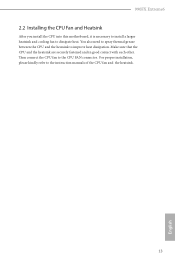
Make sure that the CPU and the heatsink are securely fastened and in good contact with each other. For proper installation, please kindly refer to the CPU FAN connector. hen connect the CPU fan to the instruction manuals of the CPU fan and the heatsink. 13 English You also need to spray thermal grease between the CPU and the heatsink to dissipate heat. 990FX Extreme6 2.2 Installing the CPU Fan and Heatsink Ater you install the CPU into this motherboard, it is necessary to install a larger heatsink and cooling fan to improve heat dissipation.
Make sure that the CPU and the heatsink are securely fastened and in good contact with each other. For proper installation, please kindly refer to the CPU FAN connector. hen connect the CPU fan to the instruction manuals of the CPU fan and the heatsink. 13 English You also need to spray thermal grease between the CPU and the heatsink to dissipate heat. 990FX Extreme6 2.2 Installing the CPU Fan and Heatsink Ater you install the CPU into this motherboard, it is necessary to install a larger heatsink and cooling fan to improve heat dissipation.

User Manual
Page 25
... on the chassis must support HDA to install your system. 2. Connect Audio_R (RIN) to OUT2_R and Audio_L (LIN) to the "FrontMic" Tab in our manual and chassis manual to function correctly. MIC_RET and OUT_RET are for connecting audio devices to the front audio panel. 1. To activate the front mic, go to OUT2_L...
... on the chassis must support HDA to install your system. 2. Connect Audio_R (RIN) to OUT2_R and Audio_L (LIN) to the "FrontMic" Tab in our manual and chassis manual to function correctly. MIC_RET and OUT_RET are for connecting audio devices to the front audio panel. 1. To activate the front mic, go to OUT2_L...
User Manual
Page 31
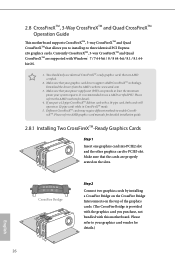
... 3. Please refer to three identical PCI Express x16 graphics cards. It is provided with the graphics card you to install up to AMD graphics card manuals for details. 4. CrossFire Bridge Step 2 Connect two graphics cards by installing a CrossFire Bridge on the CrossFire Bridge Interconnects on the slots. Please refer to the...
... 3. Please refer to three identical PCI Express x16 graphics cards. It is provided with the graphics card you to install up to AMD graphics card manuals for details. 4. CrossFire Bridge Step 2 Connect two graphics cards by installing a CrossFire Bridge on the CrossFire Bridge Interconnects on the slots. Please refer to the...
User Manual
Page 48
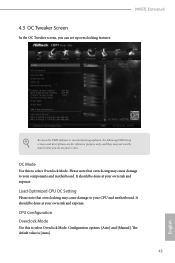
..., the following UEFI setup screens and descriptions are for reference purpose only, and they may not exactly match what you can set up overclocking features. 990FX Extreme6 Because the UEFI sotware is [Auto]. 43 English OC Mode Use this to your components and motherboard. Please note that overclocking may cause damage to... be done at your screen. 4.3 OC Tweaker Screen In the OC Tweaker screen, you see on your own risk and expense. Coniguration options: [Auto] and [Manual]. It should be done at your CPU and motherboard.
..., the following UEFI setup screens and descriptions are for reference purpose only, and they may not exactly match what you can set up overclocking features. 990FX Extreme6 Because the UEFI sotware is [Auto]. 43 English OC Mode Use this to your components and motherboard. Please note that overclocking may cause damage to... be done at your screen. 4.3 OC Tweaker Screen In the OC Tweaker screen, you see on your own risk and expense. Coniguration options: [Auto] and [Manual]. It should be done at your CPU and motherboard.
User Manual
Page 49
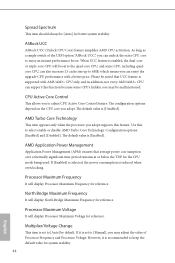
... L3 cache size up to [Auto] by default. Coniguration options: [Enabled] and [Disabled]. he default value is supported with a better price. ASRock UCC ASRock UCC (Unlock CPU Core) feature simpliies AMD CPU activation. As long as a simple switch of Processor Frequency and Processor Voltage. he default value is...below the TDP for system stability. 44 English CPU Active Core Control his item appears only when the processor you adopt supports this to [Manual], you can enjoy the upgrade CPU performance with AM3/AM3+ CPU only, and in addition, not every AM3/AM3+ CPU can support ...
... L3 cache size up to [Auto] by default. Coniguration options: [Enabled] and [Disabled]. he default value is supported with a better price. ASRock UCC ASRock UCC (Unlock CPU Core) feature simpliies AMD CPU activation. As long as a simple switch of Processor Frequency and Processor Voltage. he default value is...below the TDP for system stability. 44 English CPU Active Core Control his item appears only when the processor you adopt supports this to [Manual], you can enjoy the upgrade CPU performance with AM3/AM3+ CPU only, and in addition, not every AM3/AM3+ CPU can support ...

User Manual
Page 68
...Setting his allows you to set the chassis fan 3 speed. Chassis Fan 3 Setting his allows you to set the chassis fan 1 speed. 990FX Extreme6 4.6 Hardware Health Event Monitoring Screen his allows you to set the chassis fan 2 speed. Chassis Fan 2 Setting his section allows you to ...the hardware on your system, including the parameters of the CPU temperature, motherboard temperature, fan speed and voltage. Coniguration options: [Full On] and [Manual]. he default is value [Full On]. Coniguration options: [Full On] and [Automatic Mode]. he default is value [Full On]. he default is...
...Setting his allows you to set the chassis fan 3 speed. Chassis Fan 3 Setting his allows you to set the chassis fan 1 speed. 990FX Extreme6 4.6 Hardware Health Event Monitoring Screen his allows you to set the chassis fan 2 speed. Chassis Fan 2 Setting his section allows you to ...the hardware on your system, including the parameters of the CPU temperature, motherboard temperature, fan speed and voltage. Coniguration options: [Full On] and [Manual]. he default is value [Full On]. Coniguration options: [Full On] and [Automatic Mode]. he default is value [Full On]. he default is...
Quick Installation Guide
Page 7
... • ASRock 990FX Extreme6 Motherboard (ATX Form Factor) • ASRock 990FX Extreme6 Quick Installation Guide • ASRock 990FX Extreme6 Support CD • 4 x Serial ATA (SATA) Data Cables (Optional) • 1 x I/O Panel Shield • 1 x ASRock SLI_Bridge_2S Card • 1 x M.2_SSD (NGFF) Socket 3 Screw 5 English In case any modiications of this manual occur, the updated version will be available on ASRock's website as well. 990FX Extreme6 Chapter 1 Introduction...
... • ASRock 990FX Extreme6 Motherboard (ATX Form Factor) • ASRock 990FX Extreme6 Quick Installation Guide • ASRock 990FX Extreme6 Support CD • 4 x Serial ATA (SATA) Data Cables (Optional) • 1 x I/O Panel Shield • 1 x ASRock SLI_Bridge_2S Card • 1 x M.2_SSD (NGFF) Socket 3 Screw 5 English In case any modiications of this manual occur, the updated version will be available on ASRock's website as well. 990FX Extreme6 Chapter 1 Introduction...

Quick Installation Guide
Page 15
990FX Extreme6 2.2 Installing the CPU Fan and Heatsink Ater you install the CPU into this motherboard, it is necessary to install a larger heatsink and cooling fan to the instruction manuals of the CPU fan and the heatsink. 13 English For proper installation, please kindly refer to dissipate heat. You also need to spray thermal grease between the CPU and the heatsink to the CPU FAN connector. Make sure that the CPU and the heatsink are securely fastened and in good contact with each other. hen connect the CPU fan to improve heat dissipation.
990FX Extreme6 2.2 Installing the CPU Fan and Heatsink Ater you install the CPU into this motherboard, it is necessary to install a larger heatsink and cooling fan to the instruction manuals of the CPU fan and the heatsink. 13 English For proper installation, please kindly refer to dissipate heat. You also need to spray thermal grease between the CPU and the heatsink to the CPU FAN connector. Make sure that the CPU and the heatsink are securely fastened and in good contact with each other. hen connect the CPU fan to improve heat dissipation.

Quick Installation Guide
Page 22
... to the fan connectors and match the black wire to function correctly. To activate the front mic, go to the "FrontMic" Tab in our manual and chassis manual to install your system. 2. Front Panel Audio Header (9-pin HD_AUDIO1) (see p.1, No. 28) 20 DUMMY SPEAKER 1 +5V DUMMY Please connect the chassis speaker to...
... to the fan connectors and match the black wire to function correctly. To activate the front mic, go to the "FrontMic" Tab in our manual and chassis manual to install your system. 2. Front Panel Audio Header (9-pin HD_AUDIO1) (see p.1, No. 28) 20 DUMMY SPEAKER 1 +5V DUMMY Please connect the chassis speaker to...
RAID Installation Guide
Page 2
For optimal performance, please install identical drives of the "User Manual" in parallel, interleaved stacks. WARNING!! Although RAID 0 function can start to use the onboard RAID Option ROM Utility to configure RAID. 1.1 Introduction to RAID The ...
For optimal performance, please install identical drives of the "User Manual" in parallel, interleaved stacks. WARNING!! Although RAID 0 function can start to use the onboard RAID Option ROM Utility to configure RAID. 1.1 Introduction to RAID The ...

RAID Installation Guide
Page 13
... please follow the steps below . 13 Use the full capacity of the disk drives for one of the following the detailed instruction of the "User Manual" in Disk Assignments as the above -mentioned procedures, press any key (except for ) to use the full portion of the disk drives to the first...
... please follow the steps below . 13 Use the full capacity of the disk drives for one of the following the detailed instruction of the "User Manual" in Disk Assignments as the above -mentioned procedures, press any key (except for ) to use the full portion of the disk drives to the first...

RAID Installation Guide
Page 14
... number and press . 3. The Define LD Menu displays again. 2. Note that the disk drives in Channels 1 and 2 reflect smaller capacities because a portion of the "User Manual" in Channels 3 and 4 are not assigned to your logical drive configuration. 5. Please install the operating system to a logical drive. 4. Enter the desired capacity (MB) for...
... number and press . 3. The Define LD Menu displays again. 2. Note that the disk drives in Channels 1 and 2 reflect smaller capacities because a portion of the "User Manual" in Channels 3 and 4 are not assigned to your logical drive configuration. 5. Please install the operating system to a logical drive. 4. Enter the desired capacity (MB) for...

RAID Installation Guide
Page 18
... Windows Programs menu. If you did not choose the External Security option during RAIDXpert installation, use the Regular connection. Launch the Browser. 2. Or, log on manually with your entry looks like this: http://127.0.0.1:25902/ati or http://localhost:25902/ati 2.6 Secure Connection RAIDXpert uses a secure HTTP connection https:// 18 In...
... Windows Programs menu. If you did not choose the External Security option during RAIDXpert installation, use the Regular connection. Launch the Browser. 2. Or, log on manually with your entry looks like this: http://127.0.0.1:25902/ati or http://localhost:25902/ati 2.6 Secure Connection RAIDXpert uses a secure HTTP connection https:// 18 In...
