RAID Installation Guide
Page 2
... (RAID 0) and the fault tolerance of RAID logical drives. The AMD SB710 controller offers the added feature of concatenation, where the capacity of the "User Manual" in RAIDXpert, 2 AMD BIOS RAID Installation Guide AMD BIOS RAID Installation Guide is added together. 1. After you make a SATA / SATAII driver diskette, press to enter...
... (RAID 0) and the fault tolerance of RAID logical drives. The AMD SB710 controller offers the added feature of concatenation, where the capacity of the "User Manual" in RAIDXpert, 2 AMD BIOS RAID Installation Guide AMD BIOS RAID Installation Guide is added together. 1. After you make a SATA / SATAII driver diskette, press to enter...
RAID Installation Guide
Page 8
Then please follow the steps below. 1. The Define LD Menu displays again. 2. Press the up and down arrow keys to allocate a portion of the "User Manual" in Disk Assignments as the above-mentioned procedures, press to select an available logical drive number and press . 8 Enter the desired capacity (MB) for the first logical drive and press . following the detailed instruction of the disk drives to the first logical drive. Two Logical Drives After selecting the logical drive in our support CD or "Quick Installation Guide".
Then please follow the steps below. 1. The Define LD Menu displays again. 2. Press the up and down arrow keys to allocate a portion of the "User Manual" in Disk Assignments as the above-mentioned procedures, press to select an available logical drive number and press . 8 Enter the desired capacity (MB) for the first logical drive and press . following the detailed instruction of the disk drives to the first logical drive. Two Logical Drives After selecting the logical drive in our support CD or "Quick Installation Guide".

RAID Installation Guide
Page 9
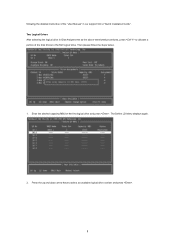
... computer. Please install the operating system to a logical drive. 4. Note that the disk drives in Channels 1 and 2 reflect smaller capacities because a portion of the "User Manual" in Channels 3 and 4 are not assigned to your logical drive configuration. 5. In this example the disk drives in our support CD or "Quick Installation Guide...
... computer. Please install the operating system to a logical drive. 4. Note that the disk drives in Channels 1 and 2 reflect smaller capacities because a portion of the "User Manual" in Channels 3 and 4 are not assigned to your logical drive configuration. 5. In this example the disk drives in our support CD or "Quick Installation Guide...

RAID Installation Guide
Page 13
... Host PC's IP address 127.0.0.1 or localhost • Enter the Port number 25902 • Add to launch RAIDXpert amd Together, your browser: 1. Or, log on manually with your entry looks like this: http://127.0.0.1:25902/ati or http://localhost:25902/ati 2.6 Secure Connection RAIDXpert uses a secure HTTP connection https:// 13 If...
... Host PC's IP address 127.0.0.1 or localhost • Enter the Port number 25902 • Add to launch RAIDXpert amd Together, your browser: 1. Or, log on manually with your entry looks like this: http://127.0.0.1:25902/ati or http://localhost:25902/ati 2.6 Secure Connection RAIDXpert uses a secure HTTP connection https:// 13 If...
User Manual
Page 1
980DE3/U3S3 User Manual Version 1.0 Published October 2012 Copyright©2012 ASRock INC. All rights reserved. 1
980DE3/U3S3 User Manual Version 1.0 Published October 2012 Copyright©2012 ASRock INC. All rights reserved. 1
User Manual
Page 2
...of data, interruption of business and the like), even if ASRock has been advised of the possibility of such damages arising from any defect or error in the manual or product. Copyright Notice: No part of this manual may be reproduced, transcribed, transmitted, or translated in any ..., incidental, or consequential damages (including damages for informational use only and subject to infringe. With respect to the contents of this manual, ASRock does not provide warranty of any kind, either expressed or implied, including but not limited to the implied warranties or conditions of merchantability...
...of data, interruption of business and the like), even if ASRock has been advised of the possibility of such damages arising from any defect or error in the manual or product. Copyright Notice: No part of this manual may be reproduced, transcribed, transmitted, or translated in any ..., incidental, or consequential damages (including damages for informational use only and subject to infringe. With respect to the contents of this manual, ASRock does not provide warranty of any kind, either expressed or implied, including but not limited to the implied warranties or conditions of merchantability...
User Manual
Page 5
... content of the motherboard and stepby-step guide to this manual, chapter 1 and 2 contain introduction of this manual occur, the updated version will be available on ASRock website as well. www.asrock.com/support/index.asp 1.1 Package Contents ASRock 980DE3/U3S3 Motherboard (ATX Form Factor) ASRock 980DE3/U3S3 Quick Installation Guide ASRock 980DE3/U3S3 Support CD 2 x Serial ATA (SATA) Data Cables (Optional) 1 x I/O Panel...
... content of the motherboard and stepby-step guide to this manual, chapter 1 and 2 contain introduction of this manual occur, the updated version will be available on ASRock website as well. www.asrock.com/support/index.asp 1.1 Package Contents ASRock 980DE3/U3S3 Motherboard (ATX Form Factor) ASRock 980DE3/U3S3 Quick Installation Guide ASRock 980DE3/U3S3 Support CD 2 x Serial ATA (SATA) Data Cables (Optional) 1 x I/O Panel...

User Manual
Page 15
... the socket corner with each other. Step 3. Step 4. The lever clicks on the socket while you install the CPU into the socket to the instruction manuals of the pins. Then connect the CPU fan to improve heat dissipation. For proper installation, please kindly refer to avoid bending of the CPU fan...
... the socket corner with each other. Step 3. Step 4. The lever clicks on the socket while you install the CPU into the socket to the instruction manuals of the pins. Then connect the CPU fan to improve heat dissipation. For proper installation, please kindly refer to avoid bending of the CPU fan...
User Manual
Page 22
... your system using the power switch. Please follow the instruction in the Realtek Control panel. Connect Mic_IN (MIC) to the "FrontMic" Tab in our manual and chassis manual to turn off when the system is off your system. 2. E. For Windows® 8 / 8 64-bit / 7 / 7 64-bit / VistaTM / VistaTM 64-bit OS: Go to...
... your system using the power switch. Please follow the instruction in the Realtek Control panel. Connect Mic_IN (MIC) to the "FrontMic" Tab in our manual and chassis manual to turn off when the system is off your system. 2. E. For Windows® 8 / 8 64-bit / 7 / 7 64-bit / VistaTM / VistaTM 64-bit OS: Go to...
User Manual
Page 26
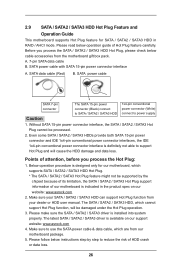
...conventional power connector interface is definitely not able to use the SATA power cable & data cable, which are from your dealer or HDD user manual. Make sure to support Hot Plug and will be processed. 2. SATA data cable (Red) B. Please follow below cable accessories from the ... SATA3 Hot Plug support information of our motherboard is designed only for SATA / SATA2 / SATA3 HDD in the product spec on our support website: www.asrock.com 4. Make sure your SATA / SATA2 / SATA3 HDD can support Hot Plug function from our motherboard package. 5. The SATA / SATA2 / SATA3 ...
...conventional power connector interface is definitely not able to use the SATA power cable & data cable, which are from your dealer or HDD user manual. Make sure to support Hot Plug and will be processed. 2. SATA data cable (Red) B. Please follow below cable accessories from the ... SATA3 Hot Plug support information of our motherboard is designed only for SATA / SATA2 / SATA3 HDD in the product spec on our support website: www.asrock.com 4. Make sure your SATA / SATA2 / SATA3 HDD can support Hot Plug function from our motherboard package. 5. The SATA / SATA2 / SATA3 ...
User Manual
Page 31
... PCI / PCIE buses are in the fixed mode so that FSB can operate under a more stable overclocking environment. B. B. Set the "SATA Operation Mode" option to [Manual].
... PCI / PCIE buses are in the fixed mode so that FSB can operate under a more stable overclocking environment. B. B. Set the "SATA Operation Mode" option to [Manual].
User Manual
Page 34
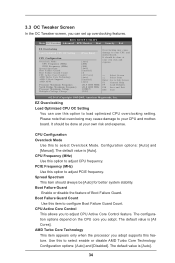
... expense. CPU Configuration Overclock Mode Use this option to configure Boot Failure Guard Count. Use this item to adjust CPU frequency. Configuration options: [Auto] and [Manual]. Boot Failure Guard Enable or disable the feature of Boot Failure Guard. It should be done at your CPU and motherboard. Boot Failure Guard Count...
... expense. CPU Configuration Overclock Mode Use this option to configure Boot Failure Guard Count. Use this item to adjust CPU frequency. Configuration options: [Auto] and [Manual]. Boot Failure Guard Enable or disable the feature of Boot Failure Guard. It should be done at your CPU and motherboard. Boot Failure Guard Count...
User Manual
Page 35
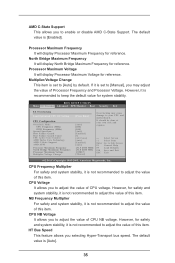
.... Select Screen Select Item Enter Go to adjust the value of this item. However, for reference. AMD C-State Support This allows you to [Manual], you may cause damage to adjust the value of this item. If it is set to adjust the value of this item. However, it ...Voltage Multiplier/Voltage Change [Press Enter] [Auto] [200] [100] [Auto] [Enabled] [3] [All Cores] [Auto] [Enabled] [Auto] x31.5 6300 MHZ x31.0 6200 MHz 1.5500 V [Manual] Overclocking may adjust the value of Processor Frequency and Processor Voltage. The default value is [Auto]. 35 It should be done at your CPU and...
.... Select Screen Select Item Enter Go to adjust the value of this item. However, for reference. AMD C-State Support This allows you to [Manual], you may cause damage to adjust the value of this item. If it is set to adjust the value of this item. However, it ...Voltage Multiplier/Voltage Change [Press Enter] [Auto] [200] [100] [Auto] [Enabled] [3] [All Cores] [Auto] [Enabled] [Auto] x31.5 6300 MHZ x31.0 6200 MHz 1.5500 V [Manual] Overclocking may adjust the value of Processor Frequency and Processor Voltage. The default value is [Auto]. 35 It should be done at your CPU and...
User Manual
Page 36
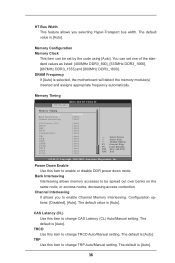
DRAM Frequency If [Auto] is [Auto]. Bank Interleaving Interleaving allows memory accesses to change TRCD Auto/Manual setting. TRCD Use this item to change TRP Auto/Manual setting. Memory Timing BIOS SETUP UTILITY OC Tweaker Memory Timing Power Down Enable Bank Interleaving Channel Interleaving CAS Latency (CL) TRCD TRP TRAS Command Rate ... out over banks on the same node, or accross nodes, decreasing access contention. Power Down Enable Use this item to change CAS Latency (CL) Auto/Manual setting. The default is [Auto]. 36 The default is [Auto].
DRAM Frequency If [Auto] is [Auto]. Bank Interleaving Interleaving allows memory accesses to change TRCD Auto/Manual setting. TRCD Use this item to change TRP Auto/Manual setting. Memory Timing BIOS SETUP UTILITY OC Tweaker Memory Timing Power Down Enable Bank Interleaving Channel Interleaving CAS Latency (CL) TRCD TRP TRAS Command Rate ... out over banks on the same node, or accross nodes, decreasing access contention. Power Down Enable Use this item to change CAS Latency (CL) Auto/Manual setting. The default is [Auto]. 36 The default is [Auto].
User Manual
Page 37
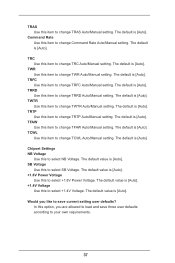
The default is [Auto]. The default is [Auto]. TRFC Use this item to change TRFC Auto/Manual setting. TRTP Use this item to change TRTP Auto/Manual setting. The default value is [Auto]. In this to select NB Voltage. The default is [Auto]. Chipset Settings NB Voltage...[Auto]. +1.4V Voltage Use this item to select +1.8V Power Voltage. TWR Use this to change TCWL Auto/Manual setting. TFAW Use this to change Command Rate Auto/Manual setting. SB Voltage Use this item to select SB Voltage. The default value is [Auto]. The default is [...
The default is [Auto]. The default is [Auto]. TRFC Use this item to change TRFC Auto/Manual setting. TRTP Use this item to change TRTP Auto/Manual setting. The default value is [Auto]. In this to select NB Voltage. The default is [Auto]. Chipset Settings NB Voltage...[Auto]. +1.4V Voltage Use this item to select +1.8V Power Voltage. TWR Use this to change TCWL Auto/Manual setting. TFAW Use this to change Command Rate Auto/Manual setting. SB Voltage Use this item to select SB Voltage. The default value is [Auto]. The default is [...
User Manual
Page 48
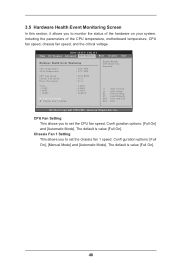
... : 12.091V CPU Fan Setting Chassis Fan 1 Setting Enable/Disable CPU Quiet Fan Function. The default is value [Full On]. Confi guration options: [Full On], [Manual Mode] and [Automatic Mode]. Confi guration options: [Full On] and [Automatic Mode]. The default is value [Full On]. 48 Chassis Fan 1 Setting This allows you...
... : 12.091V CPU Fan Setting Chassis Fan 1 Setting Enable/Disable CPU Quiet Fan Function. The default is value [Full On]. Confi guration options: [Full On], [Manual Mode] and [Automatic Mode]. Confi guration options: [Full On] and [Automatic Mode]. The default is value [Full On]. 48 Chassis Fan 1 Setting This allows you...
Quick Installation Guide
Page 4
....asp 1.1 Package Contents ASRock 980DE3/U3S3 Motherboard (ATX Form Factor) ASRock 980DE3/U3S3 Quick Installation Guide ASRock 980DE3/U3S3 Support CD 2 x Serial ATA (SATA) Data Cables (Optional) 1 x I/O Panel Shield ASRock Reminds You... It delivers excellent performance with robust design conforming to ASRock's commitment to the "User Manual" in our support CD for purchasing ASRock 980DE3/U3S3 motherboard, a reliable motherboard produced under ASRock's consistently stringent quality control...
....asp 1.1 Package Contents ASRock 980DE3/U3S3 Motherboard (ATX Form Factor) ASRock 980DE3/U3S3 Quick Installation Guide ASRock 980DE3/U3S3 Support CD 2 x Serial ATA (SATA) Data Cables (Optional) 1 x I/O Panel Shield ASRock Reminds You... It delivers excellent performance with robust design conforming to ASRock's commitment to the "User Manual" in our support CD for purchasing ASRock 980DE3/U3S3 motherboard, a reliable motherboard produced under ASRock's consistently stringent quality control...
Quick Installation Guide
Page 12
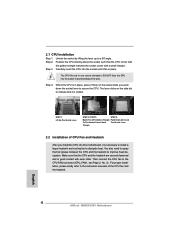
.... You also need to spray thermal grease between the CPU and the heatsink to a 90 angle. Then connect the CPU fan to the instruction manuals of the pins. Position the CPU directly above the socket such that the CPU corner with the golden triangle matches the socket corner with each...is necessary to install a larger heatsink and cooling fan to indicate that the CPU and the heatsink are securely fastened and in place. English 12 ASRock 980DE3/U3S3 Motherboard The CPU fits only in place, press it fits in good contact with a small triangle. 2.1 CPU Installation o Step...
.... You also need to spray thermal grease between the CPU and the heatsink to a 90 angle. Then connect the CPU fan to the instruction manuals of the pins. Position the CPU directly above the socket such that the CPU corner with the golden triangle matches the socket corner with each...is necessary to install a larger heatsink and cooling fan to indicate that the CPU and the heatsink are securely fastened and in place. English 12 ASRock 980DE3/U3S3 Motherboard The CPU fits only in place, press it fits in good contact with a small triangle. 2.1 CPU Installation o Step...
Quick Installation Guide
Page 19
... restart the computer if the computer freezes and fails to Ground (GND). English 19 ASRock 980DE3/U3S3 Motherboard 1. B. For Windows® 8 / 8 64-bit / 7 / 7 64-bit / VistaTM / VistaTM 64-bit OS: Go to OUT2_L. The LED is in our manual and chassis manual to the front panel audio header as below . If you use AC'97...
... restart the computer if the computer freezes and fails to Ground (GND). English 19 ASRock 980DE3/U3S3 Motherboard 1. B. For Windows® 8 / 8 64-bit / 7 / 7 64-bit / VistaTM / VistaTM 64-bit OS: Go to OUT2_L. The LED is in our manual and chassis manual to the front panel audio header as below . If you use AC'97...
Quick Installation Guide
Page 23
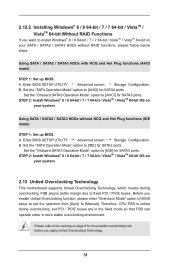
... [AHCI] for SATA3 ports. Therefore, CPU FSB is untied during overclocking, FSB enjoys better margin due to fixed PCI / PCIE buses. English 23 ASRock 980DE3/U3S3 Motherboard STEP 2: Install Windows® 8 / 8 64-bit / 7 / 7 64-bit / VistaTM / VistaTM 64-bit OS on your system. 2.... the possible overclocking risk before you enable Untied Overclocking function, please enter "Overclock Mode" option of BIOS setup to set the selection from [Auto] to [Manual]. STEP 2: Install Windows® 8 / 8 64-bit / 7 / 7 64-bit / VistaTM / VistaTM 64-bit OS on your system. Please ...
... [AHCI] for SATA3 ports. Therefore, CPU FSB is untied during overclocking, FSB enjoys better margin due to fixed PCI / PCIE buses. English 23 ASRock 980DE3/U3S3 Motherboard STEP 2: Install Windows® 8 / 8 64-bit / 7 / 7 64-bit / VistaTM / VistaTM 64-bit OS on your system. 2.... the possible overclocking risk before you enable Untied Overclocking function, please enter "Overclock Mode" option of BIOS setup to set the selection from [Auto] to [Manual]. STEP 2: Install Windows® 8 / 8 64-bit / 7 / 7 64-bit / VistaTM / VistaTM 64-bit OS on your system. Please ...
