
RAID Installation Guide
Page 1
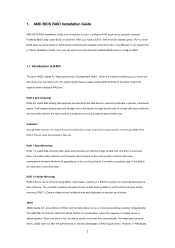
AMD BIOS RAID Installation Guide 2 1.1 Introduction to RAIDXpert from the Internet 17 2.9 Running RAIDXpert without Network Connection 17 1 AMD Windows RAID Installation Guide 10 2.1 Components of RAIDXpert ...
AMD BIOS RAID Installation Guide 2 1.1 Introduction to RAIDXpert from the Internet 17 2.9 Running RAIDXpert without Network Connection 17 1 AMD Windows RAID Installation Guide 10 2.1 Components of RAIDXpert ...
RAID Installation Guide
Page 2
...When one logical unit. 1. WARNING!! However, in a RAID 10 solution for you can be mirrored using the onboard FastBuild BIOS utility under BIOS environment. For optimal performance, please install identical drives of the same model and capacity when creating a RAID set of the ... software will direct all applications to configure RAID functions by using RAID 1 techniques, resulting in RAIDXpert, 2 AMD BIOS RAID Installation Guide AMD BIOS RAID Installation Guide is an instruction for improved performance plus resiliency. RAID 1 (Data Mirroring) RAID 1 is striped...
...When one logical unit. 1. WARNING!! However, in a RAID 10 solution for you can be mirrored using the onboard FastBuild BIOS utility under BIOS environment. For optimal performance, please install identical drives of the same model and capacity when creating a RAID set of the ... software will direct all applications to configure RAID functions by using RAID 1 techniques, resulting in RAIDXpert, 2 AMD BIOS RAID Installation Guide AMD BIOS RAID Installation Guide is an instruction for improved performance plus resiliency. RAID 1 (Data Mirroring) RAID 1 is striped...
RAID Installation Guide
Page 4
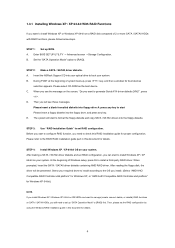
... guide in this RAID installation guide for boot devices selection appears. After reading the floppy disk, the driver will start to the BIOS RAID installation guide part in this document for details. Select your required driver to install according to generate Serial ATA driver diskette [YN...Then, please set RAID configuration. 1.3.1 Installing Windows XP / XP 64-bit With RAID Functions If you want to boot your system. Insert the ASRock Support CD into the floppy diskette. C. Then you need to set RAID configuration, you can start to format the floppy diskette and copy SATA...
... guide in this RAID installation guide for boot devices selection appears. After reading the floppy disk, the driver will start to the BIOS RAID installation guide part in this document for details. Select your required driver to install according to generate Serial ATA driver diskette [YN...Then, please set RAID configuration. 1.3.1 Installing Windows XP / XP 64-bit With RAID Functions If you want to boot your system. Insert the ASRock Support CD into the floppy diskette. C. Then you need to set RAID configuration, you can start to format the floppy diskette and copy SATA...
RAID Installation Guide
Page 5
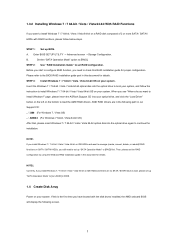
... Guide" to boot your system, and follow below steps. page, please insert the ASRock Support CD into the optical drive to set the RAID configuration by using the Windows RAID installation guide in BIOS. 1.4 Create Disk Array Power on your system. B. If this is the first time... you install Windows 7 / 7 64-bit / Vista / Vista 64-bit on your system. A. Enter BIOS SETUP UTILITY → Advanced screen →Storage Configuration. Insert the Windows 7 / 7 64-bit / Vista / Vista 64-bit optical disk into your system. ...
... Guide" to boot your system, and follow below steps. page, please insert the ASRock Support CD into the optical drive to set the RAID configuration by using the Windows RAID installation guide in BIOS. 1.4 Create Disk Array Power on your system. B. If this is the first time... you install Windows 7 / 7 64-bit / Vista / Vista 64-bit on your system. A. Enter BIOS SETUP UTILITY → Advanced screen →Storage Configuration. Insert the Windows 7 / 7 64-bit / Vista / Vista 64-bit optical disk into your system. ...
User Manual
Page 4
... 32 3.1 Introduction 32 3.1.1 BIOS Menu Bar 32 3.1.2 Navigation Keys 33 3.2 Main Screen 33 3.3 OC Tweaker Screen 34 3.4 Advanced Screen 38 3.4.1 CPU Configuration 39 3.4.2 Chipset Configuration 40 3.4.3 ACPI Configuration 41 3.4.4 ...
... 32 3.1 Introduction 32 3.1.1 BIOS Menu Bar 32 3.1.2 Navigation Keys 33 3.2 Main Screen 33 3.3 OC Tweaker Screen 34 3.4 Advanced Screen 38 3.4.1 CPU Configuration 39 3.4.2 Chipset Configuration 40 3.4.3 ACPI Configuration 41 3.4.4 ...
User Manual
Page 5
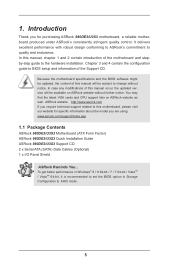
.... 1. Chapter 3 and 4 contain the configuration guide to BIOS setup and information of the motherboard and stepby-step guide to this manual, chapter 1 and 2 contain introduction of the Support CD. www.asrock.com/support/index.asp 1.1 Package Contents ASRock 980DE3/U3S3 Motherboard (ATX Form Factor) ASRock 980DE3/U3S3 Quick Installation Guide ASRock 980DE3/U3S3 Support CD 2 x Serial ATA (SATA) Data Cables (Optional...
.... 1. Chapter 3 and 4 contain the configuration guide to BIOS setup and information of the motherboard and stepby-step guide to this manual, chapter 1 and 2 contain introduction of the Support CD. www.asrock.com/support/index.asp 1.1 Package Contents ASRock 980DE3/U3S3 Motherboard (ATX Form Factor) ASRock 980DE3/U3S3 Quick Installation Guide ASRock 980DE3/U3S3 Support CD 2 x Serial ATA (SATA) Data Cables (Optional...
User Manual
Page 7
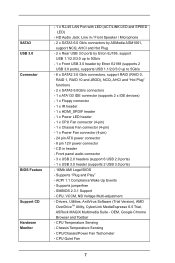
... 3 x USB 2.0 headers (support 6 USB 2.0 ports) - 1 x USB 3.0 header (supports 2 USB 3.0 ports) - 16Mb AMI Legal BIOS - CPU Temperature Sensing - OEM, Google Chrome Browser and Toolbar - CPU/Chassis/Power Fan Tachometer - Supports jumperfree - Drivers, Utilities, AntiVirus Software (Trial... Version), AMD OverDriveTM Utility, CyberLink MediaEspresso 6.5 Trial, ASRock MAGIX Multimedia Suite - SATA3 USB 3.0 Connector BIOS Feature Support CD Hardware Monitor - 1 x RJ-45 LAN Port with LED (ACT/LINK LED and ...
... 3 x USB 2.0 headers (support 6 USB 2.0 ports) - 1 x USB 3.0 header (supports 2 USB 3.0 ports) - 16Mb AMI Legal BIOS - CPU Temperature Sensing - OEM, Google Chrome Browser and Toolbar - CPU/Chassis/Power Fan Tachometer - Supports jumperfree - Drivers, Utilities, AntiVirus Software (Trial... Version), AMD OverDriveTM Utility, CyberLink MediaEspresso 6.5 Trial, ASRock MAGIX Multimedia Suite - SATA3 USB 3.0 Connector BIOS Feature Support CD Hardware Monitor - 1 x RJ-45 LAN Port with LED (ACT/LINK LED and ...

User Manual
Page 8
...ErP/EuP Ready (ErP/EuP ready power supply is required) * For detailed product information, please visit our website: http://www.asrock.com WARNING Please realize that there is supported depends on the AM3/AM3+ CPU you want to adopt DDR3 1866/1600 memory .../ 7 / 7 64-bit / VistaTM / VistaTM 64-bit / XP / XP Media Center / XP 64-bit compliant Certifications - If you adopt. ASRock website: http://www.asrock.com 2. For Windows® 64-bit OS with overclocking, including adjusting the setting in the BIOS, applying Untied Overclocking Technology, or using third-party overclocking tools.
...ErP/EuP Ready (ErP/EuP ready power supply is required) * For detailed product information, please visit our website: http://www.asrock.com WARNING Please realize that there is supported depends on the AM3/AM3+ CPU you want to adopt DDR3 1866/1600 memory .../ 7 / 7 64-bit / VistaTM / VistaTM 64-bit / XP / XP Media Center / XP 64-bit compliant Certifications - If you adopt. ASRock website: http://www.asrock.com 2. For Windows® 64-bit OS with overclocking, including adjusting the setting in the BIOS, applying Untied Overclocking Technology, or using third-party overclocking tools.

User Manual
Page 9
...S3 and S4 at specific timing during the POST or the key to enter into the BIOS setup menu to enter your BIOS only in just a few seconds. ASRock Instant Flash ASRock Instant Flash is a BIOS flash utility embedded in a few seconds, provides a much more efficient way to save the... exceptional power saving and improve power efficiency without entering operating systems first like MSDOS or Windows®. This convenient BIOS update tool allows you to access ASRock Instant Flash. The voltage regulator can press the key during the shutdown and startup process, Instant Boot allows you...
...S3 and S4 at specific timing during the POST or the key to enter into the BIOS setup menu to enter your BIOS only in just a few seconds. ASRock Instant Flash ASRock Instant Flash is a BIOS flash utility embedded in a few seconds, provides a much more efficient way to save the... exceptional power saving and improve power efficiency without entering operating systems first like MSDOS or Windows®. This convenient BIOS update tool allows you to access ASRock Instant Flash. The voltage regulator can press the key during the shutdown and startup process, Instant Boot allows you...

User Manual
Page 12
... USB0 B: USB1 USB 2.0 T: USB0 Top: RJ-45 B: USB1 Top: LINE IN Center: FRONT Bottom: MIC IN CLRCMOS1 1 PCIE1 AMD RX881/760G Chipset 980DE3/U3S3 LAN PHY XFast LAN Super I/O PCIE2 PCIE4 AUDIO CODEC 1 IR1 HD_AUDIO1 HDMI_SPDIF1 1 CD1 1 FLOPPY1 CMOS BATTERY IDE1 XFast USB PCIE3 SATA3_2(PORT 7) SATA3_1(PORT...AMD SB710 Chipset PCI2 1 PLED1 SPEAKER1 1 PANEL 1 PLED PWRBTN 1 HDLED RESET USB8_9 1 USB6_7 1 USB4_5 1 SATAII_2(PORT 1) SATAII_1(PORT 0) CHA_FAN1 16Mb BIOS SATAII_6(PORT 5) SATAII_5(PORT 4) SATAII_4(PORT 3) SATAII_3(PORT 2) 8 9 10 11 12 13 14 15 16 17 18 29 28 27 26 25 ...
... USB0 B: USB1 USB 2.0 T: USB0 Top: RJ-45 B: USB1 Top: LINE IN Center: FRONT Bottom: MIC IN CLRCMOS1 1 PCIE1 AMD RX881/760G Chipset 980DE3/U3S3 LAN PHY XFast LAN Super I/O PCIE2 PCIE4 AUDIO CODEC 1 IR1 HD_AUDIO1 HDMI_SPDIF1 1 CD1 1 FLOPPY1 CMOS BATTERY IDE1 XFast USB PCIE3 SATA3_2(PORT 7) SATA3_1(PORT...AMD SB710 Chipset PCI2 1 PLED1 SPEAKER1 1 PANEL 1 PLED PWRBTN 1 HDLED RESET USB8_9 1 USB6_7 1 USB4_5 1 SATAII_2(PORT 1) SATAII_1(PORT 0) CHA_FAN1 16Mb BIOS SATAII_6(PORT 5) SATAII_5(PORT 4) SATAII_4(PORT 3) SATAII_3(PORT 2) 8 9 10 11 12 13 14 15 16 17 18 29 28 27 26 25 ...
User Manual
Page 19
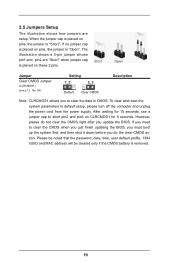
Jumper Setting Description Clear CMOS Jumper (CLRCMOS1) (see p.12, No. 38) Default Clear CMOS Note: CLRCMOS1 allows you update the BIOS. However, please do the clear-CMOS ac- If no jumper cap is placed on pins, the jumper is removed. 19 After waiting for 15 seconds, ... reset the system parameters to short pin2 and pin3 on these 2 pins. If you need to clear the CMOS when you just finish updating the BIOS, you must boot up the system first, and then shut it down before you do not clear the CMOS right after you to clear the...
Jumper Setting Description Clear CMOS Jumper (CLRCMOS1) (see p.12, No. 38) Default Clear CMOS Note: CLRCMOS1 allows you update the BIOS. However, please do the clear-CMOS ac- If no jumper cap is placed on pins, the jumper is removed. 19 After waiting for 15 seconds, ... reset the system parameters to short pin2 and pin3 on these 2 pins. If you need to clear the CMOS when you just finish updating the BIOS, you must boot up the system first, and then shut it down before you do not clear the CMOS right after you to clear the...
User Manual
Page 28
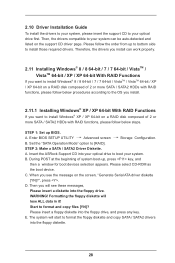
... 64-bit With RAID Functions If you see these messages, Please insert a diskette into your optical drive to boot your system. WARNING! Enter BIOS SETUP UTILITY Advanced screen Storage Configuration. D. Start to [RAID]. Please insert a floppy diskette into the floppy diskette. 28 E. 2.10 Driver ...Windows® XP / XP 64-bit on a RAID disk composed of system boot-up BIOS. Then, the drivers compatible to your optical drive first. A. Please follow below steps. A. Insert the ASRock Support CD into the floppy drive. C. Then you will lose ALL data in it!...
... 64-bit With RAID Functions If you see these messages, Please insert a diskette into your optical drive to boot your system. WARNING! Enter BIOS SETUP UTILITY Advanced screen Storage Configuration. D. Start to [RAID]. Please insert a floppy diskette into the floppy diskette. 28 E. 2.10 Driver ...Windows® XP / XP 64-bit on a RAID disk composed of system boot-up BIOS. Then, the drivers compatible to your optical drive first. A. Please follow below steps. A. Insert the ASRock Support CD into the floppy drive. C. Then you will lose ALL data in it!...
User Manual
Page 29
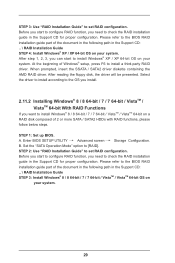
... 8 64-bit / 7 / 7 64-bit / VistaTM / VistaTM 64-bit OS on a RAID disk composed of Windows® setup, press F6 to [RAID]. Enter BIOS SETUP UTILITY Advanced screen Storage Configuration. Please refer to check the RAID installation guide in the Support CD: .. \ RAID Installation Guide STEP 4: Install Windows®...; XP / XP 64-bit OS on your system. Before you start to configure RAID function, you need to the BIOS RAID installation guide part of the document in the following path in the Support CD for proper configuration. Set the "SATA Operation Mode"...
... 8 64-bit / 7 / 7 64-bit / VistaTM / VistaTM 64-bit OS on a RAID disk composed of Windows® setup, press F6 to [RAID]. Enter BIOS SETUP UTILITY Advanced screen Storage Configuration. Please refer to check the RAID installation guide in the Support CD: .. \ RAID Installation Guide STEP 4: Install Windows®...; XP / XP 64-bit OS on your system. Before you start to configure RAID function, you need to the BIOS RAID installation guide part of the document in the following path in the Support CD for proper configuration. Set the "SATA Operation Mode"...

User Manual
Page 30
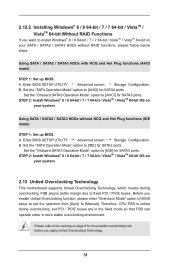
...SATA2 / SATA3 HDDs without RAID functions, please follow below steps. Enter BIOS SETUP UTILITY Advanced screen Storage Configuration. Set the "Onboard SATA3 Operation Mode" option to [IDE] for SATA2 ports.... A. Enter BIOS SETUP UTILITY Advanced screen Storage Configuration. Set the "SATA Operation Mode" option to install Windows... SATA / SATA2 / SATA3 HDDs without NCQ and Hot Plug functions (IDE mode) STEP 1: Set up BIOS. At the beginning of Windows® setup, press F6 to the OS you want to install Windows®...
...SATA2 / SATA3 HDDs without RAID functions, please follow below steps. Enter BIOS SETUP UTILITY Advanced screen Storage Configuration. Set the "Onboard SATA3 Operation Mode" option to [IDE] for SATA2 ports.... A. Enter BIOS SETUP UTILITY Advanced screen Storage Configuration. Set the "SATA Operation Mode" option to install Windows... SATA / SATA2 / SATA3 HDDs without NCQ and Hot Plug functions (IDE mode) STEP 1: Set up BIOS. At the beginning of Windows® setup, press F6 to the OS you want to install Windows®...
User Manual
Page 31
...] for SATA2 ports. Set the "SATA Operation Mode" option to [AHCI] for SATA3 ports. A. Before you apply Untied Overclocking Technology. 31 Enter BIOS SETUP UTILITY Advanced screen Storage Configuration. Set the "Onboard SATA3 Operation Mode" option to [IDE] for SATA2 ports. STEP 2: Install Windows® 8... refer to the warning on page 8 for the possible overclocking risk before you enable Untied Overclocking function, please enter "Overclock Mode" option of BIOS setup to set the selection from [Auto] to [Manual]. STEP 2: Install Windows® 8 / 8 64-bit / 7 / 7 64...
...] for SATA2 ports. Set the "SATA Operation Mode" option to [AHCI] for SATA3 ports. A. Before you apply Untied Overclocking Technology. 31 Enter BIOS SETUP UTILITY Advanced screen Storage Configuration. Set the "Onboard SATA3 Operation Mode" option to [IDE] for SATA2 ports. STEP 2: Install Windows® 8... refer to the warning on page 8 for the possible overclocking risk before you enable Untied Overclocking function, please enter "Overclock Mode" option of BIOS setup to set the selection from [Auto] to [Manual]. STEP 2: Install Windows® 8 / 8 64-bit / 7 / 7 64...
User Manual
Page 32
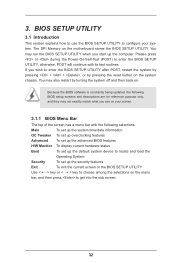
...top of the screen has a menu bar with its test routines. BIOS SETUP UTILITY 3.1 Introduction This section explains how to use the BIOS SETUP UTILITY to enter the BIOS SETUP UTILITY, otherwise, POST will continue with the following BIOS setup screens and descriptions are for reference purpose only, and they ...may also restart by pressing the reset button on your system. If you see on the system chassis. Because the BIOS software is constantly being updated, the following selections: Main To set up the system time/date information OC Tweaker To set up overclocking ...
...top of the screen has a menu bar with its test routines. BIOS SETUP UTILITY 3.1 Introduction This section explains how to use the BIOS SETUP UTILITY to enter the BIOS SETUP UTILITY, otherwise, POST will continue with the following BIOS setup screens and descriptions are for reference purpose only, and they ...may also restart by pressing the reset button on your system. If you see on the system chassis. Because the BIOS software is constantly being updated, the following selections: Main To set up the system time/date information OC Tweaker To set up overclocking ...
User Manual
Page 33
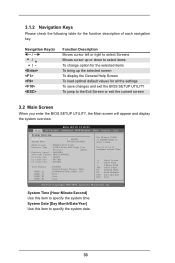
....54 (C) Copyright 1985-2005, American Megatrends, Inc. 3.1.2 Navigation Keys Please check the following table for all the settings To save changes and exit the BIOS SETUP UTILITY To jump to the Exit Screen or exit the current screen 3.2 Main Screen When you enter the... UTILITY Main OC Tweaker Advanced H/W Monitor Boot Security Exit System Overview System Time System Date [17:00:09] [Wed 10/24/2012] BIOS Version : 980DE3/U3S3 P1.00 Processor Type : AMD FX(tm)-8150 Eight Core Processor (64bit) Processor Speed : 3600MHz Microcode Update : 600F12/6000623 L1 Cache Size : 384KB L2 Cache...
....54 (C) Copyright 1985-2005, American Megatrends, Inc. 3.1.2 Navigation Keys Please check the following table for all the settings To save changes and exit the BIOS SETUP UTILITY To jump to the Exit Screen or exit the current screen 3.2 Main Screen When you enter the... UTILITY Main OC Tweaker Advanced H/W Monitor Boot Security Exit System Overview System Time System Date [17:00:09] [Wed 10/24/2012] BIOS Version : 980DE3/U3S3 P1.00 Processor Type : AMD FX(tm)-8150 Eight Core Processor (64bit) Processor Speed : 3600MHz Microcode Update : 600F12/6000623 L1 Cache Size : 384KB L2 Cache...
User Manual
Page 34
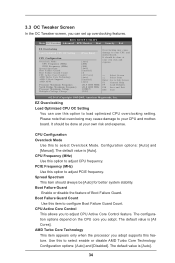
Configuration options: [Auto] and [Manual]. Spread Spectrum This item should always be done at your CPU and motherboard. The default value is [All Cores]. BIOS SETUP UTILITY Main OC Tweaker Advanced H/W Monitor Boot Security Exit EZ Overclocking Load Optimized CPU OC Setting CPU Configuration Overclock Mode CPU Frequency (MHz) PCIE ...
Configuration options: [Auto] and [Manual]. Spread Spectrum This item should always be done at your CPU and motherboard. The default value is [All Cores]. BIOS SETUP UTILITY Main OC Tweaker Advanced H/W Monitor Boot Security Exit EZ Overclocking Load Optimized CPU OC Setting CPU Configuration Overclock Mode CPU Frequency (MHz) PCIE ...
User Manual
Page 35
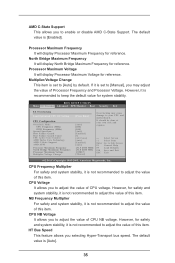
If it is not recommended to [Auto] by default. BIOS SETUP UTILITY Main OC Tweaker Advanced H/W Monitor Boot Security Exit EZ Overclocking Load Optimized CPU OC Setting CPU Configuration Overclock Mode CPU Frequency (MHz) PCIE ...
If it is not recommended to [Auto] by default. BIOS SETUP UTILITY Main OC Tweaker Advanced H/W Monitor Boot Security Exit EZ Overclocking Load Optimized CPU OC Setting CPU Configuration Overclock Mode CPU Frequency (MHz) PCIE ...
User Manual
Page 36
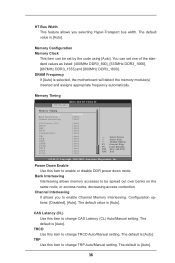
... allows you selecting Hyper-Transport bus width. The default is [Auto]. HT Bus Width This feature allows you to enable Channel Memory Interleaving. Memory Timing BIOS SETUP UTILITY OC Tweaker Memory Timing Power Down Enable Bank Interleaving Channel Interleaving CAS Latency (CL) TRCD TRP TRAS Command Rate TRC TWR TRFC TRRD...
... allows you selecting Hyper-Transport bus width. The default is [Auto]. HT Bus Width This feature allows you to enable Channel Memory Interleaving. Memory Timing BIOS SETUP UTILITY OC Tweaker Memory Timing Power Down Enable Bank Interleaving Channel Interleaving CAS Latency (CL) TRCD TRP TRAS Command Rate TRC TWR TRFC TRRD...


