RAID Installation Guide
Page 3
... to use "RAID BIOS Setting Utility" in the section 2.3 to set the RAID configuration by using "RAID Utility for Windows 3 However, if you want to install Windows 2000, Windows XP or Windows XP 64bit on your SATA HDDs with RAID functions, you will see the message on the screen, "D o you want.... Formatting the floppy diskette will start the OS installation. Once you have the SATA driver diskette ready, you may start to install Windows 2000 / Windows XP / Windows XP 64-bit on your system. (Do NOT insert any floppy diskette into the floppy drive, and press . STEP 3: When you see these ...
... to use "RAID BIOS Setting Utility" in the section 2.3 to set the RAID configuration by using "RAID Utility for Windows 3 However, if you want to install Windows 2000, Windows XP or Windows XP 64bit on your SATA HDDs with RAID functions, you will see the message on the screen, "D o you want.... Formatting the floppy diskette will start the OS installation. Once you have the SATA driver diskette ready, you may start to install Windows 2000 / Windows XP / Windows XP 64-bit on your system. (Do NOT insert any floppy diskette into the floppy drive, and press . STEP 3: When you see these ...
RAID Installation Guide
Page 7
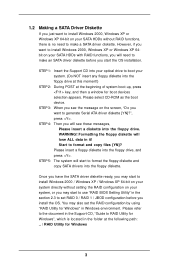
Detecting array . . . American Megatrends, Inc. After the below window appears, please press to [RAID]. Please set the option SATA Operation Mode to enter the NVIDIA RAID Utility. NVIDIA RAID IDE ROM BIOS 4.81 Copyright (C)... UTILITY IDE Configuration OnBoard IDE Controller OnBoard SATA Controller SATA Operation Mode Primary IDE Master Primary IDE Slave Secondary IDE Master Secondary IDE Slave SATA1 SATA2 [Both] [Enabled] [RAID] [Hard Disk] [Not Detected] [ATAPI CDROM] [Not Detected] [Not Detected] [Not Detected] Config SATA operation mode. +F1 F10 ESC Select Screen Select...
Detecting array . . . American Megatrends, Inc. After the below window appears, please press to [RAID]. Please set the option SATA Operation Mode to enter the NVIDIA RAID Utility. NVIDIA RAID IDE ROM BIOS 4.81 Copyright (C)... UTILITY IDE Configuration OnBoard IDE Controller OnBoard SATA Controller SATA Operation Mode Primary IDE Master Primary IDE Slave Secondary IDE Master Secondary IDE Slave SATA1 SATA2 [Both] [Enabled] [RAID] [Hard Disk] [Not Detected] [ATAPI CDROM] [Not Detected] [Not Detected] [Not Detected] Config SATA operation mode. +F1 F10 ESC Select Screen Select...
RAID Installation Guide
Page 8
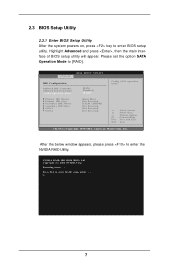
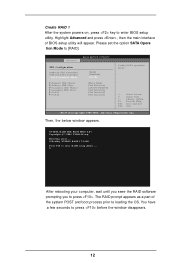
... UTILITY IDE Configuration OnBoard IDE Controller OnBoard SATA Controller SATA Operation Mode Primary IDE Master Primary IDE Slave Secondary IDE Master Secondary IDE Slave SATA1 SATA2 [Both] [Enabled] [RAID] [Hard Disk] [Not Detected] [ATAPI CDROM] [Not Detected] [Not Detected] [Not Detected] Config SATA ... Exit v02.53 (C) Copyright 1985-2004. Detecting array . . . 0 Healthy NVIDIA RAID 0 74.54G Press F10 to press before the window disappears. 8 Highlight Advanced and press , then the main interface of the system POST and boot process prior to [RAID]. After rebooting your computer...
... UTILITY IDE Configuration OnBoard IDE Controller OnBoard SATA Controller SATA Operation Mode Primary IDE Master Primary IDE Slave Secondary IDE Master Secondary IDE Slave SATA1 SATA2 [Both] [Enabled] [RAID] [Hard Disk] [Not Detected] [ATAPI CDROM] [Not Detected] [Not Detected] [Not Detected] Config SATA ... Exit v02.53 (C) Copyright 1985-2004. Detecting array . . . 0 Healthy NVIDIA RAID 0 74.54G Press F10 to press before the window disappears. 8 Highlight Advanced and press , then the main interface of the system POST and boot process prior to [RAID]. After rebooting your computer...
RAID Installation Guide
Page 9
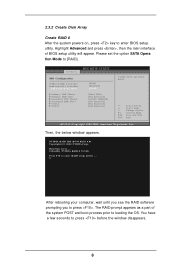
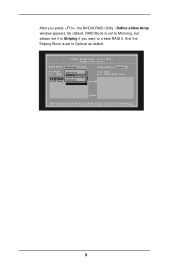
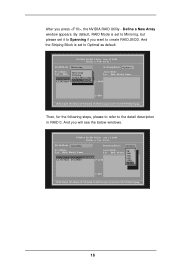
And the Striping Block is set to Mirroring, but please set to Optimal as default. NVIDIA RAID Utility Jan 12 2005 - RAID Mode : Mirroring Free Disks Loc Disk 1.0.M Maxt 1.1.M Maxt Mirroring Striping Stripe Mirroring Spanning Stripimg Block : Optimal Array Disks Loc Disk Model Name [ ]Add [ ]Del [ESC] Quit [F6] Back [F7] Finish [TAB] Navigate [ ] Select [ENTER] Popup 9 Define a New Array window appears. By default, RAID Mode is set it to Striping if you press , the NVIDIA RAID Utility - Define a New Array - After you want to create RAID 0.
And the Striping Block is set to Mirroring, but please set to Optimal as default. NVIDIA RAID Utility Jan 12 2005 - RAID Mode : Mirroring Free Disks Loc Disk 1.0.M Maxt 1.1.M Maxt Mirroring Striping Stripe Mirroring Spanning Stripimg Block : Optimal Array Disks Loc Disk Model Name [ ]Add [ ]Del [ESC] Quit [F6] Back [F7] Finish [TAB] Navigate [ ] Select [ENTER] Popup 9 Define a New Array window appears. By default, RAID Mode is set it to Striping if you press , the NVIDIA RAID Utility - Define a New Array - After you want to create RAID 0.
RAID Installation Guide
Page 11
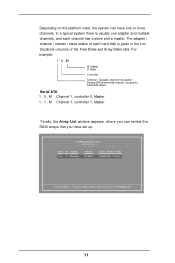
... a typical system there is given in the Loc (location) columns of the Free Disks and Array Disks lists. M Channel 1, controller 1, Master Finally, the Array List window appears, where you have one adapter and multiple channels, and each channel has a slave and a master. The adapter / channel / master / slave status of each hard...
... a typical system there is given in the Loc (location) columns of the Free Disks and Array Disks lists. M Channel 1, controller 1, Master Finally, the Array List window appears, where you have one adapter and multiple channels, and each channel has a slave and a master. The adapter / channel / master / slave status of each hard...
RAID Installation Guide
Page 12
... UTILITY IDE Configuration OnBoard IDE Controller OnBoard SATA Controller SATA Operation Mode Primary IDE Master Primary IDE Slave Secondary IDE Master Secondary IDE Slave SATA1 SATA2 [Both] [Enabled] [RAID] [Hard Disk] [Not Detected] [ATAPI CDROM] [Not Detected] [Not Detected] [Not Detected] Config SATA operation mode. +F1 F10 ESC Select... , then the main interface of the system POST and boot process prior to [RAID]. You have a few seconds to press . Then, the below window appears. After rebooting your computer, wait until you seee the RAID software prompting you to press before the...
... UTILITY IDE Configuration OnBoard IDE Controller OnBoard SATA Controller SATA Operation Mode Primary IDE Master Primary IDE Slave Secondary IDE Master Secondary IDE Slave SATA1 SATA2 [Both] [Enabled] [RAID] [Hard Disk] [Not Detected] [ATAPI CDROM] [Not Detected] [Not Detected] [Not Detected] Config SATA operation mode. +F1 F10 ESC Select... , then the main interface of the system POST and boot process prior to [RAID]. You have a few seconds to press . Then, the below window appears. After rebooting your computer, wait until you seee the RAID software prompting you to press before the...

RAID Installation Guide
Page 13
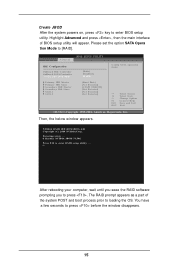
... you do not need to Optimal as default. NVIDIA RAID Utility Jan 12 2005 - NVIDIA RAID Utility Jan 12 2005 - Define a New Array window appears. Define a New Array - And you press , the NVIDIA RAID Utility - And the Striping Block is set to change it when setting up... 64K 128K Optim [ ]Del [ESC] Quit [F6] Back [F7] Finish [TAB] Navigate [ ] Select [ENTER] Popup 13 After you will see the below windows. RAID Mode : Mirroring Free Disks Loc Disk 1.0.M Maxt 1.1.M Maxt Mirroring Striping Stripe Mirroring Spanning Stripimg Block : Optimal Array Disks Loc Disk Model Name [ ]Add ...
... you do not need to Optimal as default. NVIDIA RAID Utility Jan 12 2005 - NVIDIA RAID Utility Jan 12 2005 - Define a New Array window appears. Define a New Array - And you press , the NVIDIA RAID Utility - And the Striping Block is set to change it when setting up... 64K 128K Optim [ ]Del [ESC] Quit [F6] Back [F7] Finish [TAB] Navigate [ ] Select [ENTER] Popup 13 After you will see the below windows. RAID Mode : Mirroring Free Disks Loc Disk 1.0.M Maxt 1.1.M Maxt Mirroring Striping Stripe Mirroring Spanning Stripimg Block : Optimal Array Disks Loc Disk Model Name [ ]Add ...
RAID Installation Guide
Page 15
... UTILITY IDE Configuration OnBoard IDE Controller OnBoard SATA Controller SATA Operation Mode Primary IDE Master Primary IDE Slave Secondary IDE Master Secondary IDE Slave SATA1 SATA2 [Both] [Enabled] [RAID] [Hard Disk] [Not Detected] [ATAPI CDROM] [Not Detected] [Not Detected] [Not Detected] Config ... seconds to enter RAID setup utility . . . Detecting array . . . 0 Healthy NVIDIA JBOD 74.54G Press F10 to press before the window disappears. 15 Highlight Advanced and press , then the main interface of the system POST and boot process prior to enter BIOS setup utility. Then,...
... UTILITY IDE Configuration OnBoard IDE Controller OnBoard SATA Controller SATA Operation Mode Primary IDE Master Primary IDE Slave Secondary IDE Master Secondary IDE Slave SATA1 SATA2 [Both] [Enabled] [RAID] [Hard Disk] [Not Detected] [ATAPI CDROM] [Not Detected] [Not Detected] [Not Detected] Config ... seconds to enter RAID setup utility . . . Detecting array . . . 0 Healthy NVIDIA JBOD 74.54G Press F10 to press before the window disappears. 15 Highlight Advanced and press , then the main interface of the system POST and boot process prior to enter BIOS setup utility. Then,...
RAID Installation Guide
Page 16
... 8K 16K 32K 64K 128K Optim [ ]Del [ESC] Quit [F6] Back [F7] Finish [TAB] Navigate [ ] Select [ENTER] Popup 16 After you will see the below windows. Define a New Array window appears. NVIDIA RAID Utility Jan 12 2005 - Define a New Array - NVIDIA RAID Utility Jan 12 2005 -
... 8K 16K 32K 64K 128K Optim [ ]Del [ESC] Quit [F6] Back [F7] Finish [TAB] Navigate [ ] Select [ENTER] Popup 16 After you will see the below windows. Define a New Array window appears. NVIDIA RAID Utility Jan 12 2005 - Define a New Array - NVIDIA RAID Utility Jan 12 2005 -
RAID Utility for Windows Guide
Page 1
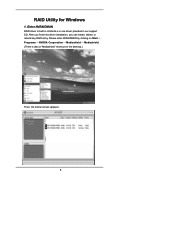
Enter NVRAIDMAN RAID driver is also a "Mediashield" shortcut on the desktop.) Then, the below screen appears. 1 RAID Utility for Windows 1. Please enter NVRAIDMAN by clicking on Start Programs NVIDIA Corporation Mediashield Mediashield. (There is built in nVidia ALL in one driver provided in our support CD. After you finish the driver installation, you can create, delete, or rebuild any RAID array.
Enter NVRAIDMAN RAID driver is also a "Mediashield" shortcut on the desktop.) Then, the below screen appears. 1 RAID Utility for Windows 1. Please enter NVRAIDMAN by clicking on Start Programs NVIDIA Corporation Mediashield Mediashield. (There is built in nVidia ALL in one driver provided in our support CD. After you finish the driver installation, you can create, delete, or rebuild any RAID array.
RAID Utility for Windows Guide
Page 2
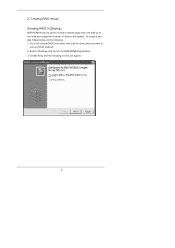
Boot to use are RAID enabled. 2. 2. To create a twodisk Striped Array do the following screen will appear. 2 Create Array and the following . 1. Go to the system BIOS and make sure that the drives that you want to Windows and launch the NVRAIDMAN application. 3. Creating RAID Arrays Creating RAID 0 (Striping) NVRAIDMAN can be used to create a striped array from one disk up to the maximum supported number of disks in the system.
Boot to use are RAID enabled. 2. 2. To create a twodisk Striped Array do the following screen will appear. 2 Create Array and the following . 1. Go to the system BIOS and make sure that the drives that you want to Windows and launch the NVRAIDMAN application. 3. Creating RAID Arrays Creating RAID 0 (Striping) NVRAIDMAN can be used to create a striped array from one disk up to the maximum supported number of disks in the system.
RAID Utility for Windows Guide
Page 6
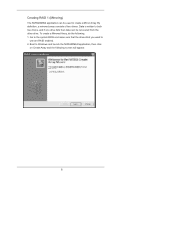
Creating RAID 1 (Mirroring) The NVRAIDMAN application can be used to create a Mirror Array. To create a Mirrored Array, do the following screen will appear. 6 Boot to Windows and launch the NVRAIDMAN application, then click on Create Array and the following . 1. Go to the system BIOS and make sure that the drives that you want to both two drives, and if one drive fails then data can be recovered from the other drive. Data is written to use are RAID enabled. 2. By definition, a mirrored array consists of two drives.
Creating RAID 1 (Mirroring) The NVRAIDMAN application can be used to create a Mirror Array. To create a Mirrored Array, do the following screen will appear. 6 Boot to Windows and launch the NVRAIDMAN application, then click on Create Array and the following . 1. Go to the system BIOS and make sure that the drives that you want to both two drives, and if one drive fails then data can be recovered from the other drive. Data is written to use are RAID enabled. 2. By definition, a mirrored array consists of two drives.

RAID Utility for Windows Guide
Page 10
Go to the system BIOS and make sure that the drives that you want to Windows and launch the NVRAIDMAN application, then click on Create Array and the following screen will appear. 10 Boot to use are RAID enabled. 2. Creating JBOD (Spanning) NVRAIDMAN can be used to create a Spanning Array which requires at least one disk to start such an array. To create a Spanning Array do the following screen will appear. 3. Click Next and the following : 1.
Go to the system BIOS and make sure that the drives that you want to Windows and launch the NVRAIDMAN application, then click on Create Array and the following screen will appear. 10 Boot to use are RAID enabled. 2. Creating JBOD (Spanning) NVRAIDMAN can be used to create a Spanning Array which requires at least one disk to start such an array. To create a Spanning Array do the following screen will appear. 3. Click Next and the following : 1.
RAID Utility for Windows Guide
Page 18
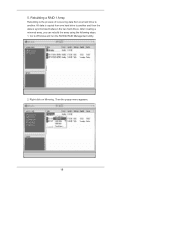
All data is copied from one hard drive to another and then the data is the process of recovering data from one hard drive to Windows and run the NVIDIA RAID Management utility. 2. Go to another . Right-click on Mirroring. After creating a mirrored array, you can rebuild the array using the following steps: 1. Then the popup menu appears. 18 5. Rebuilding a RAID 1 Array Rebuilding is synchronized between the two hard drives.
All data is copied from one hard drive to another and then the data is the process of recovering data from one hard drive to Windows and run the NVIDIA RAID Management utility. 2. Go to another . Right-click on Mirroring. After creating a mirrored array, you can rebuild the array using the following steps: 1. Then the popup menu appears. 18 5. Rebuilding a RAID 1 Array Rebuilding is synchronized between the two hard drives.
User Manual
Page 3
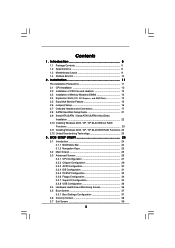
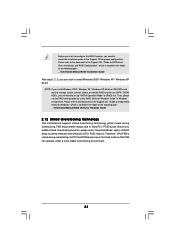
...Boot Settings Configuration 37 3.6 Security Screen 38 3.7 Exit Screen 39 3 Introduction 5 1.1 Package Contents 5 1.2 Specifications 6 1.3 Motherboard Layout 9 1.4 ASRock 8CH I/O 10 2 . Installation 11 Pre-installation Precautions 11 2.1 CPU Installation 12 2.2 Installation of CPU Fan and Heatsink 12 2.3 Installation of Memory...21 2.9 Serial ATA (SATA) / Serial ATAII (SATAII) Hard Disks Installation 22 2.10 Installing Windows 2000 / XP / XP 64-bit Without RAID Functions 23 2.11 Installing Windows 2000 / XP / XP 64-bit With RAID Functions. 23 2.12 Untied Overclocking Technology 23 ...
...Boot Settings Configuration 37 3.6 Security Screen 38 3.7 Exit Screen 39 3 Introduction 5 1.1 Package Contents 5 1.2 Specifications 6 1.3 Motherboard Layout 9 1.4 ASRock 8CH I/O 10 2 . Installation 11 Pre-installation Precautions 11 2.1 CPU Installation 12 2.2 Installation of CPU Fan and Heatsink 12 2.3 Installation of Memory...21 2.9 Serial ATA (SATA) / Serial ATAII (SATAII) Hard Disks Installation 22 2.10 Installing Windows 2000 / XP / XP 64-bit Without RAID Functions 23 2.11 Installing Windows 2000 / XP / XP 64-bit With RAID Functions. 23 2.12 Untied Overclocking Technology 23 ...

User Manual
Page 7
.../s connectors, support RAID 0, 1, JBOD (Not Support "Hot Plug" function) (see CAUTION 8) - 4Mb AMI BIOS - Motherboard Temperature Sensing - Voltage Monitoring: +12V, +5V, +3.3V, Vcore - Microsoft® Windows® 2000 / XP / XP 64-bit compliant - Front panel audio connector - 2 x USB 2.0 headers (support 4 USB 2.0 ports) (see CAUTION 7) - 2 x ATA133 IDE connectors (support 4 x IDE devices) - 1 x Floppy...
.../s connectors, support RAID 0, 1, JBOD (Not Support "Hot Plug" function) (see CAUTION 8) - 4Mb AMI BIOS - Motherboard Temperature Sensing - Voltage Monitoring: +12V, +5V, +3.3V, Vcore - Microsoft® Windows® 2000 / XP / XP 64-bit compliant - Front panel audio connector - 2 x USB 2.0 headers (support 4 USB 2.0 ports) (see CAUTION 7) - 2 x ATA133 IDE connectors (support 4 x IDE devices) - 1 x Floppy...
User Manual
Page 8
... Memory Technology. To improve heat dissipation, remember to SATAII connector directly. 8. See APPENDIX on page 10 for USB 2.0 works fine under Windows system. Although this motherboard offers stepless control, it to SATAII mode. Before installing SATAII hard disk to SATAII connector, please read "Untied ... the SATAII hard disk to SATA hard disk (from SATAII 3Gb/s down to enable AMD's Cool 'n' QuietTM technology under Microsoft® Windows® XP SP1 / 2000 SP4. 8 Frequencies other than the recommended CPU bus frequencies may cause the instability of memory modules on ...
... Memory Technology. To improve heat dissipation, remember to SATAII connector directly. 8. See APPENDIX on page 10 for USB 2.0 works fine under Windows system. Although this motherboard offers stepless control, it to SATAII mode. Before installing SATAII hard disk to SATAII connector, please read "Untied ... the SATAII hard disk to SATA hard disk (from SATAII 3Gb/s down to enable AMD's Cool 'n' QuietTM technology under Microsoft® Windows® XP SP1 / 2000 SP4. 8 Frequencies other than the recommended CPU bus frequencies may cause the instability of memory modules on ...
User Manual
Page 22
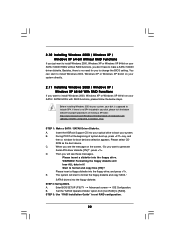
... . Insert the ASRock Support CD into your optical drive to boot your disk is no SP4 included in it! C. WARNING! The system will start to install Windows 2000, Windows XP or Windows XP 64-bit on your system directly. 2.11 Installing Windows 2000 / Windows XP / Windows XP 64-bit With... RAID Functions If you want to install Windows 2000, Windows XP or Windows XP 64-bit on the screen, "Do you...
... . Insert the ASRock Support CD into your optical drive to boot your disk is no SP4 included in it! C. WARNING! The system will start to install Windows 2000, Windows XP or Windows XP 64-bit on your system directly. 2.11 Installing Windows 2000 / Windows XP / Windows XP 64-bit With... RAID Functions If you want to install Windows 2000, Windows XP or Windows XP 64-bit on the screen, "Do you...
User Manual
Page 23
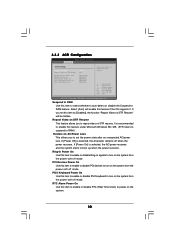
... overclocking, but PCI and PCIE buses are in the fixed mode so that FSB can start to install Windows 2000 / Windows XP / Windows XP 64-bit. If you install Windows 2000 / Windows XP / Windows XP 64-bit on IDE HDDs and want to manage (create, convert, delete, or rebuild) RAID ... overclocking environment. 23 Please refer to the document in the Support CD, "Guide to [RAID] first. Therefore, CPU FSB is located in Windows environment. Before you still need to check the installation guide in the folder at the following path: .. \Information\Manual\RAID Utility for proper configuration...
... overclocking, but PCI and PCIE buses are in the fixed mode so that FSB can start to install Windows 2000 / Windows XP / Windows XP 64-bit. If you install Windows 2000 / Windows XP / Windows XP 64-bit on IDE HDDs and want to manage (create, convert, delete, or rebuild) RAID ... overclocking environment. 23 Please refer to the document in the Support CD, "Guide to [RAID] first. Therefore, CPU FSB is located in Windows environment. Before you still need to check the installation guide in the folder at the following path: .. \Information\Manual\RAID Utility for proper configuration...
User Manual
Page 30
It is recommended to enable this feature under Microsoft Windows 98 / ME. (STR refers to suspend to turn on the system from the power-soft-off when the power recovers. PCI Devices Power On Use ...
It is recommended to enable this feature under Microsoft Windows 98 / ME. (STR refers to suspend to turn on the system from the power-soft-off when the power recovers. PCI Devices Power On Use ...


