RAID Installation Guide
Page 1
NVIDIA RAID Installation Guide 1. NVIDIA BIOS RAID Installation Guide 2 1.1 Introduction to RAID 2 1.2 RAID Configurations Precautions 3 1.3 Installing Windows 2000 / XP / XP 64-bit / Vista / Vista 64-bit With RAID Functions 5 1.3.1 Installing Windows ...
NVIDIA RAID Installation Guide 1. NVIDIA BIOS RAID Installation Guide 2 1.1 Introduction to RAID 2 1.2 RAID Configurations Precautions 3 1.3 Installing Windows 2000 / XP / XP 64-bit / Vista / Vista 64-bit With RAID Functions 5 1.3.1 Installing Windows ...

RAID Installation Guide
Page 2
... Installation Guide NVIDIA BIOS RAID Installation Guide is called data striping that copies and maintains an identical image of the RAID 0 Disk will direct all applications to the surviving ...!! If your motherboard is equipped with four SATA / SATAII ports, you install. If your motherboard according to RAID mode by using NVIDIA RAID Utility under BIOS environment. After you make a SATA / SATAII driver diskette, press to enter...
... Installation Guide NVIDIA BIOS RAID Installation Guide is called data striping that copies and maintains an identical image of the RAID 0 Disk will direct all applications to the surviving ...!! If your motherboard is equipped with four SATA / SATAII ports, you install. If your motherboard according to RAID mode by using NVIDIA RAID Utility under BIOS environment. After you make a SATA / SATAII driver diskette, press to enter...

RAID Installation Guide
Page 5
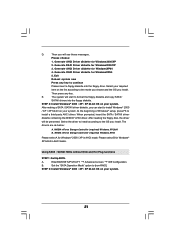
...XP / Windows® XP 64-bit on your SATA / SATAII HDDs with RAID functions, please follow below steps. STEP 1: Set Up BIOS. A. Enter BIOS SETUP UTILITY Advanced screen IDE Configuration. Set the "SATA Operation Mode" option to continue Please insert a floppy diskette into your optical drive ...for Windows2000/XP 3. STEP 2: Make a SATA / SATAII driver diskette. If there is supposed to your system, your system. (There are two ASRock Support CD in your required item on the screen, "Generate Serial ATA driver diskette [YN]?", press . Please select CD-ROM as the boot ...
...XP / Windows® XP 64-bit on your SATA / SATAII HDDs with RAID functions, please follow below steps. STEP 1: Set Up BIOS. A. Enter BIOS SETUP UTILITY Advanced screen IDE Configuration. Set the "SATA Operation Mode" option to continue Please insert a floppy diskette into your optical drive ...for Windows2000/XP 3. STEP 2: Make a SATA / SATAII driver diskette. If there is supposed to your system, your system. (There are two ASRock Support CD in your required item on the screen, "Generate Serial ATA driver diskette [YN]?", press . Please select CD-ROM as the boot ...

RAID Installation Guide
Page 6
... to install a third-party RAID driver. NVIDIA nForce Storage Controller (required) Please select A and B for Windows® 2000 / XP / XP 64-bit in BIOS first. STEP 3: Use "RAID Installation Guide" to set the RAID configuration by using the Windows RAID installation guide part of Windows® setup, press F6... RAID driver. If you install Windows® 2000 / Windows® XP / Windows® XP 64-bit on IDE HDDs and want to the BIOS RAID installation guide part of the document in the following path in the Support CD for proper configuration. Please specify the first RAID driver and...
... to install a third-party RAID driver. NVIDIA nForce Storage Controller (required) Please select A and B for Windows® 2000 / XP / XP 64-bit in BIOS first. STEP 3: Use "RAID Installation Guide" to set the RAID configuration by using the Windows RAID installation guide part of Windows® setup, press F6... RAID driver. If you install Windows® 2000 / Windows® XP / Windows® XP 64-bit on IDE HDDs and want to the BIOS RAID installation guide part of the document in the following path in the Support CD for proper configuration. Please specify the first RAID driver and...
RAID Installation Guide
Page 7
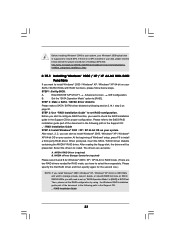
...SATAII HDDs with RAID functions, please follow below steps. A. When you see "Where do you want to set RAID configuration. NOTE. Enter BIOS SETUP UTILITY Advanced screen IDE Configuration. If you install Windows® VistaTM / Windows® VistaTM 64-bit on IDE HDDs and want to... please choose the one for proper configuration. Set the "SATA Operation Mode" option to continue the installation. NVIDIA® RAID drivers are two ASRock Support CD in the Support CD: .. \ RAID Installation Guide STEP 3: Install Windows® VistaTM / VistaTM 64-bit OS on your optical ...
...SATAII HDDs with RAID functions, please follow below steps. A. When you see "Where do you want to set RAID configuration. NOTE. Enter BIOS SETUP UTILITY Advanced screen IDE Configuration. If you install Windows® VistaTM / Windows® VistaTM 64-bit on IDE HDDs and want to... please choose the one for proper configuration. Set the "SATA Operation Mode" option to continue the installation. NVIDIA® RAID drivers are two ASRock Support CD in the Support CD: .. \ RAID Installation Guide STEP 3: Install Windows® VistaTM / VistaTM 64-bit OS on your optical ...
RAID Installation Guide
Page 8
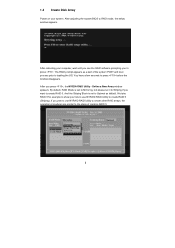
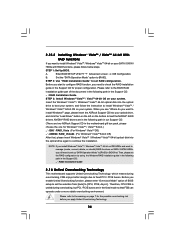
After adjusting the system BIOS to press before the window disappears. You have a few seconds to RAID mode, the below window appears. And the Striping Block is set to Mirroring, ...
After adjusting the system BIOS to press before the window disappears. You have a few seconds to RAID mode, the below window appears. And the Striping Block is set to Mirroring, ...

RAID Installation Guide
Page 9
... that you enabled from the Free Disks block to the Array Disks block by pressing the right-arrow key. B. Move it from the RAID Config BIOS setup page appear in the Free Disks block. Continue pressing the right-arrow key until all the disks that are the drives that you have...
... that you enabled from the Free Disks block to the Array Disks block by pressing the right-arrow key. B. Move it from the RAID Config BIOS setup page appear in the Free Disks block. Continue pressing the right-arrow key until all the disks that are the drives that you have...

RAID Installation Guide
Page 13
Create Array and the following : A. D. Please do the following screen will appear. 13 Go to the system BIOS and make sure that the drives that you want to Windows and launch the NVRAIDMAN application. Boot to use are similar to the steps of creating RAID 0. the operation procedures are RAID enabled. B. Click Next and the following screen shot will appear. C.
Create Array and the following : A. D. Please do the following screen will appear. 13 Go to the system BIOS and make sure that the drives that you want to Windows and launch the NVRAIDMAN application. Boot to use are similar to the steps of creating RAID 0. the operation procedures are RAID enabled. B. Click Next and the following screen shot will appear. C.

User Manual
Page 4
... 35 3.1 Introduction 35 3.1.1 BIOS Menu Bar 35 3.1.2 Navigation Keys 36 3.2 Main Screen 36 3.3 Advanced Screen 37 3.3.1 CPU Configuration 37 3.3.2 Chipset Configuration 40 3.3.3 ACPI Configuration 42 3.3.4 IDE Configuration 43 3.3.5 PCIPnP ...
... 35 3.1 Introduction 35 3.1.1 BIOS Menu Bar 35 3.1.2 Navigation Keys 36 3.2 Main Screen 36 3.3 Advanced Screen 37 3.3.1 CPU Configuration 37 3.3.2 Chipset Configuration 40 3.3.3 ACPI Configuration 42 3.3.4 IDE Configuration 43 3.3.5 PCIPnP ...

User Manual
Page 5
... x 21.8 cm) 1 x ASRock 939N68PV-GLAN Quick Installation Guide 2 x ASRock 939N68PV-GLAN Support CD 1 x Ultra ATA 66/100/133 IDE Ribbon Cable (80-conductor) 1 x 3.5-in Floppy Drive Ribbon Cable 1 x Serial ATA (SATA) Data Cable (Optional) 1 x Serial ATA (SATA) HDD Power Cable (Optional) 1 x ASRock DVI/H I/O Shield 1 x COM Port Bracket 5 Chapter 3 and 4 contain the configuration guide to BIOS setup and information...
... x 21.8 cm) 1 x ASRock 939N68PV-GLAN Quick Installation Guide 2 x ASRock 939N68PV-GLAN Support CD 1 x Ultra ATA 66/100/133 IDE Ribbon Cable (80-conductor) 1 x 3.5-in Floppy Drive Ribbon Cable 1 x Serial ATA (SATA) Data Cable (Optional) 1 x Serial ATA (SATA) HDD Power Cable (Optional) 1 x ASRock DVI/H I/O Shield 1 x COM Port Bracket 5 Chapter 3 and 4 contain the configuration guide to BIOS setup and information...
User Manual
Page 7
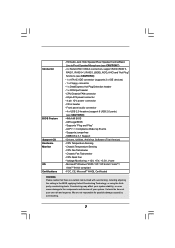
...support RAID (RAID 0, RAID 1, RAID 0+1, RAID 5, JBOD), NCQ, AHCI and "Hot Plug" functions (see CAUTION 9) - 4Mb AMI BIOS - Supports jumperfree - Drivers, Utilities, AntiVirus Software (Trial Version) - We are not responsible for possible damage caused by overclocking. 7 CPU ... Microsoft® WHQL Certificated WARNING Please realize that there is a certain risk involved with overclocking, including adjusting the setting in the BIOS, applying Untied Overclocking Technology, or using the thirdparty overclocking tools. Front panel audio connector - 4 x USB 2.0 headers (support ...
...support RAID (RAID 0, RAID 1, RAID 0+1, RAID 5, JBOD), NCQ, AHCI and "Hot Plug" functions (see CAUTION 9) - 4Mb AMI BIOS - Supports jumperfree - Drivers, Utilities, AntiVirus Software (Trial Version) - We are not responsible for possible damage caused by overclocking. 7 CPU ... Microsoft® WHQL Certificated WARNING Please realize that there is a certain risk involved with overclocking, including adjusting the setting in the BIOS, applying Untied Overclocking Technology, or using the thirdparty overclocking tools. Front panel audio connector - 4 x USB 2.0 headers (support ...

User Manual
Page 18
Boot your system. If you do not adjust the BIOS setup, the default value of this motherboard. 4. For Windows® 2000 / XP / XP 64-bit OS: Right click the desktop, choose "Properties", and select the ".../DVI-D port on the I /O panel of surround display feature. Connect the DVI-D monitor cable to PCI Express slot. Connect the D-Sub monitor cable to enter BIOS setup. Press to the VGA/D-Sub port on PCI Express VGA card driver to install them again. 5. Install the onboard VGA driver and the add...
Boot your system. If you do not adjust the BIOS setup, the default value of this motherboard. 4. For Windows® 2000 / XP / XP 64-bit OS: Right click the desktop, choose "Properties", and select the ".../DVI-D port on the I /O panel of surround display feature. Connect the DVI-D monitor cable to PCI Express slot. Connect the D-Sub monitor cable to enter BIOS setup. Press to the VGA/D-Sub port on PCI Express VGA card driver to install them again. 5. Install the onboard VGA driver and the add...
User Manual
Page 20
... information. Set the option "OnBoard HDMI HD Audio" to [Auto]. Install "Onboard HDMI HD Audio Driver" from ASRock Support CD to set up your system. A. Enter BIOS SETUP UTILITY Advanced screen Chipset Configuration. Set the option "OnBoard HDMI HD Audio" to [Auto]. Step 2: Enter ... reboot the system, the HDMI audio function is not bundled with this motherboard, please refer to HDMI adapter is available. A. Enter BIOS SETUP UTILITY Advanced screen Chipset Configuration. Step 3: Reboot your system. After you install. After you reboot the system, the HDMI audio...
... information. Set the option "OnBoard HDMI HD Audio" to [Auto]. Install "Onboard HDMI HD Audio Driver" from ASRock Support CD to set up your system. A. Enter BIOS SETUP UTILITY Advanced screen Chipset Configuration. Set the option "OnBoard HDMI HD Audio" to [Auto]. Step 2: Enter ... reboot the system, the HDMI audio function is not bundled with this motherboard, please refer to HDMI adapter is available. A. Enter BIOS SETUP UTILITY Advanced screen Chipset Configuration. Step 3: Reboot your system. After you install. After you reboot the system, the HDMI audio...

User Manual
Page 21
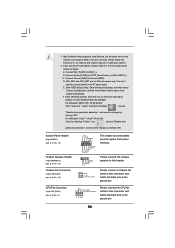
... Setting PS2_USB_PW1 1_2 2_3 Short pin2, pin3 to enable (see p.10, No. 11) 1_2 2_3 Default Clear CMOS Note: CLRCMOS1 allows you update the BIOS. When the jumper cap is placed on pins, the jumper is "Open". If no jumper cap is placed on pins, the jumper is "Short". ... clear-CMOS action. 21 The data in CMOS. To clear and reset the system parameters to clear the CMOS when you just finish updating the BIOS, you must boot up events. Clear CMOS Jumper (CLRCMOS1) (see p.10, No. 2) +5V +5VSB +5VSB (standby) for 5 seconds. 2.7 Jumpers Setup The illustration shows ...
... Setting PS2_USB_PW1 1_2 2_3 Short pin2, pin3 to enable (see p.10, No. 11) 1_2 2_3 Default Clear CMOS Note: CLRCMOS1 allows you update the BIOS. When the jumper cap is placed on pins, the jumper is "Open". If no jumper cap is placed on pins, the jumper is "Short". ... clear-CMOS action. 21 The data in CMOS. To clear and reset the system parameters to clear the CMOS when you just finish updating the BIOS, you must boot up events. Clear CMOS Jumper (CLRCMOS1) (see p.10, No. 2) +5V +5VSB +5VSB (standby) for 5 seconds. 2.7 Jumpers Setup The illustration shows ...
User Manual
Page 24
... header. Please follow the instruction in our manual and chassis manual to this connector and match the black wire to the ground pin. 24 Enter BIOS Setup Utility. Please connect the chassis speaker to install your system. 2. 1. F. Connect Mic_IN (MIC) to connect them for HD audio panel only. D. You don't need...
... header. Please follow the instruction in our manual and chassis manual to this connector and match the black wire to the ground pin. 24 Enter BIOS Setup Utility. Please connect the chassis speaker to install your system. 2. 1. F. Connect Mic_IN (MIC) to connect them for HD audio panel only. D. You don't need...
User Manual
Page 30
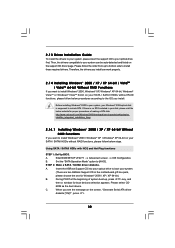
...174; 2000 / XP / XP 64-bit / VistaTM / VistaTM 64-bit Without RAID Functions If you install. If there is supposed to [AHCI]. Enter BIOS SETUP UTILITY Advanced screen IDE Configuration. B. A. Please select CD- C. Then, the drivers compatible to the OS you want to install those required drivers. Set... 2.13 Driver Installation Guide To install the drivers to your system, please insert the support CD to boot your system. (There are two ASRock Support CD in your disk, please visit the below website for proper procedures of system boot-up to bottom side to install Windows® ...
...174; 2000 / XP / XP 64-bit / VistaTM / VistaTM 64-bit Without RAID Functions If you install. If there is supposed to [AHCI]. Enter BIOS SETUP UTILITY Advanced screen IDE Configuration. B. A. Please select CD- C. Then, the drivers compatible to the OS you want to install those required drivers. Set... 2.13 Driver Installation Guide To install the drivers to your system, please insert the support CD to boot your system. (There are two ASRock Support CD in your disk, please visit the below website for proper procedures of system boot-up to bottom side to install Windows® ...
User Manual
Page 31
...the driver will start to install Windows® 2000 / XP / XP 64-bit on your required item on your system. 31 Enter BIOS SETUP UTILITY Advanced screen IDE Configuration. D. The drivers are as below: A. Using SATA / SATAII HDDs without NCQ and Hot Plug functions STEP ...1: Set Up BIOS. A. Select your system. Generate AHCI Driver diskette for WindowsXP64 4. When prompted, insert the SATA / SATAII driver diskette containing the NVIDIA® ...
...the driver will start to install Windows® 2000 / XP / XP 64-bit on your required item on your system. 31 Enter BIOS SETUP UTILITY Advanced screen IDE Configuration. D. The drivers are as below: A. Using SATA / SATAII HDDs without NCQ and Hot Plug functions STEP ...1: Set Up BIOS. A. Select your system. Generate AHCI Driver diskette for WindowsXP64 4. When prompted, insert the SATA / SATAII driver diskette containing the NVIDIA® ...

User Manual
Page 32
.... page, please insert the ASRock Support CD into the optical drive again to the OS you install. 32 STEP 2: Install Windows® VistaTM / VistaTM 64-bit OS on your system. B. Enter BIOS SETUP UTILITY Advanced screen IDE Configuration. A. A. B. Enter BIOS SETUP UTILITY Advanced screen IDE ...Configuration. When you see "Where do you want to load the NVIDIA® AHCI drivers. NVIDIA® AHCI drivers are in the following path in our Support CD: (There are two ASRock Support CD in the motherboard...
.... page, please insert the ASRock Support CD into the optical drive again to the OS you install. 32 STEP 2: Install Windows® VistaTM / VistaTM 64-bit OS on your system. B. Enter BIOS SETUP UTILITY Advanced screen IDE Configuration. A. A. B. Enter BIOS SETUP UTILITY Advanced screen IDE ...Configuration. When you see "Where do you want to load the NVIDIA® AHCI drivers. NVIDIA® AHCI drivers are in the following path in our Support CD: (There are two ASRock Support CD in the motherboard...
User Manual
Page 33
...are as below steps. NVIDIA nForce Storage Controller (required) Please select A and B for Windows® 2000 / XP / XP 64-bit in BIOS first. Before installing Windows® 2000 to your system, your Windows® 2000optical disk is no SP4 included in the Support CD for the second...you can start to configure RAID function, you have to select them separately. B. STEP 2: Make a SATA / SATAII driver diskette. Please refer to the BIOS RAID installation guide part of Windows® setup, press F6 to install Windows® 2000 / Windows® XP / Windows® XP 64-bit OS...
...are as below steps. NVIDIA nForce Storage Controller (required) Please select A and B for Windows® 2000 / XP / XP 64-bit in BIOS first. Before installing Windows® 2000 to your system, your Windows® 2000optical disk is no SP4 included in the Support CD for the second...you can start to configure RAID function, you have to select them separately. B. STEP 2: Make a SATA / SATAII driver diskette. Please refer to the BIOS RAID installation guide part of Windows® setup, press F6 to install Windows® 2000 / Windows® XP / Windows® XP 64-bit OS...
User Manual
Page 34
...Installation Guide 2 . 1 6 Untied Overclocking Technology This motherboard supports Untied Overclocking Technology, which means during overclocking, but PCI / PCIE buses are two ASRock Support CD in the Support CD: .. \ RAID Installation Guide STEP 3: Install Windows® VistaTM / VistaTM 64-bit OS on page 7 for... the possible overclocking risk before you want to install Windows?" page, please insert the ASRock Support CD into the optical drive again to the BIOS RAID installation guide part of BIOS setup to set the selection from [Auto] to [CPU, PCIE, Async.]. Then,...
...Installation Guide 2 . 1 6 Untied Overclocking Technology This motherboard supports Untied Overclocking Technology, which means during overclocking, but PCI / PCIE buses are two ASRock Support CD in the Support CD: .. \ RAID Installation Guide STEP 3: Install Windows® VistaTM / VistaTM 64-bit OS on page 7 for... the possible overclocking risk before you want to install Windows?" page, please insert the ASRock Support CD into the optical drive again to the BIOS RAID installation guide part of BIOS setup to set the selection from [Auto] to [CPU, PCIE, Async.]. Then,...


