RAID Installation Guide
Page 1
... / XP 64-bit With RAID Funtions 3 1.3.2 Installing Windows 7 / 7 64-bit / Vista / Vista 64-bit With RAID Funtions 4 1.4 Create Disk Array 5 2. AMD RAID Installation Guide 1. AMD BIOS RAID Installation Guide 2 1.1 Introduction to RAIDXpert from the Internet 17 2.9 Running RAIDXpert without Network Connection 17 1
... / XP 64-bit With RAID Funtions 3 1.3.2 Installing Windows 7 / 7 64-bit / Vista / Vista 64-bit With RAID Funtions 4 1.4 Create Disk Array 5 2. AMD RAID Installation Guide 1. AMD BIOS RAID Installation Guide 2 1.1 Introduction to RAIDXpert from the Internet 17 2.9 Running RAIDXpert without Network Connection 17 1
RAID Installation Guide
Page 2
... (Data Striping) RAID 0 is called data mirroring that optimizes two identical hard disk drives to a second drive. AMD BIOS RAID Installation Guide AMD BIOS RAID Installation Guide is called data striping that copies and maintains an identical image of the data in the other drive if ... multiple drives and duplicated on another set . Hot-Plug any fault tolerance. After you can be mirrored using the onboard FastBuild BIOS utility under BIOS environment. The controller combines the performance of data striping (RAID 0) and the fault tolerance of a physical drive failure, data ...
... (Data Striping) RAID 0 is called data mirroring that optimizes two identical hard disk drives to a second drive. AMD BIOS RAID Installation Guide AMD BIOS RAID Installation Guide is called data striping that copies and maintains an identical image of the data in the other drive if ... multiple drives and duplicated on another set . Hot-Plug any fault tolerance. After you can be mirrored using the onboard FastBuild BIOS utility under BIOS environment. The controller combines the performance of data striping (RAID 0) and the fault tolerance of a physical drive failure, data ...
RAID Installation Guide
Page 4
... A. B. STEP 4: Install Windows XP / XP 64-bit OS on the screen, "Do you need to check this document for proper configuration. Enter BIOS SETUP UTILITY → Advanced screen →Storage Configuration. Set the "SATA Operation Mode" option to set RAID configuration, you will operate under a clean ..., you want to generate Serial ATA driver diskette [YN]?", press . B. During POST at the beginning of system boot-up BIOS. Insert the ASRock Support CD into your optical drive to boot your data first before you want to "Clear Disk Data" or not. Please...
... A. B. STEP 4: Install Windows XP / XP 64-bit OS on the screen, "Do you need to check this document for proper configuration. Enter BIOS SETUP UTILITY → Advanced screen →Storage Configuration. Set the "SATA Operation Mode" option to set RAID configuration, you will operate under a clean ..., you want to generate Serial ATA driver diskette [YN]?", press . B. During POST at the beginning of system boot-up BIOS. Insert the ASRock Support CD into your optical drive to boot your data first before you want to "Clear Disk Data" or not. Please...
RAID Installation Guide
Page 5
... the "SATA Operation Mode" option to set RAID configuration. Please refer to the BIOS RAID installation guide part in this RAID installation guide for details. After reading the floppy disk, the driver will be presented. B. STEP 3: Install Windows 7 ... HDDs with RAID functions, please follow below steps. Before you start to configure RAID function, you want to check this document for proper configuration. Enter BIOS SETUP UTILITY → Advanced screen →Storage Configuration. STEP 2: Use "RAID Installation Guide" to [RAID]. prompted, insert the SATA / SATAII / SATA3 driver...
... the "SATA Operation Mode" option to set RAID configuration. Please refer to the BIOS RAID installation guide part in this RAID installation guide for details. After reading the floppy disk, the driver will be presented. B. STEP 3: Install Windows 7 ... HDDs with RAID functions, please follow below steps. Before you start to configure RAID function, you want to check this document for proper configuration. Enter BIOS SETUP UTILITY → Advanced screen →Storage Configuration. STEP 2: Use "RAID Installation Guide" to [RAID]. prompted, insert the SATA / SATAII / SATA3 driver...

User Manual
Page 4
... 60 4.1 Install Operating System 60 4.2 Support CD Information 60 4.2.1 Running Support CD 60 4.2.2 Drivers Menu 60 4.2.3 Utilities Menu 60 4.2.4 Contact Information 60 4 BIOS SETUP UTILITY 36 3.1 Introduction 36 3.1.1 BIOS Menu Bar 36 3.1.2 Navigation Keys 37 3.2 Main Screen 37 3.3 OC Tweaker Screen 38 3.4 Advanced Screen 46 3.4.1 CPU Configuration 47 3.4.2 Chipset Configuration 48 3.4.3 ACPI...
... 60 4.1 Install Operating System 60 4.2 Support CD Information 60 4.2.1 Running Support CD 60 4.2.2 Drivers Menu 60 4.2.3 Utilities Menu 60 4.2.4 Contact Information 60 4 BIOS SETUP UTILITY 36 3.1 Introduction 36 3.1.1 BIOS Menu Bar 36 3.1.2 Navigation Keys 37 3.2 Main Screen 37 3.3 OC Tweaker Screen 38 3.4 Advanced Screen 46 3.4.1 CPU Configuration 47 3.4.2 Chipset Configuration 48 3.4.3 ACPI...

User Manual
Page 5
Chapter 3 and 4 contain the configuration guide to BIOS setup and information of this motherboard, please visit our website for specific information about the model you for purchasing ASRock 890GM Pro3 motherboard, a reliable motherboard produced under ASRock's consistently stringent quality control. In case any modifications of this manual, chapter 1 and 2 contain introduction of the motherboard and step...
Chapter 3 and 4 contain the configuration guide to BIOS setup and information of this motherboard, please visit our website for specific information about the model you for purchasing ASRock 890GM Pro3 motherboard, a reliable motherboard produced under ASRock's consistently stringent quality control. In case any modifications of this manual, chapter 1 and 2 contain introduction of the motherboard and step...

User Manual
Page 7
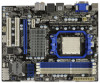
...LED) - 1 x IEEE 1394 Port - ACPI 1.1 Compliance Wake Up Events - Supports jumperfree - SMBIOS 2.3.1 Support - Supports LAN Cable Detection I /O SATA3 USB 3.0 Connector BIOS Feature - 7.1 CH HD Audio with 110dB dynamic range (VIA® VT2020 Audio Codec) - Supports "Plug and Play" - CPU VID, VCCM, NB Voltage Multi-adjustment 7... header - DAC with Content Protection - HD Audio Jack: Rear Speaker/Central/Bass/Line in/ Front Speaker/Microphone (see CAUTION 8) - 8Mb AMI BIOS - CPU/Chassis/Power FAN connector - 24 pin ATX power connector - 4 pin 12V power connector - AMI Legal...
...LED) - 1 x IEEE 1394 Port - ACPI 1.1 Compliance Wake Up Events - Supports jumperfree - SMBIOS 2.3.1 Support - Supports LAN Cable Detection I /O SATA3 USB 3.0 Connector BIOS Feature - 7.1 CH HD Audio with 110dB dynamic range (VIA® VT2020 Audio Codec) - Supports "Plug and Play" - CPU VID, VCCM, NB Voltage Multi-adjustment 7... header - DAC with Content Protection - HD Audio Jack: Rear Speaker/Central/Bass/Line in/ Front Speaker/Microphone (see CAUTION 8) - 8Mb AMI BIOS - CPU/Chassis/Power FAN connector - 24 pin ATX power connector - 4 pin 12V power connector - AMI Legal...

User Manual
Page 8
... - ASRock Instant Flash (see CAUTION 12) - ASRock OC DNA (see CAUTION 11) - CPU Temperature Sensing Monitor - FCC, CE, WHQL - ErP/EuP Ready (ErP/EuP ready power supply is a certain risk involved with overclocking, including adjusting the setting in the BIOS, applying... AMD OverDriveTM Utility, AMD Live! Voltage Monitoring: +12V, +5V, +3.3V, Vcore OS - Boot Failure Guard (B.F.G.) - Explorer, AMD Fusion, ASRock Software Suite (CyberLink DVD Suite - OEM and Trial; Creative Sound Blaster X-Fi MB - Intelligent Energy Saver (see CAUTION 15) * For detailed ...
... - ASRock Instant Flash (see CAUTION 12) - ASRock OC DNA (see CAUTION 11) - CPU Temperature Sensing Monitor - FCC, CE, WHQL - ErP/EuP Ready (ErP/EuP ready power supply is a certain risk involved with overclocking, including adjusting the setting in the BIOS, applying... AMD OverDriveTM Utility, AMD Live! Voltage Monitoring: +12V, +5V, +3.3V, Vcore OS - Boot Failure Guard (B.F.G.) - Explorer, AMD Fusion, ASRock Software Suite (CyberLink DVD Suite - OEM and Trial; Creative Sound Blaster X-Fi MB - Intelligent Energy Saver (see CAUTION 15) * For detailed ...
User Manual
Page 9
... 5. For audio output, this motherboard supports both stereo and mono modes. ASRock website: http://www.asrock.com 10. To use Intelligent Energy Saver function, please enable Cool 'n' Quiet option in the BIOS setup in addition, not every AM3 CPU can also increase L3 cache size up to 6MB, which allows ... the memory support list on this function because some CPU's hidden core may be malfunctioned. 2. As long as a simple switch of the BIOS option "ASRock UCC", you want to adopt DDR3 1800/1600 memory module on our website for USB 2.0 works fine under Windows® environment.
... 5. For audio output, this motherboard supports both stereo and mono modes. ASRock website: http://www.asrock.com 10. To use Intelligent Energy Saver function, please enable Cool 'n' Quiet option in the BIOS setup in addition, not every AM3 CPU can also increase L3 cache size up to 6MB, which allows ... the memory support list on this function because some CPU's hidden core may be malfunctioned. 2. As long as a simple switch of the BIOS option "ASRock UCC", you want to adopt DDR3 1800/1600 memory module on our website for USB 2.0 works fine under Windows® environment.
User Manual
Page 10
... supply selection, we recommend you can load the OC profile to their own system to access ASRock Instant Flash. The software name itself - Although this utility, you checking with your BIOS only in a few clicks without entering operating systems first like MS-DOS or Windows®. ...thermal grease between the CPU and the heatsink when you to save the new BIOS file to your overclocking record under 1.00W in Flash ROM. EuP, stands for Energy Using Product, was a provision regulated by ASRock, provides a convenient way for the completed system. According to Intel's suggestion,...
... supply selection, we recommend you can load the OC profile to their own system to access ASRock Instant Flash. The software name itself - Although this utility, you checking with your BIOS only in a few clicks without entering operating systems first like MS-DOS or Windows®. ...thermal grease between the CPU and the heatsink when you to save the new BIOS file to your overclocking record under 1.00W in Flash ROM. EuP, stands for Energy Using Product, was a provision regulated by ASRock, provides a convenient way for the completed system. According to Intel's suggestion,...
User Manual
Page 20
... the add-on PCI Express VGA card driver to this monitor". If you select is inserted to your system. Click "Apply" or "OK" to enter BIOS setup. Press to apply these new values. A. When you do not adjust the...
... the add-on PCI Express VGA card driver to this monitor". If you select is inserted to your system. Click "Apply" or "OK" to enter BIOS setup. Press to apply these new values. A. When you do not adjust the...

User Manual
Page 22
... rates. Step 4. ATI Catalyst Control Center 22 Enter "Advanced" screen, and enter "Chipset Settings". Install the onboard VGA driver from our support CD to enter BIOS setup. Please visit our website for ATITM Hybrid CrossFireXTM. Please refer to a single display for both the onboard VGA and the discrete graphics card. Boot...
... rates. Step 4. ATI Catalyst Control Center 22 Enter "Advanced" screen, and enter "Chipset Settings". Install the onboard VGA driver from our support CD to enter BIOS setup. Please visit our website for ATITM Hybrid CrossFireXTM. Please refer to a single display for both the onboard VGA and the discrete graphics card. Boot...

User Manual
Page 24
... USB6_7/8_9/10_11/12_13 wake up events. To clear and reset the system parameters to clear the CMOS when you just finish updating the BIOS, you update the BIOS. 2.7 Jumpers Setup The illustration shows how jumpers are "Short" when jumper cap is placed on these 2 pins. Jumper Setting PS2_USB_PW1 1_2 2_3 Short...
... USB6_7/8_9/10_11/12_13 wake up events. To clear and reset the system parameters to clear the CMOS when you just finish updating the BIOS, you update the BIOS. 2.7 Jumpers Setup The illustration shows how jumpers are "Short" when jumper cap is placed on these 2 pins. Jumper Setting PS2_USB_PW1 1_2 2_3 Short...

User Manual
Page 26
Please follow the instruction in our manual and chassis manual to MIC2_L. Connect Mic_IN (MIC) to install your system. 2. Enter BIOS Setup Utility. System Panel Header (9-pin PANEL1) (see p.11 No. 23) Chassis Speaker Header (4-pin SPEAKER 1) (see p.11 No. 25) USB_PWR P-7 P+7 GND DUMMY 1 GND P+6 P-6 USB_PWR ...
Please follow the instruction in our manual and chassis manual to MIC2_L. Connect Mic_IN (MIC) to install your system. 2. Enter BIOS Setup Utility. System Panel Header (9-pin PANEL1) (see p.11 No. 23) Chassis Speaker Header (4-pin SPEAKER 1) (see p.11 No. 25) USB_PWR P-7 P+7 GND DUMMY 1 GND P+6 P-6 USB_PWR ...

User Manual
Page 32
... POST at the beginning of system boot-up BIOS. Therefore, the drivers you install can be destroyed, proceed? [Y/N] Please insert a floppy diskette into the floppy drive, and press any key. Set the "SATA Operation Mode" option to boot your optical drive first. Insert the ASRock Support CD into the floppy diskette. 32...
... POST at the beginning of system boot-up BIOS. Therefore, the drivers you install can be destroyed, proceed? [Y/N] Please insert a floppy diskette into the floppy drive, and press any key. Set the "SATA Operation Mode" option to boot your optical drive first. Insert the ASRock Support CD into the floppy diskette. 32...
User Manual
Page 33
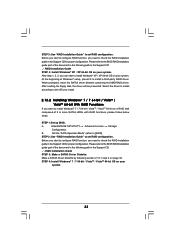
.... Please refer to install Windows® XP / XP 64-bit OS on page 32. STEP 3: Use "RAID Installation Guide" to [RAID]. STEP 1: Set up BIOS. Set the "SATA Operation Mode" option to set RAID configuration. At the beginning of Windows® setup, press F6 to the... driver. When prompted, insert the SATA3 driver diskette containing the AMD RAID driver. B. Before you start to configure RAID function, you can start to the BIOS RAID installation guide part of the document in the Support CD: .. \ RAID Installation Guide STEP 4: Install Windows® XP / XP 64-bit OS on ...
.... Please refer to install Windows® XP / XP 64-bit OS on page 32. STEP 3: Use "RAID Installation Guide" to [RAID]. STEP 1: Set up BIOS. Set the "SATA Operation Mode" option to set RAID configuration. At the beginning of Windows® setup, press F6 to the... driver. When prompted, insert the SATA3 driver diskette containing the AMD RAID driver. B. Before you start to configure RAID function, you can start to the BIOS RAID installation guide part of the document in the Support CD: .. \ RAID Installation Guide STEP 4: Install Windows® XP / XP 64-bit OS on ...

User Manual
Page 34
... 2: Install Windows® XP / XP 64-bit OS on your system. Using SATA3 HDDs with NCQ and Hot Plug functions (AHCI mode) STEP 1: Set Up BIOS. Enter BIOS SETUP UTILITY Advanced screen Storage Configuration. A. STEP 2: Make a SATA3 driver diskette. STEP 3: Install Windows® XP / XP 64-bit OS on your system. 34... to install Windows® XP / XP 64-bit on your system. B. Using SATA3 HDDs without NCQ and Hot Plug functions (IDE mode) STEP 1: Set up BIOS.
... 2: Install Windows® XP / XP 64-bit OS on your system. Using SATA3 HDDs with NCQ and Hot Plug functions (AHCI mode) STEP 1: Set Up BIOS. Enter BIOS SETUP UTILITY Advanced screen Storage Configuration. A. STEP 2: Make a SATA3 driver diskette. STEP 3: Install Windows® XP / XP 64-bit OS on your system. 34... to install Windows® XP / XP 64-bit on your system. B. Using SATA3 HDDs without NCQ and Hot Plug functions (IDE mode) STEP 1: Set up BIOS.

User Manual
Page 35
... to install Windows® 7 / 7 64-bit / VistaTM / VistaTM 64-bit on your SATA3 HDDs without NCQ and Hot Plug functions (IDE mode) STEP 1: Set up BIOS. A. STEP 2: Install Windows® 7 / 7 64-bit / VistaTM / VistaTM 64-bit OS on your system. 2.14.2 Installing Windows® 7 / 7 64-bit / ... If you want to the warning on page 8 for the possible overclocking risk before you enable Untied Overclocking function, please enter "Overclock Mode" option of BIOS setup to set the selection from [Auto] to [AHCI]. STEP 2: Install Windows® 7 / 7 64-bit / VistaTM / VistaTM 64-bit OS...
... to install Windows® 7 / 7 64-bit / VistaTM / VistaTM 64-bit on your SATA3 HDDs without NCQ and Hot Plug functions (IDE mode) STEP 1: Set up BIOS. A. STEP 2: Install Windows® 7 / 7 64-bit / VistaTM / VistaTM 64-bit OS on your system. 2.14.2 Installing Windows® 7 / 7 64-bit / ... If you want to the warning on page 8 for the possible overclocking risk before you enable Untied Overclocking function, please enter "Overclock Mode" option of BIOS setup to set the selection from [Auto] to [AHCI]. STEP 2: Install Windows® 7 / 7 64-bit / VistaTM / VistaTM 64-bit OS...

User Manual
Page 36
...following selections: Main To set up the system time/date information OC Tweaker To set up overclocking features Advanced To set up the advanced BIOS features H/W Monitor To display current hardware status Boot To set up the default system device to locate and load the Operating System Security ...To set up the computer. 3. BIOS SETUP UTILITY 3.1 Introduction This section explains how to use the BIOS SETUP UTILITY to get into the sub screen. 36 Please press or during the Power-On-Self-Test (POST...
...following selections: Main To set up the system time/date information OC Tweaker To set up overclocking features Advanced To set up the advanced BIOS features H/W Monitor To display current hardware status Boot To set up the default system device to locate and load the Operating System Security ...To set up the computer. 3. BIOS SETUP UTILITY 3.1 Introduction This section explains how to use the BIOS SETUP UTILITY to get into the sub screen. 36 Please press or during the Power-On-Self-Test (POST...

User Manual
Page 37
... UTILITY To jump to the Exit Screen or exit the current screen 3.2 Main Screen When you enter the BIOS SETUP UTILITY, the Main screen will appear and display the system overview. Navigation Key(s) / / + / Function Description Moves cursor left or right to select Screens ... UTILITY Main OC Tweaker Advanced H/W Monitor Boot Security Exit System Overview System Time System Date [17:00:09] [Tue 03/09/2010] BIOS Version : 890GM Pro3 P1.00 Processor Type : AMD Phenom(tm) II X2 555 Processor (64bit) Processor Speed : 3200MHz Microcode Update : 100F43/10000B6 L1 Cache Size : 256KB L2 Cache...
... UTILITY To jump to the Exit Screen or exit the current screen 3.2 Main Screen When you enter the BIOS SETUP UTILITY, the Main screen will appear and display the system overview. Navigation Key(s) / / + / Function Description Moves cursor left or right to select Screens ... UTILITY Main OC Tweaker Advanced H/W Monitor Boot Security Exit System Overview System Time System Date [17:00:09] [Tue 03/09/2010] BIOS Version : 890GM Pro3 P1.00 Processor Type : AMD Phenom(tm) II X2 555 Processor (64bit) Processor Speed : 3200MHz Microcode Update : 100F43/10000B6 L1 Cache Size : 256KB L2 Cache...


