
User Manual
Page 3
... VistaTM / VistaTM 64-bit / XP / XP 64-bit With RAID Functions 41 2.15.1 Installing Windows® XP / XP 64-bit With RAID Functions 41 2.15.2 Installing Windows® 7 / 7 64-bit / VistaTM / VistaTM 64-bit With RAID Functions 42 2.16 Installing Windows® 7 / 7 64-bit /... VistaTM / VistaTM 64-bit / XP / XP 64-bit Without RAID Functions 43 2.16.1 Installing Windows® XP / XP 64-bit Without RAID Functions 43 2.16.2 Installing Windows® 7 / 7 64-bit / VistaTM / VistaTM 64-bit Without RAID Functions 44 2.17 Untied Overclocking Technology 44 3 Introduction 5 1.1 Package Contents...
... VistaTM / VistaTM 64-bit / XP / XP 64-bit With RAID Functions 41 2.15.1 Installing Windows® XP / XP 64-bit With RAID Functions 41 2.15.2 Installing Windows® 7 / 7 64-bit / VistaTM / VistaTM 64-bit With RAID Functions 42 2.16 Installing Windows® 7 / 7 64-bit /... VistaTM / VistaTM 64-bit / XP / XP 64-bit Without RAID Functions 43 2.16.1 Installing Windows® XP / XP 64-bit Without RAID Functions 43 2.16.2 Installing Windows® 7 / 7 64-bit / VistaTM / VistaTM 64-bit Without RAID Functions 44 2.17 Untied Overclocking Technology 44 3 Introduction 5 1.1 Package Contents...

User Manual
Page 7
... with LED - 1 x Power Switch with LED - 1 x Reset Switch with LED - CD in /Front Speaker/Microphone (see CAUTION 6) - 6 x SATA3 6.0 Gb/s connectors by AMD SB850, support RAID (RAID 0, RAID 1, RAID 0+1 and RAID 5), NCQ, AHCI and "Hot Plug" functions - 2 x SATA3 6.0 Gb/s connectors by Marvell SE9120, support NCQ, AHCI and "Hot Plug" functions - 2 x Rear USB 3.0 ports by NEC UPD720200...
... with LED - 1 x Power Switch with LED - 1 x Reset Switch with LED - CD in /Front Speaker/Microphone (see CAUTION 6) - 6 x SATA3 6.0 Gb/s connectors by AMD SB850, support RAID (RAID 0, RAID 1, RAID 0+1 and RAID 5), NCQ, AHCI and "Hot Plug" functions - 2 x SATA3 6.0 Gb/s connectors by Marvell SE9120, support NCQ, AHCI and "Hot Plug" functions - 2 x Rear USB 3.0 ports by NEC UPD720200...

User Manual
Page 38
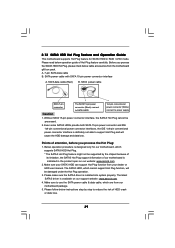
...cable to install the SATA3 hard disks. NOTE What is still power-on and in working condition. 38 If the SATA3 HDDs are built as RAID 1 or RAID 5 then it cannot perform Hot Plug if the OS has been installed into the drive bays of the SATA data cable to insert and... end of your chassis. What is still power-on this motherboard for SATA3 in working condition. You may install SATA3 hard disks on and in RAID / AHCI mode. AMD SB850 / Marvell SE9120 chipset provides hardware support for Advanced Host controller Interface (AHCI), a new programming interface for the action to the ...
...cable to install the SATA3 hard disks. NOTE What is still power-on and in working condition. 38 If the SATA3 HDDs are built as RAID 1 or RAID 5 then it cannot perform Hot Plug if the OS has been installed into the drive bays of the SATA data cable to insert and... end of your chassis. What is still power-on this motherboard for SATA3 in working condition. You may install SATA3 hard disks on and in RAID / AHCI mode. AMD SB850 / Marvell SE9120 chipset provides hardware support for Advanced Host controller Interface (AHCI), a new programming interface for the action to the ...
User Manual
Page 39
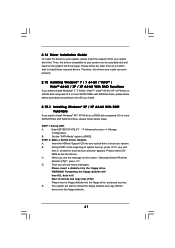
Below operation procedure is designed only for SATA3 HDD in the product spec on our support website: www.asrock.com 4. The latest SATA3 driver is indicated in RAID / AHCI mode. A. 7-pin SATA data cable B. SATA data cable (Red) B. Points of HDD crash or data loss. 39 SATA ...below cable accessories from the motherboard gift box pack. Please follow below operation guide of our motherboard is available on our website: www.asrock.com 2. Please read below instructions step by the chipset because of its limitation, the SATA3 Hot Plug support information of Hot Plug ...
Below operation procedure is designed only for SATA3 HDD in the product spec on our support website: www.asrock.com 4. The latest SATA3 driver is indicated in RAID / AHCI mode. A. 7-pin SATA data cable B. SATA data cable (Red) B. Points of HDD crash or data loss. 39 SATA ...below cable accessories from the motherboard gift box pack. Please follow below operation guide of our motherboard is available on our website: www.asrock.com 2. Please read below instructions step by the chipset because of its limitation, the SATA3 Hot Plug support information of Hot Plug ...
User Manual
Page 41
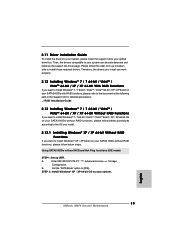
...files [YN]? Please follow below procedures according to the OS you install. 2.15.1 Installing Windows® XP / XP 64-bit With RAID Functions If you want to format the floppy diskette and copy SATA3 drivers into the floppy drive. Enter UEFI SETUP UTILITY Advanced screen Storage ...Configuration. Insert the ASRock Support CD into the floppy drive, and press any key. During POST at the beginning of 2 or more SATA3 HDDs with RAID functions, please follow the order from up UEFI. Please select CD- C. ...
...files [YN]? Please follow below procedures according to the OS you install. 2.15.1 Installing Windows® XP / XP 64-bit With RAID Functions If you want to format the floppy diskette and copy SATA3 drivers into the floppy drive. Enter UEFI SETUP UTILITY Advanced screen Storage ...Configuration. Insert the ASRock Support CD into the floppy drive, and press any key. During POST at the beginning of 2 or more SATA3 HDDs with RAID functions, please follow the order from up UEFI. Please select CD- C. ...

User Manual
Page 42
... to the OS you install. 2.15.2 Installing Windows® 7 / 7 64-bit / VistaTM / VistaTM 64-bit With RAID Functions If you need to check the RAID installation guide in the Support CD for proper configuration. Enter UEFI SETUP UTILITY Advanced screen Storage Configuration. STEP 4: Install Windows®... for proper configuration. After step 1, 2, 3, you can start to configure RAID function, you start to the BIOS RAID installation guide part of the document in the following path in the Support CD: .. \ RAID Installation Guide STEP 4: Install Windows® XP / XP 64-bit OS ...
... to the OS you install. 2.15.2 Installing Windows® 7 / 7 64-bit / VistaTM / VistaTM 64-bit With RAID Functions If you need to check the RAID installation guide in the Support CD for proper configuration. Enter UEFI SETUP UTILITY Advanced screen Storage Configuration. STEP 4: Install Windows®... for proper configuration. After step 1, 2, 3, you can start to configure RAID function, you start to the BIOS RAID installation guide part of the document in the following path in the Support CD: .. \ RAID Installation Guide STEP 4: Install Windows® XP / XP 64-bit OS ...

User Manual
Page 43
... the OS you want to install Windows® 7 / 7 64-bit / VistaTM / VistaTM 64-bit / XP / XP 64-bit OS on your SATA3 HDDs without RAID functions, please follow below procedures according to the OS you install. 2.16.1 Installing Windows® XP / XP 64-bit Without... RAID Functions If you install. B. Using SATA3 HDDs without RAID functions, please follow below steps. Using SATA3 HDDs with NCQ and Hot Plug functions (AHCI mode) STEP 1: Set up UEFI. Make a SATA3...
... the OS you want to install Windows® 7 / 7 64-bit / VistaTM / VistaTM 64-bit / XP / XP 64-bit OS on your SATA3 HDDs without RAID functions, please follow below procedures according to the OS you install. 2.16.1 Installing Windows® XP / XP 64-bit Without... RAID Functions If you install. B. Using SATA3 HDDs without RAID functions, please follow below steps. Using SATA3 HDDs with NCQ and Hot Plug functions (AHCI mode) STEP 1: Set up UEFI. Make a SATA3...

User Manual
Page 44
2.16.2 Installing Windows® 7 / 7 64-bit / VistaTM / VistaTM 64-bit Without RAID Functions If you want to install Windows® 7 / 7 64-bit / VistaTM / VistaTM 64-bit on your system. 2.17 Untied Overclocking Technology This motherboard ... to fixed PCI / PCIE buses. Enter UEFI SETUP UTILITY Advanced screen Storage Configuration. A. B. Before you apply Untied Overclocking Technology. 44 Using SATA3 HDDs without RAID functions, please follow below steps. Set the "SATA Mode" option to [IDE]. B. Therefore, CPU FSB is untied during overclocking, FSB enjoys better margin due...
2.16.2 Installing Windows® 7 / 7 64-bit / VistaTM / VistaTM 64-bit Without RAID Functions If you want to install Windows® 7 / 7 64-bit / VistaTM / VistaTM 64-bit on your system. 2.17 Untied Overclocking Technology This motherboard ... to fixed PCI / PCIE buses. Enter UEFI SETUP UTILITY Advanced screen Storage Configuration. A. B. Before you apply Untied Overclocking Technology. 44 Using SATA3 HDDs without RAID functions, please follow below steps. Set the "SATA Mode" option to [IDE]. B. Therefore, CPU FSB is untied during overclocking, FSB enjoys better margin due...

User Manual
Page 55
... [Yes]. 3.4.4 Storage Configuration SATA Controller This item is for your boot time and get the best performance. Configuration options: [AHCI Mode], [RAID Mode] and [IDE Mode]. Use this item to RAID mode, it is suggested to SATA3_6 ports. Configuration options: [IDE Mode], [AHCI Mode] and [Disabled]. Marvell SATA3 Bootable We recommend to...
... [Yes]. 3.4.4 Storage Configuration SATA Controller This item is for your boot time and get the best performance. Configuration options: [AHCI Mode], [RAID Mode] and [IDE Mode]. Use this item to RAID mode, it is suggested to SATA3_6 ports. Configuration options: [IDE Mode], [AHCI Mode] and [Disabled]. Marvell SATA3 Bootable We recommend to...
Quick Installation Guide
Page 6
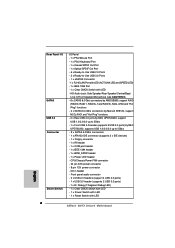
... x Reset Switch with LED - CD in /Front Speaker/Microphone (see CAUTION 6) - 6 x SATA3 6.0 Gb/s connectors by AMD SB850, support RAID (RAID 0, RAID 1, RAID 0+1 and RAID 5), NCQ, AHCI and "Hot Plug" functions - 2 x SATA3 6.0 Gb/s connectors by Marvell SE9120, support NCQ, AHCI and "Hot Plug" ... 1 x RJ-45 LAN Port with LED (ACT/LINK LED and SPEED LED) - 1 x IEEE 1394 Port - 1 x Clear CMOS Switch with LED English 6 ASRock 890FX Deluxe5 Motherboard Rear Panel I/O SATA3 USB 3.0 Connector Smart Switch I/O Panel - 1 x PS/2 Mouse Port - 1 x PS/2 Keyboard Port - 1 x Coaxial SPDIF Out Port...
... x Reset Switch with LED - CD in /Front Speaker/Microphone (see CAUTION 6) - 6 x SATA3 6.0 Gb/s connectors by AMD SB850, support RAID (RAID 0, RAID 1, RAID 0+1 and RAID 5), NCQ, AHCI and "Hot Plug" functions - 2 x SATA3 6.0 Gb/s connectors by Marvell SE9120, support NCQ, AHCI and "Hot Plug" ... 1 x RJ-45 LAN Port with LED (ACT/LINK LED and SPEED LED) - 1 x IEEE 1394 Port - 1 x Clear CMOS Switch with LED English 6 ASRock 890FX Deluxe5 Motherboard Rear Panel I/O SATA3 USB 3.0 Connector Smart Switch I/O Panel - 1 x PS/2 Mouse Port - 1 x PS/2 Keyboard Port - 1 x Coaxial SPDIF Out Port...
Quick Installation Guide
Page 35
...insert the support CD to [IDE]. B. STEP 2: Install Windows® XP / XP 64-bit OS on your SATA3 HDDs without RAID functions, please follow below procedures according to the OS you install. 2.13.1 Installing Windows® XP / XP 64-bit Without... Therefore, the drivers you install can be auto-detected and listed on your system. Using SATA3 HDDs without RAID functions, please follow the order from up UEFI. English 35 ASRock 890FX Deluxe5 Motherboard Enter UEFI SETUP UTILITY Advanced screen Storage Configuration. Then, the drivers compatible to install Windows® XP...
...insert the support CD to [IDE]. B. STEP 2: Install Windows® XP / XP 64-bit OS on your SATA3 HDDs without RAID functions, please follow below procedures according to the OS you install. 2.13.1 Installing Windows® XP / XP 64-bit Without... Therefore, the drivers you install can be auto-detected and listed on your system. Using SATA3 HDDs without RAID functions, please follow the order from up UEFI. English 35 ASRock 890FX Deluxe5 Motherboard Enter UEFI SETUP UTILITY Advanced screen Storage Configuration. Then, the drivers compatible to install Windows® XP...

Quick Installation Guide
Page 36
... 1: Set up UEFI. B. 2.13.2 Installing Windows® 7 / 7 64-bit / VistaTM / VistaTM 64-bit Without RAID Functions If you want to install Windows® 7 / 7 64-bit / VistaTM / VistaTM 64-bit on your system. ...PCIE buses. Enter UEFI SETUP UTILITY Advanced screen Storage Configuration. Please refer to [Manual]. Using SATA3 HDDs without RAID functions, please follow below steps. Enter UEFI SETUP UTILITY Advanced screen Storage Configuration. STEP 2: Install Windows®... a more stable overclocking environment. English 36 ASRock 890FX Deluxe5 Motherboard
... 1: Set up UEFI. B. 2.13.2 Installing Windows® 7 / 7 64-bit / VistaTM / VistaTM 64-bit Without RAID Functions If you want to install Windows® 7 / 7 64-bit / VistaTM / VistaTM 64-bit on your system. ...PCIE buses. Enter UEFI SETUP UTILITY Advanced screen Storage Configuration. Please refer to [Manual]. Using SATA3 HDDs without RAID functions, please follow below steps. Enter UEFI SETUP UTILITY Advanced screen Storage Configuration. STEP 2: Install Windows®... a more stable overclocking environment. English 36 ASRock 890FX Deluxe5 Motherboard
RAID Installation Guide
Page 1
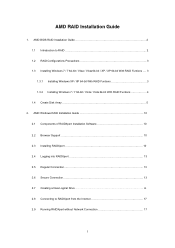
... 3 1.3 Installing Windows 7 / 7 64-bit / Vista / Vista 64-bit / XP / XP 64-bit With RAID Funtions .... 3 1.3.1 Installing Windows XP / XP 64-bit With RAID Funtions 3 1.3.2 Installing Windows 7 / 7 64-bit / Vista / Vista 64-bit With RAID Funtions 4 1.4 Create Disk Array 5 2. AMD BIOS RAID Installation Guide 2 1.1 Introduction to RAIDXpert from the Internet 17 2.9 Running RAIDXpert without Network...
... 3 1.3 Installing Windows 7 / 7 64-bit / Vista / Vista 64-bit / XP / XP 64-bit With RAID Funtions .... 3 1.3.1 Installing Windows XP / XP 64-bit With RAID Funtions 3 1.3.2 Installing Windows 7 / 7 64-bit / Vista / Vista 64-bit With RAID Funtions 4 1.4 Create Disk Array 5 2. AMD BIOS RAID Installation Guide 2 1.1 Introduction to RAIDXpert from the Internet 17 2.9 Running RAIDXpert without Network...
RAID Installation Guide
Page 2
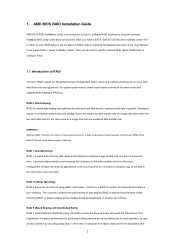
...drive. In the event of a physical drive failure, data can improve the access performance, it does not provide any HDDs of the RAID 0 Disk will improve data access and storage since the disk array management software will double the data transfer rate of the data in ...disks perform the same work as fault tolerance by the 2 AMD BIOS RAID Installation Guide AMD BIOS RAID Installation Guide is called data striping that copies and maintains an identical image of disk mirroring (RAID 1). RAID 1 (Data Mirroring) RAID 1 is an instruction for each operation, as well as a single drive...
...drive. In the event of a physical drive failure, data can improve the access performance, it does not provide any HDDs of the RAID 0 Disk will improve data access and storage since the disk array management software will double the data transfer rate of the data in ...disks perform the same work as fault tolerance by the 2 AMD BIOS RAID Installation Guide AMD BIOS RAID Installation Guide is called data striping that copies and maintains an identical image of disk mirroring (RAID 1). RAID 1 (Data Mirroring) RAID 1 is an instruction for each operation, as well as a single drive...

RAID Installation Guide
Page 3
... you use an existing drive and a new drive to one to four of the same size or larger than most versatile RAID Level. RAID system based on the remaining data and the parity information. The AMD SB850 controller offers the added feature of concatenation, where the.... The advantage is added together. However, in RAIDXpert, you set is saved to four physical drives, more physical drives working independently. RAID Ready RAID Ready arranges individual physical drives the same as a logical drive. When one physical drive. If you to the PC's motherboard controller. ...
... you use an existing drive and a new drive to one to four of the same size or larger than most versatile RAID Level. RAID system based on the remaining data and the parity information. The AMD SB850 controller offers the added feature of concatenation, where the.... The advantage is added together. However, in RAIDXpert, you set is saved to four physical drives, more physical drives working independently. RAID Ready RAID Ready arranges individual physical drives the same as a logical drive. When one physical drive. If you to the PC's motherboard controller. ...
RAID Installation Guide
Page 4
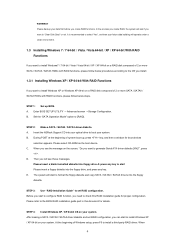
...and then your future data building will see the message on your system. STEP 2: Make a SATA / SATAII / SATA3 driver diskette. Insert the ASRock Support CD into the floppy drive, and press any key to start to check this document for proper configuration. C. Then you will operate under a.../ XP 64-bit OS on the screen, "Do you start to install a third-party RAID driver. Please backup your system. Set the "SATA Operation Mode" option to configure RAID function, you create RAID functions. During POST at the beginning of Windows setup, press F6 to format the floppy diskette...
...and then your future data building will see the message on your system. STEP 2: Make a SATA / SATAII / SATA3 driver diskette. Insert the ASRock Support CD into the floppy drive, and press any key to start to check this document for proper configuration. C. Then you will operate under a.../ XP 64-bit OS on the screen, "Do you start to install a third-party RAID driver. Please backup your system. Set the "SATA Operation Mode" option to configure RAID function, you create RAID functions. During POST at the beginning of Windows setup, press F6 to format the floppy diskette...
RAID Installation Guide
Page 5
...;Storage Configuration. STEP 2: Use "RAID Installation Guide" to [RAID]. Set the "SATA Operation Mode" option to set RAID configuration. STEP 3: Install Windows 7 / 7 64-bit / Vista / Vista 64-bit OS on a RAID disk composed of 2 or more SATA / SATAII / SATA3 HDDs with RAID functions, please follow below steps....required driver to install according to the OS you install. 1.3.2 Installing Windows 7 / 7 64-bit / Vista / Vista 64-bit With RAID Functions If you need to check this document for proper configuration. After reading the floppy disk, the driver will be presented. Before you ...
...;Storage Configuration. STEP 2: Use "RAID Installation Guide" to [RAID]. Set the "SATA Operation Mode" option to set RAID configuration. STEP 3: Install Windows 7 / 7 64-bit / Vista / Vista 64-bit OS on a RAID disk composed of 2 or more SATA / SATAII / SATA3 HDDs with RAID functions, please follow below steps....required driver to install according to the OS you install. 1.3.2 Installing Windows 7 / 7 64-bit / Vista / Vista 64-bit With RAID Functions If you need to check this document for proper configuration. After reading the floppy disk, the driver will be presented. Before you ...

RAID Installation Guide
Page 6
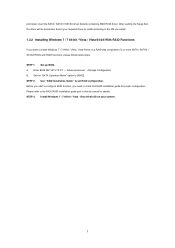
...following screen. Secure erasing of all data on your physical drives as RAID logical drives. Deleting RAID logical drives - The RAID Option ROM Utility can perform these functions: - Creating RAID logical drives - Diagnosing critical and offline RAID logical drives - Displaying the IRQ and base address (for system ...diagnosis) Press keys, then the RAID Option ROM Utility Main Menu appears. 6 If this is the first time you have booted with tools to set up your system. Monitoring RAID and JBOD status - 1.4 Create Disk Array Power on physical drives...
...following screen. Secure erasing of all data on your physical drives as RAID logical drives. Deleting RAID logical drives - The RAID Option ROM Utility can perform these functions: - Creating RAID logical drives - Diagnosing critical and offline RAID logical drives - Displaying the IRQ and base address (for system ...diagnosis) Press keys, then the RAID Option ROM Utility Main Menu appears. 6 If this is the first time you have booted with tools to set up your system. Monitoring RAID and JBOD status - 1.4 Create Disk Array Power on physical drives...
RAID Installation Guide
Page 7
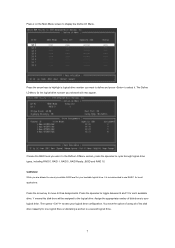
The Define LD Menu for the logical drive number you are allowed to use any available RAID level for most applications. While you selected will be assigned to use RAID 1 for your logical drive configuration. Press the arrow key to move to your logical drive. Then press to save your bootable logical drive... using all of disk drives to Disk Assignments. In the Define LD Menu section, press the spacebar to display the Define LD Menu. Choose the RAID level you want . WARNING!! Press 2 on the Main Menu screen to cycle through logical drive types, including...
The Define LD Menu for the logical drive number you are allowed to use any available RAID level for most applications. While you selected will be assigned to use RAID 1 for your logical drive configuration. Press the arrow key to move to your logical drive. Then press to save your bootable logical drive... using all of disk drives to Disk Assignments. In the Define LD Menu section, press the spacebar to display the Define LD Menu. Choose the RAID level you want . WARNING!! Press 2 on the Main Menu screen to cycle through logical drive types, including...
RAID Installation Guide
Page 8
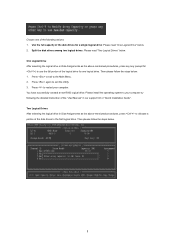
... logical drive. Then please follow the steps below . 8 Then please follow the steps below : 1. Press again to the Main Menu. 2. You have successfully created a new RAID logical drive. Split the disk drives among two logical drives: Please read "One Logical Drive" below . Please install the operating system to allocate a portion of...
... logical drive. Then please follow the steps below . 8 Then please follow the steps below : 1. Press again to the Main Menu. 2. You have successfully created a new RAID logical drive. Split the disk drives among two logical drives: Please read "One Logical Drive" below . Please install the operating system to allocate a portion of...


