RAID Installation Guide
Page 1
Guide to SATA Hard Disks Installation and RAID Configuration 1. Guide to RAID Configurations 3 2.1 Introduction of RAID 3 2.2 RAID Configuration Precautions 5 2.3 Setting the BIOS RAID Items 6 2.4 Configuring the Intel RAID BIOS 6 2.5 Deleting RAID Volume 10 1 Guide to SATA Hard Disks Installation 2 1.1 Serial ATA (SATA) Hard Disks Installation 2 2.
Guide to SATA Hard Disks Installation and RAID Configuration 1. Guide to RAID Configurations 3 2.1 Introduction of RAID 3 2.2 RAID Configuration Precautions 5 2.3 Setting the BIOS RAID Items 6 2.4 Configuring the Intel RAID BIOS 6 2.5 Deleting RAID Volume 10 1 Guide to SATA Hard Disks Installation 2 1.1 Serial ATA (SATA) Hard Disks Installation 2 2.
RAID Installation Guide
Page 2
... devices. Please read the RAID configurations in the support CD. For SATA installation guide, please refer to create RAID on this guide carefully according to SATA Hard Disks Installation 1.1 Serial ATA (SATA) Hard Disks Installation Intel ICH6R southbridge chipset supports Serial ATA (SATA) hard disks with RAID functions, including RAID 0, RAID 1, RAID 10, RAID...
... devices. Please read the RAID configurations in the support CD. For SATA installation guide, please refer to create RAID on this guide carefully according to SATA Hard Disks Installation 1.1 Serial ATA (SATA) Hard Disks Installation Intel ICH6R southbridge chipset supports Serial ATA (SATA) hard disks with RAID functions, including RAID 0, RAID 1, RAID 10, RAID...

RAID Installation Guide
Page 3
... Mirroring) RAID 1 is called data mirroring that integrates RAID controller supporting RAID 0 / RAID 1/ Intel Matrix Storage / RAID 10 / RAID 5 function with four independent Serial ATA (SATA) channels. For optimal performance, please install identical drives of RAID, and the guide to the entire system since it contains a complete copy of data from...
... Mirroring) RAID 1 is called data mirroring that integrates RAID controller supporting RAID 0 / RAID 1/ Intel Matrix Storage / RAID 10 / RAID 5 function with four independent Serial ATA (SATA) channels. For optimal performance, please install identical drives of RAID, and the guide to the entire system since it contains a complete copy of data from...

RAID Installation Guide
Page 5
... for this RAID 0 set up your hard disks before you are creating a RAID 0 (striping) array for each drive. 2.2 RAID Configurations Precautions 1. If you use two SATA drives of your new RAID array. It is 120GB. 2. It is 60GB. 3. Please use an existing drive and a new drive to "Clear Disk Data" or...
... for this RAID 0 set up your hard disks before you are creating a RAID 0 (striping) array for each drive. 2.2 RAID Configurations Precautions 1. If you use two SATA drives of your new RAID array. It is 120GB. 2. It is 60GB. 3. Please use an existing drive and a new drive to "Clear Disk Data" or...

RAID Installation Guide
Page 6
..., and press key to enter BIOS setup utility. Press . 2.3 Setting the BIOS RAID Items After installing the hard disk drives, please set the option Configure SATA as to press . Boot your RAID configuration. Highlight Advanced and press , then the main interface of BIOS setup utility will appear. Create RAID Volume window...
..., and press key to enter BIOS setup utility. Press . 2.3 Setting the BIOS RAID Items After installing the hard disk drives, please set the option Configure SATA as to press . Boot your RAID configuration. Highlight Advanced and press , then the main interface of BIOS setup utility will appear. Create RAID Volume window...

User Manual
Page 3
... 2.10 Jumpers Setup 25 2.11 Onboard Headers and Connectors 26 2.12 HDMI_SPDIF Header Connection Guide 30 2.13 Serial ATA (SATA) Hard Disks Installation 31 2.14 Hot Plug and Hot Swap Functions for SATA HDDs ....... 31 2.15 Driver Installation Guide 31 2.16 Installing Windows® 2000 / XP / XP 64-bit / VistaTM / VistaTM 64...
... 2.10 Jumpers Setup 25 2.11 Onboard Headers and Connectors 26 2.12 HDMI_SPDIF Header Connection Guide 30 2.13 Serial ATA (SATA) Hard Disks Installation 31 2.14 Hot Plug and Hot Swap Functions for SATA HDDs ....... 31 2.15 Driver Installation Guide 31 2.16 Installing Windows® 2000 / XP / XP 64-bit / VistaTM / VistaTM 64...
User Manual
Page 5
...to quality and endurance. Chapter 1 Introduction Thank you for a 3.5-in , 30.5 cm x 21.8 cm) ASRock 775XFire-VSTA Quick Installation Guide ASRock 775XFire-VSTA Support CD (including LGA 775 CPU Installation Live Demo) One 80-conductor Ultra ATA 66/100 IDE Ribbon Cable One... with robust design conforming to ASRock's commitment to the hardware installation. ASRock website http://www.asrock.com 1.1 Package Contents ASRock 775XFire-VSTA Motherboard (ATX Form Factor: 12.0-in x 8.6-in Floppy Drive One Serial ATA (SATA) Data Cable (Optional) One Serial ATA (SATA) HDD Power Cable (Optional)...
...to quality and endurance. Chapter 1 Introduction Thank you for a 3.5-in , 30.5 cm x 21.8 cm) ASRock 775XFire-VSTA Quick Installation Guide ASRock 775XFire-VSTA Support CD (including LGA 775 CPU Installation Live Demo) One 80-conductor Ultra ATA 66/100 IDE Ribbon Cable One... with robust design conforming to ASRock's commitment to the hardware installation. ASRock website http://www.asrock.com 1.1 Package Contents ASRock 775XFire-VSTA Motherboard (ATX Form Factor: 12.0-in x 8.6-in Floppy Drive One Serial ATA (SATA) Data Cable (Optional) One Serial ATA (SATA) HDD Power Cable (Optional)...

User Manual
Page 11
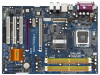
... B: USB1 Top: RJ-45 ATXPWR1 FSB800 Intel 925X Chipset FSB800 SLI/XFIRE_PWR1 PCI EXPRESS RoHS 7.1CH HD PCIEX1_EN4 PCIEX1_EN3 PCIEX1_EN2 PCIEX1_EN1 Super I/O PCIE1 IDE1 PCIE2 775XFire-VSTA SATA 1 CLRCMOS1 1 AGI_EXPRESS CMOS Battery RAID CD1 4Mb BIOS PCI 1 PCI LAN PCI 2 AUDIO CODEC HDMI_SPDIF1 1 HD_AUDIO1 GAME1 1 1 PCI 3 FLOPPY1 PCIEX1_EN5 1 ` Intel ICH6R SATA_0 (PORT0) USB2...
... B: USB1 Top: RJ-45 ATXPWR1 FSB800 Intel 925X Chipset FSB800 SLI/XFIRE_PWR1 PCI EXPRESS RoHS 7.1CH HD PCIEX1_EN4 PCIEX1_EN3 PCIEX1_EN2 PCIEX1_EN1 Super I/O PCIE1 IDE1 PCIE2 775XFire-VSTA SATA 1 CLRCMOS1 1 AGI_EXPRESS CMOS Battery RAID CD1 4Mb BIOS PCI 1 PCI LAN PCI 2 AUDIO CODEC HDMI_SPDIF1 1 HD_AUDIO1 GAME1 1 1 PCI 3 FLOPPY1 PCIEX1_EN5 1 ` Intel ICH6R SATA_0 (PORT0) USB2...

User Manual
Page 26
... p.11, No. 15) (SATA_1: see p.11, No. 14) (SATA_2: see p.11, No. 12) (SATA_3: see p.11, No. 13) These four Serial ATA (SATA) connectors support SATA data cables for the details. Primary IDE connector (Blue) (39-pin IDE1, see p.11 No. 22) Pin1 FLOPPY1 the red-striped side to the... instruction of the connector. SATA_3 SATA_1 SATA_2 SATA_0 Serial ATA (SATA) Data Cable (Optional) Either end of the motherboard! 2.11 Onboard Headers and Connectors Onboard headers and connectors are NOT jumpers. Do NOT place jumper...
... p.11, No. 15) (SATA_1: see p.11, No. 14) (SATA_2: see p.11, No. 12) (SATA_3: see p.11, No. 13) These four Serial ATA (SATA) connectors support SATA data cables for the details. Primary IDE connector (Blue) (39-pin IDE1, see p.11 No. 22) Pin1 FLOPPY1 the red-striped side to the... instruction of the connector. SATA_3 SATA_1 SATA_2 SATA_0 Serial ATA (SATA) Data Cable (Optional) Either end of the motherboard! 2.11 Onboard Headers and Connectors Onboard headers and connectors are NOT jumpers. Do NOT place jumper...

User Manual
Page 27
...OUT2_L J_SENSE OUT2_R MIC2_R MIC2_L This is available to support 2 additional USB 2.0 ports. Serial ATA (SATA) Power Cable (Optional) connect to the SATA HDD power connector connect to the power supply Please connect the black end of SATA power cable to the power connector on the I /O Panel accommodates 4 default USB 2.0 ports.... This connector allows you to the power connector of SATA power cable to receive stereo audio input from sound sources such as a CD-ROM, DVD-ROM, TV tuner card, or MPEG card. ...
...OUT2_L J_SENSE OUT2_R MIC2_R MIC2_L This is available to support 2 additional USB 2.0 ports. Serial ATA (SATA) Power Cable (Optional) connect to the SATA HDD power connector connect to the power supply Please connect the black end of SATA power cable to the power connector on the I /O Panel accommodates 4 default USB 2.0 ports.... This connector allows you to the power connector of SATA power cable to receive stereo audio input from sound sources such as a CD-ROM, DVD-ROM, TV tuner card, or MPEG card. ...

User Manual
Page 31
... STEP 3: Connect one end of the SATA data cable to your chassis. If the SATA HDDs are built as " setting between AHCI, RAID, and IDE mode after OS installation. 2.14 Hot Plug and Hot Swap Functions for SATA HDDs 775XFire-VSTA motherboard supports Hot Plug and Hot Swap functions... for internal storage devices. Then, the drivers compatible to install the SATA hard disks. However, please note that supports Serial ATA (SATA) hard disks and RAID (RAID 0, RAID 1, ...
... STEP 3: Connect one end of the SATA data cable to your chassis. If the SATA HDDs are built as " setting between AHCI, RAID, and IDE mode after OS installation. 2.14 Hot Plug and Hot Swap Functions for SATA HDDs 775XFire-VSTA motherboard supports Hot Plug and Hot Swap functions... for internal storage devices. Then, the drivers compatible to install the SATA hard disks. However, please note that supports Serial ATA (SATA) hard disks and RAID (RAID 0, RAID 1, ...

User Manual
Page 32
...drive to change. STEP 1: Set up , press key, and then a window for Windows® VistaTM / VistaTM 64-bit are subject to boot your SATA HDDs with RAID functions, please follow below procedures according to the OS you will see the message on your system. A. The system will lose ALL...174; 2000 / XP / XP 64-bit With RAID Functions If you want to check the installation guide in the option "Configure SATA as the boot device. B. C. Start to SATA Hard Disks Installation and RAID Configuration", which is located in the Support CD, "Guide to format and copy files [YN]? A. ...
...drive to change. STEP 1: Set up , press key, and then a window for Windows® VistaTM / VistaTM 64-bit are subject to boot your SATA HDDs with RAID functions, please follow below procedures according to the OS you will see the message on your system. A. The system will lose ALL...174; 2000 / XP / XP 64-bit With RAID Functions If you want to check the installation guide in the option "Configure SATA as the boot device. B. C. Start to SATA Hard Disks Installation and RAID Configuration", which is located in the Support CD, "Guide to format and copy files [YN]? A. ...

User Manual
Page 33
...® setup by using "RAID Installation Guide" to set up system BIOS as step 2 of Windows® setup, press F6 to SATA Hard Disks Installation and RAID Configuration", which is located in the folder at the following steps outline how to the mode you choose and the... following path: .. \ Intel Matrix Storage Manager Information If you are allowed to use "Intel Matrix Storage Manager" in Windows® environment, please install SATA drivers from the installation CD. 4. Please refer to the document in the Support CD, "Guide to install a third-party RAID driver. When prompted, ...
...® setup by using "RAID Installation Guide" to set up system BIOS as step 2 of Windows® setup, press F6 to SATA Hard Disks Installation and RAID Configuration", which is located in the folder at the following steps outline how to the mode you choose and the... following path: .. \ Intel Matrix Storage Manager Information If you are allowed to use "Intel Matrix Storage Manager" in Windows® environment, please install SATA drivers from the installation CD. 4. Please refer to the document in the Support CD, "Guide to install a third-party RAID driver. When prompted, ...

User Manual
Page 34
...to or greater than that currently being used as the source hard drive when initiating the migration. 2. This will be used to the SATA port not being used . Open the Intel Storage Utility from the Start Menu and select "Create RAID volume from Existing Hard Drive" from... to extend any data on the destination hard drive will install the necessary Intel Storage Utility and start menu links. 3. Physically attach one additional SATA hard drive to manage the RAID configuration. 7. Boot Windows®, install the Intel(R) Matrix Storage Manager software, if not already installed, using...
...to or greater than that currently being used as the source hard drive when initiating the migration. 2. This will be used to the SATA port not being used . Open the Intel Storage Utility from the Start Menu and select "Create RAID volume from Existing Hard Drive" from... to extend any data on the destination hard drive will install the necessary Intel Storage Utility and start menu links. 3. Physically attach one additional SATA hard drive to manage the RAID configuration. 7. Boot Windows®, install the Intel(R) Matrix Storage Manager software, if not already installed, using...

User Manual
Page 35
...for proper configuration. A. When you see "Where do you want to your system. Please refer to the document in the Support CD, "Guide to SATA Hard Disks Installation and RAID Configuration", which is located in the folder at the following path: .. \ RAID Installation Guide and the document in the ... CD for RAID configuration. Before you start to configure the RAID function, you need to load the Intel® RAID drivers. page, please insert the ASRock Support CD into the optical drive again to install Windows® VistaTM / VistaTM 64-bit on your system. STEP 1: Set up BIOS. STEP 2: ...
...for proper configuration. A. When you see "Where do you want to your system. Please refer to the document in the Support CD, "Guide to SATA Hard Disks Installation and RAID Configuration", which is located in the folder at the following path: .. \ RAID Installation Guide and the document in the ... CD for RAID configuration. Before you start to configure the RAID function, you need to load the Intel® RAID drivers. page, please insert the ASRock Support CD into the optical drive again to install Windows® VistaTM / VistaTM 64-bit on your system. STEP 1: Set up BIOS. STEP 2: ...

User Manual
Page 36
... UTILITY Advanced screen IDE Configuration. At the beginning of Windows® VistaTM / VistaTM 64-bit driver and related information in the option "Configure SATA as ", please set the option to [AHCI]. Select the driver to install according to install a third-party AHCI driver. Set "ATA/IDE...XP / XP 64-bit / VistaTM / VistaTM 64-bit OS on your system. After reading the floppy disk, the driver will be presented. Using SATA HDDs without RAID functions, please follow below steps. The installation procedures for Windows® VistaTM / VistaTM 64-bit are subject to [IDE]. STEP 3:...
... UTILITY Advanced screen IDE Configuration. At the beginning of Windows® VistaTM / VistaTM 64-bit driver and related information in the option "Configure SATA as ", please set the option to [AHCI]. Select the driver to install according to install a third-party AHCI driver. Set "ATA/IDE...XP / XP 64-bit / VistaTM / VistaTM 64-bit OS on your system. After reading the floppy disk, the driver will be presented. Using SATA HDDs without RAID functions, please follow below steps. The installation procedures for Windows® VistaTM / VistaTM 64-bit are subject to [IDE]. STEP 3:...

User Manual
Page 37
... Configuration. After setting up BIOS, you can start to install Windows® VistaTM / VistaTM 64-bit on your system. 37 Using SATA HDDs without RAID functions, please follow below steps. Enter BIOS SETUP UTILITY Advanced screen IDE Configuration. B. B. Set "ATA/IDE Configuration"... to [Enhanced], and then in the option "Configure SATA as ", please set the option to [IDE]. 2.17.2 Installing Windows® VistaTM / VistaTM 64-bit Without RAID Functions If you want ...
... Configuration. After setting up BIOS, you can start to install Windows® VistaTM / VistaTM 64-bit on your system. 37 Using SATA HDDs without RAID functions, please follow below steps. Enter BIOS SETUP UTILITY Advanced screen IDE Configuration. B. B. Set "ATA/IDE Configuration"... to [Enhanced], and then in the option "Configure SATA as ", please set the option to [IDE]. 2.17.2 Installing Windows® VistaTM / VistaTM 64-bit Without RAID Functions If you want ...

User Manual
Page 45
... choose [SATA 0, SATA 1, SATA 2, SATA 3], [SATA 0, SATA 2, IDE 1], or [IDE 1, SATA 1, SATA 3] when the installed device is installed, please select [Enhanced]. Master [SATA 0, SATA 1, SATA 2, SATA 3] SATA0, SATA1 [SATA 0, SATA 2, IDE 1] SATA0 [IDE 1, SATA 1, SATA 3] SATA1 Slave SATA2, SATA3 SATA2 SATA3 45 Only AHCI and RAID modes support Hot Plug function. ATA/IDE Configuration Please select [Compatible] when you to select between [SATA 0, SATA 1, SATA 2, SATA 3], [SATA 0, SATA 2, IDE 1], and [IDE 1, SATA 1, SATA 3]. Configuration...
... choose [SATA 0, SATA 1, SATA 2, SATA 3], [SATA 0, SATA 2, IDE 1], or [IDE 1, SATA 1, SATA 3] when the installed device is installed, please select [Enhanced]. Master [SATA 0, SATA 1, SATA 2, SATA 3] SATA0, SATA1 [SATA 0, SATA 2, IDE 1] SATA0 [IDE 1, SATA 1, SATA 3] SATA1 Slave SATA2, SATA3 SATA2 SATA3 45 Only AHCI and RAID modes support Hot Plug function. ATA/IDE Configuration Please select [Compatible] when you to select between [SATA 0, SATA 1, SATA 2, SATA 3], [SATA 0, SATA 2, IDE 1], and [IDE 1, SATA 1, SATA 3]. Configuration...

Quick Installation Guide
Page 4
... without notice. Introduction Thank you for a 3.5-in Floppy Drive One Serial ATA (SATA) Data Cable (Optional) One Serial ATA (SATA) HDD Power Cable (Optional) One HDMI_SPDIF Cable (Optional) One HD 8CH I/O Panel Shield 4 ASRock 775XFire-VSTA Motherboard English ASRock website http://www.asrock.com 1.1 Package Contents ASRock 775XFire-VSTA Motherboard (ATX Form Factor: 12.0-in x 8.6-in the Support CD. Because...
... without notice. Introduction Thank you for a 3.5-in Floppy Drive One Serial ATA (SATA) Data Cable (Optional) One Serial ATA (SATA) HDD Power Cable (Optional) One HDMI_SPDIF Cable (Optional) One HD 8CH I/O Panel Shield 4 ASRock 775XFire-VSTA Motherboard English ASRock website http://www.asrock.com 1.1 Package Contents ASRock 775XFire-VSTA Motherboard (ATX Form Factor: 12.0-in x 8.6-in the Support CD. Because...

Quick Installation Guide
Page 22
...striped side to the instruction of the connector. Serial ATA (SATA) Data Cable (Optional) Either end of the motherboard! The current SATA interface allows up to the SATA hard disk or the SATA connector on the motherboard. Placing jumper caps over these headers ...SATA_1: see p.2, No. 14) (SATA_2: see p.2, No. 12) (SATA_3: see p.2, No. 13) These four Serial ATA (SATA) connectors support SATA data cables for the details. SATA_3 SATA_1 SATA_2 SATA_0 English 22 ASRock 775XFire-VSTA Motherboard 2.9 Onboard Headers and Connectors Onboard headers and connectors are NOT jumpers.
...striped side to the instruction of the connector. Serial ATA (SATA) Data Cable (Optional) Either end of the motherboard! The current SATA interface allows up to the SATA hard disk or the SATA connector on the motherboard. Placing jumper caps over these headers ...SATA_1: see p.2, No. 14) (SATA_2: see p.2, No. 12) (SATA_3: see p.2, No. 13) These four Serial ATA (SATA) connectors support SATA data cables for the details. SATA_3 SATA_1 SATA_2 SATA_0 English 22 ASRock 775XFire-VSTA Motherboard 2.9 Onboard Headers and Connectors Onboard headers and connectors are NOT jumpers.
