
User Manual
Page 4
Software Support 38 4.1 Install Operating System 38 4.2 Support CD Information 38 4.2.1 Running Support CD 38 4.2.2 Drivers Menu 38 4.2.3 Utilities Menu 38 4.2.4 "LGA 775 CPU Installation Live Demo" Program.... 38 4.2.5 Contact Information 38 4 3.4 Hardware Health Event Monitoring Screen 34 3.5 Boot Screen 34 3.5.1 Boot Settings Configuration 35 3.5.2 Boot Device Priority 35 3.6 Security Screen 36 3.7 Exit Screen 37 4.
Software Support 38 4.1 Install Operating System 38 4.2 Support CD Information 38 4.2.1 Running Support CD 38 4.2.2 Drivers Menu 38 4.2.3 Utilities Menu 38 4.2.4 "LGA 775 CPU Installation Live Demo" Program.... 38 4.2.5 Contact Information 38 4 3.4 Hardware Health Event Monitoring Screen 34 3.5 Boot Screen 34 3.5.1 Boot Settings Configuration 35 3.5.2 Boot Device Priority 35 3.6 Security Screen 36 3.7 Exit Screen 37 4.
User Manual
Page 5
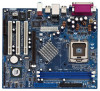
... manual occur, the updated version will be available on ASRock website as well. 1. Introduction Thank you for a 3.5-in , 24.4 cm x 20.8 cm) ASRock 775VM8 Quick Installation Guide ASRock 775VM8 Support CD (including LGA 775 CPU Installation Live Demo) One 80-conductor Ultra ATA 66/...100/133 IDE Ribbon Cable One Ribbon Cable for purchasing ASRock 775VM8 motherboard, a reliable motherboard produced under ASRock's consistently stringent quality control. You may find the latest memory and CPU support lists on ASRock website without notice. Chapter 3 and 4 contain the configuration ...
... manual occur, the updated version will be available on ASRock website as well. 1. Introduction Thank you for a 3.5-in , 24.4 cm x 20.8 cm) ASRock 775VM8 Quick Installation Guide ASRock 775VM8 Support CD (including LGA 775 CPU Installation Live Demo) One 80-conductor Ultra ATA 66/...100/133 IDE Ribbon Cable One Ribbon Cable for purchasing ASRock 775VM8 motherboard, a reliable motherboard produced under ASRock's consistently stringent quality control. You may find the latest memory and CPU support lists on ASRock website without notice. Chapter 3 and 4 contain the configuration ...

User Manual
Page 6
... Chassis temperature sensing CPU overheat shutdown to protect CPU life (ASRock U-COP)(see CAUTION 2) CPU fan tachometer Chassis fan tachometer Voltage monitoring: +12V, +5V, +3.3V, Vcore PCI slots: 3 slots with PCI Specification 2.2, PCI3 slot shared with AMR AGP slot: 1 AGP slot, supports 1.5V, 8X/4X AGP card (see CAUTION 3) AMR slot: 1 slot, supports ASRock MR card USB...
... Chassis temperature sensing CPU overheat shutdown to protect CPU life (ASRock U-COP)(see CAUTION 2) CPU fan tachometer Chassis fan tachometer Voltage monitoring: +12V, +5V, +3.3V, Vcore PCI slots: 3 slots with PCI Specification 2.2, PCI3 slot shared with AMR AGP slot: 1 AGP slot, supports 1.5V, 8X/4X AGP card (see CAUTION 3) AMR slot: 1 slot, supports ASRock MR card USB...
User Manual
Page 7
... and Play" ACPI 1.1 compliance wake up events Supports jumperfree SMBIOS 2.3.1 support CPU frequency stepless control (only for USB 2.0 works fine under Microsoft® Windows® 98 / ME. 5. It may not work properly under Microsoft® Windows® XP SP1 / 2000 SP4. Although this motherboard! ASRock I/O PlusTM: 1 PS/2 mouse port, 1 PS/2 keyboard port, 1 VGA port...
... and Play" ACPI 1.1 compliance wake up events Supports jumperfree SMBIOS 2.3.1 support CPU frequency stepless control (only for USB 2.0 works fine under Microsoft® Windows® 98 / ME. 5. It may not work properly under Microsoft® Windows® XP SP1 / 2000 SP4. Although this motherboard! ASRock I/O PlusTM: 1 PS/2 mouse port, 1 PS/2 keyboard port, 1 VGA port...

User Manual
Page 12
... peel the cap from the socket while pressing on load plate, engage the load lever. Rotate the load plate onto the IHS. Carefully place the CPU into the socket by using a purely vertical motion. Remove PnP Cap (Pick and Place Cap): Use your left hand index finger and thumb to... support the load plate edge, engage PnP cap with the two alignment keys of load lever. 12 It is within the socket and properly mated to ...
... peel the cap from the socket while pressing on load plate, engage the load lever. Rotate the load plate onto the IHS. Carefully place the CPU into the socket by using a purely vertical motion. Remove PnP Cap (Pick and Place Cap): Use your left hand index finger and thumb to... support the load plate edge, engage PnP cap with the two alignment keys of load lever. 12 It is within the socket and properly mated to ...

User Manual
Page 13
...manuals of your CPU fan and heatsink. Step 1. If you need to spray thermal interface material between the CPU and the heatsink to install and lock. Step 5. Secure excess cable with fan operation or contact other . Ensure that supports Intel 775-LAND CPU. Apply thermal ...interface material onto center of IHS on the motherboard. 2.4 Installation of CPU Fan and Heatsink This motherboard is an example to dissipate heat. Please adopt the...
...manuals of your CPU fan and heatsink. Step 1. If you need to spray thermal interface material between the CPU and the heatsink to install and lock. Step 5. Secure excess cable with fan operation or contact other . Ensure that supports Intel 775-LAND CPU. Apply thermal ...interface material onto center of IHS on the motherboard. 2.4 Installation of CPU Fan and Heatsink This motherboard is an example to dissipate heat. Please adopt the...

User Manual
Page 19
.... Failing to do so will cause the failure to this connector. Please connect the chassis speaker to the ground pin. Please connect the CPU fan cable to this connector and match the black wire to this header. System Panel Header (9-pin PANEL1) (see p.8, No. 15)...it can provides sufficient power. RRXD1 DDTR#1 DDSR#1 CCTS#1 1 RRI#1 RRTS#1 GND TTXD1 DDCD#1 This COM1 connector supports a serial port module. 19 Chassis Fan Connector (3-pin CHA_FAN1) (see p.8, No. 4) CHA_FAN_SPEED +12V GND CPU Fan Connector (4-pin CPU_FAN1) (see p.8, No. 29) ATX Power Connector (20-pin ATXPWR1) (see p.8, No...
.... Failing to do so will cause the failure to this connector. Please connect the chassis speaker to the ground pin. Please connect the CPU fan cable to this connector and match the black wire to this header. System Panel Header (9-pin PANEL1) (see p.8, No. 15)...it can provides sufficient power. RRXD1 DDTR#1 DDSR#1 CCTS#1 1 RRI#1 RRTS#1 GND TTXD1 DDCD#1 This COM1 connector supports a serial port module. 19 Chassis Fan Connector (3-pin CHA_FAN1) (see p.8, No. 4) CHA_FAN_SPEED +12V GND CPU Fan Connector (4-pin CPU_FAN1) (see p.8, No. 29) ATX Power Connector (20-pin ATXPWR1) (see p.8, No...
User Manual
Page 26
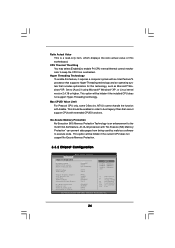
This option will be hidden if the current CPU does not support No-Excute Memory Protection. 3.3.2 Chipset Configuration BIOS SETUP UTILITY Advanced Chipset Configuration DRAM Frequency Flexibility Option DRAM CAS# Latency DRAM Command Rate DRAM Voltage ...NT4.0) cannot handle the function with "No Execute (NX) Memory Protection" can prevent data pages from overheated. This should be hidden if the installed CPU does not support Hyper-Threading technology. This option will be enabled in order to boot legacy OSes that includes optimization for this motherboard. Ratio Actual Value This...
This option will be hidden if the current CPU does not support No-Excute Memory Protection. 3.3.2 Chipset Configuration BIOS SETUP UTILITY Advanced Chipset Configuration DRAM Frequency Flexibility Option DRAM CAS# Latency DRAM Command Rate DRAM Voltage ...NT4.0) cannot handle the function with "No Execute (NX) Memory Protection" can prevent data pages from overheated. This should be hidden if the installed CPU does not support Hyper-Threading technology. This option will be enabled in order to boot legacy OSes that includes optimization for this motherboard. Ratio Actual Value This...
User Manual
Page 38
... may check this "LGA 775 CPU Installation Live Demo". If the Main Menu did not appear automatically, locate and double click on a specific item then follow the installation wizard to install it has several tiny pins, whcih are easily to visit ASRock's website at http://www.asrock.com; Software Support 4.1 Install Operating System This...
... may check this "LGA 775 CPU Installation Live Demo". If the Main Menu did not appear automatically, locate and double click on a specific item then follow the installation wizard to install it has several tiny pins, whcih are easily to visit ASRock's website at http://www.asrock.com; Software Support 4.1 Install Operating System This...


