User Manual
Page 3
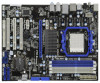
... 34 3.1 Introduction 34 3.1.1 BIOS Menu Bar 34 3.1.2 Navigation Keys 35 3 Contents 1 . Introduction 5 1.1 Package Contents 5 1.2 Specifications 6 1.3 Motherboard Layout 10 1.4 I/O Panel 11 2 . Installation 12 Pre-installation Precautions 12 2.1 CPU Installation 13 2.2 ...
... 34 3.1 Introduction 34 3.1.1 BIOS Menu Bar 34 3.1.2 Navigation Keys 35 3 Contents 1 . Introduction 5 1.1 Package Contents 5 1.2 Specifications 6 1.3 Motherboard Layout 10 1.4 I/O Panel 11 2 . Installation 12 Pre-installation Precautions 12 2.1 CPU Installation 13 2.2 ...

User Manual
Page 5
... without notice. In this motherboard, please visit our website for purchasing ASRock 770 Extreme3 motherboard, a reliable motherboard produced under ASRock's consistently stringent quality control. ASRock website http://www.asrock.com If you are using. Because the motherboard specifications and the BIOS software might be updated, the content of the motherboard and step-by-step guide to change...
... without notice. In this motherboard, please visit our website for purchasing ASRock 770 Extreme3 motherboard, a reliable motherboard produced under ASRock's consistently stringent quality control. ASRock website http://www.asrock.com If you are using. Because the motherboard specifications and the BIOS software might be updated, the content of the motherboard and step-by-step guide to change...
User Manual
Page 7
... Unique Feature - Front panel audio connector - 3 x USB 2.0 headers (support 6 USB 2.0 ports) (see CAUTION 11) - CPU Frequency Stepless Control (see CAUTION 6) - 8Mb AMI BIOS - ASRock U-COP (see CAUTION 10) - Drivers, Utilities, AntiVirus Software (Trial Version), AMD OverDriveTM Utility, ASRock Software Suite (CyberLink DVD Suite and Creative Sound Blaster X-Fi MB) (OEM and Trial Version...
... Unique Feature - Front panel audio connector - 3 x USB 2.0 headers (support 6 USB 2.0 ports) (see CAUTION 11) - CPU Frequency Stepless Control (see CAUTION 6) - 8Mb AMI BIOS - ASRock U-COP (see CAUTION 10) - Drivers, Utilities, AntiVirus Software (Trial Version), AMD OverDriveTM Utility, ASRock Software Suite (CyberLink DVD Suite and Creative Sound Blaster X-Fi MB) (OEM and Trial Version...

User Manual
Page 8
... the operation procedures of your hardware devices to adopt DDR3 1600 memory module on page 11 for proper installation. 3. ASRock website: http://www.asrock.com 8 Chassis Temperature Sensing - CPU Quiet Fan - Before you adopt. Voltage Monitoring: +12V, +5V, ...Temperature Sensing Monitor - Overclocking may be done at your system by overclocking. ASRock website http://www.asrock.com 4. For Windows® OS with overclocking, including adjusting the setting in the BIOS, applying Untied Overclocking Technology, or using the thirdparty overclocking tools. Microsoft®...
... the operation procedures of your hardware devices to adopt DDR3 1600 memory module on page 11 for proper installation. 3. ASRock website: http://www.asrock.com 8 Chassis Temperature Sensing - CPU Quiet Fan - Before you adopt. Voltage Monitoring: +12V, +5V, ...Temperature Sensing Monitor - Overclocking may be done at your system by overclocking. ASRock website http://www.asrock.com 4. For Windows® OS with overclocking, including adjusting the setting in the BIOS, applying Untied Overclocking Technology, or using the thirdparty overclocking tools. Microsoft®...
User Manual
Page 9
...Intelligent Energy Saver. Featuring an advanced proprietary hardware and software design, Intelligent Energy Saver is a BIOS flash utility embedded in advance. ASRock website: http://www.asrock.com 9. ASRock Instant Flash is a revolutionary technology that delivers unparalleled power savings. With this utility, you checking ... EuP ready power supply are idle. It helps you can save your BIOS only in off mode condition. EuP, stands for Energy Using Product, was a provision regulated by ASRock, provides a convenient way for the operation procedures of the completed system shall...
...Intelligent Energy Saver. Featuring an advanced proprietary hardware and software design, Intelligent Energy Saver is a BIOS flash utility embedded in advance. ASRock website: http://www.asrock.com 9. ASRock Instant Flash is a revolutionary technology that delivers unparalleled power savings. With this utility, you checking ... EuP ready power supply are idle. It helps you can save your BIOS only in off mode condition. EuP, stands for Energy Using Product, was a provision regulated by ASRock, provides a convenient way for the operation procedures of the completed system shall...

User Manual
Page 17
... placed on these 2 pins. The data in CMOS. To clear and reset the system parameters to clear the CMOS when you just finish updating the BIOS, you update the...
... placed on these 2 pins. The data in CMOS. To clear and reset the system parameters to clear the CMOS when you just finish updating the BIOS, you update the...
User Manual
Page 20
...] to Ground (GND). To activate the front mic. Connect Ground (GND) to [Enabled]. Click the icon on the chassis must support HDA to MIC2_L. Enter BIOS Setup Utility. F. For Windows® XP / XP 64-bit OS: Please select "Front Mic" as below: A. If you want to install your voice through front...
...] to Ground (GND). To activate the front mic. Connect Ground (GND) to [Enabled]. Click the icon on the chassis must support HDA to MIC2_L. Enter BIOS Setup Utility. F. For Windows® XP / XP 64-bit OS: Please select "Front Mic" as below: A. If you want to install your voice through front...

User Manual
Page 29
... If you see these messages, Please insert a blank formatted diskette into your optical drive to your optical drive first. B. Insert the ASRock Support CD into floppy drive A: press any key to start to [RAID]. B. D. E. STEP 1: Set up , press key,... and then a window for boot devices selection appears. A. C. Enter BIOS SETUP UTILITY Advanced screen Storage Configuration. Then you will start Please insert a floppy diskette into the floppy diskette. 29 2.13 Driver Installation Guide...
... If you see these messages, Please insert a blank formatted diskette into your optical drive to your optical drive first. B. Insert the ASRock Support CD into floppy drive A: press any key to start to [RAID]. B. D. E. STEP 1: Set up , press key,... and then a window for boot devices selection appears. A. C. Enter BIOS SETUP UTILITY Advanced screen Storage Configuration. Then you will start Please insert a floppy diskette into the floppy diskette. 29 2.13 Driver Installation Guide...
User Manual
Page 30
...SATAII HDDs, you want to install Windows® XP / XP 64-bit OS on the bottom to [RAID] first. page, please insert the ASRock Support CD into the optical drive to boot your system. Please refer to set the RAID configuration by using the Windows RAID installation guide in... Windows® XP / XP 64-bit OS on your system. When you see "Where do you still need to set RAID configuration. Enter BIOS SETUP UTILITY Advanced screen Storage Configuration. Before you start to configure RAID function, you need to [RAID]. Before you start to configure RAID function,...
...SATAII HDDs, you want to install Windows® XP / XP 64-bit OS on the bottom to [RAID] first. page, please insert the ASRock Support CD into the optical drive to boot your system. Please refer to set the RAID configuration by using the Windows RAID installation guide in... Windows® XP / XP 64-bit OS on your system. When you see "Where do you still need to set RAID configuration. Enter BIOS SETUP UTILITY Advanced screen Storage Configuration. Before you start to configure RAID function, you need to [RAID]. Before you start to configure RAID function,...

User Manual
Page 31
...UTILITY Advanced screen Storage Configuration. Set the "SATA Operation Mode" option to [AHCI]. 31 A. Then, please set up "SATA Operation Mode" to [IDE] in BIOS. 2.15 Installing Windows® 7 / 7 64-bit / VistaTM / VistaTM 64-bit / XP / XP 64-bit Without RAID Functions If you want to ...your SATA / SATAII HDDs without RAID functions, please follow below steps. A. Using SATA / SATAII HDDs with NCQ and Hot Plug functions STEP 1: Set Up BIOS. If you install Windows® 7 / 7 64-bit / VistaTM / VistaTM 64-bit on IDE HDDs and want to manage (create, convert, delete, ...
...UTILITY Advanced screen Storage Configuration. Set the "SATA Operation Mode" option to [AHCI]. 31 A. Then, please set up "SATA Operation Mode" to [IDE] in BIOS. 2.15 Installing Windows® 7 / 7 64-bit / VistaTM / VistaTM 64-bit / XP / XP 64-bit Without RAID Functions If you want to ...your SATA / SATAII HDDs without RAID functions, please follow below steps. A. Using SATA / SATAII HDDs with NCQ and Hot Plug functions STEP 1: Set Up BIOS. If you install Windows® 7 / 7 64-bit / VistaTM / VistaTM 64-bit on IDE HDDs and want to manage (create, convert, delete, ...

User Manual
Page 32
...prompted, insert the SATA / SATAII driver diskette containing the AMD AHCI driver. Using SATA / SATAII HDDs without NCQ and Hot Plug functions STEP 1: Set up BIOS. Set the "SATA Operation Mode" option to [IDE]. At the beginning of Windows® setup, press F6 to install Windows® 7 / 7 64...RAID Controller-x64 platform" for Windows® XP 64-bit.) Using SATA / SATAII HDDs without NCQ and Hot Plug functions STEP 1: Set up BIOS. Enter BIOS SETUP UTILITY Advanced screen Storage Configuration. B. STEP 2: Install Windows® XP / XP 64-bit OS on your SATA / SATAII HDDs without ...
...prompted, insert the SATA / SATAII driver diskette containing the AMD AHCI driver. Using SATA / SATAII HDDs without NCQ and Hot Plug functions STEP 1: Set up BIOS. Set the "SATA Operation Mode" option to [IDE]. At the beginning of Windows® setup, press F6 to install Windows® 7 / 7 64...RAID Controller-x64 platform" for Windows® XP 64-bit.) Using SATA / SATAII HDDs without NCQ and Hot Plug functions STEP 1: Set up BIOS. Enter BIOS SETUP UTILITY Advanced screen Storage Configuration. B. STEP 2: Install Windows® XP / XP 64-bit OS on your SATA / SATAII HDDs without ...

User Manual
Page 33
.... 33 Please refer to the warning on page 8 for the possible overclocking risk before you enable Untied Overclocking function, please enter "Overclock Mode" option of BIOS setup to set the selection from [Auto] to fixed PCI / PCIE buses. 2.16 Untied Overclocking Technology This motherboard supports Untied Overclocking Technology, which means during...
.... 33 Please refer to the warning on page 8 for the possible overclocking risk before you enable Untied Overclocking function, please enter "Overclock Mode" option of BIOS setup to set the selection from [Auto] to fixed PCI / PCIE buses. 2.16 Untied Overclocking Technology This motherboard supports Untied Overclocking Technology, which means during...

User Manual
Page 34
... the system by pressing + + , or by turning the system off and then back on the menu bar, and then press to configure your screen. 3.1.1 BIOS Menu Bar The top of the screen has a menu bar with its test routines. You may also restart by pressing the reset button on the..., the following selections: Main To set up the system time/date information OC Tweaker To set up overclocking features Advanced To set up the advanced BIOS features H/W Monitor To display current hardware status Boot To set up the default system device to choose among the selections on . You may not...
... the system by pressing + + , or by turning the system off and then back on the menu bar, and then press to configure your screen. 3.1.1 BIOS Menu Bar The top of the screen has a menu bar with its test routines. You may also restart by pressing the reset button on the..., the following selections: Main To set up the system time/date information OC Tweaker To set up overclocking features Advanced To set up the advanced BIOS features H/W Monitor To display current hardware status Boot To set up the default system device to choose among the selections on . You may not...

User Manual
Page 35
...this item to specify the system time. 3.1.2 Navigation Keys Please check the following table for all the settings To save changes and exit the BIOS SETUP UTILITY To jump to configure system Time. +Tab F1 F9 F10 ESC Select Screen Select Item Change Field Select Field General Help Load Defaults... UTILITY Main OC Tweaker Advanced H/W Monitor System Overview System Time System Date [17:00:09] [Tue 02/09/2010] BIOS Version : A770 Extreme3 P1.00 Processor Type : AMD Phenom(tm) II X4 600e Processor (64bit) Processor Speed : 2200MHz Microcode Update : 100F52/1000086 L1 Cache Size : 512KB L2...
...this item to specify the system time. 3.1.2 Navigation Keys Please check the following table for all the settings To save changes and exit the BIOS SETUP UTILITY To jump to configure system Time. +Tab F1 F9 F10 ESC Select Screen Select Item Change Field Select Field General Help Load Defaults... UTILITY Main OC Tweaker Advanced H/W Monitor System Overview System Time System Date [17:00:09] [Tue 02/09/2010] BIOS Version : A770 Extreme3 P1.00 Processor Type : AMD Phenom(tm) II X4 600e Processor (64bit) Processor Speed : 2200MHz Microcode Update : 100F52/1000086 L1 Cache Size : 512KB L2...

User Manual
Page 36
... the optiomized CPU overclocking setting. It should be done at your CPU and motherboard. Configuration options: [Auto], [CPU, PCIE, Sync.], [CPU, PCIE, Async.] and [Optimized]. BIOS SETUP UTILITY Main OC Tweaker Advanced H/W Monitor Boot Security Exit EZ Overclocking Load Optimized CPU OC Setting [Press Enter] CPU Configuration Overclock Mode CPU Frequency...
... the optiomized CPU overclocking setting. It should be done at your CPU and motherboard. Configuration options: [Auto], [CPU, PCIE, Sync.], [CPU, PCIE, Async.] and [Optimized]. BIOS SETUP UTILITY Main OC Tweaker Advanced H/W Monitor Boot Security Exit EZ Overclocking Load Optimized CPU OC Setting [Press Enter] CPU Configuration Overclock Mode CPU Frequency...

User Manual
Page 37
... it is set to [Manual], you will display North Bridge Maximum Frequency for safety and system stability, it is not recommended to [Auto] by default. BIOS SETUP UTILITY Main OC Tweaker Advanced H/W Monitor Boot Security Exit EZ Overclocking Load Optimized CPU OC Setting [Press Enter] CPU Configuration Overclock Mode CPU Frequency...
... it is set to [Manual], you will display North Bridge Maximum Frequency for safety and system stability, it is not recommended to [Auto] by default. BIOS SETUP UTILITY Main OC Tweaker Advanced H/W Monitor Boot Security Exit EZ Overclocking Load Optimized CPU OC Setting [Press Enter] CPU Configuration Overclock Mode CPU Frequency...

User Manual
Page 38
... this to select DRAM voltage. Memory Configuration Memory Clock This item can set by the code using [Auto]. The default value is [Auto]. Memory Timing BIOS SETUP UTILITY OC Tweaker DRAM Configuration Memory Controller Mode Power Down Enable Bank Interleaving Channel Interleaving CAS Latency (CL) 9 TRCD 12 TRP 12 TRAS 30...
... this to select DRAM voltage. Memory Configuration Memory Clock This item can set by the code using [Auto]. The default value is [Auto]. Memory Timing BIOS SETUP UTILITY OC Tweaker DRAM Configuration Memory Controller Mode Power Down Enable Bank Interleaving Channel Interleaving CAS Latency (CL) 9 TRCD 12 TRP 12 TRAS 30...

User Manual
Page 43
...12 file system. CPU Configuration Chipset Configuration ACPI Configuration Storage Configuration PCIPnP Configuration Floppy Configuration SuperIO Configuration USB Configuration BIOS Update Utility ASRock Instant Flash Select Screen Select Item Enter Go to malfunction. Setting wrong values in Flash ROM. Just launch..., Storage Configuration, PCIPnP Configuration, Floppy Configuration, SuperIO Configuration, and USB Configuration. Select the proper BIOS file to malfunction. 3.4 Advanced Screen In this section, you execute ASRock Instant Flash utility, the utility will show the...
...12 file system. CPU Configuration Chipset Configuration ACPI Configuration Storage Configuration PCIPnP Configuration Floppy Configuration SuperIO Configuration USB Configuration BIOS Update Utility ASRock Instant Flash Select Screen Select Item Enter Go to malfunction. Setting wrong values in Flash ROM. Just launch..., Storage Configuration, PCIPnP Configuration, Floppy Configuration, SuperIO Configuration, and USB Configuration. Select the proper BIOS file to malfunction. 3.4 Advanced Screen In this section, you execute ASRock Instant Flash utility, the utility will show the...

User Manual
Page 44
... AMD's Cool 'n' QuietTM technology. The C1 state is [Auto]. 3.4.1 CPU Configuration Advanced CPU Configuration Cool 'n' Quiet Secure Virtual Machine Enhanced Halt State L3 Cache Allocation BIOS SETUP UTILITY [Auto] [Enabled] [Disabled] [Auto] Enabling this function may reduce CPU voltage and memory frequency, and lead to system stability or compatibility issue with...
... AMD's Cool 'n' QuietTM technology. The C1 state is [Auto]. 3.4.1 CPU Configuration Advanced CPU Configuration Cool 'n' Quiet Secure Virtual Machine Enhanced Halt State L3 Cache Allocation BIOS SETUP UTILITY [Auto] [Enabled] [Disabled] [Auto] Enabling this function may reduce CPU voltage and memory frequency, and lead to system stability or compatibility issue with...

User Manual
Page 45
... [Auto] or [Disabled] for the onboard HD Audio feature. Primary Graphics Adapter This item will be disabled when PCI Sound Card is [PCI]. 3.4.2 Chipset Configuration BIOS SETUP UTILITY Advanced Chipset Settings Onboard HD Audio Front Panel OnBoard Lan Primary Graphics Adapter [Auto] [Enabled] [Enabled] [PCI] Auto/Enable/Disable Onboard HD Audio...
... [Auto] or [Disabled] for the onboard HD Audio feature. Primary Graphics Adapter This item will be disabled when PCI Sound Card is [PCI]. 3.4.2 Chipset Configuration BIOS SETUP UTILITY Advanced Chipset Settings Onboard HD Audio Front Panel OnBoard Lan Primary Graphics Adapter [Auto] [Enabled] [Enabled] [PCI] Auto/Enable/Disable Onboard HD Audio...


