
Spec Sheet_e2051F
Page 1
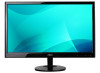
A08/10 UPC Code 685417039586 Note: Specifications are trademarks or registered trademarks of High-Definition contents. e2051F Cabinet Color Piano-black Glossy Bezel and Base, Patterned Texture Back Cover Panel Pixel Pitch Display Area... User Friendly Graphical OSD Menu, Dual Function Stand (Normal or Photoframe Style), Horizontal Direct Insert Connectors, Includes AOC's e-Saver and Screen+ Software Dimensions (WxHxD mm) Monitor: 479x391x179, Carton: 531x371x110 Dimensions (WxHxD inches) Monitor: 18.9x15.4x7.0, Carton: 20.9x14.6x4.3 Weight 4.2 lbs (1.9 kgs) Net 6.6 lbs (3.0 kgs)...
A08/10 UPC Code 685417039586 Note: Specifications are trademarks or registered trademarks of High-Definition contents. e2051F Cabinet Color Piano-black Glossy Bezel and Base, Patterned Texture Back Cover Panel Pixel Pitch Display Area... User Friendly Graphical OSD Menu, Dual Function Stand (Normal or Photoframe Style), Horizontal Direct Insert Connectors, Includes AOC's e-Saver and Screen+ Software Dimensions (WxHxD mm) Monitor: 479x391x179, Carton: 531x371x110 Dimensions (WxHxD inches) Monitor: 18.9x15.4x7.0, Carton: 20.9x14.6x4.3 Weight 4.2 lbs (1.9 kgs) Net 6.6 lbs (3.0 kgs)...

User's Manual_e2051F
Page 1
LCD Monitor User Manual e2051F 1 www.aoc.com ®2010 AOC. All Rights Reserved.
LCD Monitor User Manual e2051F 1 www.aoc.com ®2010 AOC. All Rights Reserved.

User's Manual_e2051F
Page 2
... Power ...5 Installation...6 Cleaning ...7 Other ...8 Setup ...9 Contents in Box ...9 Setup Stand & Base...10 Adjusting Viewing Angle...12 Connecting the Monitor...13 Adjusting ...14 Setting Optimal Resolution ...14 Windows Vista ...14 Windows XP ...16 Windows ME/2000...17 Hotkeys ...18 OSD Setting...19 ...Luminance ...20 Image Setup ...22 Color Setup...24 Picture Boost ...26 OSD Setup ...28 Extra ...30 Exit ...32 LED Indicator ...32 Driver ...33 Monitor Driver ...33 Windows 7 ...33 Windows Vista ...37 Windows XP ...39 Windows 2000 ...42 Windows ME...42 i-Menu ...43 e-Saver ...44 Screen+ ...
... Power ...5 Installation...6 Cleaning ...7 Other ...8 Setup ...9 Contents in Box ...9 Setup Stand & Base...10 Adjusting Viewing Angle...12 Connecting the Monitor...13 Adjusting ...14 Setting Optimal Resolution ...14 Windows Vista ...14 Windows XP ...16 Windows ME/2000...17 Hotkeys ...18 OSD Setting...19 ...Luminance ...20 Image Setup ...22 Color Setup...24 Picture Boost ...26 OSD Setup ...28 Extra ...30 Exit ...32 LED Indicator ...32 Driver ...33 Monitor Driver ...33 Windows 7 ...33 Windows Vista ...37 Windows XP ...39 Windows 2000 ...42 Windows ME...42 i-Menu ...43 e-Saver ...44 Screen+ ...

User's Manual_e2051F
Page 5
... power company. Do not overload power strips and extension cords. To ensure satisfactory operation, use the monitor only with a third (grounding) pin. This plug will protect the monitor from the type of time. Unplug the unit during a lightning storm or when it will not be... grounded plug. Overloading can result in fire or electric shock. Do not defeat the safety purpose of power supplied to power surges. The monitor is equipped with a three-pronged grounded plug, a plug with UL listed computers which have appropriate configured receptacles marked between 100 - 240V ...
... power company. Do not overload power strips and extension cords. To ensure satisfactory operation, use the monitor only with a third (grounding) pin. This plug will protect the monitor from the type of time. Unplug the unit during a lightning storm or when it will not be... grounded plug. Overloading can result in fire or electric shock. Do not defeat the safety purpose of power supplied to power surges. The monitor is equipped with a three-pronged grounded plug, a plug with UL listed computers which have appropriate configured receptacles marked between 100 - 240V ...

User's Manual_e2051F
Page 6
... liquids on an unstable cart, stand, tripod, bracket, or table. If the monitor falls, it can injure a person and cause serious damage to the monitor. Do not place the front of the product on the monitor cabinet. Otherwise, air-circulation may cause a fire or damage to this product. Leave... some space around the monitor as shown below the recommended ventilation areas around the monitor when the monitor is installed on the wall or on the stand:...
... liquids on an unstable cart, stand, tripod, bracket, or table. If the monitor falls, it can injure a person and cause serious damage to the monitor. Do not place the front of the product on the monitor cabinet. Otherwise, air-circulation may cause a fire or damage to this product. Leave... some space around the monitor as shown below the recommended ventilation areas around the monitor when the monitor is installed on the wall or on the stand:...

User's Manual_e2051F
Page 8
Make sure that the ventilating openings are not blocked by a table or curtain. Do not engage the LCD monitor in severe vibration or high impact conditions during operation or transportation. 8 Do not knock or drop the monitor during operation. Other If the product is emitting a strange smell, sound or smoke, disconnect the power plug IMMEDIATELY and contact a Service Center.
Make sure that the ventilating openings are not blocked by a table or curtain. Do not engage the LCD monitor in severe vibration or high impact conditions during operation or transportation. 8 Do not knock or drop the monitor during operation. Other If the product is emitting a strange smell, sound or smoke, disconnect the power plug IMMEDIATELY and contact a Service Center.

User's Manual_e2051F
Page 9
Please check with the local dealer or AOC branch office for all countries and regions. Setup Contents in Box QSG CD Manual Monitor Base Stand Power Cable Audio Analog Cable DVI Cable HDMI Not all signal cables (Analog, DVI, and HDMI cables) will be provided for confirmation. 9
Please check with the local dealer or AOC branch office for all countries and regions. Setup Contents in Box QSG CD Manual Monitor Base Stand Power Cable Audio Analog Cable DVI Cable HDMI Not all signal cables (Analog, DVI, and HDMI cables) will be provided for confirmation. 9

User's Manual_e2051F
Page 12
Hold the stand so you will not topple the monitor when you change the monitor's angle. NOTE: Do not touch the LCD screen when you change the angle. You are able to adjust the monitor's angle from -3° to your own preference. Adjusting Viewing Angle For optimal viewing, it is recommended to look at the full face of the monitor, and then adjust the monitor's angle to 25 °. It may cause damage or break the LCD screen. 12
Hold the stand so you will not topple the monitor when you change the monitor's angle. NOTE: Do not touch the LCD screen when you change the angle. You are able to adjust the monitor's angle from -3° to your own preference. Adjusting Viewing Angle For optimal viewing, it is recommended to look at the full face of the monitor, and then adjust the monitor's angle to 25 °. It may cause damage or break the LCD screen. 12

User's Manual_e2051F
Page 13
...If it does not display an image, please refer Troubleshooting. 13 If your monitor and computer. Connecting the Monitor Cable Connections In Back of Monitor and Computer: 1 DVI 2 D-SUB 3 Power To protect equipment, always turn off the PC and LCD monitor before connecting. 1 Connect the power cable to the AC port on the back... of the monitor. 2 Connect one end of the 15-pin D-Sub cable to the back of the monitor and connect the other end to the computer's D-Sub port. 3 (Optional-Requires a video card with DVI port) -Connect one end ...
...If it does not display an image, please refer Troubleshooting. 13 If your monitor and computer. Connecting the Monitor Cable Connections In Back of Monitor and Computer: 1 DVI 2 D-SUB 3 Power To protect equipment, always turn off the PC and LCD monitor before connecting. 1 Connect the power cable to the AC port on the back... of the monitor. 2 Connect one end of the 15-pin D-Sub cable to the back of the monitor and connect the other end to the computer's D-Sub port. 3 (Optional-Requires a video card with DVI port) -Connect one end ...

User's Manual_e2051F
Page 18
... When the OSD is closed, press Auto/Source/Exit button continuously about 2 second to select the Eco mode of brightness and DCR on /off the monitor. Eco (DCR)/ Press the Eco key continuously to do auto configure (only for the models with dual or more inputs). 18 Menu/Enter Press to...
... When the OSD is closed, press Auto/Source/Exit button continuously about 2 second to select the Eco mode of brightness and DCR on /off the monitor. Eco (DCR)/ Press the Eco key continuously to do auto configure (only for the models with dual or more inputs). 18 Menu/Enter Press to...

User's Manual_e2051F
Page 19
press and hold the MENU-button while the monitor is off and then press power button to turn the monitor on. If the product has only one signal input, the item of DCR, Color Boost, and Picture Boost functions is disabled to turn the monitor on the control keys. 1. OSD Lock Function: To lock... the OSD, press and hold the MENU-button while the monitor is off accordingly. 19 To un-lock the OSD - Press adjust any other two functions are turned off and then press power button to adjust. 2. ...
press and hold the MENU-button while the monitor is off and then press power button to turn the monitor on. If the product has only one signal input, the item of DCR, Color Boost, and Picture Boost functions is disabled to turn the monitor on the control keys. 1. OSD Lock Function: To lock... the OSD, press and hold the MENU-button while the monitor is off accordingly. 19 To un-lock the OSD - Press adjust any other two functions are turned off and then press power button to adjust. 2. ...
User's Manual_e2051F
Page 33
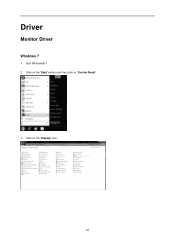
Start Windows® 7 2. Click on the 'Start' button and then click on the 'Display' icon. 33 Click on 'Control Panel'. 3. Driver Monitor Driver Windows 7 1.
Start Windows® 7 2. Click on the 'Start' button and then click on the 'Display' icon. 33 Click on 'Control Panel'. 3. Driver Monitor Driver Windows 7 1.

User's Manual_e2051F
Page 34
Click the "Monitor" tab and then click the "Properties" button. 34 Click the "Advanced Settings" button. 6. 4. Click on the "Change display settings" button. 5.
Click the "Monitor" tab and then click the "Properties" button. 34 Click the "Advanced Settings" button. 6. 4. Click on the "Change display settings" button. 5.

User's Manual_e2051F
Page 35
Select "Let me pick from a list of device drivers on "Update Driver... Open the "Update Driver Software-Generic PnP Monitor" window by clicking on my computer". 35 Click the "Driver" tab. 8. " and then click the "Browse my computer for driver software" button. 9. 7.
Select "Let me pick from a list of device drivers on "Update Driver... Open the "Update Driver Software-Generic PnP Monitor" window by clicking on my computer". 35 Click the "Driver" tab. 8. " and then click the "Browse my computer for driver software" button. 9. 7.

User's Manual_e2051F
Page 36
Click on the "Browse" button and navigate to your monitor model and click the "Next" button. The files will automatically select the maximum refresh rate and corresponding Color Matching Profiles. 36 Select your hard disk drive. 13. Restart the system. Click the "OK" button. 12. Close all open windows and remove the CD. 14. The system will be copied from the CD to the following directory: X:\Driver\module name (where X is the drive letter designator for the CD-ROM drive). 11. 10. Select the "xxx.inf" file and click the "Open" button. Click the "Have Disk" button.
Click on the "Browse" button and navigate to your monitor model and click the "Next" button. The files will automatically select the maximum refresh rate and corresponding Color Matching Profiles. 36 Select your hard disk drive. 13. Restart the system. Click the "OK" button. 12. Close all open windows and remove the CD. 14. The system will be copied from the CD to the following directory: X:\Driver\module name (where X is the drive letter designator for the CD-ROM drive). 11. 10. Select the "xxx.inf" file and click the "Open" button. Click the "Have Disk" button.

User's Manual_e2051F
Page 38
... on my computer". 7. If the message "Windows needs..." Check the "Browse my computer for your monitor model and click on the 'Browse...' Select your monitor is . The monitor can be used as shown in sequence. 38 Click on the following screens displayed in the figure below..., click "Continue". 5. Click "Properties" in the "Driver" tab. 6. 4. button, then click on the 'Next' button. 9. in the "Monitor" tab. is displayed...
... on my computer". 7. If the message "Windows needs..." Check the "Browse my computer for your monitor model and click on the 'Browse...' Select your monitor is . The monitor can be used as shown in sequence. 38 Click on the following screens displayed in the figure below..., click "Continue". 5. Click "Properties" in the "Driver" tab. 6. 4. button, then click on the 'Next' button. 9. in the "Monitor" tab. is displayed...

User's Manual_e2051F
Page 40
Please stop installation. - If the 'Properties' button is properly configured. Select 'Monitor' tab - Please follow the steps below. 7. If the 'Properties' button is inactive, it means your monitor is active, click on 'Properties' button. button. 40 5. Select the 'Settings' tab then click on 'Update Driver...' Click on the 'Driver' tab and then click on the 'Advanced' button. 6.
Please stop installation. - If the 'Properties' button is properly configured. Select 'Monitor' tab - Please follow the steps below. 7. If the 'Properties' button is inactive, it means your monitor is active, click on 'Properties' button. button. 40 5. Select the 'Settings' tab then click on 'Update Driver...' Click on the 'Driver' tab and then click on the 'Advanced' button. 6.

User's Manual_e2051F
Page 41
......' button and then select the appropriate drive F: (CD-ROM Drive). 11. Then click on the 'Have disk...' Click on the 'Next' button. 10. Select your monitor model and click on the 'Next' button. 9. 8. Select the 'Don't Search. Select the 'Install from a list or specific location [advanced]' radio button and then click...
......' button and then select the appropriate drive F: (CD-ROM Drive). 11. Then click on the 'Have disk...' Click on the 'Next' button. 10. Select your monitor model and click on the 'Next' button. 9. 8. Select the 'Don't Search. Select the 'Install from a list or specific location [advanced]' radio button and then click...

User's Manual_e2051F
Page 42
...then the 'Close' button. 42 button. 6. Click on the 'Display' Icon. 4. Select the 'Settings' tab then click on 'Update Driver...' Select 'Monitor' - Start Windows® Me 2. If the 'Properties' button is properly configured. Click on 'Driver' and then click on 'Advanced...'. 5. Select '...appropriate drive F: (CD-ROM Drive). 9. Click on 'Have disk...'. 8. Select the 'Settings' tab then click on 'Change...' Select the 'Monitor' button, then click on 'Advanced...'. 5. Select 'Specify the location of all the drivers in a specific location, so you can choose the ...
...then the 'Close' button. 42 button. 6. Click on the 'Display' Icon. 4. Select the 'Settings' tab then click on 'Update Driver...' Select 'Monitor' - Start Windows® Me 2. If the 'Properties' button is properly configured. Click on 'Driver' and then click on 'Advanced...'. 5. Select '...appropriate drive F: (CD-ROM Drive). 9. Click on 'Have disk...'. 8. Select the 'Settings' tab then click on 'Change...' Select the 'Monitor' button, then click on 'Advanced...'. 5. Select 'Specify the location of all the drivers in a specific location, so you can choose the ...

User's Manual_e2051F
Page 43
i-Menu makes it easy to "i-Menu" software by using on screen menus instead of the OSD button on the monitor. To complete installation, please follow the installation guide. 43 i-Menu Welcome to adjust your monitor display setting by AOC.
i-Menu makes it easy to "i-Menu" software by using on screen menus instead of the OSD button on the monitor. To complete installation, please follow the installation guide. 43 i-Menu Welcome to adjust your monitor display setting by AOC.


