

Operating Instructions
Page 2
.... 2 Do not install the appliance in a confined space, such as it any solid object or liquid fall into the component, unplug the stereo system and have the component checked by the plug. To disconnect the cord (mains lead), pull it correctly as chemical waste. Allow 10 cm clearance from the rear and the top of the unit...
.... 2 Do not install the appliance in a confined space, such as it any solid object or liquid fall into the component, unplug the stereo system and have the component checked by the plug. To disconnect the cord (mains lead), pull it correctly as chemical waste. Allow 10 cm clearance from the rear and the top of the unit...
Operating Instructions
Page 3
... any questions or problems concerning your stereo system, please consult your nearest Aiwa dealer. Those discs cannot be played on this unit are Audio CDs (CDs), CD-R/ CD-RW with audio data (CD-R/RW) and CD-R/CD-RW with copyright protection technologies are some record companies. Do not use this occur, the system will not operate properly. Music discs encoded with copyright...
... any questions or problems concerning your stereo system, please consult your nearest Aiwa dealer. Those discs cannot be played on this unit are Audio CDs (CDs), CD-R/ CD-RW with audio data (CD-R/RW) and CD-R/CD-RW with copyright protection technologies are some record companies. Do not use this occur, the system will not operate properly. Music discs encoded with copyright...
Operating Instructions
Page 5
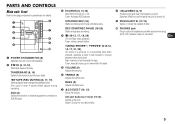
... features. Tuner: manually tunes up or down . BASS (9) Adjusts the bass level. 7 zCD EJECT (10, 12) Ejects the disc(s). TUNER/BAND (8, 14) Selects tuner function and the tuner band. Tuner: clears a preset station. Switches DEMO on and off (standby). 2 ECD (8, 10-12) Starts and pauses CD play. En 5 PARTS AND CONTROLS Main unit: front Refer to AUX IN jacks. 3 ECO/RDS (8, 14-16) Sets the ECO mode on or off. AUX (8) Selects the function of external equipment connected to...
... features. Tuner: manually tunes up or down . BASS (9) Adjusts the bass level. 7 zCD EJECT (10, 12) Ejects the disc(s). TUNER/BAND (8, 14) Selects tuner function and the tuner band. Tuner: clears a preset station. Switches DEMO on and off (standby). 2 ECD (8, 10-12) Starts and pauses CD play. En 5 PARTS AND CONTROLS Main unit: front Refer to AUX IN jacks. 3 ECO/RDS (8, 14-16) Sets the ECO mode on or off. AUX (8) Selects the function of external equipment connected to...
Operating Instructions
Page 6
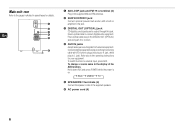
... display of the supplied speakers. 6 AC power cord (4) 6 AUX VIDEO TV 5 SPEAKERS3 terminals (4) Connect the speaker cords of the AUX function. Refer also to the operating instructions for details. 1 2 3 En 4 5 6 1 AM LOOP jack and FM 75 Ω terminal (4) Plug in the supplied AM and FM antennas. 2 SUB WOOFER3 jack Connect optional powered sub woofer with RCA phono plugs (red plug to R jack, white plug to L jack). Hold down AUX and press POWER while the power is on. Use an optical cable to external input, press AUX. Connect...
... display of the supplied speakers. 6 AC power cord (4) 6 AUX VIDEO TV 5 SPEAKERS3 terminals (4) Connect the speaker cords of the AUX function. Refer also to the operating instructions for details. 1 2 3 En 4 5 6 1 AM LOOP jack and FM 75 Ω terminal (4) Plug in the supplied AM and FM antennas. 2 SUB WOOFER3 jack Connect optional powered sub woofer with RCA phono plugs (red plug to R jack, white plug to L jack). Hold down AUX and press POWER while the power is on. Use an optical cable to external input, press AUX. Connect...
Operating Instructions
Page 7
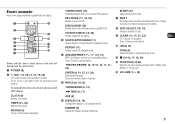
... pressing a numbered button to change its function to that printed above the number. 8 DISC SELECT (10, 12) Selects a desired CD slot. 9 CLEAR (11, 15, 21, 22) En CD: Clears a CD program Tuner: Clears a preset station. 0 i-Bass (9) TONE (9) Selects the bass or treble adjusting mode. ! Stores the received station to preset. 5 ECD (8, 10-12) TUNER/BAND (8, 14) dTAPE (8, 17) AUX (8) 6 DISPLAY (10, 12) Changes the display in a preset station. SLEEP (21) Selects sleep-timer mode. 7 SHIFT Hold down : CLOCK (8) Selects clock mode. Remote commander...
... pressing a numbered button to change its function to that printed above the number. 8 DISC SELECT (10, 12) Selects a desired CD slot. 9 CLEAR (11, 15, 21, 22) En CD: Clears a CD program Tuner: Clears a preset station. 0 i-Bass (9) TONE (9) Selects the bass or treble adjusting mode. ! Stores the received station to preset. 5 ECD (8, 10-12) TUNER/BAND (8, 14) dTAPE (8, 17) AUX (8) 6 DISPLAY (10, 12) Changes the display in a preset station. SLEEP (21) Selects sleep-timer mode. 7 SHIFT Hold down : CLOCK (8) Selects clock mode. Remote commander...
Operating Instructions
Page 8
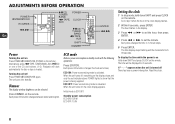
...: Power economizing mode is activated. Alternatively, press dTAPE, TUNER/BAND, AUX, ECD or one of the button changes the mode as follows; ECO ON: Power economizing mode is cancelled. Press DIMMER on the remote ). The time display stops flashing and the clock starts from 00 seconds. ADJUSTMENTS BEFORE OPERATION POWER 6STANDBY/ON ECO/RDS f,g En ECD, TUNER/ BAND, dTAPE, AUX POWER CLOCK ECD, TUNER/ BAND, dTAPE, AUX SHIFT DIMMER ENTER f,g Power Turning...
...: Power economizing mode is activated. Alternatively, press dTAPE, TUNER/BAND, AUX, ECD or one of the button changes the mode as follows; ECO ON: Power economizing mode is cancelled. Press DIMMER on the remote ). The time display stops flashing and the clock starts from 00 seconds. ADJUSTMENTS BEFORE OPERATION POWER 6STANDBY/ON ECO/RDS f,g En ECD, TUNER/ BAND, dTAPE, AUX POWER CLOCK ECD, TUNER/ BAND, dTAPE, AUX SHIFT DIMMER ENTER f,g Power Turning...

Operating Instructions
Page 9
... the button changes the following four levels: "i-Bass OFF", "i-Bass 1", "i-Bass 2" and "i-Bass MAX". •During recording, you cannot activate or deactivate i-Bass. on the remote. Press i-Bass/DEMO (i-Bass on the remote). Adjust from "-5" to select the bass or treble, then press f or g within 6 seconds. To cancel the Muting, repeat the above or turn up the volume. i-Bass Produces rich and clear low frequency sound besides BASS effect. SOUND ADJUSTMENTS TREBLE, BASS VOLUME i-Bass f,g SHIFT MUTING i-Bass TONE VOLUME +,-
... the button changes the following four levels: "i-Bass OFF", "i-Bass 1", "i-Bass 2" and "i-Bass MAX". •During recording, you cannot activate or deactivate i-Bass. on the remote. Press i-Bass/DEMO (i-Bass on the remote). Adjust from "-5" to select the bass or treble, then press f or g within 6 seconds. To cancel the Muting, repeat the above or turn up the volume. i-Bass Produces rich and clear low frequency sound besides BASS effect. SOUND ADJUSTMENTS TREBLE, BASS VOLUME i-Bass f,g SHIFT MUTING i-Bass TONE VOLUME +,-
Operating Instructions
Page 10
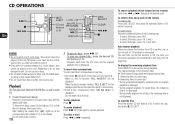
... disc number (1-5) in the following way. - To select a disc and a track on the remote during playback. CD OPERATIONS ECD s f,g En zCD EJECT 1-10/0, >10 CD slot buttons (1-5) SHUFFLE/ PROGRAM REPEAT ECD DISPLAY DISC SELECT CLEAR f,g s Notes •Do not insert 8-cm (3-inch) discs. Those discs cannot be played on this unit. Moreover, if you may not be able to CD, the track you change the function...
... disc number (1-5) in the following way. - To select a disc and a track on the remote during playback. CD OPERATIONS ECD s f,g En zCD EJECT 1-10/0, >10 CD slot buttons (1-5) SHUFFLE/ PROGRAM REPEAT ECD DISPLAY DISC SELECT CLEAR f,g s Notes •Do not insert 8-cm (3-inch) discs. Those discs cannot be played on this unit. Moreover, if you may not be able to CD, the track you change the function...
Operating Instructions
Page 12
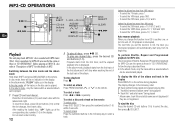
... play one , or turn the unit off, CD playback is displayed. In the album mode, "ALBM" lights up at the corresponding disc number (1-5) in "CD OPERATIONS". Press the CD slot buttons (1-5) and insert a disc with MP3 tracks (files). To play from the first track, and the elapsed playback time is interrupted. To select the 100th track, press >10, 1, 10/0 and 10/0. - The display changes...
... play one , or turn the unit off, CD playback is displayed. In the album mode, "ALBM" lights up at the corresponding disc number (1-5) in "CD OPERATIONS". Press the CD slot buttons (1-5) and insert a disc with MP3 tracks (files). To play from the first track, and the elapsed playback time is interrupted. To select the 100th track, press >10, 1, 10/0 and 10/0. - The display changes...
Operating Instructions
Page 14
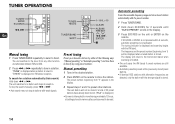
... 32 preset stations have already been stored. ("Full" is displayed.) •If power is not activated. Manual presetting 1 Tune in the desired station. 2 Press ENTER on the remote. Automatic presetting Scans the receivable frequency range and stores tuned stations automatically with weak signals. "TUNE" is displayed when a station is stored. The preset number, beginning from any other stations. The frequency and the preset number (beginning from 1) will be displayed when a tuned station is tuned in memory after purchase need...
... 32 preset stations have already been stored. ("Full" is displayed.) •If power is not activated. Manual presetting 1 Tune in the desired station. 2 Press ENTER on the remote. Automatic presetting Scans the receivable frequency range and stores tuned stations automatically with weak signals. "TUNE" is displayed when a station is stored. The preset number, beginning from any other stations. The frequency and the preset number (beginning from 1) will be displayed when a tuned station is tuned in memory after purchase need...

Operating Instructions
Page 15
... and press TUNER MODE on the display. Radio Text (RT) You can tune in the desired preset station directly by pressing the numbered buttons on the remote within 6 seconds. Tuning in preset stations 1 Select the band. 2 Press ALBUM/PRESET N,M on the unit *TRAFFIC, NEWS, AFFAIRS, INFO, SPORT, EDUCATE, DRAMA, CULTURE, SCIENCE, VARIED, POP M, ROCK M, EASY M (easy listening music), LIGHT M (light classical music), CLASSICS, OTHER M (other music), WEATHER, FINANCE, CHILDREN (children's program), SOCIAL...
... and press TUNER MODE on the display. Radio Text (RT) You can tune in the desired preset station directly by pressing the numbered buttons on the remote within 6 seconds. Tuning in preset stations 1 Select the band. 2 Press ALBUM/PRESET N,M on the unit *TRAFFIC, NEWS, AFFAIRS, INFO, SPORT, EDUCATE, DRAMA, CULTURE, SCIENCE, VARIED, POP M, ROCK M, EASY M (easy listening music), LIGHT M (light classical music), CLASSICS, OTHER M (other music), WEATHER, FINANCE, CHILDREN (children's program), SOCIAL...

Operating Instructions
Page 16
... button input for a station which regularly broadcasts traffic announcements. If there is also cancelled. To cancel the standby mode for 6 seconds in an RDS station. Note on the remote. INFO Search makes the function above may not be received. To return to the previously tuned station from the station contains too much interference or the reception signal is displayed. 2 Press f or g to tune in an RDS station...
... button input for a station which regularly broadcasts traffic announcements. If there is also cancelled. To cancel the standby mode for 6 seconds in an RDS station. Note on the remote. INFO Search makes the function above may not be received. To return to the previously tuned station from the station contains too much interference or the reception signal is displayed. 2 Press f or g to tune in an RDS station...
Operating Instructions
Page 17
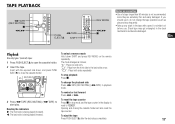
... deck mechanism and become damaged. To select a reverse mode Hold down , and press PUSH EJECTz to close the cassette holder. "p" : Plays one side only "[" : Plays from the front side to open the cassette holder. 2 Insert the tape. Reading the indicators l: The front side is being played (forward). The mode changes as play . En Playback Use only type I (normal) tapes. 1 Press...
... deck mechanism and become damaged. To select a reverse mode Hold down , and press PUSH EJECTz to close the cassette holder. "p" : Plays one side only "[" : Plays from the front side to open the cassette holder. 2 Insert the tape. Reading the indicators l: The front side is being played (forward). The mode changes as play . En Playback Use only type I (normal) tapes. 1 Press...

Operating Instructions
Page 18
... radio programs, press TUNER/BAND and tune in the display for TUNER or AUX source) Press REC START/REC PAUSE. To stop recording Press s. To record on the remote repeatedly to select the reverse mode. If selecting "]" mode in step 4. Press PUSH EJECTz to close the cassette holder. 3 Hold down SHIFT and press REV MODE on the remote repeatedly to select the CD function, and load the disc...
... radio programs, press TUNER/BAND and tune in the display for TUNER or AUX source) Press REC START/REC PAUSE. To stop recording Press s. To record on the remote repeatedly to select the reverse mode. If selecting "]" mode in step 4. Press PUSH EJECTz to close the cassette holder. 3 Hold down SHIFT and press REV MODE on the remote repeatedly to select the CD function, and load the disc...

Operating Instructions
Page 19
... for TUNER or AUX source) Inserting 4-second blank spaces may help you locate the beginning of the track on other equipment with MP3-CDs. • AI Edit Recording cannot be used to specify tape length. 6 Press REC START/REC PAUSE once to start from a point halfway in stop mode. When using the remote, press DISC SELECT then press the numbered button (1-5) within...
... for TUNER or AUX source) Inserting 4-second blank spaces may help you locate the beginning of the track on other equipment with MP3-CDs. • AI Edit Recording cannot be used to specify tape length. 6 Press REC START/REC PAUSE once to start from a point halfway in stop mode. When using the remote, press DISC SELECT then press the numbered button (1-5) within...
Operating Instructions
Page 20
..., "REC MUTING" flashes on the remote to select side A or B, and press s to clear the program for the selected side. The remaining recording time of side A is displayed. 4 Press the desired CD slot buttons (1-5) to select a disc. The tape is played through for 10 seconds, and recording starts. To stop simultaneously. When using the remote, press DISC SELECT then press the numbered button (1-5) within the length...
..., "REC MUTING" flashes on the remote to select side A or B, and press s to clear the program for the selected side. The remaining recording time of side A is displayed. 4 Press the desired CD slot buttons (1-5) to select a disc. The tape is played through for 10 seconds, and recording starts. To stop simultaneously. When using the remote, press DISC SELECT then press the numbered button (1-5) within the length...
Operating Instructions
Page 21
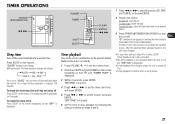
... stop timer setting in the desired station. 9 Press POWER 6STANDBY/ON (POWER) to 6, press CLEAR. "OFF TIME" is displayed. 4 Press f or g to set the volume level. 2 Hold down SHIFT and press TIMER on the unit at a specified time for 6 seconds. To play the radio, select the band and tune in steps 4 to turn the unit off first. •Timer playback for AUX function is deactivated...
... stop timer setting in the desired station. 9 Press POWER 6STANDBY/ON (POWER) to 6, press CLEAR. "OFF TIME" is displayed. 4 Press f or g to set the volume level. 2 Hold down SHIFT and press TIMER on the unit at a specified time for 6 seconds. To play the radio, select the band and tune in steps 4 to turn the unit off first. •Timer playback for AUX function is deactivated...

Operating Instructions
Page 22
...change the timer setting Reset the timer again. At timer-on time, the unit turns on the remote repeatedly so that "TIMER PLAY" or "TIMER REC" appears in the display. In this step, the reverse mode changes to 6, press CLEAR. To record on both sides, select [. En To record on one side only, select p. If selecting "]" mode...you do that "5" and "TIMER REC" are displayed for timer-on the remote repeatedly until "TIMER OFF" is turned off first. To change your previous setting, or simply use the same setting again. Timer standby mode is also cancelled. •The timer recording ...
...change the timer setting Reset the timer again. At timer-on time, the unit turns on the remote repeatedly so that "TIMER PLAY" or "TIMER REC" appears in the display. In this step, the reverse mode changes to 6, press CLEAR. To record on both sides, select [. En To record on one side only, select p. If selecting "]" mode...you do that "5" and "TIMER REC" are displayed for timer-on the remote repeatedly until "TIMER OFF" is turned off first. To change your previous setting, or simply use the same setting again. Timer standby mode is also cancelled. •The timer recording ...
Operating Instructions
Page 23
... the tape heads Dirty tape heads cause sound deterioration. Do not leave tapes near magnets, motors, television sets, or any problem persist, consult your nearest Aiwa dealer. First check that the AC power cord and the speakers are needed to the instructions of the speaker cord will obstruct the speaker connections. The unit shut off . •ECO is mode set the timer, also redo "Timer playback...
... the tape heads Dirty tape heads cause sound deterioration. Do not leave tapes near magnets, motors, television sets, or any problem persist, consult your nearest Aiwa dealer. First check that the AC power cord and the speakers are needed to the instructions of the speaker cord will obstruct the speaker connections. The unit shut off . •ECO is mode set the timer, also redo "Timer playback...
Operating Instructions
Page 25
... µV/m Loop antenna AMPLIFIER Power output Input Outputs Rated: 64 W + 64 W (6 Ω, T.H.D. 1 %, 1 kHz/DIN 45500) Reference: 80 W + 80 W (6 Ω, T.H.D. 10 %, 1 kHz/DIN 45324) AUX IN: 1.4 V SPEAKERS: 6 Ω or more PHONES: 32 Ω or more CASSETTE DECK Track format Frequency response Recording system Heads 4 tracks, 2 channels stereo 100 Hz - 10000 Hz AC bias Recording/playback × 1, erase × 1 CD PLAYER Laser D/A converter Signal-to-noise...
... µV/m Loop antenna AMPLIFIER Power output Input Outputs Rated: 64 W + 64 W (6 Ω, T.H.D. 1 %, 1 kHz/DIN 45500) Reference: 80 W + 80 W (6 Ω, T.H.D. 10 %, 1 kHz/DIN 45324) AUX IN: 1.4 V SPEAKERS: 6 Ω or more PHONES: 32 Ω or more CASSETTE DECK Track format Frequency response Recording system Heads 4 tracks, 2 channels stereo 100 Hz - 10000 Hz AC bias Recording/playback × 1, erase × 1 CD PLAYER Laser D/A converter Signal-to-noise...


