
Operating Instructions
Page 3
Damage Requiring Service Have the unit serviced by one or more of your Aiwa dealer in a particular installation. These limits are not expressly approved by turning the equipment off and on circuit different ...gotten inside the unit - Increase the separation between the equipment and receiver. - XC-RW700 Serial No. (Lot No.) TABLE OF CONTENTS PRECAUTIONS 2 FEATURES 4 BEFORE OPERATION 4 TYPES OF DISCS 4 ACCESSORIES 4 CLEANING THE CABINET 5 STORING DISCS 5 CARE OF DISCS 5 REMOTE CONTROL 5 GENERAL GUIDE 6 FRONT PANEL CONTROLS 6 INFORMATION DISPLAY 7 REAR PANEL CONNECTIONS...
Damage Requiring Service Have the unit serviced by one or more of your Aiwa dealer in a particular installation. These limits are not expressly approved by turning the equipment off and on circuit different ...gotten inside the unit - Increase the separation between the equipment and receiver. - XC-RW700 Serial No. (Lot No.) TABLE OF CONTENTS PRECAUTIONS 2 FEATURES 4 BEFORE OPERATION 4 TYPES OF DISCS 4 ACCESSORIES 4 CLEANING THE CABINET 5 STORING DISCS 5 CARE OF DISCS 5 REMOTE CONTROL 5 GENERAL GUIDE 6 FRONT PANEL CONTROLS 6 INFORMATION DISPLAY 7 REAR PANEL CONNECTIONS...
Operating Instructions
Page 4
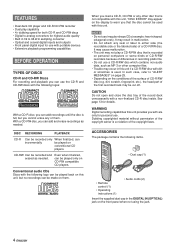
... . ACCESSORIES The package contains the following logo can be played on this unit. Conventional audio CDs Discs with the following items. • Dust cap (1) • Remote control (1) • Operating instructions (1) • Audio cords (2) Insert the supplied dust cap in this unit provides you load a CD-R, CD-RW or any seal or...
... . ACCESSORIES The package contains the following logo can be played on this unit. Conventional audio CDs Discs with the following items. • Dust cap (1) • Remote control (1) • Operating instructions (1) • Audio cords (2) Insert the supplied dust cap in this unit provides you load a CD-R, CD-RW or any seal or...
Operating Instructions
Page 5
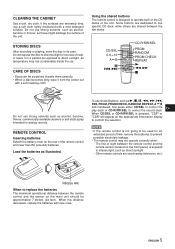
...Handle them carefully. • When a disc becomes dirty, wipe it in its case. The line of the unit. Using the shared buttons The remote control is designed to confirm the selection. When CD/SEL or CD-R/RW/SEL is pressed, "CDP" or "CDR" will appear on the appropriate ...CABINET Use a soft, dry cloth. STORING DISCS After recording or playing, store the disc in a parked car exposed to prevent possible electrolyte leakage. • The remote control may rise considerably inside the car. CARE OF DISCS • Discs can be approximately 7 meters (23 feet). CD/SEL 0-9,+10 A B a r,t CD...
...Handle them carefully. • When a disc becomes dirty, wipe it in its case. The line of the unit. Using the shared buttons The remote control is designed to confirm the selection. When CD/SEL or CD-R/RW/SEL is pressed, "CDP" or "CDR" will appear on the appropriate ...CABINET Use a soft, dry cloth. STORING DISCS After recording or playing, store the disc in a parked car exposed to prevent possible electrolyte leakage. • The remote control may rise considerably inside the car. CARE OF DISCS • Discs can be approximately 7 meters (23 feet). CD/SEL 0-9,+10 A B a r,t CD...

Operating Instructions
Page 6
... the play a CD or to set a selection in the record deck. = Information display Displays the status of a single track or an entire disc from the remote control. Press again to close the deck. % t/gSKIP/SEARCH Press and hold to play the disc in the play CD, CD-R or CD-RW discs... of an unfinalized CD-RW disc. 8 CD SYNC Press to begin sync recording of this unit for digital recording. 5 Play deck Use to play deck. ' REMOTE SENSOR Receives commands from an external CD, MD, DAT player. 9 FINALIZE Press to finalize the recording process. 0 DUBBING Press to make a complete copy of the...
... the play a CD or to set a selection in the record deck. = Information display Displays the status of a single track or an entire disc from the remote control. Press again to close the deck. % t/gSKIP/SEARCH Press and hold to play the disc in the play CD, CD-R or CD-RW discs... of an unfinalized CD-RW disc. 8 CD SYNC Press to begin sync recording of this unit for digital recording. 5 Play deck Use to play deck. ' REMOTE SENSOR Receives commands from an external CD, MD, DAT player. 9 FINALIZE Press to finalize the recording process. 0 DUBBING Press to make a complete copy of the...
Operating Instructions
Page 9
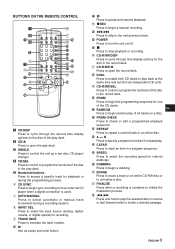
RANDOM En Press to begin the programming sequence for one of the CD decks. - BUTTONS ON THE REMOTE CONTROL 1 2 3 4 5 6 7 98 0 ! @ # $ % ^ & (* ) = [ ] \; ' , . / 1 CD/DISP Press to cycle through the various time display options for the disc in the play deck. 2 CD/z Press to open the ...
RANDOM En Press to begin the programming sequence for one of the CD decks. - BUTTONS ON THE REMOTE CONTROL 1 2 3 4 5 6 7 98 0 ! @ # $ % ^ & (* ) = [ ] \; ' , . / 1 CD/DISP Press to cycle through the various time display options for the disc in the play deck. 2 CD/z Press to open the ...
Operating Instructions
Page 12
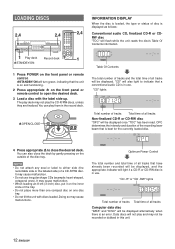
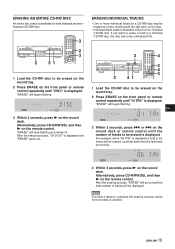
... side) of the disc tray. "CD" will turn green, indicating that the unit is on and functioning. 2 Press appropriate z on the front panel or remote control to indicate that a conventional audio CD is in use. You can play deck may not be displayed. Doing so may cause malfunction. • Do...will flash while the unit reads the disc's Table Of Contents information. 1 Play deck Record deck 1 6STANDBY/ON 1 Press POWER on the front panel or remote control. 6STANDBY/ON will also light to open the desired deck. 3 Load a disc with discs loaded. NOTE • Do not attach any seal or ...
... side) of the disc tray. "CD" will turn green, indicating that the unit is on and functioning. 2 Press appropriate z on the front panel or remote control to indicate that a conventional audio CD is in use. You can play deck may not be displayed. Doing so may cause malfunction. • Do...will flash while the unit reads the disc's Table Of Contents information. 1 Play deck Record deck 1 6STANDBY/ON 1 Press POWER on the front panel or remote control. 6STANDBY/ON will also light to open the desired deck. 3 Load a disc with discs loaded. NOTE • Do not attach any seal or ...
Operating Instructions
Page 14
..., the unit will automatically make a programmed dubbing at 4x speed, the unit will automatically select the 2x speed. Alternatively, press s on the remote control. "CD" lights When "DISC FULL" is displayed There is in progress. • Tracks will stop a dubbing operation manually Press s ...the actual running time of the disc. • When no information has been lost in other machines. Alternatively, press c on the remote control. To stop automatically when the source disc has played through to variations in the tray. See page 22 for details. DISC DUBBING...
..., the unit will automatically make a programmed dubbing at 4x speed, the unit will automatically select the 2x speed. Alternatively, press s on the remote control. "CD" lights When "DISC FULL" is displayed There is in progress. • Tracks will stop a dubbing operation manually Press s ...the actual running time of the disc. • When no information has been lost in other machines. Alternatively, press c on the remote control. To stop automatically when the source disc has played through to variations in the tray. See page 22 for details. DISC DUBBING...

Operating Instructions
Page 15
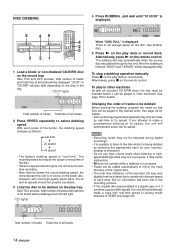
... panel or INPUT SEL on your receiver, preamp or processor. En 4 Play the source device. To stop the recording manually Press s on the remote control. CD SYNC RECORDING (from external CD or MD player.) CD sync recording allows you switch the source device from playback to make an automatic... non-finalized CD-R/RW disc on the record tray. 3 Press CD SYNC repeatedly on the front panel or remote control to the sound while recording by selecting the appropriate input on the remote control repeatedly until the desired input is a CD, tracks will be displayed briefly. • If the source...
... panel or INPUT SEL on your receiver, preamp or processor. En 4 Play the source device. To stop the recording manually Press s on the remote control. CD SYNC RECORDING (from external CD or MD player.) CD sync recording allows you switch the source device from playback to make an automatic... non-finalized CD-R/RW disc on the record tray. 3 Press CD SYNC repeatedly on the front panel or remote control to the sound while recording by selecting the appropriate input on the remote control repeatedly until the desired input is a CD, tracks will be displayed briefly. • If the source...
Operating Instructions
Page 16
... the level indicator are always lit. 2 Load a blank or non-finalized CD-R/RW disc on the record tray. 3 Press AUTO/MANUAL on the remote control to select how tracks will be numbered on the recorded disc. When recording level is ready to change the setting of the button, the... the blue segments of the level indicator are almost lit, and the red segments flash only occasionally. "RECORD" will stop the recording Press s on the remote control repeatedly until the desired input is possible to listen to your will. 4 1 6 3 1 6 62 4 1 Press INPUT on the front panel or INPUT SEL ...
... the level indicator are always lit. 2 Load a blank or non-finalized CD-R/RW disc on the record tray. 3 Press AUTO/MANUAL on the remote control to select how tracks will be numbered on the recorded disc. When recording level is ready to change the setting of the button, the... the blue segments of the level indicator are almost lit, and the red segments flash only occasionally. "RECORD" will stop the recording Press s on the remote control repeatedly until the desired input is possible to listen to your will. 4 1 6 3 1 6 62 4 1 Press INPUT on the front panel or INPUT SEL ...
Operating Instructions
Page 17
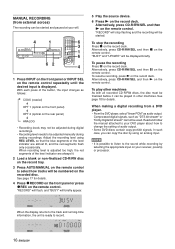
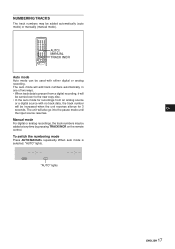
... pause mode until En the input source resumes. NUMBERING TRACKS The track numbers may be added at any time by pressing TRACK INCR on the remote control. Manual mode For digital or analog recordings, the track numbers may be added automatically (auto mode) or manually (manual mode).
... pause mode until En the input source resumes. NUMBERING TRACKS The track numbers may be added at any time by pressing TRACK INCR on the remote control. Manual mode For digital or analog recordings, the track numbers may be added automatically (auto mode) or manually (manual mode).

Operating Instructions
Page 18
...finalization process the record deck will not accept any operating commands. Alternatively, press CD-R/RW/SEL and then c on the front panel or remote control repeatedly until "TOC" is already recorded on a CD-RW disc and to add an additional track and erase an individual track, ...accept any operating commands. 3 2 3 2 31 1 Load the CD-R/RW disc on the record tray. 2 Press FINALIZE on the front panel or remote control. UNFINALIZATION To keep the material that is displayed. FINALIZATION Finalization completes the recording of a disc so that it from being finalized successfully. • ...
...finalization process the record deck will not accept any operating commands. Alternatively, press CD-R/RW/SEL and then c on the front panel or remote control repeatedly until "TOC" is already recorded on a CD-RW disc and to add an additional track and erase an individual track, ...accept any operating commands. 3 2 3 2 31 1 Load the CD-R/RW disc on the record tray. 2 Press FINALIZE on the front panel or remote control. UNFINALIZATION To keep the material that is displayed. FINALIZATION Finalization completes the recording of a disc so that it from being finalized successfully. • ...
Operating Instructions
Page 19
... • One or more individual tracks on a CD-RW disc may be erased at a time, starting with the last track on the front panel or remote control repeatedly until the number of tracks to be erased is displayed a total of tracks will be erased, counting back from one disc to another... the CD-RW disc to complete the erasing process varies from the last track on the disc. 4 Within 3 seconds, press c on the record deck or remote control until "01 TRK" is displayed and "ERASE" goes out. En 3 Within 3 seconds, press r or t on the record deck. ERASING AN ENTIRE CD-RW DISC...
... • One or more individual tracks on a CD-RW disc may be erased at a time, starting with the last track on the front panel or remote control repeatedly until the number of tracks to be erased is displayed a total of tracks will be erased, counting back from one disc to another... the CD-RW disc to complete the erasing process varies from the last track on the disc. 4 Within 3 seconds, press c on the record deck or remote control until "01 TRK" is displayed and "ERASE" goes out. En 3 Within 3 seconds, press r or t on the record deck. ERASING AN ENTIRE CD-RW DISC...
Operating Instructions
Page 20
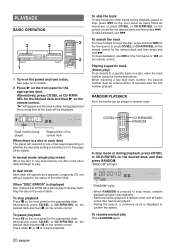
... many times as a separate, single play deck. To skip the track To skip forward to the status of two ways depending on the remote control for the appropriate deck. RANDOM PLAYBACK All of the current track When there is displayed Non-finalized CD-R/RW discs will operate as necessary..., enter the track number using the numbered buttons. "RANDOM" will be played in each deck The player will begin to a specific track on the remote control. When selecting a two digit track number, the second number must be played in the record deck. Alternatively press CD/SEL or CD-R/RW/SEL...
... many times as a separate, single play deck. To skip the track To skip forward to the status of two ways depending on the remote control for the appropriate deck. RANDOM PLAYBACK All of the current track When there is displayed Non-finalized CD-R/RW discs will operate as necessary..., enter the track number using the numbered buttons. "RANDOM" will be played in each deck The player will begin to a specific track on the remote control. When selecting a two digit track number, the second number must be played in the record deck. Alternatively press CD/SEL or CD-R/RW/SEL...
Operating Instructions
Page 23
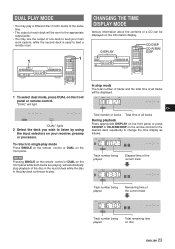
...automatically stop mode The total number of tracks and the total time of the current track Track number being played Total remaining time on the remote control for the desired deck repeatedly to change the time display as follows: Track number being played Elapsed time of the current track Track number... 2 Select the deck you wish to listen by using the input selectors on your main room system, while the second deck is used to feed a remote room. 1 1 CHANGING THE TIME DISPLAY MODE Various information about the contents of a CD can be displayed on the front panel while both decks at ...
...automatically stop mode The total number of tracks and the total time of the current track Track number being played Total remaining time on the remote control for the desired deck repeatedly to change the time display as follows: Track number being played Elapsed time of the current track Track number... 2 Select the deck you wish to listen by using the input selectors on your main room system, while the second deck is used to feed a remote room. 1 1 CHANGING THE TIME DISPLAY MODE Various information about the contents of a CD can be displayed on the front panel while both decks at ...
Operating Instructions
Page 24
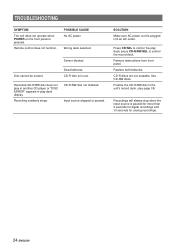
... in another CD player or "DISC ERROR" appears in use. Press CD/SEL to control the record deck. Replace both batteries. Use CD-RW discs. Remote control does not function. Sensor blocked Disc cannot be erased. Dead batteries CD-R disc is pressed. Recording suddenly stops. SOLUTION Make sure AC power cord...
... in another CD player or "DISC ERROR" appears in use. Press CD/SEL to control the record deck. Replace both batteries. Use CD-RW discs. Remote control does not function. Sensor blocked Disc cannot be erased. Dead batteries CD-R disc is pressed. Recording suddenly stops. SOLUTION Make sure AC power cord...


