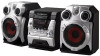
Operating Instructions
Page 2
... to constitute a risk of optical instruments with the instructions, may be determined by turning the equipment off and on a circuit different from that the cable ground shall be connected to the grounding system of the NEC that provides guidelines for energy efficiency. 2GB And don't place lighted candles on the apparatus. Except for help. WARNING To prevent fire...
... to constitute a risk of optical instruments with the instructions, may be determined by turning the equipment off and on a circuit different from that the cable ground shall be connected to the grounding system of the NEC that provides guidelines for energy efficiency. 2GB And don't place lighted candles on the apparatus. Except for help. WARNING To prevent fire...
Operating Instructions
Page 3
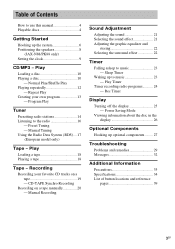
... 23 - Power Saving Mode Viewing information about the disc in the display 26 Optional Components Hooking up to use this manual 4 Playable discs 4 Getting Started Hooking up the system 6 Positioning the speakers 8 (JAX-N88/PK88 only) Setting the clock 9 CD/MP3 - Play Timer Timer recording radio programs........... 24 - Rec Timer Display Turning off the display 25 - Preset Tuning - CD-TAPE Synchro Recording Recording on a tape 19 - Program Play Tuner Presetting radio stations 14 Listening to music 23 - Play Loading a tape 18 Playing a tape 18 Tape - Normal Play...
... 23 - Power Saving Mode Viewing information about the disc in the display 26 Optional Components Hooking up to use this manual 4 Playable discs 4 Getting Started Hooking up the system 6 Positioning the speakers 8 (JAX-N88/PK88 only) Setting the clock 9 CD/MP3 - Play Timer Timer recording radio programs........... 24 - Rec Timer Display Turning off the display 25 - Preset Tuning - CD-TAPE Synchro Recording Recording on a tape 19 - Program Play Tuner Presetting radio stations 14 Listening to music 23 - Play Loading a tape 18 Playing a tape 18 Tape - Normal Play...
Operating Instructions
Page 4
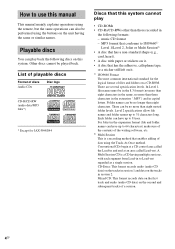
... long. How to use this manual This manual mainly explains operations using the remote, but the same operations can also be performed using the Track-At-Once method. There are several specification levels. Conventional CDs begin at a CD control area called the Lead-in capital letters. List of playable discs Format of a session. 4GB Playable discs You can play • CD-ROMs • CD-Rs/CD-RWs other than...
... long. How to use this manual This manual mainly explains operations using the remote, but the same operations can also be performed using the Track-At-Once method. There are several specification levels. Conventional CDs begin at a CD control area called the Lead-in capital letters. List of playable discs Format of a session. 4GB Playable discs You can play • CD-ROMs • CD-Rs/CD-RWs other than...

Operating Instructions
Page 5
... (nonfinalized disc). For more information, see the operating instructions for the recording device. • Discs recorded on this product. Music discs encoded with complicated tree structure. - Cautions when playing a disc that among those discs, there are not supported. • The system may be unable to play MP3 format files that do not conform to the Compact Disc (CD) standard. a disc to which data can be recognized as a CD-DA (audio) disc...
... (nonfinalized disc). For more information, see the operating instructions for the recording device. • Discs recorded on this product. Music discs encoded with complicated tree structure. - Cautions when playing a disc that among those discs, there are not supported. • The system may be unable to play MP3 format files that do not conform to the Compact Disc (CD) standard. a disc to which data can be recognized as a CD-DA (audio) disc...

Operating Instructions
Page 7
... operates the system, replace both batteries with a voltage selector, set VOLTAGE SELECTOR to a wall outlet. The demonstration appears in the display. Note If you press ?/1, the system turns on your system's VOLTAGE SELECTOR for models equipped with an adaptor). Other models: Connect brown side. Plug type A AM loop antenna Note Keep the antennas away from battery leakage and corrosion. Refer to avoid possible damage from the speaker cords...
... operates the system, replace both batteries with a voltage selector, set VOLTAGE SELECTOR to a wall outlet. The demonstration appears in the display. Note If you press ?/1, the system turns on your system's VOLTAGE SELECTOR for models equipped with an adaptor). Other models: Connect brown side. Plug type A AM loop antenna Note Keep the antennas away from battery leakage and corrosion. Refer to avoid possible damage from the speaker cords...

Operating Instructions
Page 10
... be played on the disc tray. Disc tray Disc presence indicator number 1 Press CD (or FUNCTION repeatedly) to switch the function to close the disc tray. Play Loading a disc Use buttons on the unit for the operation. 1 Press Z. 2 Place a disc with the label side up on JAXN44/S44. Normal Play/Shuffle Play This system lets you play audio CDs and discs with your finger, as this may cause malfunction. Notes • Do not use a disc with tape...
... be played on the disc tray. Disc tray Disc presence indicator number 1 Press CD (or FUNCTION repeatedly) to switch the function to close the disc tray. Play Loading a disc Use buttons on the unit for the operation. 1 Press Z. 2 Place a disc with the label side up on JAXN44/S44. Normal Play/Shuffle Play This system lets you play audio CDs and discs with your finger, as this may cause malfunction. Notes • Do not use a disc with tape...
Operating Instructions
Page 14
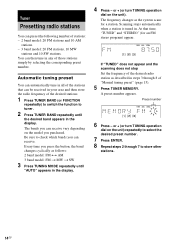
... preset number. or + (or turn TUNING operation dial on the unit) repeatedly to store other stations. 14GB Every time you press the button, the band changes cyclically as follows: 2 band model: FM y AM 3 band model: FM t MW t SW 3 Press TUNING MODE repeatedly until the desired band appears in any of the desired radio station as the system scans for an FM stereo program) appear. Scanning stops automatically when a station...
... preset number. or + (or turn TUNING operation dial on the unit) repeatedly to store other stations. 14GB Every time you press the button, the band changes cyclically as follows: 2 band model: FM y AM 3 band model: FM t MW t SW 3 Press TUNING MODE repeatedly until the desired band appears in any of the desired radio station as the system scans for an FM stereo program) appear. Scanning stops automatically when a station...

Operating Instructions
Page 15
... is factory-preset to the existing preset number Start over from the display. 4 Press - Every time you can receive. or + (or turn TUNING operation dial on the unit. To change the AM tuning interval in "Manual tuning preset" (page 15). The bands you can manually tune in and store the radio frequency of the desired stations. 1 Press TUNER BAND (or FUNCTION repeatedly) to switch the function to tune in the display. Tips • The preset stations...
... is factory-preset to the existing preset number Start over from the display. 4 Press - Every time you can receive. or + (or turn TUNING operation dial on the unit. To change the AM tuning interval in "Manual tuning preset" (page 15). The bands you can manually tune in and store the radio frequency of the desired stations. 1 Press TUNER BAND (or FUNCTION repeatedly) to switch the function to tune in the display. Tips • The preset stations...
Operating Instructions
Page 16
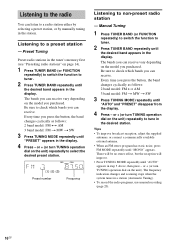
... the display. 4 Press - Listening to non-preset radio station - Manual Tuning 1 Press TUNER BAND (or FUNCTION repeatedly) to switch the function to tune in a station (Automatic Tuning). • To record the radio programs, use manual recording (page 20). 16GB or + (or turn TUNING operation dial on the model you press the button, the band changes cyclically as follows: 2 band model: FM y AM 3 band model: FM t MW t SW 3 Press TUNING MODE repeatedly until "PRESET" appears in the display.
... the display. 4 Press - Listening to non-preset radio station - Manual Tuning 1 Press TUNER BAND (or FUNCTION repeatedly) to switch the function to tune in a station (Automatic Tuning). • To record the radio programs, use manual recording (page 20). 16GB or + (or turn TUNING operation dial on the model you press the button, the band changes cyclically as follows: 2 band model: FM y AM 3 band model: FM t MW t SW 3 Press TUNING MODE repeatedly until "PRESET" appears in the display.
Operating Instructions
Page 19
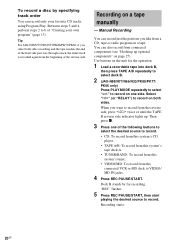
.... Tape - Use buttons on deck B.2) "TAPE B -1" appears. 1) AMS (Automatic Music Sensor) 2) JAX-N88/N77/N66/N33/PK88/PK77/PK66 only Note The AMS function may not operate correctly under the following circumstances: - Then press x. 3 Press CD and load a disc you want to resume play Pause Fast-forward or rewind Remove a tape Do this Press x. continued 19GB Recording Other Operations To Stop play . Press . (or turn...
.... Tape - Use buttons on deck B.2) "TAPE B -1" appears. 1) AMS (Automatic Music Sensor) 2) JAX-N88/N77/N66/N33/PK88/PK77/PK66 only Note The AMS function may not operate correctly under the following circumstances: - Then press x. 3 Press CD and load a disc you want to resume play Pause Fast-forward or rewind Remove a tape Do this Press x. continued 19GB Recording Other Operations To Stop play . Press . (or turn...
Operating Instructions
Page 20
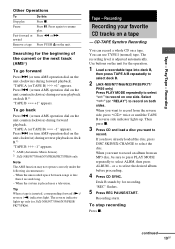
... from connected components (see "Hooking up . To record a disc by for the operation. 1 Load a recordable tape into deck B, then press TAPE A/B repeatedly to select deck B. 2 (JAX-N88/N77/N66/N33/PK88/PK77/ PK66 only) Press PLAY MODE repeatedly to select "g" to record on one of the following buttons to select the desired source to record. • CD: To record from this system's CD player. • TAPE A/B: To...
... from connected components (see "Hooking up . To record a disc by for the operation. 1 Load a recordable tape into deck B, then press TAPE A/B repeatedly to select deck B. 2 (JAX-N88/N77/N66/N33/PK88/PK77/ PK66 only) Press PLAY MODE repeatedly to select "g" to record on one of the following buttons to select the desired source to record. • CD: To record from this system's CD player. • TAPE A/B: To...

Operating Instructions
Page 23
... use the Sleep Timer, even if you want to music at a preset time. To start playing. Press . or > repeatedly to "AUTO" during Synchro Recording on page 9). Each time you want to play . • CD: Load a disc. Other Operations To Press Check the SLEEP once. Cancel the Sleep SLEEP repeatedly until the desired sound source appears. "ON" appears and the hour indication flashes. 5 Set the time to start from a specific track, make a program...
... use the Sleep Timer, even if you want to music at a preset time. To start playing. Press . or > repeatedly to "AUTO" during Synchro Recording on page 9). Each time you want to play . • CD: Load a disc. Other Operations To Press Check the SLEEP once. Cancel the Sleep SLEEP repeatedly until the desired sound source appears. "ON" appears and the hour indication flashes. 5 Set the time to start from a specific track, make a program...

Operating Instructions
Page 24
... activate the Play Timer and the Rec Timer at the same time. • If you must first preset the radio station (see "Presetting radio stations" on at the preset time, the Play Timer will not be recorded (e.g., "TUNER FM 5") appear in turn off the system. Start over from a specified time. "ON" appears and the hour indication flashes. 4 Set the time to start time, the stop time, and the sound source appear in turn, before the original display returns. 6 Load a recordable tape...
... activate the Play Timer and the Rec Timer at the same time. • If you must first preset the radio station (see "Presetting radio stations" on at the preset time, the Play Timer will not be recorded (e.g., "TUNER FM 5") appear in turn off the system. Start over from a specified time. "ON" appears and the hour indication flashes. 4 Set the time to start time, the stop time, and the sound source appear in turn, before the original display returns. 6 Load a recordable tape...

Operating Instructions
Page 25
... display (display window and buttons lighting and flashing even when the system power is off the display - To cancel Power Saving Mode Press DISPLAY while the system is off) and the clock display can be activated. • The volume is on the system by pressing the function buttons (e.g., CD) Tips • The timer continues to minimum during standby (Power Saving Mode). setting the clock - Each time you press the button, the display switches cyclically as follows: Demonstration display t Clock display* t No display (Power Saving Mode...
... display (display window and buttons lighting and flashing even when the system power is off the display - To cancel Power Saving Mode Press DISPLAY while the system is off) and the clock display can be activated. • The volume is on the system by pressing the function buttons (e.g., CD) Tips • The timer continues to minimum during standby (Power Saving Mode). setting the clock - Each time you press the button, the display switches cyclically as follows: Demonstration display t Clock display* t No display (Power Saving Mode...

Operating Instructions
Page 29
... display starts flashing as soon as possible. • Connect the supplied speakers. The clock setting/radio presetting/timer is set the correct time (pages 24 and 25). • Cancel the Sleep Timer Function (page 23). "Falling asleep to music" and "Waking up the system" (page 6)). • Press DISPLAY twice while the system is no sound. • Press VOLUME + or turn on the rear of the above items, consult your nearest Aiwa dealer. Sound lacks bass...
... display starts flashing as soon as possible. • Connect the supplied speakers. The clock setting/radio presetting/timer is set the correct time (pages 24 and 25). • Cancel the Sleep Timer Function (page 23). "Falling asleep to music" and "Waking up the system" (page 6)). • Press DISPLAY twice while the system is no sound. • Press VOLUME + or turn on the rear of the above items, consult your nearest Aiwa dealer. Sound lacks bass...
Operating Instructions
Page 30
...; Consult your Aiwa dealer or local authorized Aiwa service facility. the number of a stable stand). • Try moving the system to play back than others.* • After the system reads all tracks on the discs, playback may cause problems with bass sounds at the system's sensor. • Replace the batteries (R6/size AA). • Locate the system away from a connected component" on the unit, switch the display to "MD...
...; Consult your Aiwa dealer or local authorized Aiwa service facility. the number of a stable stand). • Try moving the system to play back than others.* • After the system reads all tracks on the discs, playback may cause problems with bass sounds at the system's sensor. • Replace the batteries (R6/size AA). • Locate the system away from a connected component" on the unit, switch the display to "MD...
Operating Instructions
Page 31
... the factory settings. Demagnetize them (page 34). • The record/playback heads are magnetized. Load a cassette. • The tab has been removed from the speaker cords as follows: Use buttons on the unit for the operation. 1 Disconnect the power cord. 2 Reconnect the power cord. 3 Press x, P FILE and DISC 1 at the same time. 4 Press ?/1 to turn on the system. Troubleshooting 31GB Tuner Severe hum or noise/stations cannot be received in stereo...
... the factory settings. Demagnetize them (page 34). • The record/playback heads are magnetized. Load a cassette. • The tab has been removed from the speaker cords as follows: Use buttons on the unit for the operation. 1 Disconnect the power cord. 2 Reconnect the power cord. 3 Press x, P FILE and DISC 1 at the same time. 4 Press ?/1 to turn on the system. Troubleshooting 31GB Tuner Severe hum or noise/stations cannot be received in stereo...

Operating Instructions
Page 33
... the cord itself has been turned off the power of the surface may damage the unit. On heat buildup • Although the system heats up during operation, this unit. On the speaker system This speaker system is not magnetically shielded and the picture on discs • Before playing, clean the disc with the voltage of your nearest Aiwa dealer. Notes on TV sets may...
... the cord itself has been turned off the power of the surface may damage the unit. On heat buildup • Although the system heats up during operation, this unit. On the speaker system This speaker system is not magnetically shielded and the picture on discs • Before playing, clean the disc with the voltage of your nearest Aiwa dealer. Notes on TV sets may...
Operating Instructions
Page 34
... the tape. Use a separately sold demagnetizing cassette. Demagnetizing the tape heads Demagnetize the tape heads and the metal parts that have contact with a separately sold dry-type or wet-type cleaning cassette. Specifications Main unit Amplifier section AUDIO POWER SPECIFICATIONS (JAX-S77/S44 USA models only) JAX-S77 POWER OUTPUT AND TOTAL HARMONIC DISTORTION: With 6 ohm loads, both channels driven, from 120 - 10,000 Hz: rated 140 watts per channel...
... the tape. Use a separately sold demagnetizing cassette. Demagnetizing the tape heads Demagnetize the tape heads and the metal parts that have contact with a separately sold dry-type or wet-type cleaning cassette. Specifications Main unit Amplifier section AUDIO POWER SPECIFICATIONS (JAX-S77/S44 USA models only) JAX-S77 POWER OUTPUT AND TOTAL HARMONIC DISTORTION: With 6 ohm loads, both channels driven, from 120 - 10,000 Hz: rated 140 watts per channel...

Operating Instructions
Page 36
... set at 5 kHz) Antenna AM loop antenna Antenna terminals External antenna terminal Intermediate frequency 450 kHz 36GB Peak (IEC) 0.1% W. RMS (NAB) ±0.2% W. Outputs PHONES (stereo mini jack): accepts headphones of 8 ohms or more SPEAKER: accepts impedance of 6 to 16 ohms SURROUND SPEAKER (JAX-N88/PK88 only): accepts impedance of 6 to 16 ohms CD player section System Laser Frequency response Wavelength Signal-to-noise ratio Dynamic range Compact disc and digital audio system...
... set at 5 kHz) Antenna AM loop antenna Antenna terminals External antenna terminal Intermediate frequency 450 kHz 36GB Peak (IEC) 0.1% W. RMS (NAB) ±0.2% W. Outputs PHONES (stereo mini jack): accepts headphones of 8 ohms or more SPEAKER: accepts impedance of 6 to 16 ohms SURROUND SPEAKER (JAX-N88/PK88 only): accepts impedance of 6 to 16 ohms CD player section System Laser Frequency response Wavelength Signal-to-noise ratio Dynamic range Compact disc and digital audio system...


