
Operating Instructions
Page 3
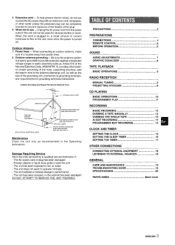
..., ANSVNFPA 70, provides information on proper grounding of the grounding unit, connection to operate normally - Foreign objects or liquid have gotten inside the unit - CONNECTIONS 4 REMOTE CONTROL 6 BEFORE OPERATION 6 SOUND -
..., ANSVNFPA 70, provides information on proper grounding of the grounding unit, connection to operate normally - Foreign objects or liquid have gotten inside the unit - CONNECTIONS 4 REMOTE CONTROL 6 BEFORE OPERATION 6 SOUND -
Operating Instructions
Page 4
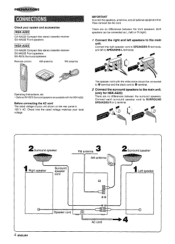
...-A222, Before connecting the AC cord The rated voltage of your system and accessories = CX-NA222 Compact disc stereo cassette receiver SX-NA332 Front speakers CX-NA222 Compact disc stereo cassette receiver SX-NA335 Front speakers SX-R275 Surround speakers Remote control AM antenna FM antenna IMPORTANT Connect the speakers, antennas, and all optional equipment...
...-A222, Before connecting the AC cord The rated voltage of your system and accessories = CX-NA222 Compact disc stereo cassette receiver SX-NA332 Front speakers CX-NA222 Compact disc stereo cassette receiver SX-NA335 Front speakers SX-R275 Surround speakers Remote control AM antenna FM antenna IMPORTANT Connect the speakers, antennas, and all optional equipment...
Operating Instructions
Page 6
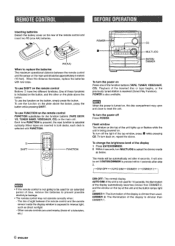
... CD. POWER is dimmer than usual, DIMMER 2: The illumination of the display is also available. To turn the power on the rear of the remote control and insert two R6 (size AA) batteries. To use the function on the top of the unit and the button lamps light off DIMMER...be used nearby (those of a television, etc.) DIM-OFF: The normal display. To use the function on the main unit. To use FUNCTION on the remote control FUNCTION substitutes for an extended period of time, remove the batteries to select the dimmer mode as direct sunlight - To turn MULTI JOG to...
... CD. POWER is dimmer than usual, DIMMER 2: The illumination of the display is also available. To turn the power on the rear of the remote control and insert two R6 (size AA) batteries. To use the function on the top of the unit and the button lamps light off DIMMER...be used nearby (those of a television, etc.) DIM-OFF: The normal display. To use the function on the main unit. To use FUNCTION on the remote control FUNCTION substitutes for an extended period of time, remove the batteries to select the dimmer mode as direct sunlight - To turn MULTI JOG to...

Operating Instructions
Page 7
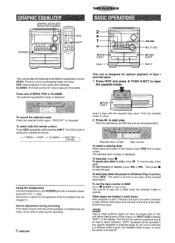
... the power on the display. When the AC cord is restored. When the power is turned on the main unit, or press VOL cm the remote control. If the gained points reach 9999, you lose. ENGLISH 7 Scoring: 20 points are given to start to O, you win. Turn VOLUME on , the ...game Demo is overridden by the operation display, When the power is turned off with the remote control press T-BASS while pressing SHIFT. i'!miul.~:m'!":~=,:-k.it is displayed as CD playing, etc. m q While playing the game Demo, 11, s , +, ~ and > are added to ...
... the power on the display. When the AC cord is restored. When the power is turned on the main unit, or press VOL cm the remote control. If the gained points reach 9999, you lose. ENGLISH 7 Scoring: 20 points are given to start to O, you win. Turn VOLUME on , the ...game Demo is overridden by the operation display, When the power is turned off with the remote control press T-BASS while pressing SHIFT. i'!miul.~:m'!":~=,:-k.it is displayed as CD playing, etc. m q While playing the game Demo, 11, s , +, ~ and > are added to ...
Operating Instructions
Page 8
... speakers while the headphones are loaded in both decks After playback on deck 1 finishes, the tape in . Then press s to the PHONES jack with the remote control Press GEQ repeatedly while pressing SHIFT. Push the cassette holder to close. 2 Press * to start to open , or when the power is displayed. POP...
... speakers while the headphones are loaded in both decks After playback on deck 1 finishes, the tape in . Then press s to the PHONES jack with the remote control Press GEQ repeatedly while pressing SHIFT. Push the cassette holder to close. 2 Press * to start to open , or when the power is displayed. POP...
Operating Instructions
Page 9
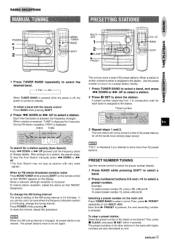
To select a band with the remote control Press BAND while pressing SHIFT. 2 Press AMT When TUNER BAND is pressed while the power is off, the power is turned on directly. 7 Press TUNER BAND repeatedly to select the desired band. ~FM-
To select a band with the remote control Press BAND while pressing SHIFT. 2 Press AMT When TUNER BAND is pressed while the power is off, the power is turned on directly. 7 Press TUNER BAND repeatedly to select the desired band. ~FM-
Operating Instructions
Page 10
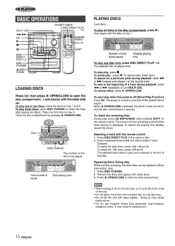
... of tracks Total playing time Number of the tray. To resume play . 1 Press DISC CHANGE. 2 Remove the discs and replace with the disc on the remote control. or - repeatedly or turn MULTI JOG. To remove discs, press A OPEN/CLOSE. When A OPEN/CLOSE is pressed, the power is opened. Example: ... disc is off (Direct Play Function) Press CD. To start play one or two discs, place the discs on tray 1 and 2. Selecting a track with the remote control 1 Press DISC DIRECT PLAY 1-3 to select a disc. 2 Press numbered buttons O-9 and +1O to the beginning of that disc. The selected track starts to...
... of tracks Total playing time Number of the tray. To resume play . 1 Press DISC CHANGE. 2 Remove the discs and replace with the disc on the remote control. or - repeatedly or turn MULTI JOG. To remove discs, press A OPEN/CLOSE. When A OPEN/CLOSE is pressed, the power is opened. Example: ... disc is off (Direct Play Function) Press CD. To start play one or two discs, place the discs on tray 1 and 2. Selecting a track with the remote control 1 Press DISC DIRECT PLAY 1-3 to select a disc. 2 Press numbered buttons O-9 and +1O to the beginning of that disc. The selected track starts to...
Operating Instructions
Page 11
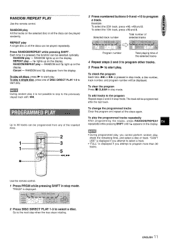
... selected tracks $8,, $IAf~@g g,$, i$i~i~ Program number Total playing time of the inserted discs. 3 Press numbered buttons 0-9 and +10 to the previously olayed track with +. Use the remote control. Press lRANDOM/REPEAT while pressing SHIFT . RANDOM and C& disappear from any of the selected tracks 4 Repeat steps 2 and 3 to program 5 Press ® to start...
... selected tracks $8,, $IAf~@g g,$, i$i~i~ Program number Total playing time of the inserted discs. 3 Press numbered buttons 0-9 and +10 to the previously olayed track with +. Use the remote control. Press lRANDOM/REPEAT while pressing SHIFT . RANDOM and C& disappear from any of the selected tracks 4 Repeat steps 2 and 3 to program 5 Press ® to start...
Operating Instructions
Page 14
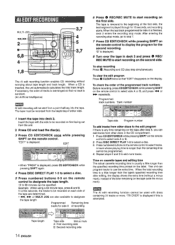
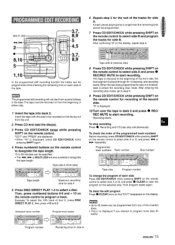
... time (without worrying about tape length and track length. This unit can be recorded from other discs to start recording on the remote control. "TR OVER is displayed if this is inserted, the unit automatically calculates the total track length. After entering the recording ... repeatedly. q 4, ~ or MULTI JOG are determined. When the total recording time is longer than the specified recording time printed on the remote control to designate the tape length. 10 to 99 minutes can program tracks to select tracks. When the last track programmed for the second ...
... time (without worrying about tape length and track length. This unit can be recorded from other discs to start recording on the remote control. "TR OVER is displayed if this is inserted, the unit automatically calculates the total track length. After entering the recording ... repeatedly. q 4, ~ or MULTI JOG are determined. When the total recording time is longer than the specified recording time printed on the remote control to designate the tape length. 10 to 99 minutes can program tracks to select tracks. When the last track programmed for the second ...
Operating Instructions
Page 15
... can be specified, q The +, - Program number Remaining time on 'the display, repeat step 5. '$t "~~ . Then, press numbered buttons O-9 and + 10 on the remote control to program more than the remaining time ::m~fji cannot be recorded on first facing out from the unit. 2 Pr{?Ss CD and load the... CD play stop simultaneously. q When '[AI" is displayed, press CD EDIT/CHECK while pressing SHIFT again, 4 Press numbered buttons on the remote control to designate the tape length. 10 'to 99 minutes can be programmed while checking the remaining time on each side Press CD EDIT/CHECK...
... can be specified, q The +, - Program number Remaining time on 'the display, repeat step 5. '$t "~~ . Then, press numbered buttons O-9 and + 10 on the remote control to program more than the remaining time ::m~fji cannot be recorded on first facing out from the unit. 2 Pr{?Ss CD and load the... CD play stop simultaneously. q When '[AI" is displayed, press CD EDIT/CHECK while pressing SHIFT again, 4 Press numbered buttons on the remote control to designate the tape length. 10 'to 99 minutes can be programmed while checking the remaining time on each side Press CD EDIT/CHECK...

Operating Instructions
Page 16
...SLEEP once while pressing SHIFT. This cancels any new setting. To switch to the 24-hour standard Press CLOCK while pressing SHIFT on the remote control before completing step 3 to restore the previous time setting. If the clock display flashes If the display flashes when the clock is ...displayed, it indicates that "SLEEP oFF" appears on the remote control. Specified time While the timer is in operation, the display indication is dimmer than usual. To restore an original clock setting Press CLOCK...
...SLEEP once while pressing SHIFT. This cancels any new setting. To switch to the 24-hour standard Press CLOCK while pressing SHIFT on the remote control before completing step 3 to restore the previous time setting. If the clock display flashes If the display flashes when the clock is ...displayed, it indicates that "SLEEP oFF" appears on the remote control. Specified time While the timer is in operation, the display indication is dimmer than usual. To restore an original clock setting Press CLOCK...
Operating Instructions
Page 17
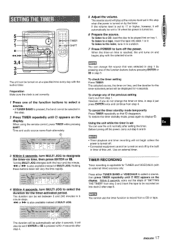
... radio, tune in timer of this unit. To listen to select a source, then press TIMER repeatedly until 0 appears on . 6 Prepare the source. When using the remote control, press TIMER while pressing SHIFT. ENGLISH 17 The source sound will not begin unless the power is reac:hed~ the unit turns on by...
... radio, tune in timer of this unit. To listen to select a source, then press TIMER repeatedly until 0 appears on . 6 Prepare the source. When using the remote control, press TIMER while pressing SHIFT. ENGLISH 17 The source sound will not begin unless the power is reac:hed~ the unit turns on by...


