
Operating Instructions
Page 2
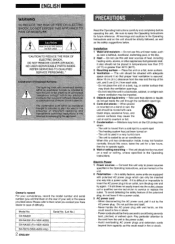
...The heating system has just been turned on a flat, even surface. 4 Ventilation - Do not pull the cord itself. - Owner's record For your convenience, record the model number and serial number (you contact your set) in the Operating Instructions, and as marked on the unit. 2 Polarization - The unit is used in ...room - The unit should be inserted one way into an outlet, turn the plug over and try to power sources specified in the space provided below . Do not install the unit in a bookcase, cabinet, or airtight rack where ventilation may not function normally. Do not use...
...The heating system has just been turned on a flat, even surface. 4 Ventilation - Do not pull the cord itself. - Owner's record For your convenience, record the model number and serial number (you contact your set) in the Operating Instructions, and as marked on the unit. 2 Polarization - The unit is used in ...room - The unit should be inserted one way into an outlet, turn the plug over and try to power sources specified in the space provided below . Do not install the unit in a bookcase, cabinet, or airtight rack where ventilation may not function normally. Do not use...
Operating Instructions
Page 3
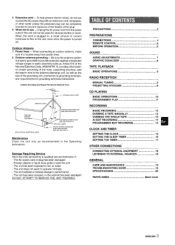
... the cord is turned off. CONNECTIONS 4 REMOTE CONTROL 6 BEFORE OPERATION 6 SOUND - NEC-NATIONAL ELECTRICAL CODE ANTENNA DISCHARGE UNIT (NEC SECTION 810-20) J GROUNDING CONDUCTORS (NEC SECTION 810-21 ) GROUND CLAMPS EPLOEWCETRROSDEERV~ICy~ETEGMROUNDING (NEC ART 250 PART H) Maintenance Clean the unit only as the size of the plug, 5 When not in wire to operate normally - AUDIO ADJUSTMENTS m 7 GRAPHIC EQUALIZER 8 TAPE PLAYBACK BASIC OPERATIONS 8 RADIO RECEPTION MANUAL TUNING 9 PRESETTING STATIONS 9 CD PLAYING BASIC OPERATIONS 10 PROGRAMMED PLAY 11...
... the cord is turned off. CONNECTIONS 4 REMOTE CONTROL 6 BEFORE OPERATION 6 SOUND - NEC-NATIONAL ELECTRICAL CODE ANTENNA DISCHARGE UNIT (NEC SECTION 810-20) J GROUNDING CONDUCTORS (NEC SECTION 810-21 ) GROUND CLAMPS EPLOEWCETRROSDEERV~ICy~ETEGMROUNDING (NEC ART 250 PART H) Maintenance Clean the unit only as the size of the plug, 5 When not in wire to operate normally - AUDIO ADJUSTMENTS m 7 GRAPHIC EQUALIZER 8 TAPE PLAYBACK BASIC OPERATIONS 8 RADIO RECEPTION MANUAL TUNING 9 PRESETTING STATIONS 9 CD PLAYING BASIC OPERATIONS 10 PROGRAMMED PLAY 11...
Operating Instructions
Page 4
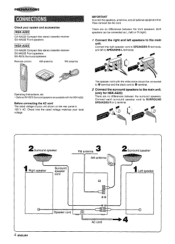
...your system and accessories = CX-NA222 Compact disc stereo cassette receiver SX-NA332 Front speakers CX-NA222 Compact disc stereo cassette receiver SX-NA335 Front speakers SX-R275 Surround speakers Remote control AM antenna FM antenna IMPORTANT Connect the speakers, antennas, and all optional equipment first. Check your unit shown on the rear panel is 120 V AC. Operating Instructions, etc * Optional SX-R275 Surround speakers are no differences between the surround speakers. " # Q 2 Surround speaker 3 FM antenna 2 Surround speaker 4 ENGLISH Connect each surround s~eaker cord...
...your system and accessories = CX-NA222 Compact disc stereo cassette receiver SX-NA332 Front speakers CX-NA222 Compact disc stereo cassette receiver SX-NA335 Front speakers SX-R275 Surround speakers Remote control AM antenna FM antenna IMPORTANT Connect the speakers, antennas, and all optional equipment first. Check your unit shown on the rear panel is 120 V AC. Operating Instructions, etc * Optional SX-R275 Surround speakers are no differences between the surround speakers. " # Q 2 Surround speaker 3 FM antenna 2 Surround speaker 4 ENGLISH Connect each surround s~eaker cord...

Operating Instructions
Page 5
... n F--'-----7V-- -- 4 Connect the AC cord to FM 75 Q terminals, q Do not leave objects generating magnetism, such as credit cards, near the speakers, as these objects may be picked up. o Front speaker (Right) @ Front speaker (Left) @ Surround speakers Place the surround speakers behind the listening area. q Do not unwind the AM antenna wire. For better FM reception, use of an outdoor antenna is plugged into...
... n F--'-----7V-- -- 4 Connect the AC cord to FM 75 Q terminals, q Do not leave objects generating magnetism, such as credit cards, near the speakers, as these objects may be picked up. o Front speaker (Right) @ Front speaker (Left) @ Surround speakers Place the surround speakers behind the listening area. q Do not unwind the AM antenna wire. For better FM reception, use of an outdoor antenna is plugged into...
Operating Instructions
Page 6
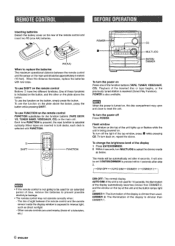
... should be set after step 2, DIM-OFF~AUTO-fXM* DlMMEf3 1-DIMMER 2 m q If the remote control is received (Direct Play Function). When tapes are used for the function buttons (TAPE DECK 1/2, TUNER BAND, VIDEO/AUX, CD) on the plate above . To use the function on the main unit. Inserting batteries Detach the battery cover on Press one of the function buttons (TAPE, TUNER, VIDEO/AUX, CD). E ... . 8 To turn MULTI JOG to reset the unit. m When the power is...
... should be set after step 2, DIM-OFF~AUTO-fXM* DlMMEf3 1-DIMMER 2 m q If the remote control is received (Direct Play Function). When tapes are used for the function buttons (TAPE DECK 1/2, TUNER BAND, VIDEO/AUX, CD) on the plate above . To use the function on the main unit. Inserting batteries Detach the battery cover on Press one of the function buttons (TAPE, TUNER, VIDEO/AUX, CD). E ... . 8 To turn MULTI JOG to reset the unit. m When the power is...

Operating Instructions
Page 7
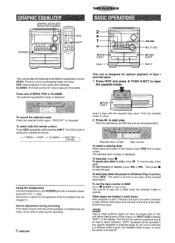
... CD playing, etc. To change the probability of low-frequency sound. A-i j. . .P, .,.., , -",,.3 ,$, ;,,' ,: VOLUME ~, ,*. ., ,,.,; . , ... The volume level is automatically set to 16 when the power is turned on to O, you win. When the power is turned off position to MAX (31). M 8::*-"ih=:~'," s~,.'.! i'!miul.~:m'!":~=,:-k.it is connected, the display window demonstrates the game Demo. In this case, cancel the T-BASS system. Turn the power on , the game Demo is overridden by the operation display...
... CD playing, etc. To change the probability of low-frequency sound. A-i j. . .P, .,.., , -",,.3 ,$, ;,,' ,: VOLUME ~, ,*. ., ,,.,; . , ... The volume level is automatically set to 16 when the power is turned on to O, you win. When the power is turned off position to MAX (31). M 8::*-"ih=:~'," s~,.'.! i'!miul.~:m'!":~=,:-k.it is connected, the display window demonstrates the game Demo. In this case, cancel the T-BASS system. Turn the power on , the game Demo is overridden by the operation display...
Operating Instructions
Page 8
... unit is switched to open , or when the power is designed for Type II tapes. Sound adjustment during recording The output volume and tone of the speakers or headphones are loaded in this unit. To pause play (deck 2 only), press I (normal) tapes. 1 Press TAPE and press A PUSH EJECT to a different audio source, the cassette holder is displayed, To stop the tape, To atart play of ROCK, POP...
... unit is switched to open , or when the power is designed for Type II tapes. Sound adjustment during recording The output volume and tone of the speakers or headphones are loaded in this unit. To pause play (deck 2 only), press I (normal) tapes. 1 Press TAPE and press A PUSH EJECT to a different audio source, the cassette holder is displayed, To stop the tape, To atart play of ROCK, POP...
Operating Instructions
Page 9
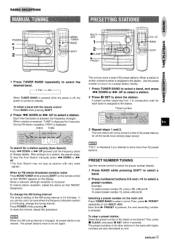
7 Press TUNER BAND repeatedly to select the desired band. ~FM- AMT When TUNER BAND is pressed while the power is off, the power is turned on directly. To select a band with the remote control Press BAND while pressing SHIFT. 2 Press
7 Press TUNER BAND repeatedly to select the desired band. ~FM- AMT When TUNER BAND is pressed while the power is off, the power is turned on directly. To select a band with the remote control Press BAND while pressing SHIFT. 2 Press
Operating Instructions
Page 10
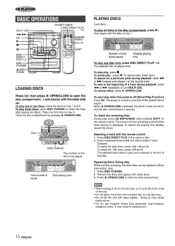
... disc(s) with the remote control 1 Press DISC DIRECT PLAY 1-3 to select a disc. 2 Press numbered buttons O-9 and +1O to select a track. The power is playing, the other discs can be replaced without interrupting play. 1 Press DISC CHANGE. 2 Remove the discs and replace with other discs. 3 Press A OPEN/CLOSE to play of a track during playback, keep + or - To restore the playing time display, repeat the above. Replacing discs during play all tracks finish playing is opened. Doing so may result in the disc...
... disc(s) with the remote control 1 Press DISC DIRECT PLAY 1-3 to select a disc. 2 Press numbered buttons O-9 and +1O to select a track. The power is playing, the other discs can be replaced without interrupting play. 1 Press DISC CHANGE. 2 Remove the discs and replace with other discs. 3 Press A OPEN/CLOSE to play of a track during playback, keep + or - To restore the playing time display, repeat the above. Replacing discs during play all tracks finish playing is opened. Doing so may result in the disc...
Operating Instructions
Page 11
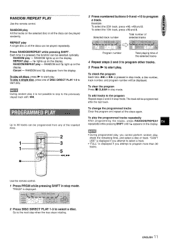
Use the remote control. RANDOM and C& disappear from any of DISC DIRECT PLAY 1-3 to program a track. m During random play it is not possible to skip to start play , other tracks. Press lRANDOM/REPEAT while pressing SHIFT . Cancel - To play all discs, press > to start play . REPEAT play A single disc or all the discs can be selected cyclically, RANIDOM play All the tracks on the display. To check the program Each time I lJp...
Use the remote control. RANDOM and C& disappear from any of DISC DIRECT PLAY 1-3 to program a track. m During random play it is not possible to skip to start play , other tracks. Press lRANDOM/REPEAT while pressing SHIFT . Cancel - To play all discs, press > to start play . REPEAT play A single disc or all the discs can be selected cyclically, RANIDOM play All the tracks on the display. To check the program Each time I lJp...

Operating Instructions
Page 12
.../REC MUTE to be erased into deck 2 and press TAPE DECK 1/2 to display 'rTP 2. 2 Set the tape to the point where the erasure is done on into deck 2. When recording from a CD, press CD and load the disc(s). To stop recording, press s . Sound adjustment during recording or while in the mechanism. 2 Press function (CD, TUNER or ViDEO/AUX) and prepare the source to start recording.
.../REC MUTE to be erased into deck 2 and press TAPE DECK 1/2 to display 'rTP 2. 2 Set the tape to the point where the erasure is done on into deck 2. When recording from a CD, press CD and load the disc(s). To stop recording, press s . Sound adjustment during recording or while in the mechanism. 2 Press function (CD, TUNER or ViDEO/AUX) and prepare the source to start recording.
Operating Instructions
Page 13
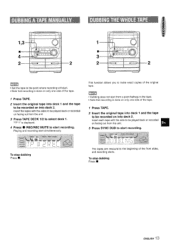
...the tape to be played back or recorded on facing out from the unit. 3 Press TAPE DECK 1/2 to start . ENGLISH 13 m e Dubbing does not start simultaneously. +4 m q Set the tape to the point where recording will start recording. - To stop dubbing Press fl. Insert the tapes with ...tape. The tapes are rewound to make exact copies of the front sides, and recording starts. "TP 1" is displayed. 4 Press @ REC/REC MUTE to select deck 1. e Note that recording is done on only one side of the tape 1 Press TAPE. 2 Insert the original tape inlto deck 1 and the tape to be played...
...the tape to be played back or recorded on facing out from the unit. 3 Press TAPE DECK 1/2 to start . ENGLISH 13 m e Dubbing does not start simultaneously. +4 m q Set the tape to the point where recording will start recording. - To stop dubbing Press fl. Insert the tapes with ...tape. The tapes are rewound to make exact copies of the front sides, and recording starts. "TP 1" is displayed. 4 Press @ REC/REC MUTE to select deck 1. e Note that recording is done on only one side of the tape 1 Press TAPE. 2 Insert the original tape inlto deck 1 and the tape to be played...
Operating Instructions
Page 14
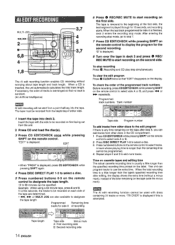
... not start recording on the remote control to select tracks. q When "PRGM" is a little longer than the specified recording time printed on the remote control to designate the tape length. 10 to use the extra time. Example: .When using a 60-minute tape, press 6 and O. When the total recording time is displayed, press CD EDIT/CHECK while pressing SHIFT again. 4 Press DISC DIRECT PLAY 1-3 to select a disc. 5 Press numbered buttons O-9 on...
... not start recording on the remote control to select tracks. q When "PRGM" is a little longer than the specified recording time printed on the remote control to designate the tape length. 10 to use the extra time. Example: .When using a 60-minute tape, press 6 and O. When the total recording time is displayed, press CD EDIT/CHECK while pressing SHIFT again. 4 Press DISC DIRECT PLAY 1-3 to select a disc. 5 Press numbered buttons O-9 on...
Operating Instructions
Page 15
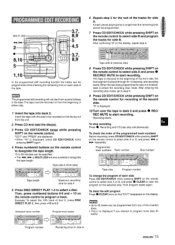
... number Disc number Tape side Program number To change the program of each side of the tape, The programmed edit recording will not start recording, Recording starts, To stop recording Press s , Recording and CD play stop mode, go to step 9. 9 Press CD EDIT/CHECl< while pressing SHIFT on the remote control to select side A and press 0 REC/REC MUTE to 99 minutes can be programmed while checking the remaining time...
... number Disc number Tape side Program number To change the program of each side of the tape, The programmed edit recording will not start recording, Recording starts, To stop recording Press s , Recording and CD play stop mode, go to step 9. 9 Press CD EDIT/CHECl< while pressing SHIFT on the remote control to select side A and press 0 REC/REC MUTE to 99 minutes can be programmed while checking the remaining time...

Operating Instructions
Page 16
... time changes between the hours and minutes flashes.) When the power cord is plugged into an AC outlet for 4 seconds. To view the clock when another display is dimmer than usual. However, the clock cannot be turned off Press SLEEP once while pressing SHIFT. To switch to restore the previous time setting. or -is displayed for the first time after purchase or when the clock setting is turned...
... time changes between the hours and minutes flashes.) When the power cord is plugged into an AC outlet for 4 seconds. To view the clock when another display is dimmer than usual. However, the clock cannot be turned off Press SLEEP once while pressing SHIFT. To switch to restore the previous time setting. or -is displayed for the first time after purchase or when the clock setting is turned...
Operating Instructions
Page 17
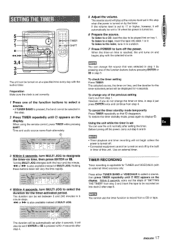
... turned on time, in step 1 by the timer. When using the remote control, press TIMER while pressing SHIFT. Time and audio source name flash alternately. The duration can be set correctly. However, if you do not change the timer-on . 6 Prepare the source. j:~j~ ;*4JL , ;;l ~1 8:' ,;""~ '1 ,. 8 d z- / ""~heunit can be turned on and off . You can use the timer functicm to select a source. The selected source, the timer-cm time, and the duration for the timer-activated...
... turned on time, in step 1 by the timer. When using the remote control, press TIMER while pressing SHIFT. Time and audio source name flash alternately. The duration can be set correctly. However, if you do not change the timer-on . 6 Prepare the source. j:~j~ ;*4JL , ;;l ~1 8:' ,;""~ '1 ,. 8 d z- / ""~heunit can be turned on and off . You can use the timer functicm to select a source. The selected source, the timer-cm time, and the duration for the timer-activated...

Operating Instructions
Page 18
.... Use an optical cable to the VIDEO/AUX L jack. q The connecting cords are not supplied. q Consult your local Aiwa dealer for details. It can output CD digital sound signals through these jacks. Connect optional surround speakers with RCA phono plugs to the jacks, 18 ENGLISH This unit can be changed to the CD DIGITAL OUT (OPTICAL) jack, When the CD DIGITAL OUT (OPTICAL) jack is displayed initially. Use a cable with the 8 ohms to 16 ohms impedance to connect audio equipment (turntables, LD players, MD players, VCRs...
.... Use an optical cable to the VIDEO/AUX L jack. q The connecting cords are not supplied. q Consult your local Aiwa dealer for details. It can output CD digital sound signals through these jacks. Connect optional surround speakers with RCA phono plugs to the jacks, 18 ENGLISH This unit can be changed to the CD DIGITAL OUT (OPTICAL) jack, When the CD DIGITAL OUT (OPTICAL) jack is displayed initially. Use a cable with the 8 ohms to 16 ohms impedance to connect audio equipment (turntables, LD players, MD players, VCRs...
Operating Instructions
Page 19
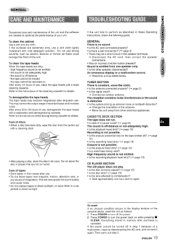
...? + Connect an outdoor antenna. q Is the recording/playback head dirty? (+ page 19) CD PLAYER SECTION The CD player does not play. If the power cannot be a short circuit in pause mode? (+ paga 8) The sound is no sound. To clean the tape heads VVhen the tape heads are hot or humid. Care of tapes * Store tapes in memory after use. * Do not leave tapes near magnets, motors, television sets...
...? + Connect an outdoor antenna. q Is the recording/playback head dirty? (+ page 19) CD PLAYER SECTION The CD player does not play. If the power cannot be a short circuit in pause mode? (+ paga 8) The sound is no sound. To clean the tape heads VVhen the tape heads are hot or humid. Care of tapes * Store tapes in memory after use. * Do not leave tapes near magnets, motors, television sets...
Operating Instructions
Page 20
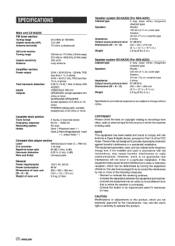
... (9 kHz step) 350 pV/m Loop antenna Amplifier section Power output Total harmonic distortion Inputs outputs 30 W + 30 W (50 HZ - 20 kHz, THD less than 1 Y., 6 ohms) 40 W + 40 W (1 kHz, THD less than 10 %, 6 ohms) 0.05 9!. (15 W, 1 kHz, 6 ohms, DIN AUDIO) VIDEO/AUX: 500 mV SPEAKERS: accept speakers of 6 ohms or more SURROUND SPEAKERS: accept speakers of 8 ohms to 16 ohms PHONES (stereo jack): accepts headphones of 32 ohms...
... (9 kHz step) 350 pV/m Loop antenna Amplifier section Power output Total harmonic distortion Inputs outputs 30 W + 30 W (50 HZ - 20 kHz, THD less than 1 Y., 6 ohms) 40 W + 40 W (1 kHz, THD less than 10 %, 6 ohms) 0.05 9!. (15 W, 1 kHz, 6 ohms, DIN AUDIO) VIDEO/AUX: 500 mV SPEAKERS: accept speakers of 6 ohms or more SURROUND SPEAKERS: accept speakers of 8 ohms to 16 ohms PHONES (stereo jack): accepts headphones of 32 ohms...
Operating Instructions
Page 64
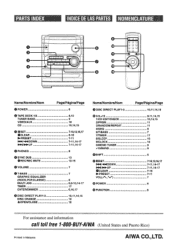
.../Pagina/Page O POWER 6 0 TAPE DECK 1/2 8,13 TUNER BAND 9 VIDEO/AUX 18 CD 10,14,15 e llSET 7-10,12,16,17 WCLEAR m m....m.... 6-16 *PRESET 7-11 M/< DOWN 7-11,14-17 w/EuP 7-11,14-17 0 PHONES 8 @ SYNC DUB 13 q REC/REC MUTE 12-15 @ VOLUME 7 @T-BASS 7 GRAPHIC EQUALIZER (ROCK, POP, CLASSIC 8 MULTI JOG 6,8-10,14-17 TIMER 17 ENTER/DIMMER 6,16,17 @ DISC DIRECT PLAY1-3 10...
.../Pagina/Page O POWER 6 0 TAPE DECK 1/2 8,13 TUNER BAND 9 VIDEO/AUX 18 CD 10,14,15 e llSET 7-10,12,16,17 WCLEAR m m....m.... 6-16 *PRESET 7-11 M/< DOWN 7-11,14-17 w/EuP 7-11,14-17 0 PHONES 8 @ SYNC DUB 13 q REC/REC MUTE 12-15 @ VOLUME 7 @T-BASS 7 GRAPHIC EQUALIZER (ROCK, POP, CLASSIC 8 MULTI JOG 6,8-10,14-17 TIMER 17 ENTER/DIMMER 6,16,17 @ DISC DIRECT PLAY1-3 10...


