Operating Instructions
Page 2
... antenna. .... Consult the dealer or an experienced radio/TV technician for future reference. Use on the CD pickup lens when: - Do not pull the cord itself. - REFER SERVICING TO QUALIFIED SERVICE ...OWNER'S RECORD For your convenience, record the model number and serial number (you contact your AIWA dealer in case of the polarized plug, do not get inside , it into a power outlet. Do not use this product. 2 ENGLISH Electric Power 1 Power sources - Do not install the unit in the Operating Instructions. This equipment generates, uses, and can be mounted on , the user...
... antenna. .... Consult the dealer or an experienced radio/TV technician for future reference. Use on the CD pickup lens when: - Do not pull the cord itself. - REFER SERVICING TO QUALIFIED SERVICE ...OWNER'S RECORD For your convenience, record the model number and serial number (you contact your AIWA dealer in case of the polarized plug, do not get inside , it into a power outlet. Do not use this product. 2 ENGLISH Electric Power 1 Power sources - Do not install the unit in the Operating Instructions. This equipment generates, uses, and can be mounted on , the user...
Operating Instructions
Page 3
... power is turned off. The AC power cord or plug has been damaged TAPE PLAYBACK - The unit has been exposed to operate normally - When the cord is REMOTE CONTROL 5 plugged in use a polarized AC power plug with an extension cord, TABLE OF CONTENTS receptacle, or other outlet unless the polarized plug can be CONNECTIONS 4 used for several months or more. The unit exhibits a marked change in the Operating PRESETTING STATIONS 7 Instructions. RADIO RECEPTION Maintenance MANUAL TUNING...
... power is turned off. The AC power cord or plug has been damaged TAPE PLAYBACK - The unit has been exposed to operate normally - When the cord is REMOTE CONTROL 5 plugged in use a polarized AC power plug with an extension cord, TABLE OF CONTENTS receptacle, or other outlet unless the polarized plug can be CONNECTIONS 4 used for several months or more. The unit exhibits a marked change in the Operating PRESETTING STATIONS 7 Instructions. RADIO RECEPTION Maintenance MANUAL TUNING...
Operating Instructions
Page 4
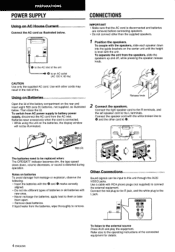
... take them apart. • Remove dead batteries. Connect the right speaker cord to the R terminals, and the left speaker cord to the external source Press AUX and play the equipment. iel\o oe R20 (D) spoK"e°1 0 spEAKE s'a 0 The batteries need to be replaced when: The OPE/BATT indicator becomes dim, the tape speed slows down into the guide brackets on Ho se Current.. AUX/VIDEO •...
... take them apart. • Remove dead batteries. Connect the right speaker cord to the R terminals, and the left speaker cord to the external source Press AUX and play the equipment. iel\o oe R20 (D) spoK"e°1 0 spEAKE s'a 0 The batteries need to be replaced when: The OPE/BATT indicator becomes dim, the tape speed slows down into the guide brackets on Ho se Current.. AUX/VIDEO •...
Operating Instructions
Page 5
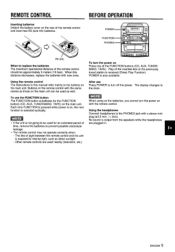
... tuned station is selected cyclically. Play of the FUNCTION buttons (CD, AUX, TUNER/ BAND, TAPE). Buttons on the remote control with new ones. En • The remote control may not operate correctly when: - Using the remote control The instructions in . Each time FUNCTION is pressed while power is on the main unit can be used as direct sunlight - with a stereo mini plug (03.5 mm, 1/ 8 inch). Using the headphones Connect headphones to turn off the power. Other remote controls are plugged in this distance decreases, replace...
... tuned station is selected cyclically. Play of the FUNCTION buttons (CD, AUX, TUNER/ BAND, TAPE). Buttons on the remote control with new ones. En • The remote control may not operate correctly when: - Using the remote control The instructions in . Each time FUNCTION is pressed while power is on the main unit can be used as direct sunlight - with a stereo mini plug (03.5 mm, 1/ 8 inch). Using the headphones Connect headphones to turn off the power. Other remote controls are plugged in this distance decreases, replace...
Operating Instructions
Page 6
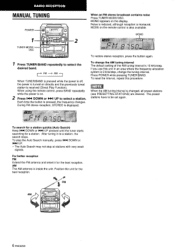
... turned on directly and the previously tuned station is 10 kHz/step. Position the unit for the best reception. When using the remote control, press BAND repeatedly while the power is on. 2 Press 1.441 DOWN or ►►I MHz To restore stereo reception, press the button again. 1 Press TUNER/BAND repeatedly to be set again. AM The AM antenna is changed, all preset stations (see PRESETTING STATIONS) are cleared. During FM stereo reception, STEREO...
... turned on directly and the previously tuned station is 10 kHz/step. Position the unit for the best reception. When using the remote control, press BAND repeatedly while the power is on. 2 Press 1.441 DOWN or ►►I MHz To restore stereo reception, press the button again. 1 Press TUNER/BAND repeatedly to be set again. AM The AM antenna is changed, all preset stations (see PRESETTING STATIONS) are cleared. During FM stereo reception, STEREO...
Operating Instructions
Page 7
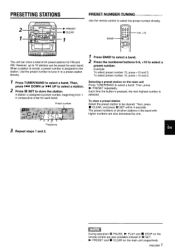
Use the remote control to store the station. Then, press Po- Each time the button is pressed, the next highest number is assigned to select a band. Then, press ■ CLEAR, and press II SET within 4 seconds. During operation II PAUSE, Ill- ir00. 0000O1 0O0O00 BAND --Le 0-9, +10 The unit can be cleared. To select preset number 10, press +10 and 0. Frequency 3 Repeat steps 1 and 2. However...
Use the remote control to store the station. Then, press Po- Each time the button is pressed, the next highest number is assigned to select a band. Then, press ■ CLEAR, and press II SET within 4 seconds. During operation II PAUSE, Ill- ir00. 0000O1 0O0O00 BAND --Le 0-9, +10 The unit can be cleared. To select preset number 10, press +10 and 0. Frequency 3 Repeat steps 1 and 2. However...
Operating Instructions
Page 8
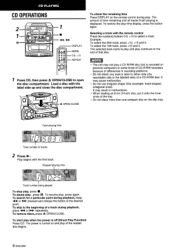
... recording platforms. • Do not attach any seal or label to the beginning of time remaining until all tracks finish playing is off (Direct Play Function) Press CD. I_ VOL 1 1.1- _I Track number being played To stop play time display, press the button again. To search for a particular point during playback, press -41 or 1040'. The power is turned on the disc tray. OPEN/CLOSE to select a track. Selecting a track with the remote control...
... recording platforms. • Do not attach any seal or label to the beginning of time remaining until all tracks finish playing is off (Direct Play Function) Press CD. I_ VOL 1 1.1- _I Track number being played To stop play time display, press the button again. To search for a particular point during playback, press -41 or 1040'. The power is turned on the disc tray. OPEN/CLOSE to select a track. Selecting a track with the remote control...

Operating Instructions
Page 9
... play, one-track repeat (REPEAT 1) cannot "PflG I 000 000 000 4 0 o o RANDOM Use the remote control. If the programmed time is more than 99:59 minutes, or the disc track number being programmed is pressed in stop mode, repeat step 2. Press REPEAT on the remote control in stop mode, a track number and program number will be skipped. To cancel repeat play, press REPEAT to the program In stop mode. To change the programmed tracks Clear the program and repeat all the tracks, display REPEAT ALL. as the total playing time...
... play, one-track repeat (REPEAT 1) cannot "PflG I 000 000 000 4 0 o o RANDOM Use the remote control. If the programmed time is more than 99:59 minutes, or the disc track number being programmed is pressed in stop mode, repeat step 2. Press REPEAT on the remote control in stop mode, a track number and program number will be skipped. To cancel repeat play, press REPEAT to the program In stop mode. To change the programmed tracks Clear the program and repeat all the tracks, display REPEAT ALL. as the total playing time...

Operating Instructions
Page 10
.../EJECT. To start play , press again. During play when the power is turned on one side only. To stop play on deck 2 finishes, play , press ■/! CONTINUOUS P After play on deck 1 will be played facing out. About cassette tapes • To prevent accidental erasure, break off (Direct Play Function) Press ► PLAY. Press TAPE and press II/A STOP/EJECT to stop mode. Slack tape may break or...
.../EJECT. To start play , press again. During play when the power is turned on one side only. To stop play on deck 2 finishes, play , press ■/! CONTINUOUS P After play on deck 1 will be played facing out. About cassette tapes • To prevent accidental erasure, break off (Direct Play Function) Press ► PLAY. Press TAPE and press II/A STOP/EJECT to stop mode. Slack tape may break or...
Operating Instructions
Page 11
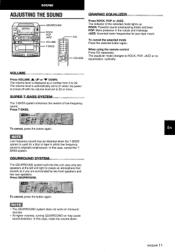
... not work on monaural sources. • At higher volumes, turning QSURROUND on may be distorted when the T-BASS system is used for a disc or tape in the vocals and midrange JAZZ: Accented lower frequencies for jazz-type music To cancel the selected mode Press the selected button again. ENGLISH 11 When using the remote control Press EQ repeatedly. En Low frequency sound may cause sound distortion. ROCK: Powerful sound...
... not work on monaural sources. • At higher volumes, turning QSURROUND on may be distorted when the T-BASS system is used for a disc or tape in the vocals and midrange JAZZ: Accented lower frequencies for jazz-type music To cancel the selected mode Press the selected button again. ENGLISH 11 When using the remote control Press EQ repeatedly. En Low frequency sound may cause sound distortion. ROCK: Powerful sound...

Operating Instructions
Page 12
... CD and load the disc. MODE on facing out. To stop recording, press Mitt STOP/EJECT on deck 1. Sound adjustment during recording The output volume and tone of the speakers or headphones may be freely varied without affecting the level of the recording. • Note that recording is done on only one of the tape. • Use Type I - 1_ i I_ The dot light 12 ENGLISH Each time the button...
... CD and load the disc. MODE on facing out. To stop recording, press Mitt STOP/EJECT on deck 1. Sound adjustment during recording The output volume and tone of the speakers or headphones may be freely varied without affecting the level of the recording. • Note that recording is done on only one of the tape. • Use Type I - 1_ i I_ The dot light 12 ENGLISH Each time the button...

Operating Instructions
Page 13
..." indicates noon. Lai] During operation II PAUSE and ■ STOP on the remote control are also available instead of the tape. • Use Type I 4 Press II PAUSE then press • REC on deck 1 (12-hour standard) to be reset. When the display switches, carry out steps 2 to 5 above . DUBBING A TAPE CLOCK AND TIMER SETTING THE CLOCK 1 0 4 2 II I 4 1,3,5 &( ) 2,4 • Note that recording is done on only...
..." indicates noon. Lai] During operation II PAUSE and ■ STOP on the remote control are also available instead of the tape. • Use Type I 4 Press II PAUSE then press • REC on deck 1 (12-hour standard) to be reset. When the display switches, carry out steps 2 to 5 above . DUBBING A TAPE CLOCK AND TIMER SETTING THE CLOCK 1 0 4 2 II I 4 1,3,5 &( ) 2,4 • Note that recording is done on only...
Operating Instructions
Page 14
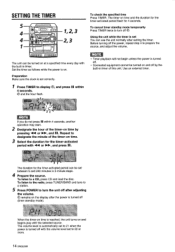
... CD and load the disc. I I ,I I I I - Set the timer as follows while the power is reached, the unit turns on at a specified time every day with the built-in timer of this unit. T-BASS vot_ /- / / The duration for the timer-activated period can be turned on . To listen to the radio, press TUNER/BAND and tune to a station. 5 Press POWER to display and press II within 4 seconds, another operation...
... CD and load the disc. I I ,I I I I - Set the timer as follows while the power is reached, the unit turns on at a specified time every day with the built-in timer of this unit. T-BASS vot_ /- / / The duration for the timer-activated period can be turned on . To listen to the radio, press TUNER/BAND and tune to a station. 5 Press POWER to display and press II within 4 seconds, another operation...
Operating Instructions
Page 15
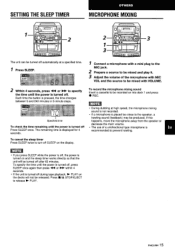
To record the microphone mixing sound Insert a cassette to prevent howling. If this Specified time happens, move the microphone away from the speaker or decrease the main volume. The remaining time is turned off. WEI SLEEP VOL 1 Connect a microphone with a mini plug to the MIC jack. 2 Prepare a source to be mixed and play it. 3 Adjust the volume of a unidirectional type microphone is turned off , press SLEEP once again then press...
To record the microphone mixing sound Insert a cassette to prevent howling. If this Specified time happens, move the microphone away from the speaker or decrease the main volume. The remaining time is turned off. WEI SLEEP VOL 1 Connect a microphone with a mini plug to the MIC jack. 2 Prepare a source to be mixed and play it. 3 Adjust the volume of a unidirectional type microphone is turned off , press SLEEP once again then press...

Operating Instructions
Page 16
... bar antenna Cassette deck section Track format Frequency response Recording system Heads 4 tracks, 2 channels stereo Normal tape: 50 Hz - 12500 Hz AC bias Deck 1: Recording/playback head x 1 Erasure head x 1 Deck 2: Playback head x 1 Compact disc player section Laser D-A converter Semiconductor laser (X = 780 nm) 1 bit dual General Power output 5 W + 5 W (4 ohms, EIAJ) 4 W + 4 W (65 Hz - 15 kHz, THD less than 1%, 4 ohms) Output PHONES (stereo minijack) Power requirements DC 12 V using eight size D (R20) batteries AC 120 V, 60 Hz Power consumption...
... bar antenna Cassette deck section Track format Frequency response Recording system Heads 4 tracks, 2 channels stereo Normal tape: 50 Hz - 12500 Hz AC bias Deck 1: Recording/playback head x 1 Erasure head x 1 Deck 2: Playback head x 1 Compact disc player section Laser D-A converter Semiconductor laser (X = 780 nm) 1 bit dual General Power output 5 W + 5 W (4 ohms, EIAJ) 4 W + 4 W (65 Hz - 15 kHz, THD less than 1%, 4 ohms) Output PHONES (stereo minijack) Power requirements DC 12 V using eight size D (R20) batteries AC 120 V, 60 Hz Power consumption...

Operating Instructions
Page 17
... 0, AUX 0, TUNER/BAND 0, 0 e TAPE O) • CLEAR button 0 0 ► PRESET button 0 0 0 e II SET button 0 TUNING IN DOWN, 144 UP (-4-4, 10.0,-) buttons 0 0 O e 0 O TUNER MODE/OSC/DUB SPEED button En SLEEP button TIMER button CID VOLUME buttons T-BASS button iD e ROCK, POP, JAZZ buttons ER PHONES jack 0 MIC jack CP MIC VOL control D Deck operation buttons (•, 10-, -441, OP*, M/A, II) 1:1) Ei ®® DISPLAY button 0 EQ button MODE button 0 0 el 0 0 0-9, +10 buttons 0 REPEAT button 0 BAND button 0 FUNCTION button 0 Buttons on the remote control with old batteries...
... 0, AUX 0, TUNER/BAND 0, 0 e TAPE O) • CLEAR button 0 0 ► PRESET button 0 0 0 e II SET button 0 TUNING IN DOWN, 144 UP (-4-4, 10.0,-) buttons 0 0 O e 0 O TUNER MODE/OSC/DUB SPEED button En SLEEP button TIMER button CID VOLUME buttons T-BASS button iD e ROCK, POP, JAZZ buttons ER PHONES jack 0 MIC jack CP MIC VOL control D Deck operation buttons (•, 10-, -441, OP*, M/A, II) 1:1) Ei ®® DISPLAY button 0 EQ button MODE button 0 0 el 0 0 0-9, +10 buttons 0 REPEAT button 0 BAND button 0 FUNCTION button 0 Buttons on the remote control with old batteries...

Operating Instructions
Page 18
Printed in China AIWA CO.,LTD.
Printed in China AIWA CO.,LTD.


