Operating Instructions
Page 2
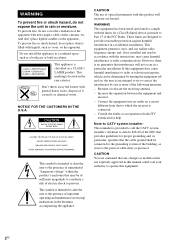
... designed to operate this manual could void your authority to provide reasonable protection against harmful interference in a particular installation. Do not install the appliance in a confined space, such as a bookcase or built-in this equipment. 2GB Reorient or relocate the receiving antenna. - WARNING To prevent fire or shock hazard, do not expose the unit to Part 15 of...
... designed to operate this manual could void your authority to provide reasonable protection against harmful interference in a particular installation. Do not install the appliance in a confined space, such as a bookcase or built-in this equipment. 2GB Reorient or relocate the receiving antenna. - WARNING To prevent fire or shock hazard, do not expose the unit to Part 15 of...
Operating Instructions
Page 4
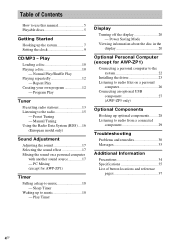
... Play Timer Display Turning off the display 20 - Normal Play/Shuffle Play Playing repeatedly 12 - Play Loading a disc 10 Playing a disc 10 - Program Play Tuner Presetting radio stations 13 Listening to use this manual 5 Playable discs 5 Getting Started Hooking up the system 7 Setting the clock 9 CD/MP3 - Repeat Play Creating your own program 12 - Preset Tuning - Sleep Timer Waking up optional components......... 28 Listening to audio from a connected component 29 Troubleshooting Problems and remedies 30 Messages 33 Additional Information Precautions 34 Specifications...
... Play Timer Display Turning off the display 20 - Normal Play/Shuffle Play Playing repeatedly 12 - Play Loading a disc 10 Playing a disc 10 - Program Play Tuner Presetting radio stations 13 Listening to use this manual 5 Playable discs 5 Getting Started Hooking up the system 7 Setting the clock 9 CD/MP3 - Repeat Play Creating your own program 12 - Preset Tuning - Sleep Timer Waking up optional components......... 28 Listening to audio from a connected component 29 Troubleshooting Problems and remedies 30 Messages 33 Additional Information Precautions 34 Specifications...
Operating Instructions
Page 8
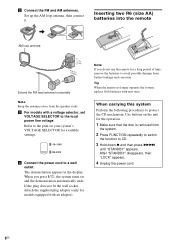
... avoid possible damage from the system. 2 Press FUNCTION repeatedly to switch the function to protect the CD mechanism. After "STANDBY" disappears, then "LOCK" appears. 4 Unplug the power cord. 8GB If the plug does not fit the wall socket, detach the supplied plug adaptor (only for the operation. 1 Make sure that the disc is removed from battery leakage and corrosion. Set up the AM loop antenna, then connect it.
... avoid possible damage from the system. 2 Press FUNCTION repeatedly to switch the function to protect the CD mechanism. After "STANDBY" disappears, then "LOCK" appears. 4 Unplug the power cord. 8GB If the plug does not fit the wall socket, detach the supplied plug adaptor (only for the operation. 1 Make sure that the disc is removed from battery leakage and corrosion. Set up the AM loop antenna, then connect it.
Operating Instructions
Page 9
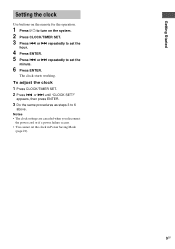
...; You cannot set the clock in Power Saving Mode (page 20). 9GB or > repeatedly to 6 above. appears, then press ENTER. 3 Do the same procedures as steps 3 to set the minute. 6 Press ENTER. Getting Started Setting the clock Use buttons on the system. 2 Press CLOCK/TIMER SET. 3 Press . or > repeatedly to turn on the remote for the operation. 1 Press ?/1 to set the hour...
...; You cannot set the clock in Power Saving Mode (page 20). 9GB or > repeatedly to 6 above. appears, then press ENTER. 3 Do the same procedures as steps 3 to set the minute. 6 Press ENTER. Getting Started Setting the clock Use buttons on the system. 2 Press CLOCK/TIMER SET. 3 Press . or > repeatedly to turn on the remote for the operation. 1 Press ?/1 to set the hour...

Operating Instructions
Page 11
... is possible up to 8 levels. • MP3 audio tracks are many layers. • When the disc is recorded, you may not be needed to CD function from another source Remove a disc Do this Press x. Press the number button(s). Playback automatically starts. 11GB The tracks on the disc in alphabetical order. • Depending on the disc, it may be displayed correctly for MP3 listening...
... is possible up to 8 levels. • MP3 audio tracks are many layers. • When the disc is recorded, you may not be needed to CD function from another source Remove a disc Do this Press x. Press the number button(s). Playback automatically starts. 11GB The tracks on the disc in alphabetical order. • Depending on the disc, it may be displayed correctly for MP3 listening...
Operating Instructions
Page 13
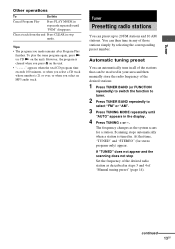
... Set the frequency of the stations that time, "TUNED" and "STEREO" (for a station. Tuner Presetting radio stations You can be received in your area and then manually store the radio frequency of those stations simply by selecting the corresponding preset number. continued 13GB At that can preset up to select "FM" or "AM". 3 Press TUNING MODE repeatedly until "PGM" disappears. Tips • The program you made remains after Program Play finishes. Automatic tuning preset You can then tune...
... Set the frequency of the stations that time, "TUNED" and "STEREO" (for a station. Tuner Presetting radio stations You can be received in your area and then manually store the radio frequency of those stations simply by selecting the corresponding preset number. continued 13GB At that can preset up to select "FM" or "AM". 3 Press TUNING MODE repeatedly until "PGM" disappears. Tips • The program you made remains after Program Play finishes. Automatic tuning preset You can then tune...
Operating Instructions
Page 14
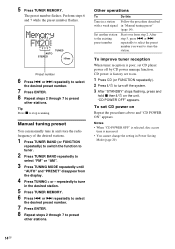
Manual tuning preset You can manually tune in the desired station. 5 Press TUNER MEMORY. 6 Press . Preset number 6 Press . Set another station to select "FM" or "AM". 3 Press TUNING MODE repeatedly until "AUTO" and "PRESET" disappear from step 2. CD power is factory set CD player power off the system. 3 After "STANDBY" stops flashing, press and hold x then ?/1 on Repeat the procedures above and "CD POWER ON" appears. Tip Press x to tune in and store the radio frequency of the...
Manual tuning preset You can manually tune in the desired station. 5 Press TUNER MEMORY. 6 Press . Preset number 6 Press . Set another station to select "FM" or "AM". 3 Press TUNING MODE repeatedly until "AUTO" and "PRESET" disappear from step 2. CD power is factory set CD player power off the system. 3 After "STANDBY" stops flashing, press and hold x then ?/1 on Repeat the procedures above and "CD POWER ON" appears. Tip Press x to tune in and store the radio frequency of the...
Operating Instructions
Page 15
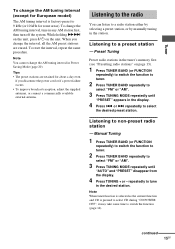
... FUNCTION repeatedly) to switch the function to tuner. 2 Press TUNER BAND repeatedly to a preset station - To reset the interval, repeat the same procedure. Listening to select "FM" or "AM". 3 Press TUNING MODE repeatedly until "AUTO" and "PRESET" disappear from the display. 4 Press TUNING + or - Note You cannot change the AM tuning interval, tune in any AM station first, then turn off the system. continued 15GB Preset Tuning Preset radio stations in the tuner's memory first (see "Presetting radio stations...
... FUNCTION repeatedly) to switch the function to tuner. 2 Press TUNER BAND repeatedly to a preset station - To reset the interval, repeat the same procedure. Listening to select "FM" or "AM". 3 Press TUNING MODE repeatedly until "AUTO" and "PRESET" disappear from the display. 4 Press TUNING + or - Note You cannot change the AM tuning interval, tune in any AM station first, then turn off the system. continued 15GB Preset Tuning Preset radio stations in the tuner's memory first (see "Presetting radio stations...
Operating Instructions
Page 16
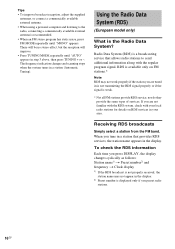
... Using the Radio Data System (RDS) (European model only) What is recommended. • When an FM stereo program has static noise, press FM MODE repeatedly until "AUTO" appears in is not transmitting the RDS signal properly or if the signal is displayed only if you press DISPLAY, the display changes cyclically as follows: Station name1) t Preset number2) and frequency t Clock display 1) If the RDS broadcast is a broadcasting service...
... Using the Radio Data System (RDS) (European model only) What is recommended. • When an FM stereo program has static noise, press FM MODE repeatedly until "AUTO" appears in is not transmitting the RDS signal properly or if the signal is displayed only if you press DISPLAY, the display changes cyclically as follows: Station name1) t Preset number2) and frequency t Clock display 1) If the RDS broadcast is a broadcasting service...
Operating Instructions
Page 18
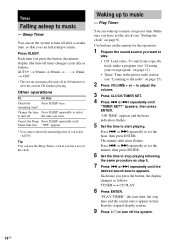
... in turn, then the original display returns. 9 Press ?/1 to music. Each time you select "AUTO". or > repeatedly to music at a preset time. "PLAY TIMER", the start playing. Waking up to set the hour, then press ENTER. Timer Falling asleep to music - Sleep Timer You can set the clock (see "Creating your own program" on the remote for the operation. 1 Prepare the sound source you want to adjust the volume...
... in turn, then the original display returns. 9 Press ?/1 to music. Each time you select "AUTO". or > repeatedly to music at a preset time. "PLAY TIMER", the start playing. Waking up to set the hour, then press ENTER. Timer Falling asleep to music - Sleep Timer You can set the clock (see "Creating your own program" on the remote for the operation. 1 Prepare the sound source you want to adjust the volume...
Operating Instructions
Page 23
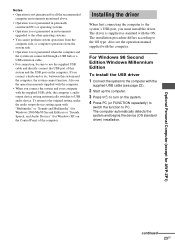
... with the OS. Optional Personal Computer (except for Windows XP) on the computer. Also see the operation manual supplied with the supplied USB cable, the computer's audio output device setting automatically switches to USB audio device. Installing the driver When first connecting the computer to the system's USB port, you connect a keyboard or etc. The computer automatically detects the system and begins the device (OS standard...
... with the OS. Optional Personal Computer (except for Windows XP) on the computer. Also see the operation manual supplied with the supplied USB cable, the computer's audio output device setting automatically switches to USB audio device. Installing the driver When first connecting the computer to the system's USB port, you connect a keyboard or etc. The computer automatically detects the system and begins the device (OS standard...

Operating Instructions
Page 24
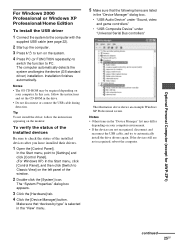
...; "USB Audio Device" under "Sound, video and game controllers" • "USB Composite Device" under "Universal Serial Bus controllers" The illustrations above shows an example Windows Millennium Edition screen. 5 Follow the instructions appearing on top of any of the installed devices after you have installed their drivers. 1 Open the [Control Panel]. The "System Properties" dialog box appears. If the devices still are not recognized, disconnect and reconnect the USB cable...
...; "USB Audio Device" under "Sound, video and game controllers" • "USB Composite Device" under "Universal Serial Bus controllers" The illustrations above shows an example Windows Millennium Edition screen. 5 Follow the instructions appearing on top of any of the installed devices after you have installed their drivers. 1 Open the [Control Panel]. The "System Properties" dialog box appears. If the devices still are not recognized, disconnect and reconnect the USB cable...
Operating Instructions
Page 25
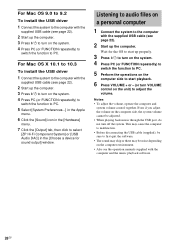
... XP Professional/Home Edition To install the USB driver 1 Connect the system to the computer with the supplied USB cable (see page 22). 2 Start up the computer. 3 Press ?/1 to turn on your computer environment. • If the devices are listed in the "Device Manager" dialog box. • "USB Audio Device" under "Sound, video and game controllers" • "USB Composite Device" under "Universal Serial Bus controllers" The illustration...
... XP Professional/Home Edition To install the USB driver 1 Connect the system to the computer with the supplied USB cable (see page 22). 2 Start up the computer. 3 Press ?/1 to turn on your computer environment. • If the devices are listed in the "Device Manager" dialog box. • "USB Audio Device" under "Sound, video and game controllers" • "USB Composite Device" under "Universal Serial Bus controllers" The illustration...
Operating Instructions
Page 26
... turn VOLUME control on the unit) to adjust the volume. Listening to audio files on a personal computer 1 Connect the system to first quit the software. • The sound may skip or there may be adjusted. • When playing back music through the USB port, do not turn off the system. Wait for sound output] window. This may cause the computer to malfunction. • Before disconnecting the USB cable (supplied...
... turn VOLUME control on the unit) to adjust the volume. Listening to audio files on a personal computer 1 Connect the system to first quit the software. • The sound may skip or there may be adjusted. • When playing back music through the USB port, do not turn off the system. Wait for sound output] window. This may cause the computer to malfunction. • Before disconnecting the USB cable (supplied...
Operating Instructions
Page 27
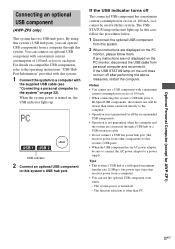
... that receives power from other than when connected directly to the computer. • Operation is not guaranteed for AWP-ZP1) Connecting an optional USB component (AWP-ZP5 only) This system has two USB hub ports. For details on compatible USB components, refer to the operating instructions "USB Hub Port Information" provided with this system. 1 Connect the system to a computer with the supplied USB cable (see "Connecting a personal computer to this system's USB ports. • When the USB component...
... that receives power from other than when connected directly to the computer. • Operation is not guaranteed for AWP-ZP1) Connecting an optional USB component (AWP-ZP5 only) This system has two USB hub ports. For details on compatible USB components, refer to the operating instructions "USB Hub Port Information" provided with this system. 1 Connect the system to a computer with the supplied USB cable (see "Connecting a personal computer to this system's USB ports. • When the USB component...
Operating Instructions
Page 30
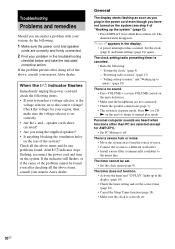
.... The timer does not function. • Activate the timer and "c PLAY" lights up to music" (page 18) There is no sound. • Press VOLUME + (or turn on the unit clockwise). • Make sure the headphones are not connected. • Check the speaker connections (page 7). • The system is set correctly. • Are the + and - Troubleshooting Problems and remedies Should you encounter a problem with your system...
.... The timer does not function. • Activate the timer and "c PLAY" lights up to music" (page 18) There is no sound. • Press VOLUME + (or turn on the unit clockwise). • Make sure the headphones are not connected. • Check the speaker connections (page 7). • The system is set correctly. • Are the + and - Troubleshooting Problems and remedies Should you encounter a problem with your system...
Operating Instructions
Page 32
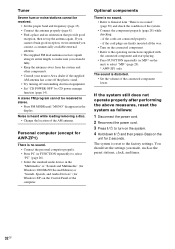
... turning off surrounding electrical equipment. • Set "CD POWER OFF" by CD power manage function (page 14). Personal computer (except for AWP-ZP1) There is heard while loading/removing a disc. • Change the location of the AM antenna. Noise is no sound. • Refer to General item "There is reset to select "MD" (page 29). * AWP-ZP1 only The sound is distorted. • Set the volume of the connected component...
... turning off surrounding electrical equipment. • Set "CD POWER OFF" by CD power manage function (page 14). Personal computer (except for AWP-ZP1) There is heard while loading/removing a disc. • Change the location of the AM antenna. Noise is no sound. • Refer to General item "There is reset to select "MD" (page 29). * AWP-ZP1 only The sound is distorted. • Set the volume of the connected component...
Operating Instructions
Page 34
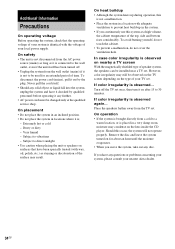
...Remove the disc and leave the system turned on surfaces that the operating voltage of your system is identical with adequate ventilation to direct sunlight. • Use caution when placing the unit or speakers on for an extended period of speaker system, the speakers can be changed only at a high volume... AC power cord must be installed near a TV set . However, color irregularity may condense on nearby a TV screen With the magnetically shielded type of time. Extremely hot or cold - Turn off . • Unplug the system from the wall outlet (mains) if it is connected to ...
...Remove the disc and leave the system turned on surfaces that the operating voltage of your system is identical with adequate ventilation to direct sunlight. • Use caution when placing the unit or speakers on for an extended period of speaker system, the speakers can be changed only at a high volume... AC power cord must be installed near a TV set . However, color irregularity may condense on nearby a TV screen With the magnetically shielded type of time. Extremely hot or cold - Turn off . • Unplug the system from the wall outlet (mains) if it is connected to ...
Operating Instructions
Page 35
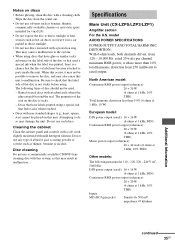
... from the center out. • Do not use a commercially available CD/DVD lens cleaning disc with no more than 0.9% (6 ohms at 1 kHz, 10 W) European model: DIN power output (rated): 16 + 16 W (6 ohms at 1 kHz, DIN) Continuous RMS power output (reference): 20 + 20 W (6 ohms at 1 kHz, 10% THD) Music power output (reference): 40 + 40 watts (6 ohms at 1 kHz, 10% THD) Inputs MD (RCA pin jacks): Sensitivity...
... from the center out. • Do not use a commercially available CD/DVD lens cleaning disc with no more than 0.9% (6 ohms at 1 kHz, 10 W) European model: DIN power output (rated): 16 + 16 W (6 ohms at 1 kHz, DIN) Continuous RMS power output (reference): 20 + 20 W (6 ohms at 1 kHz, 10% THD) Music power output (reference): 40 + 40 watts (6 ohms at 1 kHz, 10% THD) Inputs MD (RCA pin jacks): Sensitivity...
Operating Instructions
Page 36
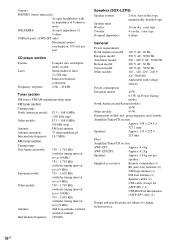
...; 223 mm Mass Amplifier/Tuner/CD section AWP-ZP5: Approx. 4.4 kg AWP-ZP3/ZP1: Approx. 4.2 kg Speakers: Approx. 3.8 kg net per port CD player section System Laser Frequency response Compact disc and digital audio system Semiconductor laser (λ=780 nm) Emission duration: continuous 2 Hz - 20 kHz Tuner section FM stereo, FM/AM superheterodyne tuner FM tuner section Tuning range North American model: Other models: Antenna Antenna terminals Intermediate frequency 87.5 - 108.0 MHz...
...; 223 mm Mass Amplifier/Tuner/CD section AWP-ZP5: Approx. 4.4 kg AWP-ZP3/ZP1: Approx. 4.2 kg Speakers: Approx. 3.8 kg net per port CD player section System Laser Frequency response Compact disc and digital audio system Semiconductor laser (λ=780 nm) Emission duration: continuous 2 Hz - 20 kHz Tuner section FM stereo, FM/AM superheterodyne tuner FM tuner section Tuning range North American model: Other models: Antenna Antenna terminals Intermediate frequency 87.5 - 108.0 MHz...


