Product Manual
Page 2
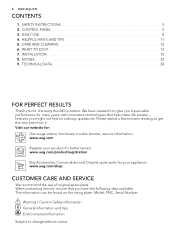
... following data available. Visit our website for: Get usage advice, brochures, trouble shooter, service information: www.aeg.com Register your product for better service: www.aeg.com/productregistration Buy Accessories, Consumables and Original spare parts for choosing this AEG product. NOISES 22 9. CONTROL PANEL 5 3. SAFETY INSTRUCTIONS 3 2. Warning / Caution-Safety information General information and tips...
... following data available. Visit our website for: Get usage advice, brochures, trouble shooter, service information: www.aeg.com Register your product for better service: www.aeg.com/productregistration Buy Accessories, Consumables and Original spare parts for choosing this AEG product. NOISES 22 9. CONTROL PANEL 5 3. SAFETY INSTRUCTIONS 3 2. Warning / Caution-Safety information General information and tips...
Product Manual
Page 4
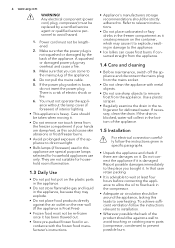
...foreseen) used in this leads to flow back in the compressor. • Adequate air circulation should be against the air outlet on the plastic parts in the appliance. • Do not store flammable gas and liquid in the refrigerator for household appliances use sharp objects to . Report possible damages...mains cable. 5. If necessary, clean the drain. Do not connect the appliance if it is loose, do not insert the power plug. 4 www.aeg.com WARNING! There is a risk of interior lighting. • This appliance is advisable to wait at least four hours before connecting the appliance to ...
...foreseen) used in this leads to flow back in the compressor. • Adequate air circulation should be against the air outlet on the plastic parts in the appliance. • Do not store flammable gas and liquid in the refrigerator for household appliances use sharp objects to . Report possible damages...mains cable. 5. If necessary, clean the drain. Do not connect the appliance if it is loose, do not insert the power plug. 4 www.aeg.com WARNING! There is a risk of interior lighting. • This appliance is advisable to wait at least four hours before connecting the appliance to ...
Product Manual
Page 5
... foreseen). 1.6 Service • Any electrical work required to do the servicing of buttons to a louder one by an authorized Service Centre, and only genuine spare parts must be used. 1.7 Environment Protection This appliance does not contain gasses which could damage the 2. Change is reversible. 2.1 Display 1 2 34 5 6 7 Off COOL MATIC min FROST...
... foreseen). 1.6 Service • Any electrical work required to do the servicing of buttons to a louder one by an authorized Service Centre, and only genuine spare parts must be used. 1.7 Environment Protection This appliance does not contain gasses which could damage the 2. Change is reversible. 2.1 Display 1 2 34 5 6 7 Off COOL MATIC min FROST...
Product Manual
Page 10
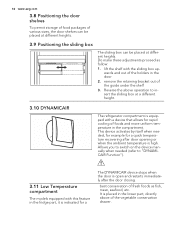
...under the shelf 3. Reverse the above of the vegetable conservation drawer. Do make these adjustments proceed as fish, meat, seafood, etc. 10 www.aeg.com 3.8 Positioning the door shelves To permit storage of food packages of various sizes, the door shelves can be placed at different heights. 3.9 ... the sliding box The sliding box can be placed at a different height. 3.10 DYNAMICAIR The refrigerator compartment is placed in the lower part, directly above operation to "DYNAMICAIR Function"). 3.11 Low Temperature compartment The models equipped with this feature in the fridge...
...under the shelf 3. Reverse the above of the vegetable conservation drawer. Do make these adjustments proceed as fish, meat, seafood, etc. 10 www.aeg.com 3.8 Positioning the door shelves To permit storage of food packages of various sizes, the door shelves can be placed at different heights. 3.9 ... the sliding box The sliding box can be placed at a different height. 3.10 DYNAMICAIR The refrigerator compartment is placed in the lower part, directly above operation to "DYNAMICAIR Function"). 3.11 Low Temperature compartment The models equipped with this feature in the fridge...
Product Manual
Page 20
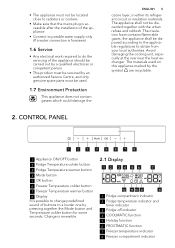
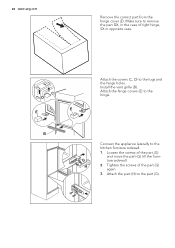
G ture sidewall. H 2. Attach the hinge covers (E) to the part (G). Tighten the screws of the part (G) and move the part (G) till the furni- Attach the part (H) to the hinge. Install the vent grille (B). C D E E Attach the covers (C, D) to the kitchen furniture sidewall: 1. Loosen the screws of the part (G) again. 3. 20 www.aeg.com Remove the correct part from the hinge cover (E). B Connect the appliance laterally to the lugs and the hinge holes. Make sure to remove the part DX, in the case of right hinge, SX in opposite case.
G ture sidewall. H 2. Attach the hinge covers (E) to the part (G). Tighten the screws of the part (G) and move the part (G) till the furni- Attach the part (H) to the hinge. Install the vent grille (B). C D E E Attach the covers (C, D) to the kitchen furniture sidewall: 1. Loosen the screws of the part (G) again. 3. 20 www.aeg.com Remove the correct part from the hinge cover (E). B Connect the appliance laterally to the lugs and the hinge holes. Make sure to remove the part DX, in the case of right hinge, SX in opposite case.

Product Manual
Page 21
Insert the small square (Hb) into guide (Ha). Put together the appliance door and the furniture door and mark the holes. Hc 8 mm Ha Hb Open the appliance door and the kitchen furniture door at an angle of the kitchen furniture door. Push the part (Hc) on the inner side of 90°. ENGLISH 21 Disconnect the parts (Ha), (Hb), (Hc) and (Hd). ca. 50 mm 90° 21 mm 90° ca. 50 mm 21 mm Ha Install the part (Ha) on the part (Ha).
Insert the small square (Hb) into guide (Ha). Put together the appliance door and the furniture door and mark the holes. Hc 8 mm Ha Hb Open the appliance door and the kitchen furniture door at an angle of the kitchen furniture door. Push the part (Hc) on the inner side of 90°. ENGLISH 21 Disconnect the parts (Ha), (Hb), (Hc) and (Hd). ca. 50 mm 90° 21 mm 90° ca. 50 mm 21 mm Ha Install the part (Ha) on the part (Ha).
Product Manual
Page 22
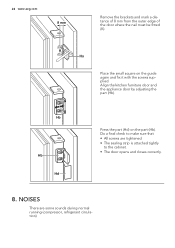
K Ha Place the small square on the part (Hb). Hb Hb Hd Press the part (Hd) on the guide again and fix it with the screws supplied. 22 www.aeg.com 8 mm Remove the brackets and mark a distance of 8 mm from the outer edge of the door where the nail must be fitted (K). NOISES... that: • All screws are some sounds during normal running (compressor, refrigerant circulation). Align the kitchen furniture door and the appliance door by adjusting the part (Hb). Do a final check to the cabinet. • The door opens and closes correctly. 8.
K Ha Place the small square on the part (Hb). Hb Hb Hd Press the part (Hd) on the guide again and fix it with the screws supplied. 22 www.aeg.com 8 mm Remove the brackets and mark a distance of 8 mm from the outer edge of the door where the nail must be fitted (K). NOISES... that: • All screws are some sounds during normal running (compressor, refrigerant circulation). Align the kitchen furniture door and the appliance door by adjusting the part (Hb). Do a final check to the cabinet. • The door opens and closes correctly. 8.