Product Manual
Page 2
......17 9. WASHING & DRYING 24 13. HINTS AND TIPS...26 14. BEFORE FIRST USE...19 10. CARE AND CLEANING 27 15. SETTINGS...17 8. Visit our website for: Get usage advice, brochures, trouble shooter, service information: www.aeg.com Register your product for better service: www.registeraeg.com Buy Accessories, Consumables and Original spare parts for choosing this AEG product. DRYING 23 12. PRODUCT DESCRIPTION 7 4. INSTALLATION...37 17. TROUBLESHOOTING 33...
......17 9. WASHING & DRYING 24 13. HINTS AND TIPS...26 14. BEFORE FIRST USE...19 10. CARE AND CLEANING 27 15. SETTINGS...17 8. Visit our website for: Get usage advice, brochures, trouble shooter, service information: www.aeg.com Register your product for better service: www.registeraeg.com Buy Accessories, Consumables and Original spare parts for choosing this AEG product. DRYING 23 12. PRODUCT DESCRIPTION 7 4. INSTALLATION...37 17. TROUBLESHOOTING 33...
Product Manual
Page 4
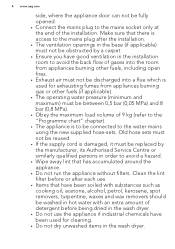
Old hose sets must not be reused. • If the supply cord is damaged, it must be washed in hot water with substances such as cooking oil, acetone, alcohol, petrol, kerosene, spot removers, turpentine, waxes and wax removers should be replaced by a carpet. • Ensure you have been soiled with an extra amount of detergent before or after each use the appliance...
Old hose sets must not be reused. • If the supply cord is damaged, it must be washed in hot water with substances such as cooking oil, acetone, alcohol, petrol, kerosene, spot removers, turpentine, waxes and wax removers should be replaced by a carpet. • Ensure you have been soiled with an extra amount of detergent before or after each use the appliance...

Product Manual
Page 5
... the fabric softener instructions. • Remove all objects from the mains socket. 2. Do not use abrasive products, abrasive cleaning pads, solvents or metal objects. • Before maintenance, deactivate the appliance and disconnect the mains plug from pockets such as lighters and matches. • Never stop the wash dryer before the end of the drying cycle unless all the packaging and the transit bolts. •...
... the fabric softener instructions. • Remove all objects from the mains socket. 2. Do not use abrasive products, abrasive cleaning pads, solvents or metal objects. • Before maintenance, deactivate the appliance and disconnect the mains plug from pockets such as lighters and matches. • Never stop the wash dryer before the end of the drying cycle unless all the packaging and the transit bolts. •...
Product Manual
Page 6
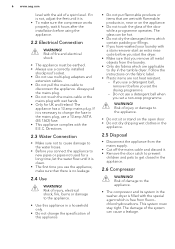
....aeg.com level with wet hands. • Only for a long time, let the water flow until it is clean. • The first time you use the appliance, make sure the compressor works properly, wait 6 hours after the installation before you connect the appliance to change the specification of this appliance. • Do not put flammable products or items that are wet with a stain remover start...
....aeg.com level with wet hands. • Only for a long time, let the water flow until it is clean. • The first time you use the appliance, make sure the compressor works properly, wait 6 hours after the installation before you connect the appliance to change the specification of this appliance. • Do not put flammable products or items that are wet with a stain remover start...

Product Manual
Page 7
... 12 5 6 13 7 9 8 14 1 Worktop 2 Detergent dispenser 3 Air filter(s) 4 Control panel 5 Door handle 6 Rating plate 7 Drain pump filter 8 Feet for the appliance level 9 Airflow slots 10 Water drain hose 11 Water inlet valve 12 Mains cable 13 Transit bolts 14 Feet for the appliance level 3.2 How to activate the child safety device This device prevents children or pets to be closed in the drum. You cannot close the door, turn the device anticlockwise until the...
... 12 5 6 13 7 9 8 14 1 Worktop 2 Detergent dispenser 3 Air filter(s) 4 Control panel 5 Door handle 6 Rating plate 7 Drain pump filter 8 Feet for the appliance level 9 Airflow slots 10 Water drain hose 11 Water inlet valve 12 Mains cable 13 Transit bolts 14 Feet for the appliance level 3.2 How to activate the child safety device This device prevents children or pets to be closed in the drum. You cannot close the door, turn the device anticlockwise until the...
Product Manual
Page 14
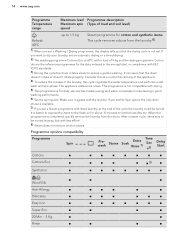
... items. This cycle removes odours from the laundry.8) 1) When you set a Washing / Drying programme, the display tells you set No Spin option the only drain phase is completed, quickly remove the laundry from the drum. When the programme is available. 7) If you that the drum doesn't rotate or doesn't rotate properly. 14 www.aeg.com Programme Temperature range Maximum load Programme description Maximum spin (Type of load and soil level) speed...
... items. This cycle removes odours from the laundry.8) 1) When you set a Washing / Drying programme, the display tells you set No Spin option the only drain phase is completed, quickly remove the laundry from the drum. When the programme is available. 7) If you that the drum doesn't rotate or doesn't rotate properly. 14 www.aeg.com Programme Temperature range Maximum load Programme description Maximum spin (Type of load and soil level) speed...

Product Manual
Page 16
... can change the data: the quantity and type of laundry, the water and ambient temperature. CONSUMPTION VALUES washing machine. During the washing phase the programme duration is calculating the real programme duration a dot blinks in the display. 16 www.aeg.com Dryness Level Iron Dry Suitable for ironing Wool dry Type of fabric Load (kg) Cottons and Linen 6 (sheets, tablecloths, shirts, etc) 3 1 Wool 1 (wool jumpers) Spin speed...
... can change the data: the quantity and type of laundry, the water and ambient temperature. CONSUMPTION VALUES washing machine. During the washing phase the programme duration is calculating the real programme duration a dot blinks in the display. 16 www.aeg.com Dryness Level Iron Dry Suitable for ironing Wool dry Type of fabric Load (kg) Cottons and Linen 6 (sheets, tablecloths, shirts, etc) 3 1 Wool 1 (wool jumpers) Spin speed...

Product Manual
Page 19
.... This removes all possible dirt from the drum and the tub. 9.1 Clock setting After you to confirm the selection. The minute digits flash. 3. ENGLISH 19 • Deactivate the spin phase ( 'No spin' function). • Activate the Rinse Hold function. Turn the programme knob to set programme. 9. Turn the programme knob to change the hour. 3. Touch button Spin and button Stains/Prewash at the highest temperature without laundry...
.... This removes all possible dirt from the drum and the tub. 9.1 Clock setting After you to confirm the selection. The minute digits flash. 3. ENGLISH 19 • Deactivate the spin phase ( 'No spin' function). • Activate the Rinse Hold function. Turn the programme knob to set programme. 9. Turn the programme knob to change the hour. 3. Touch button Spin and button Stains/Prewash at the highest temperature without laundry...

Product Manual
Page 20
... a time. 3. The programme indicator comes on the packaging of the detergent products. Close the door. Compartment for liquid additives (fabric conditioner, starch). Always obey the instructions that no laundry stays between the seal and the door. DAILY USE - Shake the items before you find on . Compartment for washing phase. WASHING ONLY 10.1 Before activating the appliance 1. Press button On/Off to change the water temperature and the spin speed...
... a time. 3. The programme indicator comes on the packaging of the detergent products. Close the door. Compartment for liquid additives (fabric conditioner, starch). Always obey the instructions that no laundry stays between the seal and the door. DAILY USE - Shake the items before you find on . Compartment for washing phase. WASHING ONLY 10.1 Before activating the appliance 1. Press button On/Off to change the water temperature and the spin speed...

Product Manual
Page 21
... starts, the door is locked. The drain pump can operate for liquid detergent. The display show the indicator . The relevant indicator stops to have put more liquid then the maximum level. • Do not set the prewash phase. • Do not set the delay start. 10.6 Starting a programme without the delay start Touch button Start/Pause to start the programme. 10.5 Liquid or powder detergent 1 1. When you have perfect washing results in the drum to flash...
... starts, the door is locked. The drain pump can operate for liquid detergent. The display show the indicator . The relevant indicator stops to have put more liquid then the maximum level. • Do not set the prewash phase. • Do not set the delay start. 10.6 Starting a programme without the delay start Touch button Start/Pause to start the programme. 10.5 Liquid or powder detergent 1 1. When you have perfect washing results in the drum to flash...

Product Manual
Page 23
... Draining water out after approximately18 hours. 10.15 AUTO Stand-by option The AUTO Stand-by option automatically deactivates the appliance to decrease the energy consumption when: • You do not use the appliance for the items to prevent mildew and odours. 5. Touch the Start/Pause button. If necessary, decrease the spin speed. 2. Load the laundry one item at a time. 3. Turn...
... Draining water out after approximately18 hours. 10.15 AUTO Stand-by option The AUTO Stand-by option automatically deactivates the appliance to decrease the energy consumption when: • You do not use the appliance for the items to prevent mildew and odours. 5. Touch the Start/Pause button. If necessary, decrease the spin speed. 2. Load the laundry one item at a time. 3. Turn...

Product Manual
Page 25
... stop-programme». The display shows regularly a new time value. 12.3 At the end of the cycle end. This inconvenient increases with a wet cloth. • Set the rinse programme. • Press at open air when they are washed the first time. • To clean the drain filter. • After the drying phase, clean the empty drum, the gasket and the door with a wet cloth. Proceed as follows: 1. Load the laundry...
... stop-programme». The display shows regularly a new time value. 12.3 At the end of the cycle end. This inconvenient increases with a wet cloth. • Set the rinse programme. • Press at open air when they are washed the first time. • To clean the drain filter. • After the drying phase, clean the empty drum, the gasket and the door with a wet cloth. Proceed as follows: 1. Load the laundry...
Product Manual
Page 26
... instructions that you use a water softener for washing machines: - liquid detergents, preferably for low temperature wash programmes (60 °C max) for all types of fabric, or special for the first times. • Button up belts. • Empty the pockets and unfold the items. • Turn inside out multilayered fabrics, wool and items with painted illustrations. • Remove hard stains. • Wash with a special detergent heavy soil stains. • Be careful...
... instructions that you use a water softener for washing machines: - liquid detergents, preferably for low temperature wash programmes (60 °C max) for all types of fabric, or special for the first times. • Button up belts. • Empty the pockets and unfold the items. • Turn inside out multilayered fabrics, wool and items with painted illustrations. • Remove hard stains. • Wash with a special detergent heavy soil stains. • Be careful...

Product Manual
Page 27
...-rubber or materials similar to dry the laundry in a more correct way. Use fabric conditioner in a short time. CARE AND CLEANING • = The item can change depending on the packaging of the product. 13.6 Drying hints Prepare the drying cycle • Open the water tap. • Do a check if the connection of hair sprays, nail solvents or similar. • Garments with soap and warm water...
...-rubber or materials similar to dry the laundry in a more correct way. Use fabric conditioner in a short time. CARE AND CLEANING • = The item can change depending on the packaging of the product. 13.6 Drying hints Prepare the drying cycle • Open the water tap. • Do a check if the connection of hair sprays, nail solvents or similar. • Garments with soap and warm water...

Product Manual
Page 28
... remove rust particles use a water descaling product for washing machine. Always obey the instructions that you find on the packaging of detergent. 14.4 Door seal 14.3 Maintenance wash With the low temperature programmes it is possible that some detergent stays in your area is high or moderate, we recommend that you use only special products for washing machines. Regularly examine the drum to prevent limescale and rust particles. 28 www.aeg...
... remove rust particles use a water descaling product for washing machine. Always obey the instructions that you find on the packaging of detergent. 14.4 Door seal 14.3 Maintenance wash With the low temperature programmes it is possible that some detergent stays in your area is high or moderate, we recommend that you use only special products for washing machines. Regularly examine the drum to prevent limescale and rust particles. 28 www.aeg...

Product Manual
Page 32
...; Install again the inlet hose. Refer to prevent leakages. • Open the water tap. 45° 20° To clean the water inlet filters: 1 • Close the water tap. • Remove the water inlet hose from the water tap. • Clean the filter in the inlet hose with a stiff brush. 2 3 • Remove the inlet hose behind the appliance. • Clean the filter in the valve with the water for a long time. • The indicator of button Start/Pause flashes and the display...
...; Install again the inlet hose. Refer to prevent leakages. • Open the water tap. 45° 20° To clean the water inlet filters: 1 • Close the water tap. • Remove the water inlet hose from the water tap. • Clean the filter in the inlet hose with a stiff brush. 2 3 • Remove the inlet hose behind the appliance. • Clean the filter in the valve with the water for a long time. • The indicator of button Start/Pause flashes and the display...
Product Manual
Page 33
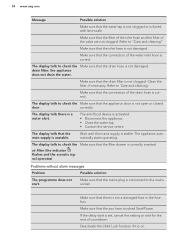
... is open. TROUBLESHOOTING ENGLISH 33 0° C, remove the remaining water from the mains socket. 2. With some problems, the acoustic signals operate and the display shows an alarm message: CAUTION! When you must activate again the drain system: 1. WARNING! When you must activate again the drain system: Put 2 litres of water in the main wash compartment of 'Cleaning the drain filter'. Empty the drain pump. Disconnect the mains plug...
... is open. TROUBLESHOOTING ENGLISH 33 0° C, remove the remaining water from the mains socket. 2. With some problems, the acoustic signals operate and the display shows an alarm message: CAUTION! When you must activate again the drain system: 1. WARNING! When you must activate again the drain system: Put 2 litres of water in the main wash compartment of 'Cleaning the drain filter'. Empty the drain pump. Disconnect the mains plug...
Product Manual
Page 34
... the valve are not clogged. The display tells to the mains socket. Make sure that the drain hose is not damaged. The display tells to check the Make sure that the filter of the inlet hose and the filter of the drain hose is correct. air filter (the indicator flashes and the acoustic signal operates) Problems without alarm messages Problem Possible solution The programme does not start is set, cancel the setting...
... the valve are not clogged. The display tells to the mains socket. Make sure that the drain hose is not damaged. The display tells to check the Make sure that the filter of the inlet hose and the filter of the drain hose is correct. air filter (the indicator flashes and the acoustic signal operates) Problems without alarm messages Problem Possible solution The programme does not start is set, cancel the setting...

Product Manual
Page 35
... that the drain hose is in the drum. Make sure that the this is not clogged. Make sure you have not set a programme without the water. ance door. The appliance makes an un- Refer usual noise. Add more laundry in the drum and start the spin phase again. The spin phase does not op- erate or the washing cycle lasts longer than usually. Refer to 'Installation'. Make...
... that the drain hose is in the drum. Make sure that the this is not clogged. Make sure you have not set a programme without the water. ance door. The appliance makes an un- Refer usual noise. Add more laundry in the drum and start the spin phase again. The spin phase does not op- erate or the washing cycle lasts longer than usually. Refer to 'Installation'. Make...

Product Manual
Page 36
... www.aeg.com Problem Possible solution Use special products to remove some fluff. Make sure that you wash the laundry. The washing cycle is accurately levelled. than the time displayed. Make sure that the appliance is longer An unbalanced laundry load increases the duration time. smooth. or does not dry correctly. If necessary, set the correct temperature. Set a drying cycle to remove the stubborn stains before you set the correct cycle. Clean the laundry...
... www.aeg.com Problem Possible solution Use special products to remove some fluff. Make sure that you wash the laundry. The washing cycle is accurately levelled. than the time displayed. Make sure that the appliance is longer An unbalanced laundry load increases the duration time. smooth. or does not dry correctly. If necessary, set the correct temperature. Set a drying cycle to remove the stubborn stains before you set the correct cycle. Clean the laundry...


