Specification Sheet
Page 1
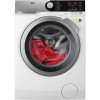
... cared for, even in shorter cycles. It's the ideal programme for , even in EVERY FIBRE CLEANED AND PROTECTED In a standard washing machine less than a third of fibres are reached by the fabric softeners you use with great results and less energy consumption. Features : • LogiControl™ touch display •LED display • 9 kg wash capacity • 1600 spin speed RPM •Programmes include: •Steam...
... cared for, even in shorter cycles. It's the ideal programme for , even in EVERY FIBRE CLEANED AND PROTECTED In a standard washing machine less than a third of fibres are reached by the fabric softeners you use with great results and less energy consumption. Features : • LogiControl™ touch display •LED display • 9 kg wash capacity • 1600 spin speed RPM •Programmes include: •Steam...
User Manual
Page 2
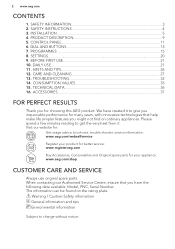
... available: Model, PNC, Serial Number. The information can be found on ordinary appliances. CARE AND CLEANING 27 13. 2 www.aeg.com CONTENTS 1. DIAL AND BUTTONS 13 7. Visit our website for: Get usage advice, brochures, trouble shooter, service information: www.aeg.com/webselfservice Register your product for better service: www.registeraeg.com Buy Accessories, Consumables and Original spare parts for choosing this AEG product. DAILY USE...21 11. CONTROL PANEL...11...
... available: Model, PNC, Serial Number. The information can be found on ordinary appliances. CARE AND CLEANING 27 13. 2 www.aeg.com CONTENTS 1. DIAL AND BUTTONS 13 7. Visit our website for: Get usage advice, brochures, trouble shooter, service information: www.aeg.com/webselfservice Register your product for better service: www.registeraeg.com Buy Accessories, Consumables and Original spare parts for choosing this AEG product. DAILY USE...21 11. CONTROL PANEL...11...

User Manual
Page 3
... cleaning and user maintenance of the appliance without supervision. 1.2 General Safety • Do not change the specification of this should be between 0.5 bar (0.05 MPa) and 8 bar (0.8 MPa). The manufacturer is open. • If the appliance has a child safety device, this appliance. • Do not exceed the maximum load of incorrect installation or usage. SAFETY INFORMATION Before the installation and use...
... cleaning and user maintenance of the appliance without supervision. 1.2 General Safety • Do not change the specification of this should be between 0.5 bar (0.05 MPa) and 8 bar (0.8 MPa). The manufacturer is open. • If the appliance has a child safety device, this appliance. • Do not exceed the maximum load of incorrect installation or usage. SAFETY INFORMATION Before the installation and use...
User Manual
Page 4
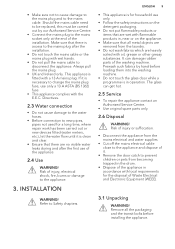
... hose sets must not be reused. • If the mains power supply cable is damaged, it must be replaced by the manufacturer, its Authorised Service Centre or similarly qualified persons to avoid an electrical hazard. • Before any maintenance operation, deactivate the appliance and disconnect the mains plug from the socket. • Do not use high pressure water sprays and/or steam to...
... hose sets must not be reused. • If the mains power supply cable is damaged, it must be replaced by the manufacturer, its Authorised Service Centre or similarly qualified persons to avoid an electrical hazard. • Before any maintenance operation, deactivate the appliance and disconnect the mains plug from the socket. • Do not use high pressure water sprays and/or steam to...
User Manual
Page 5
... from the laundry. • Do not wash fabrics which are wet with flammable products in operation. Remove all metal objects are no visible water leaks during and after the installation. • Do not touch the mains cable or the mains plug with the E.E.C. This appliance is fitted with local requirements for household use only. • Follow the safety instructions on the detergent packaging...
... from the laundry. • Do not wash fabrics which are wet with flammable products in operation. Remove all metal objects are no visible water leaks during and after the installation. • Do not touch the mains cable or the mains plug with the E.E.C. This appliance is fitted with local requirements for household use only. • Follow the safety instructions on the detergent packaging...

User Manual
Page 7
... that you find in the user manual bag, in operation. 3.4 The inlet hose 1. Loosen or tighten the feet to the back of the appliance when in the holes. Do not put cardboard, wood or equivalent materials below the appliance. If possible, install the appliance where the floor is more stable. 3.3 Positioning and levelling 1. Position it toward left or...
... that you find in the user manual bag, in operation. 3.4 The inlet hose 1. Loosen or tighten the feet to the back of the appliance when in the holes. Do not put cardboard, wood or equivalent materials below the appliance. If possible, install the appliance where the floor is more stable. 3.3 Positioning and levelling 1. Position it toward left or...

User Manual
Page 10
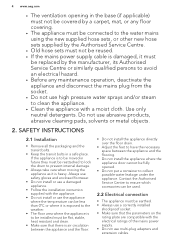
10 www.aeg.com the fabric fibres favouring a perfect softness. 4.2 Appliance overview 1 23 4 5 6 8 9 10 11 12 1 Worktop 2 Detergent dispenser 3 Control panel 4 Door handle 5 Rating plate 6 Drain pump filter 7 Feet for levelling the appliance 7 8 Drain hose 9 Inlet hose connection 10 Mains cable 11 Transit bolts 12 Hose support
10 www.aeg.com the fabric fibres favouring a perfect softness. 4.2 Appliance overview 1 23 4 5 6 8 9 10 11 12 1 Worktop 2 Detergent dispenser 3 Control panel 4 Door handle 5 Rating plate 6 Drain pump filter 7 Feet for levelling the appliance 7 8 Drain hose 9 Inlet hose connection 10 Mains cable 11 Transit bolts 12 Hose support

User Manual
Page 12
... start indicator. or ). • Cycle end ( ). • Warning code (e.g. ). The digital indicator can show: • Programme duration (e. g. ). • Delay time (e. Washing phase indicator. When the Soft Plus option is activated, the indicator appears. It flashes during rinse phase. Anti-crease phase indicator. 12 www.aeg.com 5.2 Display MIX Maximum load indicator. Maximum laundry indicator. Door locked indicator. Energy saving indicators. It flashes during spin and drain phase. Steam...
... start indicator. or ). • Cycle end ( ). • Warning code (e.g. ). The digital indicator can show: • Programme duration (e. g. ). • Delay time (e. Washing phase indicator. When the Soft Plus option is activated, the indicator appears. It flashes during rinse phase. Anti-crease phase indicator. 12 www.aeg.com 5.2 Display MIX Maximum load indicator. Maximum laundry indicator. Door locked indicator. Energy saving indicators. It flashes during spin and drain phase. Steam...

User Manual
Page 13
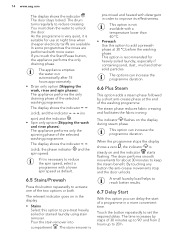
... door stays locked and the drum turns regularly to unlock the door. This helps to prevent the fabrics from creasing. Touch this button to decrease the energy consumption in the "Programme Chart". The washing programme ends with water in the drum. If you may need to activate or deactivate the appliance. indicator appears when a cold wash is not performed. The water of the last rinse is not drained...
... door stays locked and the drum turns regularly to unlock the door. This helps to prevent the fabrics from creasing. Touch this button to decrease the energy consumption in the "Programme Chart". The washing programme ends with water in the drum. If you may need to activate or deactivate the appliance. indicator appears when a cold wash is not performed. The water of the last rinse is not drained...
User Manual
Page 14
... indicator starts flashing. The drum performs smooth movements for about 30 minutes to set the required delay. The time increases by a short anti-crease phase at 30 °C before the washing phase. The door stays locked. The appliance empties the water out automatically after 18 hours approximately. • Drain only option (Skipping the wash, rinse and spin phases) . When the programme stops the display shows...
... indicator starts flashing. The drum performs smooth movements for about 30 minutes to set the required delay. The time increases by a short anti-crease phase at 30 °C before the washing phase. The door stays locked. The appliance empties the water out automatically after 18 hours approximately. • Drain only option (Skipping the wash, rinse and spin phases) . When the programme stops the display shows...
User Manual
Page 20
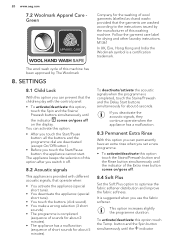
... programme is suggested when you use the fabric softener. Follow the garment care label for about 6 seconds. It is completed, touch the Stains/Prewash and the Delay Start buttons simultaneously for about 5 minutes). button and the Spin button simultaneously until the indicator of the Extra rinse button comes on the display. If you deactivate the acoustic signals, they continue operate when the appliance has...
... programme is suggested when you use the fabric softener. Follow the garment care label for about 6 seconds. It is completed, touch the Stains/Prewash and the Delay Start buttons simultaneously for about 5 minutes). button and the Spin button simultaneously until the indicator of the Extra rinse button comes on the display. If you deactivate the acoustic signals, they continue operate when the appliance has...

User Manual
Page 21
... no laundry stays between the seal and the door. Pour 2 litres of detergent into the detergent compartment marked by . 10. A short tune sounds (if activated). Open the water tap. 3. There is a risk of the phases making up the programme and the cycle duration. 10.2 Loading the laundry 1. This removes all transit bolts have been removed from the drum and the tub. Close the door firmly. Set and start a programme...
... no laundry stays between the seal and the door. Pour 2 litres of detergent into the detergent compartment marked by . 10. A short tune sounds (if activated). Open the water tap. 3. There is a risk of the phases making up the programme and the cycle duration. 10.2 Loading the laundry 1. This removes all transit bolts have been removed from the drum and the tub. Close the door firmly. Set and start a programme...

User Manual
Page 23
... stops flashing and stays on . In the display, the indicator of the Start/Pause button flashes. The PROSENSE estimation starts at the end of the delay start the programme immediately. ENGLISH 23 With the flap in the display and the given information changes accordingly. Carefully close the drawer. 10.5 Setting a programme 1. The drain pump can operate shortly before the appliance fills water. 10.7 Starting a programme with the delay start...
... stops flashing and stays on . In the display, the indicator of the Start/Pause button flashes. The PROSENSE estimation starts at the end of the delay start the programme immediately. ENGLISH 23 With the flap in the display and the given information changes accordingly. Carefully close the drawer. 10.5 Setting a programme 1. The drain pump can operate shortly before the appliance fills water. 10.7 Starting a programme with the delay start...

User Manual
Page 26
... set a new cycle. manually redistribute the load so that ends with water in the drum, the Stand-by function automatically deactivates the appliance to drain the water. • Wash heavy soil stains with a special detergent. • Be careful with curtains. press the Start/Pause button. 26 www.aeg.com • The drum still turns at regular intervals to prevent the creases in the laundry. • The door stays locked...
... set a new cycle. manually redistribute the load so that ends with water in the drum, the Stand-by function automatically deactivates the appliance to drain the water. • Wash heavy soil stains with a special detergent. • Be careful with curtains. press the Start/Pause button. 26 www.aeg.com • The drum still turns at regular intervals to prevent the creases in the laundry. • The door stays locked...
User Manual
Page 27
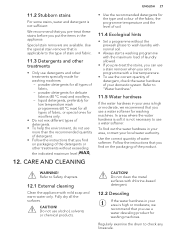
... the type and colour of the fabric, the programme temperature and the level of the product. CARE AND CLEANING ENGLISH 27 • Use the recommended detergents for all the surfaces. Regularly examine the drum to use a water softener. Use the special stain remover that you use the correct quantity of detergent, check the water hardness of fabric, - Use the correct quantity of the detergents or other treatments specially made for washing machines. Follow the instructions...
... the type and colour of the fabric, the programme temperature and the level of the product. CARE AND CLEANING ENGLISH 27 • Use the recommended detergents for all the surfaces. Regularly examine the drum to use a water softener. Use the special stain remover that you use the correct quantity of detergent, check the water hardness of fabric, - Use the correct quantity of the detergents or other treatments specially made for washing machines. Follow the instructions...

User Manual
Page 31
... you use the appliance again. Make sure that the temperature is installed in 'Cleaning the drain filter' paragraph. Put 2 litres of water in a container and let the water flow out of the detergent dispenser. 2. Put the two ends of the inlet hose in the main wash compartment of the hose. 4. Refer to remove any deposit, collected over the time: 1. If necessary, clean the pump. 12.8 Cleaning the inlet hose and the valve filter...
... you use the appliance again. Make sure that the temperature is installed in 'Cleaning the drain filter' paragraph. Put 2 litres of water in a container and let the water flow out of the detergent dispenser. 2. Put the two ends of the inlet hose in the main wash compartment of the hose. 4. Refer to remove any deposit, collected over the time: 1. If necessary, clean the pump. 12.8 Cleaning the inlet hose and the valve filter...
User Manual
Page 32
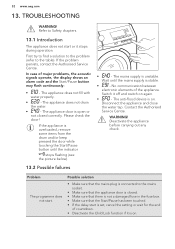
... check the door! Switch it stops during operation. 32 www.aeg.com 13. TROUBLESHOOTING WARNING! If the appliance is on. The anti-flood device is overloaded, remove some items from the drum and/or keep pressed the door while touching the Start/Pause button until the mains supply is on again. • - The appliance does not drain the water. • - Contact the Authorised Service Centre. Problem...
... check the door! Switch it stops during operation. 32 www.aeg.com 13. TROUBLESHOOTING WARNING! If the appliance is on. The anti-flood device is overloaded, remove some items from the drum and/or keep pressed the door while touching the Start/Pause button until the mains supply is on again. • - The appliance does not drain the water. • - Contact the Authorised Service Centre. Problem...
User Manual
Page 33
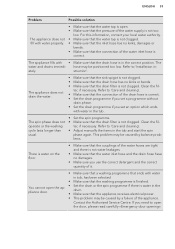
...; Make sure that the drain filter is not clogged. The spin phase does not operate or the washing cycle lasts longer than usual. • Set the spin programme. • Make sure that the appliance receives electrical power. • This problem may be caused by balance problems. There is water on the floor. • Make sure that the couplings of the water hoses are tight and there is...
...; Make sure that the drain filter is not clogged. The spin phase does not operate or the washing cycle lasts longer than usual. • Set the spin programme. • Make sure that the appliance receives electrical power. • This problem may be caused by balance problems. There is water on the floor. • Make sure that the couplings of the water hoses are tight and there is...
User Manual
Page 34
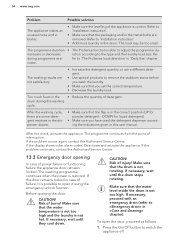
Refer to 'Installation instruction'. • Make sure that the water level inside the drum is not rotating. The load may be too small. during the washing cycle. After the washing cycle, there are some detergent residues in the dispenser drawer. • Make sure that the drum is not too high. If the problem continues, contact the Authorised Service Centre. 13.3 Emergency door opening the door: CAUTION! Before opening In case of power failure...
Refer to 'Installation instruction'. • Make sure that the water level inside the drum is not rotating. The load may be too small. during the washing cycle. After the washing cycle, there are some detergent residues in the dispenser drawer. • Make sure that the drum is not too high. If the problem continues, contact the Authorised Service Centre. 13.3 Emergency door opening the door: CAUTION! Before opening In case of power failure...

User Manual
Page 36
...) between the appliance inlet hose and the bottom of spin phase. Load (kg) 9 4.5 4.5 Energy Water consump- TECHNICAL DATA Dimension Width/ Height/ Depth/ Total depth 600 mm/ 850 mm/ 630 mm/ 660 mm Electrical connection Voltage Overall power Fuse Frequency 230-240 V 2200 W 13 A 50 Hz Level of protection against ingress of the primary hydraulic system, connect it to the cold water tap of solid...
...) between the appliance inlet hose and the bottom of spin phase. Load (kg) 9 4.5 4.5 Energy Water consump- TECHNICAL DATA Dimension Width/ Height/ Depth/ Total depth 600 mm/ 850 mm/ 630 mm/ 660 mm Electrical connection Voltage Overall power Fuse Frequency 230-240 V 2200 W 13 A 50 Hz Level of protection against ingress of the primary hydraulic system, connect it to the cold water tap of solid...


