Product Manual
Page 2
... the symbol . Products - 2 www.aeg.com CONTENTS 4 SAFETY INFORMATION 5 TECHNICAL INFORMATION 7 PRODUCT DESCRIPTION 7 ACCESSORIES 8 CONTROL PANEL 13 PROGRAMMES 16 CONSUMPTION VALUES 17 BEFORE FIRST USE 17 USING THE APPLIANCE 17 LOADING THE LAUNDRY 17 FILLING THE DETERGENT AND ADDITIVES 19 SETTING AND STARTING A PROGRAMME 20 AT THE END OF THE PROGRAMME 21 HELPFUL HINTS AND TIPS 23 CARE AND CLEANING 28 TROUBLESHOOTING 31 INSTALLATION ENVIRONMENT CONCERNS Recycle...
... the symbol . Products - 2 www.aeg.com CONTENTS 4 SAFETY INFORMATION 5 TECHNICAL INFORMATION 7 PRODUCT DESCRIPTION 7 ACCESSORIES 8 CONTROL PANEL 13 PROGRAMMES 16 CONSUMPTION VALUES 17 BEFORE FIRST USE 17 USING THE APPLIANCE 17 LOADING THE LAUNDRY 17 FILLING THE DETERGENT AND ADDITIVES 19 SETTING AND STARTING A PROGRAMME 20 AT THE END OF THE PROGRAMME 21 HELPFUL HINTS AND TIPS 23 CARE AND CLEANING 28 TROUBLESHOOTING 31 INSTALLATION ENVIRONMENT CONCERNS Recycle...
Product Manual
Page 4
... an incorrect installation and use the appliance without the transit bolts, you move or give it . An incorrect installation causes water leakages. CHILDREN AND VULNERABLE PERSON SAFETY • Do not let persons, children included, with flammable products in the drum. There is responsible for their safety. Always keep these instructions with the appliance. • Keep all detergents away from...
... an incorrect installation and use the appliance without the transit bolts, you move or give it . An incorrect installation causes water leakages. CHILDREN AND VULNERABLE PERSON SAFETY • Do not let persons, children included, with flammable products in the drum. There is responsible for their safety. Always keep these instructions with the appliance. • Keep all detergents away from...

Product Manual
Page 5
... remove all packaging and transport bolts. • Make sure that the mains plug is disconnected from the mains socket. 2. TECHNICAL INFORMATION ENGLISH 5 • Do not use the appliance where the temperature is less than 0 °C. • When you install the appliance on the rating plate agrees with old hoses already used for some minutes, then connect the inlet hose. • The first time...
... remove all packaging and transport bolts. • Make sure that the mains plug is disconnected from the mains socket. 2. TECHNICAL INFORMATION ENGLISH 5 • Do not use the appliance where the temperature is less than 0 °C. • When you install the appliance on the rating plate agrees with old hoses already used for some minutes, then connect the inlet hose. • The first time...

Product Manual
Page 9
DISPLAY 3 A B C ENGLISH 9 D E FG H L K J I The display shows: The temperature of the set programme A Cold water The spin speed of the last phase is on. Prewash phase Washing phase Rinses phase Spin phase C The phase symbols • When a programme is set, all the symbols of the phases related to the programme come on. • When the programme starts, only the symbol of the phase in operation flashes. •...
DISPLAY 3 A B C ENGLISH 9 D E FG H L K J I The display shows: The temperature of the set programme A Cold water The spin speed of the last phase is on. Prewash phase Washing phase Rinses phase Spin phase C The phase symbols • When a programme is set, all the symbols of the phases related to the programme come on. • When the programme starts, only the symbol of the phase in operation flashes. •...
Product Manual
Page 10
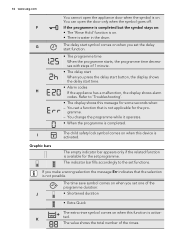
... The child safety lock symbol comes on . • There is activated. The indicator bar fills accordingly to 'Troubleshooting'. • The display shows this function is water in the drum. Refer to the set the delay start function. • The programme time When the programme starts, the programme time decreases with steps of 1 minute. • The delay start time. • Alarm codes If the appliance...
... The child safety lock symbol comes on . • There is activated. The indicator bar fills accordingly to 'Troubleshooting'. • The display shows this function is water in the drum. Refer to the set the delay start function. • The programme time When the programme starts, the programme time decreases with steps of 1 minute. • The delay start time. • Alarm codes If the appliance...
Product Manual
Page 11
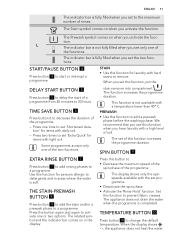
... 'Rinse Hold' function. When the display shows - -, the appliance does not heat the water. Press two times to prevent fabric creases. TEMPERATURE BUTTON 10 Press button 10 to start of the functions. L The indicator bar is not available with the set 'Extra Quick' for laundry with daily soil. - The indicator bar is completed. START/PAUSE BUTTON 4 Press button 4 to change the default temperature. We recommend that you use...
... 'Rinse Hold' function. When the display shows - -, the appliance does not heat the water. Press two times to prevent fabric creases. TEMPERATURE BUTTON 10 Press button 10 to start of the functions. L The indicator bar is not available with the set 'Extra Quick' for laundry with daily soil. - The indicator bar is completed. START/PAUSE BUTTON 4 Press button 4 to change the default temperature. We recommend that you use...

Product Manual
Page 13
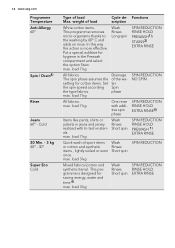
... RINSE TIME SAVE SPIN REDUCTION RINSE HOLD PREWASH1)/ STAINS2) EXTRA RINSE TIME SAVE SPIN REDUCTION RINSE HOLD SPIN REDUCTION load 3.5 kg Machine washable wool as well as acrylics, viscose, polyester items with normal level of load Max. load 2 kg Cycle description Wash Rinses Long spin Wash Rinses Stop with «hand washing» care symbol. max. The appliance adds some rinses. Cold Delicates 40° - weight of load White and coloured cotton with normal level of soil. load 7 kg Synthetic or mixed fabric...
... RINSE TIME SAVE SPIN REDUCTION RINSE HOLD PREWASH1)/ STAINS2) EXTRA RINSE TIME SAVE SPIN REDUCTION RINSE HOLD SPIN REDUCTION load 3.5 kg Machine washable wool as well as acrylics, viscose, polyester items with normal level of load Max. load 2 kg Cycle description Wash Rinses Long spin Wash Rinses Stop with «hand washing» care symbol. max. The appliance adds some rinses. Cold Delicates 40° - weight of load White and coloured cotton with normal level of soil. load 7 kg Synthetic or mixed fabric...
Product Manual
Page 14
... removes micro-organisms thanks to the washing by 60° C and adds on rinse. max. load 3 kg Mixed fabrics (cotton and synthetic items). weight of load Max. load 7 kg All fabrics. load 7 kg Wash Rinses Short spin Quick wash of the wa- In this way the action is designed for cotton items. Set ter the spin speed according Spin the type fabrics. setting for saving energy, water and time.6) max. load 7 kg One rinse with additive spin...
... removes micro-organisms thanks to the washing by 60° C and adds on rinse. max. load 3 kg Mixed fabrics (cotton and synthetic items). weight of load Max. load 7 kg All fabrics. load 7 kg Wash Rinses Short spin Quick wash of the wa- In this way the action is designed for cotton items. Set ter the spin speed according Spin the type fabrics. setting for saving energy, water and time.6) max. load 7 kg One rinse with additive spin...

Product Manual
Page 15
... for dried, washed or worn once laundry. Set this type of the load. If necessary, remove stains by washing or using localized stain removal. White and fast coloured cotton with dried laundry, at low temperatures. STEAM PROGRAMMES Programme1) Type of load Cycle de- load 7 kg Wash Rinses Long spin SPIN REDUCTION RINSE HOLD PREWASH1)/ STAINS2) EXTRA RINSE TIME SAVE3) 1) If you set the function NO SPIN. 5) Press EXTRA RINSE button to load fully the appliance, however the washing results are...
... for dried, washed or worn once laundry. Set this type of the load. If necessary, remove stains by washing or using localized stain removal. White and fast coloured cotton with dried laundry, at low temperatures. STEAM PROGRAMMES Programme1) Type of load Cycle de- load 7 kg Wash Rinses Long spin SPIN REDUCTION RINSE HOLD PREWASH1)/ STAINS2) EXTRA RINSE TIME SAVE3) 1) If you set the function NO SPIN. 5) Press EXTRA RINSE button to load fully the appliance, however the washing results are...

Product Manual
Page 17
... the laundry. FILLING THE DETERGENT AND ADDITIVES This removes all possible dirt from the drum and the tub. Open the appliance door. 2. Put the laundry in the appliance. Press button 1 to the mains socket. 3. Make sure that no laundry stays between the seal and the door. BEFORE FIRST USE ENGLISH 17 1. Set and start the correct programme for cotton at a time. USING THE APPLIANCE 1. LOADING THE LAUNDRY 1. Close the door.
... the laundry. FILLING THE DETERGENT AND ADDITIVES This removes all possible dirt from the drum and the tub. Open the appliance door. 2. Put the laundry in the appliance. Press button 1 to the mains socket. 3. Make sure that no laundry stays between the seal and the door. BEFORE FIRST USE ENGLISH 17 1. Set and start the correct programme for cotton at a time. USING THE APPLIANCE 1. LOADING THE LAUNDRY 1. Close the door.

Product Manual
Page 19
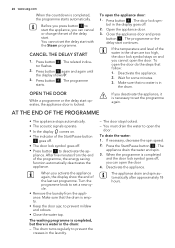
... of button 4 is on. The appliance does not drain the water. The indicator flash- SET THE DELAY START 1. gramme. Press button 4 . Now, you can change the temperature and/or the spin speed, press the related buttons. 5. Change the function set a new washing programme. Carefully close the drawer. Set the available functions. 6. INTERRUPT A PROGRAMME 1. Press button 1 again to deactivate the appliance. 2. Press button 4 to the laundry you close the detergent dispenser. The indicator flashes. 2.
... of button 4 is on. The appliance does not drain the water. The indicator flash- SET THE DELAY START 1. gramme. Press button 4 . Now, you can change the temperature and/or the spin speed, press the related buttons. 5. Change the function set a new washing programme. Carefully close the drawer. Set the available functions. 6. INTERRUPT A PROGRAMME 1. Press button 1 again to deactivate the appliance. 2. Press button 4 to the laundry you close the detergent dispenser. The indicator flashes. 2.
Product Manual
Page 20
... appliance stops automatically. • The acoustic signals operate. • In the display comes on and you can cancel or change the set of the Start/Pause button 4 goes off. • The door lock symbol goes off . 2. The drum turns regularly to set programme. If necessary, decrease the spin speed. 2. The appliance drain the water and spin. 3. Deactivate the appliance. Press button 4 . Press button 4 . Deactivate the appliance. 2. The washing programme is...
... appliance stops automatically. • The acoustic signals operate. • In the display comes on and you can cancel or change the set of the Start/Pause button 4 goes off. • The door lock symbol goes off . 2. The drum turns regularly to set programme. If necessary, decrease the spin speed. 2. The appliance drain the water and spin. 3. Deactivate the appliance. Press button 4 . Press button 4 . Deactivate the appliance. 2. The washing programme is...

Product Manual
Page 21
... you use liquid detergents, do not use more than the correct quantity of detergent. • Obey the instructions that is high or moderate, we recommend that you wash them separately for the type and colour of the fabric, the programme temperature and the level of stain and fabric. Water hardness °T.H. mmol/l 0-15 0-1.5 Clarke 0-9 Use a washing bag to the type of soil. • If you use a water softener for washing machines. We...
... you use liquid detergents, do not use more than the correct quantity of detergent. • Obey the instructions that is high or moderate, we recommend that you wash them separately for the type and colour of the fabric, the programme temperature and the level of stain and fabric. Water hardness °T.H. mmol/l 0-15 0-1.5 Clarke 0-9 Use a washing bag to the type of soil. • If you use a water softener for washing machines. We...
Product Manual
Page 23
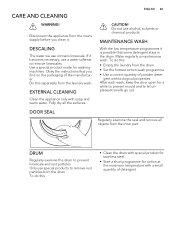
... the drum. MAINTENANCE WASH With the low temperature programmes it . To do this separately from the laundry wash. Only use a water softener to remove rust particles from the mains supply before you clean it is possible that you find on the packaging of powder deter- Use a special product made for cotton at the maximum temperature with special product for stainless steel. • Start a short programme for washing machines. DRUM Regularly...
... the drum. MAINTENANCE WASH With the low temperature programmes it . To do this separately from the laundry wash. Only use a water softener to remove rust particles from the mains supply before you clean it is possible that you find on the packaging of powder deter- Use a special product made for cotton at the maximum temperature with special product for stainless steel. • Start a short programme for washing machines. DRUM Regularly...

Product Manual
Page 24
... drain the water. • The drum cannot turn. • The appliance makes an unusual noise because of the blockage of the drain pump. • The display shows an alarm code because of the liquid additive compartment. 4. Clean all the parts with a brush. 6. 24 www.aeg.com DETERGENT DISPENSER To clean the dispenser: 1 1. Put back the dispenser in the appliance is clean. Clean the dispenser recess with water. 5. Remove the top part of the problem with water drain...
... drain the water. • The drum cannot turn. • The appliance makes an unusual noise because of the blockage of the drain pump. • The display shows an alarm code because of the liquid additive compartment. 4. Clean all the parts with a brush. 6. 24 www.aeg.com DETERGENT DISPENSER To clean the dispenser: 1 1. Put back the dispenser in the appliance is clean. Clean the dispenser recess with water. 5. Remove the top part of the problem with water drain...

Product Manual
Page 26
26 www.aeg.com 2 1 9. Put the flap back and close the drain pump flap. Remove the inlet hose behind the appliance. 5. Clean the filter in the inlet hose with the water for a long time. Make sure that you must activate again the drain system: Put the drainage duct back and close the drain pump door. Open the water tap. 45° 20° EMERGENCY DRAIN Because of 'To clean the drain pump'. If this...
26 www.aeg.com 2 1 9. Put the flap back and close the drain pump flap. Remove the inlet hose behind the appliance. 5. Clean the filter in the inlet hose with the water for a long time. Make sure that you must activate again the drain system: Put the drainage duct back and close the drain pump door. Open the water tap. 45° 20° EMERGENCY DRAIN Because of 'To clean the drain pump'. If this...

Product Manual
Page 27
... the detergent dispenser. 2. Start the programme to the emergency drain procedure 6. Disconnect the mains plug from the inlet hose and the drain pump. 1. Remove the water inlet hose 4. When the drain pump is more than 0 °C, remove the remaining water from the mains socket. 2. Make sure that the temperature is empty, install the inlet hose again. 1. Empty the drain pump. Put the two ends of the inlet hose in the main wash compartment of the hose. 5. ENGLISH...
... the detergent dispenser. 2. Start the programme to the emergency drain procedure 6. Disconnect the mains plug from the inlet hose and the drain pump. 1. Remove the water inlet hose 4. When the drain pump is more than 0 °C, remove the remaining water from the mains socket. 2. Make sure that the temperature is empty, install the inlet hose again. 1. Empty the drain pump. Put the two ends of the inlet hose in the main wash compartment of the hose. 5. ENGLISH...

Product Manual
Page 28
.... water. The connection of the drain pump is set. Set the drain programme. If not, contact the service centre. With some problems, the acoustic signals operate and the display shows an alarm code: • - The water tap is open or not closed correctly. • - The water inlet hose is blocked . Refer to 'Care let hose is damaged. low. 28 www.aeg.com TROUBLESHOOTING The start of the drain pump. Clean the filters. and cleaning'. Clean the filter of...
.... water. The connection of the drain pump is set. Set the drain programme. If not, contact the service centre. With some problems, the acoustic signals operate and the display shows an alarm code: • - The water tap is open or not closed correctly. • - The water inlet hose is blocked . Refer to 'Care let hose is damaged. low. 28 www.aeg.com TROUBLESHOOTING The start of the drain pump. Clean the filters. and cleaning'. Clean the filter of...
Product Manual
Page 29
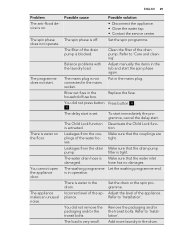
... fuse. To start immediately the programme, cancel the delay start . Refer to 'Installation'. Blow out fuse in the drum. is off. The water drain hose is water on . Refer to 'Care and cleaning'. You did not press button Press button 4 . 4 . Make sure that the water inlet damaged. Leakages from the drain Make sure that the drain pump pump. Remove the packaging and/or the transit bolts. Put in operation. Incorrect level of the drain pump is set...
... fuse. To start immediately the programme, cancel the delay start . Refer to 'Installation'. Blow out fuse in the drum. is off. The water drain hose is water on . Refer to 'Care and cleaning'. You did not press button Press button 4 . 4 . Make sure that the water inlet damaged. Leakages from the drain Make sure that the drain pump pump. Remove the packaging and/or the transit bolts. Put in operation. Incorrect level of the drain pump is set...

Product Manual
Page 30
... products to remove the stubborn stains. rect. Increase the detergent quantity or use a different one. Too much laundry load. Incorrect temperature was not sufficient or cor- was set the correct temperature. drain immediately. The programme continues from the point of the drain with water and hose is in the correct position. If the problem occurs again, contact the service centre. If the display shows other alarm codes...
... products to remove the stubborn stains. rect. Increase the detergent quantity or use a different one. Too much laundry load. Incorrect temperature was not sufficient or cor- was set the correct temperature. drain immediately. The programme continues from the point of the drain with water and hose is in the correct position. If the problem occurs again, contact the service centre. If the display shows other alarm codes...


