
Specification Sheet
Page 1
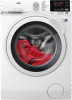
... the specific load. Ensuring they stand the test of the drum to different fabrics and adjusts programmes accordingly. Both washing and drying cycles are cleaned in one go; SMOOTHEN WITH STEAM FOR LESS IRONING The steam programme from relaxes the fibres in your clothes - Everything from textured jackets to soft jumpers can be carefully washed, dried and protected in one go. 7000 Series Freestanding Washer Dryer...
... the specific load. Ensuring they stand the test of the drum to different fabrics and adjusts programmes accordingly. Both washing and drying cycles are cleaned in one go; SMOOTHEN WITH STEAM FOR LESS IRONING The steam programme from relaxes the fibres in your clothes - Everything from textured jackets to soft jumpers can be carefully washed, dried and protected in one go. 7000 Series Freestanding Washer Dryer...
Specification Sheet
Page 2
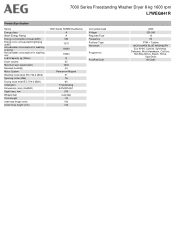
... Permanent Magnet 51 76 60 Freestanding 847x597x551 575 4 adj feet 1.8 150 140 Connected Load Voltage Required Fuse Frequency Porthole Type Woolmark Program list ProdPartCode 2200 230-240 13 50 P1W + Turbine WOOLMARK BLUE WASH&DRY Eco 40-60, Cottons, Synthetics, Delicates, Wool\Handwash, OutDoor, NonStop 60min, Steam, Rinse, Spin/Drain All Open 7000 Series Freestanding Washer Dryer 8 kg 1600 rpm L7WEG841R Product Specification Series Energy class Wash Energy Rating Energy consumption Annual (kWh...
... Permanent Magnet 51 76 60 Freestanding 847x597x551 575 4 adj feet 1.8 150 140 Connected Load Voltage Required Fuse Frequency Porthole Type Woolmark Program list ProdPartCode 2200 230-240 13 50 P1W + Turbine WOOLMARK BLUE WASH&DRY Eco 40-60, Cottons, Synthetics, Delicates, Wool\Handwash, OutDoor, NonStop 60min, Steam, Rinse, Spin/Drain All Open 7000 Series Freestanding Washer Dryer 8 kg 1600 rpm L7WEG841R Product Specification Series Energy class Wash Energy Rating Energy consumption Annual (kWh...

User Manual
Page 2
...: Model, PNC, Serial Number. PRODUCT DESCRIPTION 12 5. DAILY USE - DAILY USE - Please spend a few minutes reading to change without notice. DRYING ONLY 29 13. HINTS AND TIPS...31 15. PROGRAMMES...16 8. WASHING & DRYING 28 12. We have created it . DAILY USE - Visit our website for: Get usage advice, brochures, trouble shooter, service information: www.aeg.com/webselfservice Register your appliance: www.aeg.com/shop CUSTOMER CARE...
...: Model, PNC, Serial Number. PRODUCT DESCRIPTION 12 5. DAILY USE - DAILY USE - Please spend a few minutes reading to change without notice. DRYING ONLY 29 13. HINTS AND TIPS...31 15. PROGRAMMES...16 8. WASHING & DRYING 28 12. We have created it . DAILY USE - Visit our website for: Get usage advice, brochures, trouble shooter, service information: www.aeg.com/webselfservice Register your appliance: www.aeg.com/shop CUSTOMER CARE...

User Manual
Page 5
... not be dried in the washer dryer. • Fabric softeners, or similar products, should only be used as specified by the product manufacturer's instructions. • Remove all objects from items that could be a source of fire ignition such as lighters or matches. • Never stop the washer dryer before the end of the drying cycle unless all items are quickly removed and separated so that...
... not be dried in the washer dryer. • Fabric softeners, or similar products, should only be used as specified by the product manufacturer's instructions. • Remove all objects from items that could be a source of fire ignition such as lighters or matches. • Never stop the washer dryer before the end of the drying cycle unless all items are quickly removed and separated so that...

User Manual
Page 6
... be reattached to lock the drum to prevent an internal damage. • Always take care when moving the appliance as it is not, adjust the feet accordingly. 2.2 Electrical Connection WARNING! Risk of fire and electric shock. • The appliance must comply with relevant national regulations. • Follow the installation instructions supplied with a moist cloth. 6 www.aeg.com • Clean the appliance...
... be reattached to lock the drum to prevent an internal damage. • Always take care when moving the appliance as it is not, adjust the feet accordingly. 2.2 Electrical Connection WARNING! Risk of fire and electric shock. • The appliance must comply with relevant national regulations. • Follow the installation instructions supplied with a moist cloth. 6 www.aeg.com • Clean the appliance...
User Manual
Page 7
... the cleaning instruction on the item label. • Plastic items are wet with flammable products in, near or on the open door. • Do not dry dripping wet clothes in the appliance. 2.5 Service • To repair the appliance contact an Authorised Service Centre. • Use original spare parts only. 2.6 Disposal • Disconnect the appliance from the laundry. • Only dry fabrics that are...
... the cleaning instruction on the item label. • Plastic items are wet with flammable products in, near or on the open door. • Do not dry dripping wet clothes in the appliance. 2.5 Service • To repair the appliance contact an Authorised Service Centre. • Use original spare parts only. 2.6 Disposal • Disconnect the appliance from the laundry. • Only dry fabrics that are...

User Manual
Page 8
... the drum. 9. Remove the three bolts by using the spanner supplied with water of the appliance in vertical position. 4. Pull up the appliance in factory. 10. Carefully put the appliance down on the floor under the appliance. Put the front polystyrene packaging element on its rear side. 6. Remove the internal film. 7. Remove the power supply cable and the drain hose from...
... the drum. 9. Remove the three bolts by using the spanner supplied with water of the appliance in vertical position. 4. Pull up the appliance in factory. 10. Carefully put the appliance down on the floor under the appliance. Put the front polystyrene packaging element on its rear side. 6. Remove the internal film. 7. Remove the power supply cable and the drain hose from...

User Manual
Page 9
... other units. A correct adjustment of the appliance level prevents the vibration, noise and the movement of the appliance. 3.2 Installation on the washing machine, use the accessories described in operation. When the machine is installed on a flat hard floor. Connect the water inlet hose to adjust the level. Install the appliance on a plinth or if a washer dryer is more stable. 3.3 Positioning and levelling 1. Do not put cardboard, wood or...
... other units. A correct adjustment of the appliance level prevents the vibration, noise and the movement of the appliance. 3.2 Installation on the washing machine, use the accessories described in operation. When the machine is installed on a flat hard floor. Connect the water inlet hose to adjust the level. Install the appliance on a plinth or if a washer dryer is more stable. 3.3 Positioning and levelling 1. Do not put cardboard, wood or...

User Manual
Page 12
12 www.aeg.com 4. PRODUCT DESCRIPTION 4.1 Appliance overview 1 23 4 5 6 8 9 10 11 12 1 Worktop 2 Detergent dispenser 3 Control panel 4 Door handle 5 Rating plate 6 Drain pump filter 7 Feet for levelling the appliance 7 8 Drain hose 9 Inlet hose connection 10 Mains cable 11 Transit bolts 12 Hose support
12 www.aeg.com 4. PRODUCT DESCRIPTION 4.1 Appliance overview 1 23 4 5 6 8 9 10 11 12 1 Worktop 2 Detergent dispenser 3 Control panel 4 Door handle 5 Rating plate 6 Drain pump filter 7 Feet for levelling the appliance 7 8 Drain hose 9 Inlet hose connection 10 Mains cable 11 Transit bolts 12 Hose support

User Manual
Page 13
... button (Auto Drying) 5 Washing and drying mode touch button (Mode) • Wash • Dry 5.2 Display 6 Start and pause touch button (Start/ Pause) 7 Option touch button (Stains/Prewash) 8 Delay Start touch button (Delay Start) 9 Time Saving touch button (Quick Wash) 10 Spin reduction touch button (Spin) 11 Temperature touch button (Temp.) 12 On/Off push button (On/Off) MIX Maximum load indicator. CONTROL PANEL 5.1 Control panel description 1 ENGLISH 13 2 3 Programme Cottons Cottons Eco Synthetics Delicates Wool/Handwash Outdoor NonStop 60min Steam Rinse Spin/Drain Time...
... button (Auto Drying) 5 Washing and drying mode touch button (Mode) • Wash • Dry 5.2 Display 6 Start and pause touch button (Start/ Pause) 7 Option touch button (Stains/Prewash) 8 Delay Start touch button (Delay Start) 9 Time Saving touch button (Quick Wash) 10 Spin reduction touch button (Spin) 11 Temperature touch button (Temp.) 12 On/Off push button (On/Off) MIX Maximum load indicator. CONTROL PANEL 5.1 Control panel description 1 ENGLISH 13 2 3 Programme Cottons Cottons Eco Synthetics Delicates Wool/Handwash Outdoor NonStop 60min Steam Rinse Spin/Drain Time...

User Manual
Page 20
... which are labelled "hand wash" provided that the products are washed in a Woolmark endorsed hand washing cycle and dried according to the instructions issued by the manufacturer of this washing machine. The cycle is not available with temperature lower than 40 °C. 3) If you set the shortest duration, we recommend that you set No Spin option, the appliance only drains the water. 2) This option is...
... which are labelled "hand wash" provided that the products are washed in a Woolmark endorsed hand washing cycle and dried according to the instructions issued by the manufacturer of this washing machine. The cycle is not available with temperature lower than 40 °C. 3) If you set the shortest duration, we recommend that you set No Spin option, the appliance only drains the water. 2) This option is...

User Manual
Page 23
... at a time. Open the appliance door. 2. Close the door firmly. BEFORE FIRST USE add one item at the highest temperature without any laundry in the appliance. button and the Spin button three times to activate the appliance. Make sure that the electrical power is available and the water tap is delivered to add two extra rinses. Set and start a programme for a few seconds to remove extra rinses. This removes all transit bolts have...
... at a time. Open the appliance door. 2. Close the door firmly. BEFORE FIRST USE add one item at the highest temperature without any laundry in the appliance. button and the Spin button three times to activate the appliance. Make sure that the electrical power is available and the water tap is delivered to add two extra rinses. Set and start a programme for a few seconds to remove extra rinses. This removes all transit bolts have...

User Manual
Page 25
... the delay start 1. The related indicator stops flashing and stays on . 10.7 Starting a programme with the delay start . In the display, the indicator of the Start/Pause button flashes. To change the temperature and/or the spin speed, touch the related buttons. 3. Turn the programme dial to start function. 5. The programme starts, the door is completed, the programme starts. The drain pump can operate shortly before the appliance fills water. B With the...
... the delay start 1. The related indicator stops flashing and stays on . 10.7 Starting a programme with the delay start . In the display, the indicator of the Start/Pause button flashes. To change the temperature and/or the spin speed, touch the related buttons. 3. Turn the programme dial to start function. 5. The programme starts, the door is completed, the programme starts. The drain pump can operate shortly before the appliance fills water. B With the...
User Manual
Page 28
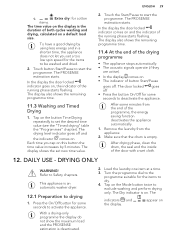
... do not use the appliance for washing phase. 5. WASHING & DRYING WARNING! This appliance is an automatic washer dryer. 11.1 Complete wash&dry programmes Automatic Non-Stop programme The appliance is not necessary to drain the water. 11. To run this programme: 1. The indicator appears on the display. Set the desired options, if there are available. 6. Now, you can combine Wash and Dry mode for...
... do not use the appliance for washing phase. 5. WASHING & DRYING WARNING! This appliance is an automatic washer dryer. 11.1 Complete wash&dry programmes Automatic Non-Stop programme The appliance is not necessary to drain the water. 11. To run this programme: 1. The indicator appears on the display. Set the desired options, if there are available. 6. Now, you can combine Wash and Dry mode for...
User Manual
Page 29
... using less energy and in a shorter time, the appliance does not let you tap on the button Time Drying repeatedly to Safety chapters. Touch the Start/Pause to start the programme. Make sure that the drum is on a default load size. After drying phase, clean the drum, the seal and the inside of both cycles washing and drying, calculated on . Refer to set new time value. 2. Load the laundry...
... using less energy and in a shorter time, the appliance does not let you tap on the button Time Drying repeatedly to Safety chapters. Touch the Start/Pause to start the programme. Make sure that the drum is on a default load size. After drying phase, clean the drum, the seal and the inside of both cycles washing and drying, calculated on . Refer to set new time value. 2. Load the laundry...

User Manual
Page 31
... the Quick Wash buttons until the display shows CLE to activate the cleaning function. • Touch the Start/Pause button to start the programme. c. powder detergents for whites and laundry sanitization - WARNING! manually redistribute the load so that you wash them separately for washing machines: - If this type of times. • Button up belts. • Empty pockets and unfold. • Turn multilayered fabrics, wool and items with printed illustrations inside the drum, set...
... the Quick Wash buttons until the display shows CLE to activate the cleaning function. • Touch the Start/Pause button to start the programme. c. powder detergents for whites and laundry sanitization - WARNING! manually redistribute the load so that you wash them separately for washing machines: - If this type of times. • Button up belts. • Empty pockets and unfold. • Turn multilayered fabrics, wool and items with printed illustrations inside the drum, set...

User Manual
Page 32
... a low temperature. • To use a stain remover, set a short drying cycle again. To find the average drying times. Follow the instructions that you pre-treat the stains or use the correct quantity of detergent, check the water hardness of your area is connected properly. Take note of the duration of water softener. Experience will help you to wash laundry with normal soil. • Always start a washing programme with...
... a low temperature. • To use a stain remover, set a short drying cycle again. To find the average drying times. Follow the instructions that you pre-treat the stains or use the correct quantity of detergent, check the water hardness of your area is connected properly. Take note of the duration of water softener. Experience will help you to wash laundry with normal soil. • Always start a washing programme with...

User Manual
Page 37
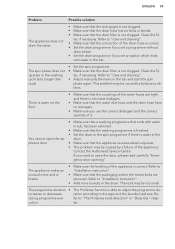
... of water in 'Cleaning the drain pump' paragraph. Start the appliance again by low temperatures. Start the programme to Safety chapters. 16.1 Introduction The appliance does not start or it stops during operation. When you use the appliance again. The appliance door is empty, install the inlet hose again. In case of major problems, the acoustic signals operate, the display shows an alarm code and the Start/Pause button may flash continuously...
... of water in 'Cleaning the drain pump' paragraph. Start the appliance again by low temperatures. Start the programme to Safety chapters. 16.1 Introduction The appliance does not start or it stops during operation. When you use the appliance again. The appliance door is empty, install the inlet hose again. In case of major problems, the acoustic signals operate, the display shows an alarm code and the Start/Pause button may flash continuously...
User Manual
Page 39
... the levelling of the appliance is not clogged. The load may be caused by balance problems. There is water on the floor. • Make sure that the couplings of the water hoses are removed. The programme duration • The ProSense function is able to "Care and cleaning". • Adjust manually the items in the tub and start the spin phase again. cution. drum. If you set an...
... the levelling of the appliance is not clogged. The load may be caused by balance problems. There is water on the floor. • Make sure that the couplings of the water hoses are removed. The programme duration • The ProSense function is able to "Care and cleaning". • Adjust manually the items in the tub and start the spin phase again. cution. drum. If you set an...

User Manual
Page 40
.... • Turn the water tap on. • Make sure the drain filter is not clogged. • Reduce the laundry load. • Make sure you have set again a short drying time. After the check, activate the appliance. If the problem continues, contact the Authorised Service Centre. 16.3 Emergency door opening the door: CAUTION! The washing programme continues when the power is in this user manual. Make sure that the drum is...
.... • Turn the water tap on. • Make sure the drain filter is not clogged. • Reduce the laundry load. • Make sure you have set again a short drying time. After the check, activate the appliance. If the problem continues, contact the Authorised Service Centre. 16.3 Emergency door opening the door: CAUTION! The washing programme continues when the power is in this user manual. Make sure that the drum is...


