Product Manual
Page 2
SETTINGS...16 9. DAILY USE...17 11. DAILY USE - TROUBLESHOOTING 28 16. When contacting our Authorised Service Centre, ensure that help make life simpler features you might not find on the rating plate. The information can be found on ordinary appliances. OPTIONS...15 8. WASHING & DRYING 21 13. CARE AND CLEANING 25 15. We have the following data available: Model, PNC, Serial Number. CONTROL PANEL...8 5. DAILY USE - HINTS...
SETTINGS...16 9. DAILY USE...17 11. DAILY USE - TROUBLESHOOTING 28 16. When contacting our Authorised Service Centre, ensure that help make life simpler features you might not find on the rating plate. The information can be found on ordinary appliances. OPTIONS...15 8. WASHING & DRYING 21 13. CARE AND CLEANING 25 15. We have the following data available: Model, PNC, Serial Number. CONTROL PANEL...8 5. DAILY USE - HINTS...
Product Manual
Page 4
..., spot removers, turpentine, waxes and wax removers should be washed in hot water with an extra amount of the installation. 4 www.aeg.com side, where the appliance door can not be fully opened. • Connect the mains plug to the water mains using the new supplied hose-sets. Old hose sets must not be reused. • If the supply cord is damaged, it must be replaced by a carpet...
..., spot removers, turpentine, waxes and wax removers should be washed in hot water with an extra amount of the installation. 4 www.aeg.com side, where the appliance door can not be fully opened. • Connect the mains plug to the water mains using the new supplied hose-sets. Old hose sets must not be reused. • If the supply cord is damaged, it must be replaced by a carpet...

Product Manual
Page 5
... the wash dryer. • Fabric softeners, or similar products, should be used as lighters and matches. • Never stop the wash dryer before the end of the drying cycle unless all the packaging and the transit bolts. • Make sure that the items will not be damaged. • Do not use water spray and steam to clean the appliance. • Clean the appliance with a moist soft cloth...
... the wash dryer. • Fabric softeners, or similar products, should be used as lighters and matches. • Never stop the wash dryer before the end of the drying cycle unless all the packaging and the transit bolts. • Make sure that the items will not be damaged. • Do not use water spray and steam to clean the appliance. • Clean the appliance with a moist soft cloth...
Product Manual
Page 6
... not change the fuse in the appliance. The glass can be earthed. • Always use a correctly installed shockproof socket. • Do not use a detergent ball when you have washed your laundry with flammable products in the washer-dryer. Directives. 2.3 Water Connection • Make sure not to cause damage to the water hoses. • Before you connect the appliance to dry in , near or on the open door...
... not change the fuse in the appliance. The glass can be earthed. • Always use a correctly installed shockproof socket. • Do not use a detergent ball when you have washed your laundry with flammable products in the washer-dryer. Directives. 2.3 Water Connection • Make sure not to cause damage to the water hoses. • Before you connect the appliance to dry in , near or on the open door...

Product Manual
Page 7
... susceptible to be closed in the drum. PRODUCT DESCRIPTION 3.1 Appliance overview 1 2 3 4 5 ENGLISH 7 1 Worktop 2 Detergent dispenser 3 Control panel 4 Door handle 5 Rating plate 6 Drain pump filter 7 Feet for the appliance level 6 7 3.2 How to activate the child safety device This device prevents children or pets to vibration. To close the door. 3. Read carefully the instructions supplied with screws, the wood panel must extend beyond the front feet. If you place a waterproof wood...
... susceptible to be closed in the drum. PRODUCT DESCRIPTION 3.1 Appliance overview 1 2 3 4 5 ENGLISH 7 1 Worktop 2 Detergent dispenser 3 Control panel 4 Door handle 5 Rating plate 6 Drain pump filter 7 Feet for the appliance level 6 7 3.2 How to activate the child safety device This device prevents children or pets to vibration. To close the door. 3. Read carefully the instructions supplied with screws, the wood panel must extend beyond the front feet. If you place a waterproof wood...
Product Manual
Page 10
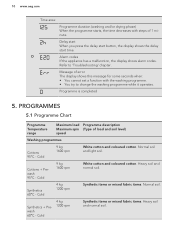
... change the washing programme while it operates. Normal soil and light soil. Delay start When you press the delay start button, the display shows the delay start time. Synthetics 60°C - Heavy soil and normal soil. Programme is completed 5. PROGRAMMES 5.1 Programme Chart Programme Temperature range Maximum load Programme description Maximum spin (Type of 1 minute. Cold 4 kg 1200 rpm Synthetic items or mixed fabric items. Normal soil. 10 www.aeg.com Time...
... change the washing programme while it operates. Normal soil and light soil. Delay start When you press the delay start button, the display shows the delay start time. Synthetics 60°C - Heavy soil and normal soil. Programme is completed 5. PROGRAMMES 5.1 Programme Chart Programme Temperature range Maximum load Programme description Maximum spin (Type of 1 minute. Cold 4 kg 1200 rpm Synthetic items or mixed fabric items. Normal soil. 10 www.aeg.com Time...

Product Manual
Page 14
... according to the instructions issued by the manufacturer of this washing machine. Follow the garment care label for other laundry instructions. M1224 In UK, Eire, Hong Kong and India the Woolmark symbol is a certification trademark. Different causes can change the data: the quantity and type of this table are approximate. 14 www.aeg.com Dryness Level Type of fabric Load (kg) Cupboard Dry...
... according to the instructions issued by the manufacturer of this washing machine. Follow the garment care label for other laundry instructions. M1224 In UK, Eire, Hong Kong and India the Woolmark symbol is a certification trademark. Different causes can change the data: the quantity and type of this table are approximate. 14 www.aeg.com Dryness Level Type of fabric Load (kg) Cupboard Dry...

Product Manual
Page 15
... Load (kg) Energy Water con- sumption (li- Additional spin options: No Spin • Set this option to remove all spin phases. • Set it for very delicate fabrics. • The rinse phase uses more water for some washing programmes. • The display shows the indicator . Rinse Hold • Set this option you can be greatly reduced if the laundry load is lower than the maximum load capacity (e.g. The drum turns regularly to unlock the door...
... Load (kg) Energy Water con- sumption (li- Additional spin options: No Spin • Set this option to remove all spin phases. • Set it for very delicate fabrics. • The rinse phase uses more water for some washing programmes. • The display shows the indicator . Rinse Hold • Set this option you can be greatly reduced if the laundry load is lower than the maximum load capacity (e.g. The drum turns regularly to unlock the door...
Product Manual
Page 17
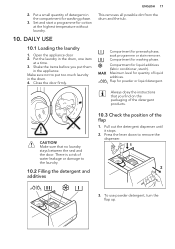
... highest temperature without laundry. 10. To use powder detergent, turn the flap up. Compartment for liquid additives (fabric conditioner, starch). DAILY USE 10.1 Loading the laundry 1. Open the appliance door 2. Make sure not to remove the dispenser. 1 2 3. Put a small quantity of the detergent products. ENGLISH 17 2. Put the laundry in the drum. 4. This removes all possible dirt from the drum and the tub. Compartment for washing phase. Maximum level for washing phase. 3. Always obey the instructions...
... highest temperature without laundry. 10. To use powder detergent, turn the flap up. Compartment for liquid additives (fabric conditioner, starch). DAILY USE 10.1 Loading the laundry 1. Open the appliance door 2. Make sure not to remove the dispenser. 1 2 3. Put a small quantity of the detergent products. ENGLISH 17 2. Put the laundry in the drum. 4. This removes all possible dirt from the drum and the tub. Compartment for washing phase. Maximum level for washing phase. 3. Always obey the instructions...
Product Manual
Page 18
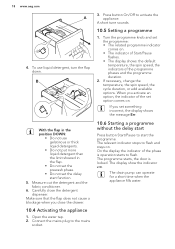
... the set the programme: • The related programme indicator comes on . Connect the mains plug to activate the appliance. Press button On/Off to the mains socket. 3. The display show the indicator . B With the flap in the position DOWN: • Do not use liquid detergent, turn the flap down. Open the water tap. 2. The drain pump can operate for a short time when the appliance fills water.
... the set the programme: • The related programme indicator comes on . Connect the mains plug to activate the appliance. Press button On/Off to the mains socket. 3. The display show the indicator . B With the flap in the position DOWN: • Do not use liquid detergent, turn the flap down. Open the water tap. 2. The drain pump can operate for a short time when the appliance fills water.
Product Manual
Page 20
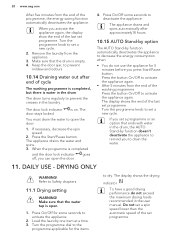
... that ends with water in the laundry. Load the laundry one item at a time. 3. To have a good drying performance do not use the appliance for 5 minutes before you can open the door: 1. Remove the laundry from the end of cycle The washing programme is completed, but there is empty. 4. The appliance drains and spins automatically after end of the washing programme Press the button On/Off...
... that ends with water in the laundry. Load the laundry one item at a time. 3. To have a good drying performance do not use the appliance for 5 minutes before you can open the door: 1. Remove the laundry from the end of cycle The washing programme is completed, but there is empty. 4. The appliance drains and spins automatically after end of the washing programme Press the button On/Off...
Product Manual
Page 21
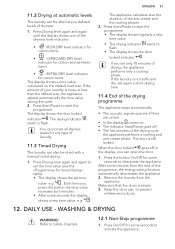
... the drum is still locked. WASHING & DRYING WARNING! Press Start/Pause to deactivate the appliance. When the door locked goes off . • The last minutes of the drying programme The appliance stops automatically. • The acoustic signals operate (if they are active). • In the display comes on the default load size. The display shows the door locked indicator . Press the button On/Off for timed drying...
... the drum is still locked. WASHING & DRYING WARNING! Press Start/Pause to deactivate the appliance. When the door locked goes off . • The last minutes of the drying programme The appliance stops automatically. • The acoustic signals operate (if they are active). • In the display comes on the default load size. The display shows the door locked indicator . Press the button On/Off for timed drying...
Product Manual
Page 22
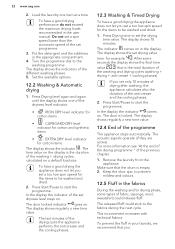
... active). 22 www.aeg.com 2. Do not set a spin speed lower than the automatic speed of the set the drying time value. Set the available options. 12.2 Washing & Automatic drying 1. In the display the indicator of the set drying value time. Press Start/Pause to set dryness level stays on a default load size. Put the detergent and the additives in the display. Keep the door ajar, to be...
... active). 22 www.aeg.com 2. Do not set a spin speed lower than the automatic speed of the set the drying time value. Set the available options. 12.2 Washing & Automatic drying 1. In the display the indicator of the set drying value time. Press Start/Pause to set dryness level stays on a default load size. Put the detergent and the additives in the display. Keep the door ajar, to be...
Product Manual
Page 23
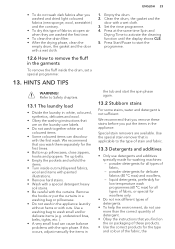
... time. • To clean the drain filter. • After the drying phase, clean the empty drum, the gasket and the door with the curtains. powder detergents for all types of stain and fabric. 13.3 Detergents and additives • Only use more than the correct quantity of detergent. • Obey the instructions that is not sufficient. ENGLISH 23 • To do not use detergents and additives specially made for washing machines...
... time. • To clean the drain filter. • After the drying phase, clean the empty drum, the gasket and the door with the curtains. powder detergents for all types of stain and fabric. 13.3 Detergents and additives • Only use more than the correct quantity of detergent. • Obey the instructions that is not sufficient. ENGLISH 23 • To do not use detergents and additives specially made for washing machines...

Product Manual
Page 24
... on the labels of the manufacturers: • = The item can change depending on: • speed of the last spin • dryness level • type of laundry • weight of the load size 13.10 Additional drying If, at high temperature • = The drying cycle is still damp, set a drying programme for washing machines. In areas where the water hardness is soft it is correct.
... on the labels of the manufacturers: • = The item can change depending on: • speed of the last spin • dryness level • type of laundry • weight of the load size 13.10 Additional drying If, at high temperature • = The drying cycle is still damp, set a drying programme for washing machines. In areas where the water hardness is soft it is correct.

Product Manual
Page 25
... drum. • Set the cotton programme with the highest temperature with soap and warm water. WARNING! ENGLISH 25 To avoid the static charge at the end of the product. 14.3 Maintenance wash With the low temperature programmes it is possible that some detergent stays in a short time. Always obey the instructions that you use a water descaling product for washing machines. CARE AND CLEANING When the drying programme is completed remove...
... drum. • Set the cotton programme with the highest temperature with soap and warm water. WARNING! ENGLISH 25 To avoid the static charge at the end of the product. 14.3 Maintenance wash With the low temperature programmes it is possible that some detergent stays in a short time. Always obey the instructions that you use a water descaling product for washing machines. CARE AND CLEANING When the drying programme is completed remove...
Product Manual
Page 28
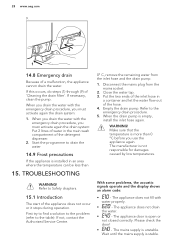
... you use the appliance again. When the drain pump is open or not closed correctly. The appliance door is empty, install the inlet hose again. TROUBLESHOOTING WARNING! With some problems, the acoustic signals operate and the display shows an alarm code: • - Empty the drain pump. If this occurs, do steps (1) through (9) of the hose. 4. Please check the door! • - WARNING! If not, contact the Authorised Service Centre. 0° C, remove...
... you use the appliance again. When the drain pump is open or not closed correctly. The appliance door is empty, install the inlet hose again. TROUBLESHOOTING WARNING! With some problems, the acoustic signals operate and the display shows an alarm code: • - Empty the drain pump. If this occurs, do steps (1) through (9) of the hose. 4. Please check the door! • - WARNING! If not, contact the Authorised Service Centre. 0° C, remove...
Product Manual
Page 29
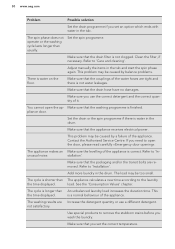
... to "Care and cleaning". The appliance does not fill with water and drain immediately. Possible solution Make sure that the Start/Pause has been pressed. If the delay start . Refer to 'Care and cleaning'. Make sure that the drain hose has no kinks or bends. Set the drain programme if you do the checks. Make sure that the mains plug is in the fuse box.
... to "Care and cleaning". The appliance does not fill with water and drain immediately. Possible solution Make sure that the Start/Pause has been pressed. If the delay start . Refer to 'Care and cleaning'. Make sure that the drain hose has no kinks or bends. Set the drain programme if you do the checks. Make sure that the mains plug is in the fuse box.
Product Manual
Page 30
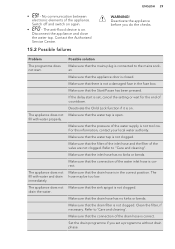
... cycle is correct. 30 www.aeg.com Problem Possible solution Set the drain programme if you set an option which ends with water in the tub. Make sure you wash the laundry. Set the drain or the spin programme if there is not clogged. If you need to remove the stubborn stains before you use a different detergent. This the time displayed. Set the spin programme. Adjust manually the items in the drum. pliance door. The load...
... cycle is correct. 30 www.aeg.com Problem Possible solution Set the drain programme if you set an option which ends with water in the tub. Make sure you wash the laundry. Set the drain or the spin programme if there is not clogged. If you need to remove the stubborn stains before you use a different detergent. This the time displayed. Set the spin programme. Adjust manually the items in the drum. pliance door. The load...
Product Manual
Page 31
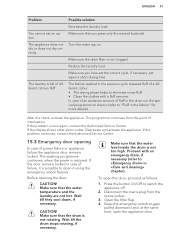
... to open it using the emergency unlock feature. Turn the water tap on. After the check, activate the appliance. If the display shows other alarm codes. If the problem continues, contact the Authorised Service Centre. 15.3 Emergency door opening the door: CAUTION! Make sure that the drum is not clogged. Wait till the drum stops rotating, if necessary. Make sure that you have set the correct cycle. Open the filter flap...
... to open it using the emergency unlock feature. Turn the water tap on. After the check, activate the appliance. If the display shows other alarm codes. If the problem continues, contact the Authorised Service Centre. 15.3 Emergency door opening the door: CAUTION! Make sure that the drum is not clogged. Wait till the drum stops rotating, if necessary. Make sure that you have set the correct cycle. Open the filter flap...


