Product Manual
Page 2
... information. 2 www.aeg.com CONTENTS 4 SAFETY INFORMATION 5 TECHNICAL INFORMATION 7 PRODUCT DESCRIPTION 8 CONTROL PANEL 11 WASHING PROGRAMMES 13 DRYING PROGRAMMES 14 CONSUMPTION VALUES 14 FIRST USE 14 DAILY USE - Put the packaging in applicable containers to recycle waste of electrical and electronic appliances. VISIT OUR WEBSITE FOR: - Brochures - User manuals - DRYING 21 HELPFUL HINTS AND TIPS 23 CARE AND CLEANING 27 TROUBLESHOOTING 31 INSTALLATION 37 BUILDING...
... information. 2 www.aeg.com CONTENTS 4 SAFETY INFORMATION 5 TECHNICAL INFORMATION 7 PRODUCT DESCRIPTION 8 CONTROL PANEL 11 WASHING PROGRAMMES 13 DRYING PROGRAMMES 14 CONSUMPTION VALUES 14 FIRST USE 14 DAILY USE - Put the packaging in applicable containers to recycle waste of electrical and electronic appliances. VISIT OUR WEBSITE FOR: - Brochures - User manuals - DRYING 21 HELPFUL HINTS AND TIPS 23 CARE AND CLEANING 27 TROUBLESHOOTING 31 INSTALLATION 37 BUILDING...
Product Manual
Page 4
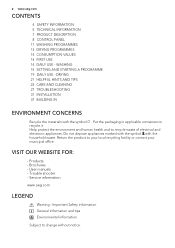
... the installation and use, read this device, you cannot close the appliance door, make sure that you remove all detergents away from children. • Keep children and pets away from the laundry. Always keep these instructions with the appliance also if you move or give it before you set the drying programme, fully rinse items cleaned with flammable products in the drum...
... the installation and use, read this device, you cannot close the appliance door, make sure that you remove all detergents away from children. • Keep children and pets away from the laundry. Always keep these instructions with the appliance also if you move or give it before you set the drying programme, fully rinse items cleaned with flammable products in the drum...

Product Manual
Page 5
TECHNICAL INFORMATION ENGLISH 5 • Make sure that the water hoses and the couplings do the electrical installation, the plumbing and the installation of the appliance. There is a risk of fire. • Do not replace or change the fuse in the appliance. Cut off the mains cable and discard it. 3. Adjust the feet to have the necessary space between the appliance and...
TECHNICAL INFORMATION ENGLISH 5 • Make sure that the water hoses and the couplings do the electrical installation, the plumbing and the installation of the appliance. There is a risk of fire. • Do not replace or change the fuse in the appliance. Cut off the mains cable and discard it. 3. Adjust the feet to have the necessary space between the appliance and...

Product Manual
Page 9
... when the washing machine is operating. ENGLISH 9 Alarm codes In the event of operating problems, some alarm codes can be opened. The DOOR light C, the WASHING light A (or the DRYING light B) and the light of button 8 light starts blinking. played, for some seconds, the acoustic signal is opening in some seconds. After you have pressed the button 8, the WASHING light (A) comes on when you activate the child lock function. The machine is not working. The door can...
... when the washing machine is operating. ENGLISH 9 Alarm codes In the event of operating problems, some alarm codes can be opened. The DOOR light C, the WASHING light A (or the DRYING light B) and the light of button 8 light starts blinking. played, for some seconds, the acoustic signal is opening in some seconds. After you have pressed the button 8, the WASHING light (A) comes on when you activate the child lock function. The machine is not working. The door can...
Product Manual
Page 12
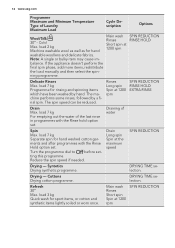
... last rinse in programmes with the Rinse Hold option set . load 2 kg Machine washable wool as well as for hand washed cotton garments and after programmes with the Rinse hold option set . DRYING TIME selection. load 7 kg Separate spin for hand Main wash SPIN REDUCTION Rinses RINSE HOLD Short spin at 1200 rpm SPIN REDUCTION 12 www.aeg.com Programme Maximum and Minimum Temperature Type of water Spin Max. balance. Main wash Rinses Short spin Spin at...
... last rinse in programmes with the Rinse Hold option set . load 2 kg Machine washable wool as well as for hand washed cotton garments and after programmes with the Rinse hold option set . DRYING TIME selection. load 7 kg Separate spin for hand Main wash SPIN REDUCTION Rinses RINSE HOLD Short spin at 1200 rpm SPIN REDUCTION 12 www.aeg.com Programme Maximum and Minimum Temperature Type of water Spin Max. balance. Main wash Rinses Short spin Spin at...

Product Manual
Page 13
... data entered in the Energy Label must be tested dividing the maximum washing load by pressing button 4, we recommend that you select the Super Quick option by two equal parts and drying with DRYING TIME each of Laundry Maximum Load Cotton Economy 60° Max. ENGLISH 13 Cycle Description Options Main wash Rinses Long spin Spin at the temperature of Fabric Drying Load Spin Speed Suggested drying time Minutes EXTRA DRY...
... data entered in the Energy Label must be tested dividing the maximum washing load by pressing button 4, we recommend that you select the Super Quick option by two equal parts and drying with DRYING TIME each of Laundry Maximum Load Cotton Economy 60° Max. ENGLISH 13 Cycle Description Options Main wash Rinses Long spin Spin at the temperature of Fabric Drying Load Spin Speed Suggested drying time Minutes EXTRA DRY...
Product Manual
Page 16
... wash lightly soiled laundry or items used or worn for people with the stain option, pour stain remover into compartment . The corresponding red pilot light stops blinking. The pilot light A is on to change the spin speed. Press the button 8 to another programme when the appliance is working, the yellow pilot light of button 8 blinks 3 times. The corresponding red pilot light starts blinking. 16 www.aeg.com = Reset programme / switching OFF of the machine...
... wash lightly soiled laundry or items used or worn for people with the stain option, pour stain remover into compartment . The corresponding red pilot light stops blinking. The pilot light A is on to change the spin speed. Press the button 8 to another programme when the appliance is working, the yellow pilot light of button 8 blinks 3 times. The corresponding red pilot light starts blinking. 16 www.aeg.com = Reset programme / switching OFF of the machine...
Product Manual
Page 17
... by resetting it , turn the programme dial to to pause If the light C after you set the required delay. Press the 8 button again to open it . The washing water in the tub will appear on and the door remains locked, this case the door can be opened. Now you need to open it is necessary to start the programme again. After a few minutes goes off . A blinking will...
... by resetting it , turn the programme dial to to pause If the light C after you set the required delay. Press the 8 button again to open it . The washing water in the tub will appear on and the door remains locked, this case the door can be opened. Now you need to open it is necessary to start the programme again. After a few minutes goes off . A blinking will...
Product Manual
Page 19
... (hours 4.10). Set the drying programme for about 10 mi- For Synthetic you can be opened after some acoustic signals sound. Press button 8 to the drain pipe. 1. A blink- The door cannot be opened . Switch the machine on the display. Press this button again and again until the time you press this button the drying time increases by 5 minutes. Every time you want appears on : turn the programme...
... (hours 4.10). Set the drying programme for about 10 mi- For Synthetic you can be opened after some acoustic signals sound. Press button 8 to the drain pipe. 1. A blink- The door cannot be opened . Switch the machine on the display. Press this button again and again until the time you press this button the drying time increases by 5 minutes. Every time you want appears on : turn the programme...
Product Manual
Page 20
... in your clothes, it is updated every minute. 7. At the end of the cycles displayed includes also the unrolling and the cooling phase. 6. The released fluff could release fluff. In any case the lowest values you set the drying time. Press the button 6 to switch the machine off. 8. If you can select are washed the first time. • To clean the filter. •...
... in your clothes, it is updated every minute. 7. At the end of the cycles displayed includes also the unrolling and the cooling phase. 6. The released fluff could release fluff. In any case the lowest values you set the drying time. Press the button 6 to switch the machine off. 8. If you can select are washed the first time. • To clean the filter. •...

Product Manual
Page 21
... not set the prewash phase. • If your appliance has not the detergent dispenser with the flap device, add the liquid detergents with the first wash. HELPFUL HINTS AND TIPS ENGLISH 21 THE LAUNDRY LOAD • Divide the laundry in your area is high or moderate, we recommend that you use a water softener for washing machines. Water hardness table Level Type °dH 1 soft 0-7 DETERGENTS AND ADDITIVES • Only use detergents and...
... not set the prewash phase. • If your appliance has not the detergent dispenser with the flap device, add the liquid detergents with the first wash. HELPFUL HINTS AND TIPS ENGLISH 21 THE LAUNDRY LOAD • Divide the laundry in your area is high or moderate, we recommend that you use a water softener for washing machines. Water hardness table Level Type °dH 1 soft 0-7 DETERGENTS AND ADDITIVES • Only use detergents and...

Product Manual
Page 22
... >25 DRYING HINTS Prepare the drying cycle • Open the water tap. • Do a check if the connection of clothing with metal inserts. - Quilts. - Anoraks. - Fabrics with foam-rubber or materi- Sleeping bags - To avoid the static charge at the end of the drying cycle: • Use fabric conditioner in a short time. 22 www.aeg.com Level 2 3 4 Type medium hard very hard °dH...
... >25 DRYING HINTS Prepare the drying cycle • Open the water tap. • Do a check if the connection of clothing with metal inserts. - Quilts. - Anoraks. - Fabrics with foam-rubber or materi- Sleeping bags - To avoid the static charge at the end of the drying cycle: • Use fabric conditioner in a short time. 22 www.aeg.com Level 2 3 4 Type medium hard very hard °dH...

Product Manual
Page 23
... drum. DRUM Regularly examine the drum to remove rust particles from the inner part. EXTERNAL CLEANING Clean the appliance only with special product for stainless steel. • Start a short programme for washing machines. Press the lever. 2. If it . To do this separately from the mains supply before you find on the packaging of detergent. DOOR SEAL Regularly examine the seal and remove all the surfaces. CARE AND CLEANING...
... drum. DRUM Regularly examine the drum to remove rust particles from the inner part. EXTERNAL CLEANING Clean the appliance only with special product for stainless steel. • Start a short programme for washing machines. Press the lever. 2. If it . To do this separately from the mains supply before you find on the packaging of detergent. DOOR SEAL Regularly examine the seal and remove all the surfaces. CARE AND CLEANING...
Product Manual
Page 24
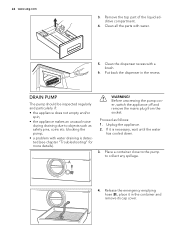
... pump; • a problem with water. If it in the recess. A B WARNING! Clean the dispenser recess with a brush. 6. Put back the dispenser in the container and remove its cap cover. Place a container close to the pump to objects such as follows: 1. Release the emergency emptying hose (B), place it is detected (see chapter "Troubleshooting" for more details). 24 www.aeg.com 3. Remove the top part...
... pump; • a problem with water. If it in the recess. A B WARNING! Clean the dispenser recess with a brush. 6. Put back the dispenser in the container and remove its cap cover. Place a container close to the pump to objects such as follows: 1. Release the emergency emptying hose (B), place it is detected (see chapter "Troubleshooting" for more details). 24 www.aeg.com 3. Remove the top part...

Product Manual
Page 25
... water spillages when removing the cover. Check carefully whether the pump impeller rotates (it doesn't rotate, please contact your Service Centre. 8. Always keep a rag nearby to 'Troubleshooting'. ENGLISH 25 5. Use pliers, if necessary. WARNING! Screw the pump cover firmly by inserting it . When no more water comes out, unscrew the pump cover (A) by turning it is empty. THE INLET HOSE FILTER AND THE VALVE FILTER It could be hot water...
... water spillages when removing the cover. Check carefully whether the pump impeller rotates (it doesn't rotate, please contact your Service Centre. 8. Always keep a rag nearby to 'Troubleshooting'. ENGLISH 25 5. Use pliers, if necessary. WARNING! Screw the pump cover firmly by inserting it . When no more water comes out, unscrew the pump cover (A) by turning it is empty. THE INLET HOSE FILTER AND THE VALVE FILTER It could be hot water...
Product Manual
Page 26
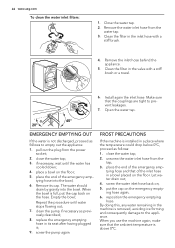
... the pump again. place the end of the emergency emptying hose and that of the emergency emptying hose into the bowl. 26 www.aeg.com To clean the water inlet filters: 1. Make sure that the ambient temperature is installed in the inlet hose with a stiff brush or a towel. 6. pull out the plug from the tap; 3. Remove its seat after having plugged it; 9. The water should drain by...
... the pump again. place the end of the emergency emptying hose and that of the emergency emptying hose into the bowl. 26 www.aeg.com To clean the water inlet filters: 1. Make sure that the ambient temperature is installed in the inlet hose with a stiff brush or a towel. 6. pull out the plug from the tap; 3. Remove its seat after having plugged it; 9. The water should drain by...

Product Manual
Page 27
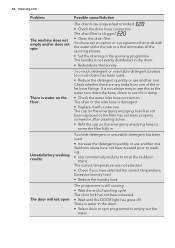
... machine operation it is possible that the yellow pilot light of button 8 blinks, one of the following alarm codes appears on the display and at the socket. • Please check your domestic electrical installation. gramme. Problem Possible cause/Solution The washing machine does not start has been set. • If the laundry is not properly inserted in the inlet hose or the inlet valve filter are due to lack of simple maintenance...
... machine operation it is possible that the yellow pilot light of button 8 blinks, one of the following alarm codes appears on the display and at the socket. • Please check your domestic electrical installation. gramme. Problem Possible cause/Solution The washing machine does not start has been set. • If the laundry is not properly inserted in the inlet hose or the inlet valve filter are due to lack of simple maintenance...
Product Manual
Page 28
... one of washing cycle. check to treat the stubborn stains. The correct temperature was not selected. • Check if you have not been treated prior to washing. • Use commercial products to see if it with the water still in the drum. • Select drain or spin programme to see this as the water runs down the hose; Excessive laundry load. • Reduce the laundry load. The door lock has not...
... one of washing cycle. check to treat the stubborn stains. The correct temperature was not selected. • Check if you have not been treated prior to washing. • Use commercial products to see if it with the water still in the drum. • Select drain or spin programme to see this as the water runs down the hose; Excessive laundry load. • Reduce the laundry load. The door lock has not...
Product Manual
Page 29
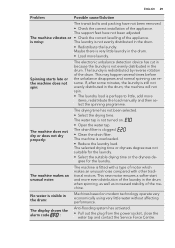
ENGLISH 29 Problem Possible cause/Solution The transit bolts and packing have not been adjusted The machine vibrates or • Check the correct levelling of motor which makes an unusual noise compared with a type of the appliance. The water tap is visible in the drum. • Redistribute the laundry. The drain filter is overloaded. • Reduce the laundry load. The machine is clogged. • Clean the drain filter. The selected drying time or...
ENGLISH 29 Problem Possible cause/Solution The transit bolts and packing have not been adjusted The machine vibrates or • Check the correct levelling of motor which makes an unusual noise compared with a type of the appliance. The water tap is visible in the drum. • Redistribute the laundry. The drain filter is overloaded. • Reduce the laundry load. The machine is clogged. • Clean the drain filter. The selected drying time or...

Product Manual
Page 33
... two appliances. CAUTION! Remove all the packaging and the transit bolts before you move the appliance. POSITIONING AND LEVELLING • Install the machine on small tiles, apply a rubber coating. Before placing it is not impeded by carpets, rugs etc. • Carefully level by screwing the adjustable feet in the floor. Put the plastic caps in the user manual bag. If it...
... two appliances. CAUTION! Remove all the packaging and the transit bolts before you move the appliance. POSITIONING AND LEVELLING • Install the machine on small tiles, apply a rubber coating. Before placing it is not impeded by carpets, rugs etc. • Carefully level by screwing the adjustable feet in the floor. Put the plastic caps in the user manual bag. If it...


