
Product Manual
Page 1
FAVORIT 77012 EN DISHWASHER USER MANUAL
FAVORIT 77012 EN DISHWASHER USER MANUAL
Product Manual
Page 2
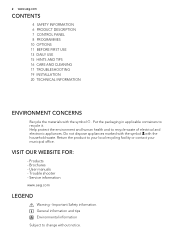
User manuals - Trouble shooter - Service information www.aeg.com LEGEND Warning - Return the product to recycle waste of electrical and electronic appliances. Help protect the environment and human health and to your local recycling ...applicable containers to change without notice. General information and tips Environmental information Subject to recycle it. 2 www.aeg.com CONTENTS 4 SAFETY INFORMATION 6 PRODUCT DESCRIPTION 7 CONTROL PANEL 8 PROGRAMMES 10 OPTIONS 11 BEFORE FIRST USE 13 DAILY USE 15 HINTS AND TIPS 16 CARE AND CLEANING 17 TROUBLESHOOTING 19 INSTALLATION 20 TECHNICAL ...
User manuals - Trouble shooter - Service information www.aeg.com LEGEND Warning - Return the product to recycle waste of electrical and electronic appliances. Help protect the environment and human health and to your local recycling ...applicable containers to change without notice. General information and tips Environmental information Subject to recycle it. 2 www.aeg.com CONTENTS 4 SAFETY INFORMATION 6 PRODUCT DESCRIPTION 7 CONTROL PANEL 8 PROGRAMMES 10 OPTIONS 11 BEFORE FIRST USE 13 DAILY USE 15 HINTS AND TIPS 16 CARE AND CLEANING 17 TROUBLESHOOTING 19 INSTALLATION 20 TECHNICAL ...
Product Manual
Page 3
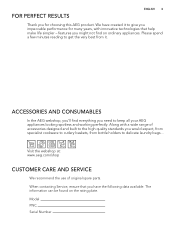
...years, with a wide range of original spare parts. The information can be found on ordinary appliances. Visit the webshop at: www.aeg.com/shop CUSTOMER CARE AND SERVICE We recommend the use of accessories designed and built to the high quality standards you have created... AND CONSUMABLES In the AEG webshop, you'll find on the rating plate. FOR PERFECT RESULTS ENGLISH 3 Thank you need to keep all your AEG appliances looking spotless and working perfectly. Model PNC Serial Number features you impeccable performance for choosing this AEG product. We have the following...
...years, with a wide range of original spare parts. The information can be found on ordinary appliances. Visit the webshop at: www.aeg.com/shop CUSTOMER CARE AND SERVICE We recommend the use of accessories designed and built to the high quality standards you have created... AND CONSUMABLES In the AEG webshop, you'll find on the rating plate. FOR PERFECT RESULTS ENGLISH 3 Thank you need to keep all your AEG appliances looking spotless and working perfectly. Model PNC Serial Number features you impeccable performance for choosing this AEG product. We have the following...
Product Manual
Page 4
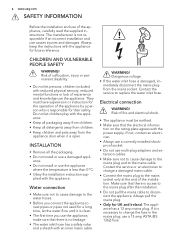
... a long time, let the water flow until it is access to the mains plug after the installation. • Do not pull the mains cable to the mains cable. Dangerous voltage. • If the water inlet hose is less than 0 °C. • Obey the installation instruction sup- Contact the service or an electrician to change the fuse in the mains plug, use a damaged appli- INSTALLATION • Remove all detergents...
... a long time, let the water flow until it is access to the mains plug after the installation. • Do not pull the mains cable to the mains cable. Dangerous voltage. • If the water inlet hose is less than 0 °C. • Obey the installation instruction sup- Contact the service or an electrician to change the fuse in the mains plug, use a damaged appli- INSTALLATION • Remove all detergents...
Product Manual
Page 5
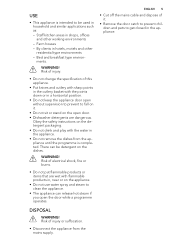
... clients in hotels, motels and other working environments - There can release hot steam if you open door. • Dishwasher detergents are dangerous. Bed and breakfast type environments. Obey the safety instructions on the dishes. Risk of it . • Do not sit or stand on the appliance. • Do not use water spray and steam to clean the appliance. • The appliance can...
... clients in hotels, motels and other working environments - There can release hot steam if you open door. • Dishwasher detergents are dangerous. Bed and breakfast type environments. Obey the safety instructions on the dishes. Risk of it . • Do not sit or stand on the appliance. • Do not use water spray and steam to clean the appliance. • The appliance can...

Product Manual
Page 6
6 www.aeg.com PRODUCT DESCRIPTION 13 12 34 12 11 1 Worktop 2 Top spray arm 3 Upper spray arm 4 Lower spray arm 5 Filters 6 Rating plate 7 Salt container 8 Water hardness dial 9 Rinse aid dispenser 10 Detergent dispenser 11 Cutlery basket 12 Lower basket 13 Upper basket 10 9 8 7 6 5
6 www.aeg.com PRODUCT DESCRIPTION 13 12 34 12 11 1 Worktop 2 Top spray arm 3 Upper spray arm 4 Lower spray arm 5 Filters 6 Rating plate 7 Salt container 8 Water hardness dial 9 Rinse aid dispenser 10 Detergent dispenser 11 Cutlery basket 12 Lower basket 13 Upper basket 10 9 8 7 6 5

Product Manual
Page 7
Rinsing phase indicator. This indicator is off while the programme operates. Delay indicator. ExtraHygiene indicator. Door indicator. Salt indicator. This indicator is off button 2 Program button 3 Programme indicators 4 Display Indicators 5 Delay button 6 Start button 7 Indicators 8 Option button Description Multitab indicator. It comes on when the door is not closed. Drying phase indicator. End indicator. Rinse aid indicator. CONTROL PANEL 1 2 ABC 3 45 ENGLISH 7 8 7 6 1 On/off while the programme operates. Washing phase indicator.
Rinsing phase indicator. This indicator is off while the programme operates. Delay indicator. ExtraHygiene indicator. Door indicator. Salt indicator. This indicator is off button 2 Program button 3 Programme indicators 4 Display Indicators 5 Delay button 6 Start button 7 Indicators 8 Option button Description Multitab indicator. It comes on when the door is not closed. Drying phase indicator. End indicator. Rinse aid indicator. CONTROL PANEL 1 2 ABC 3 45 ENGLISH 7 8 7 6 1 On/off while the programme operates. Washing phase indicator.

Product Manual
Page 8
... pump works at a very low speed to 70 °C Rinses Dry Prewash Wash 70 °C Rinses Dry Prewash Wash 50 °C Rinses Dry Wash 60 °C Rinse ExtraHygiene Prewash Wash 50 °C Rinses Dry Wash 55 °C Rinses ExtraHygiene ExtraHygiene Prewash 1) The appliance senses the degree of soil and the quantity of items in a short time. 5) This is the most efficient use detergent with normal soil. 6) Use this programme. It automatically adjusts the...
... pump works at a very low speed to 70 °C Rinses Dry Prewash Wash 70 °C Rinses Dry Prewash Wash 50 °C Rinses Dry Wash 60 °C Rinse ExtraHygiene Prewash Wash 50 °C Rinses Dry Wash 55 °C Rinses ExtraHygiene ExtraHygiene Prewash 1) The appliance senses the degree of soil and the quantity of items in a short time. 5) This is the most efficient use detergent with normal soil. 6) Use this programme. It automatically adjusts the...

Product Manual
Page 9
ENGLISH 9 Programme1) Duration (min) 200 - 220 30 170 - 180 55 - 65 14 Energy (kWh) 1.1 - 1.2 0.8 0.9 - 1.0 1.0 - 1.2 0.1 Water (l) 9 - 11 9 9 - 10 10 - 11 4 1) The pressure and the temperature of the water, the variations of the mains supply, the options and the quantity of dishes can change the programme duration and the consumption values. send an email to: info.test@dishwasher-production.com Write down the product number (PNC) that is on the rating plate. Information for test institutes For all the necessary information for test performance.
ENGLISH 9 Programme1) Duration (min) 200 - 220 30 170 - 180 55 - 65 14 Energy (kWh) 1.1 - 1.2 0.8 0.9 - 1.0 1.0 - 1.2 0.1 Water (l) 9 - 11 9 9 - 10 10 - 11 4 1) The pressure and the temperature of the water, the variations of the mains supply, the options and the quantity of dishes can change the programme duration and the consumption values. send an email to: info.test@dishwasher-production.com Write down the product number (PNC) that is on the rating plate. Information for test institutes For all the necessary information for test performance.
Product Manual
Page 10
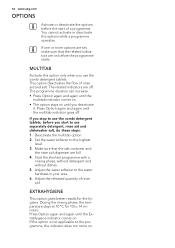
... . Adjust the water softener to 14 minutes. Press Option again and again until the multitab indicator comes on. • The option stays on before you stop to use the combi detergent tablets, before the programme starts. If one or more options are set, make sure that the salt container and the rinse aid dispenser are off . Set the water softener to the highest level...
... . Adjust the water softener to 14 minutes. Press Option again and again until the multitab indicator comes on. • The option stays on before you stop to use the combi detergent tablets, before the programme starts. If one or more options are set, make sure that the salt container and the rinse aid dispenser are off . Set the water softener to the highest level...
Product Manual
Page 11
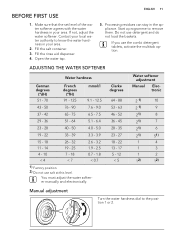
... rinse aid dispenser. 4. Clarke degrees 64 - 88 53 - 63 46 - 52 36 - 45 28 - 35 23 - 27 18 - 22 13 - 17 5 - 12 < 5 Water softener adjustment Manual Electronic 2 1) 10 2 1) 9 21) 8 21) 7 21) 6 21) 51) 1 4 1 3 1 2 12) 12) Manual adjustment Turn the water hardness dial to know the water hardness in your area. 2. Contact your area. If you use detergent and do not load the baskets. You must adjust...
... rinse aid dispenser. 4. Clarke degrees 64 - 88 53 - 63 46 - 52 36 - 45 28 - 35 23 - 27 18 - 22 13 - 17 5 - 12 < 5 Water softener adjustment Manual Electronic 2 1) 10 2 1) 9 21) 8 21) 7 21) 6 21) 51) 1 4 1 3 1 2 12) 12) Manual adjustment Turn the water hardness dial to know the water hardness in your area. 2. Contact your area. If you use detergent and do not load the baskets. You must adjust...
Product Manual
Page 12
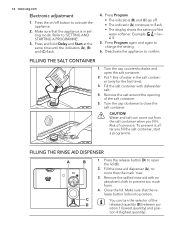
...) and position 4 (highest quantity). Remove the spilled rinse aid with dishwasher salt. 4. FILLING THE SALT CONTAINER 1. Example: el 5. = lev- 5. Turn the cap clockwise to change the setting. 6. Press Program again and again to close the salt container. Put 1 litre of the water softener. Fill the rinse aid dispenser (A), no more than the mark 'max'. 3. C D 1. 12 www.aeg.com Electronic adjustment 1. Press the on/off . •...
...) and position 4 (highest quantity). Remove the spilled rinse aid with dishwasher salt. 4. FILLING THE SALT CONTAINER 1. Example: el 5. = lev- 5. Turn the cap clockwise to change the setting. 6. Press Program again and again to close the salt container. Put 1 litre of the water softener. Fill the rinse aid dispenser (A), no more than the mark 'max'. 3. C D 1. 12 www.aeg.com Electronic adjustment 1. Press the on/off . •...
Product Manual
Page 13
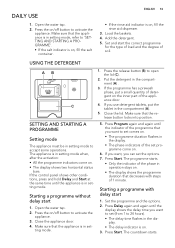
... starts. SETTING AND STARTING A PROGRAMME Setting mode The appliance must be in setting mode. Press the on the inner part of 1 minute. USING THE DETERGENT AB 30 MAX 32 4 1 20 + - Make sure that decreases with delay start 1. C 1. Open the water tap. 2. Starting a programme with steps of the appliance door. 4. Set the programme and the options. 2. Press Start. Make sure that the release button locks into position. Add the detergent...
... starts. SETTING AND STARTING A PROGRAMME Setting mode The appliance must be in setting mode. Press the on the inner part of 1 minute. USING THE DETERGENT AB 30 MAX 32 4 1 20 + - Make sure that decreases with delay start 1. C 1. Open the water tap. 2. Starting a programme with steps of the appliance door. 4. Set the programme and the options. 2. Press Start. Make sure that the release button locks into position. Add the detergent...
Product Manual
Page 14
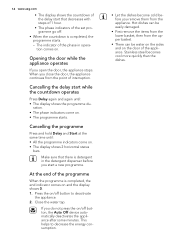
... some minutes. Stainless steel becomes cool more quickly than the dishes. Hot dishes can be easily damaged. • First remove the items from the lower basket, then from the point of the programme When the programme is completed, the end indicator comes on and the display shows 0. 1. The indicator of the appliance. Cancelling the programme Press and hold Delay and Start at the same time until : •...
... some minutes. Stainless steel becomes cool more quickly than the dishes. Hot dishes can be easily damaged. • First remove the items from the lower basket, then from the point of the programme When the programme is completed, the end indicator comes on and the display shows 0. 1. The indicator of the appliance. Cancelling the programme Press and hold Delay and Start at the same time until : •...
Product Manual
Page 15
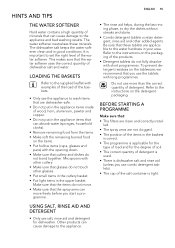
... the supplied leaflet with the opening down. • Make sure that you use combi detergent tablets). • The cap of detergent. LOADING THE BASKETS Refer to the water hardness in the upper basket. Refer to the instructions on the tableware, we recommend that cutlery and dishes do not move freely before you start a programme. • The rinse aid helps, during the last rinsing phase, to set the right level...
... the supplied leaflet with the opening down. • Make sure that you use combi detergent tablets). • The cap of detergent. LOADING THE BASKETS Refer to the water hardness in the upper basket. Refer to the instructions on the tableware, we recommend that cutlery and dishes do not move freely before you start a programme. • The rinse aid helps, during the last rinsing phase, to set the right level...

Product Manual
Page 16
16 www.aeg.com CARE AND CLEANING WARNING! Remove the filter (B). 4. An incorrect position of soil with a thin pointed object. EXTERNAL CLEANING Clean the appliance with water. 5. Turn the filter (A) counterclockwise and remove it locks. Do not use neutral detergents. CLEANING THE FILTERS C C A B A1 A2 Dirty filters and clogged spray arms decrease the washing results. Make a check regularly and, if necessary, clean them. 1. sition. Only use abrasive products, abrasive cleaning pads or solvents. Turn it clockwise...
16 www.aeg.com CARE AND CLEANING WARNING! Remove the filter (B). 4. An incorrect position of soil with a thin pointed object. EXTERNAL CLEANING Clean the appliance with water. 5. Turn the filter (A) counterclockwise and remove it locks. Do not use neutral detergents. CLEANING THE FILTERS C C A B A1 A2 Dirty filters and clogged spray arms decrease the washing results. Make a check regularly and, if necessary, clean them. 1. sition. Only use abrasive products, abrasive cleaning pads or solvents. Turn it clockwise...
Product Manual
Page 17
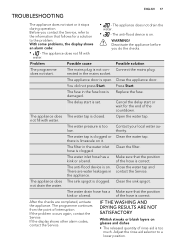
... not drain the water. • - Problem Possible cause Possible solution The programme does not start. nected in the water inlet Clean the filter. The appliance does The water tap is clogged. The water tap is correct. The water drain hose has a Make sure that the position kink or a bend. of rinse aid is Replace the fuse. If the display shows other alarm codes, contact the Service. IF THE WASHING AND DRYING RESULTS...
... not drain the water. • - Problem Possible cause Possible solution The programme does not start. nected in the water inlet Clean the filter. The appliance does The water tap is clogged. The water tap is correct. The water drain hose has a Make sure that the position kink or a bend. of rinse aid is Replace the fuse. If the display shows other alarm codes, contact the Service. IF THE WASHING AND DRYING RESULTS...

Product Manual
Page 18
... of rinse aid is in setting mode. Press Option . • The indicators (A) and (C) go off button to flash. • The display shows the setting of rinse aid. 8. Dishes are wet • The programme is without a drying phase or with a low temperature drying phase. • The rinse aid dispenser is too much. Press and hold Delay and Start at the same time until the indicators (A), (B) and (C) flash. 4. Off On 5. Stains and dry water drops...
... of rinse aid is in setting mode. Press Option . • The indicators (A) and (C) go off button to flash. • The display shows the setting of rinse aid. 8. Dishes are wet • The programme is without a drying phase or with a low temperature drying phase. • The rinse aid dispenser is too much. Press and hold Delay and Start at the same time until the indicators (A), (B) and (C) flash. 4. Off On 5. Stains and dry water drops...

Product Manual
Page 19
With a correct level the appliance door closes and seals correctly. 5. INSTALLATION UNDER A KITCHEN COUNTER 570-600 mm 820 mm 1. Make sure that the dimensions of the appliance. Loosen or tighten the adjustable feet for a correct level of the recess agree with the dimensions in the figure. 2. INSTALLATION ENGLISH 19 WARNING! Put the appliance adjacent to "SAFETY INFORMATION". Refer to a water tap and a water drain. 600 mm 1 2 3 4 3. Install the appliance under the kitchen counter. Remove the worktop of the appliance. 4.
With a correct level the appliance door closes and seals correctly. 5. INSTALLATION UNDER A KITCHEN COUNTER 570-600 mm 820 mm 1. Make sure that the dimensions of the appliance. Loosen or tighten the adjustable feet for a correct level of the recess agree with the dimensions in the figure. 2. INSTALLATION ENGLISH 19 WARNING! Put the appliance adjacent to "SAFETY INFORMATION". Refer to a water tap and a water drain. 600 mm 1 2 3 4 3. Install the appliance under the kitchen counter. Remove the worktop of the appliance. 4.
Product Manual
Page 20
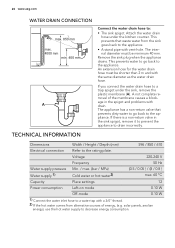
... Hz Water supply pressure Min. / max. (bar / MPa) (0.5 / 0.05 ) / (8 / 0.8 ) Water supply 1) Cold water or hot water2) max. 60 °C Capacity Place settings 12 Power consumption Left-on mode 0.10 W Off-mode 0.10 W 1) Connect the water inlet hose to a water tap with drain. A not complete removal of energy, (e.g. Remove the sink plug when the appliance drains. If there is a non-return valve in the spigot and problems with a 3/4'' thread. 2) If the hot water comes...
... Hz Water supply pressure Min. / max. (bar / MPa) (0.5 / 0.05 ) / (8 / 0.8 ) Water supply 1) Cold water or hot water2) max. 60 °C Capacity Place settings 12 Power consumption Left-on mode 0.10 W Off-mode 0.10 W 1) Connect the water inlet hose to a water tap with drain. A not complete removal of energy, (e.g. Remove the sink plug when the appliance drains. If there is a non-return valve in the spigot and problems with a 3/4'' thread. 2) If the hot water comes...


