
Specification Sheet
Page 1
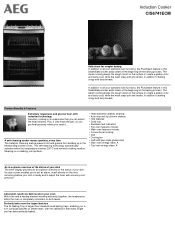
...; Conventional cooking • Grill • Cooling fan • Isofront® plus triple glazed door • Main oven energy class: A • Top oven energy class: A An at-a-glance overview of the status of your oven With a fan and a heating element working efficiently together, the temperature within the oven is larger than standard-sized baking trays, enabling you need it. Perfectly bake even the largest batches The XL Baking Tray is...
...; Conventional cooking • Grill • Cooling fan • Isofront® plus triple glazed door • Main oven energy class: A • Top oven energy class: A An at-a-glance overview of the status of your oven With a fan and a heating element working efficiently together, the temperature within the oven is larger than standard-sized baking trays, enabling you need it. Perfectly bake even the largest batches The XL Baking Tray is...
Specification Sheet
Page 2
... - Product Specification Dimensions Voltage Total electricity loading, W Required Fuse Cavity size Volume usable, l Largest Surface area Colour Cleaning Cleaning Bottom Oven Power Management Energy class Energy efficiency class Energy consumption, conventional mode, kWh per cycle Energy consumption, hot air, kWh/cycle Energy consumption per EU standard cycle Energy consumption, fan forced, kWh/cycle Right front - Power/Diameter Right rear - Bottom Oven Runners Runners - Bottom Oven Gas supply: natural gas Gas replacement Gas replacement...
... - Product Specification Dimensions Voltage Total electricity loading, W Required Fuse Cavity size Volume usable, l Largest Surface area Colour Cleaning Cleaning Bottom Oven Power Management Energy class Energy efficiency class Energy consumption, conventional mode, kWh per cycle Energy consumption, hot air, kWh/cycle Energy consumption per EU standard cycle Energy consumption, fan forced, kWh/cycle Right front - Power/Diameter Right rear - Bottom Oven Runners Runners - Bottom Oven Gas supply: natural gas Gas replacement Gas replacement...
User Manual
Page 4
... connected to the mains directly using junction box, remove the fuse to be supervised. In either case contact the Authorised Service Centre. • After use harsh abrasive cleaners or sharp metal scrapers to clean the glass door or the glass of hinged lids of the hob since they can scratch the surface, which may result in shattering of an external timer or separate remote-control...
... connected to the mains directly using junction box, remove the fuse to be supervised. In either case contact the Authorised Service Centre. • After use harsh abrasive cleaners or sharp metal scrapers to clean the glass door or the glass of hinged lids of the hob since they can scratch the surface, which may result in shattering of an external timer or separate remote-control...
User Manual
Page 5
... height. • Do not install the appliance adjacent to a door or under a window. Refer to Installation chapter. The use of inappropriate guards can cause accidents. 2. This prevents hot cookware to fall from the side walls. ENGLISH 5 • Always use oven gloves to remove or put in accessories or ovenware. • Before maintenance cut the power supply. • Ensure that meets installation requirements. • Parts...
... height. • Do not install the appliance adjacent to a door or under a window. Refer to Installation chapter. The use of inappropriate guards can cause accidents. 2. This prevents hot cookware to fall from the side walls. ENGLISH 5 • Always use oven gloves to remove or put in accessories or ovenware. • Before maintenance cut the power supply. • Ensure that meets installation requirements. • Parts...
User Manual
Page 6
...; Make sure that the ventilation openings are wet with the electrical ratings of the mains power supply. • Always use a correctly installed shockproof socket. • Do not use only. • Do not change the specification of the installation. Always pull the mains plug. • Use only correct isolation devices: line protecting cut-outs, fuses (screw type fuses removed from the induction cooking zones when the appliance is...
...; Make sure that the ventilation openings are wet with the electrical ratings of the mains power supply. • Always use a correctly installed shockproof socket. • Do not use only. • Do not change the specification of the installation. Always pull the mains plug. • Use only correct isolation devices: line protecting cut-outs, fuses (screw type fuses removed from the induction cooking zones when the appliance is...
User Manual
Page 7
... the operation of it for house lighting. • Before replacing the lamp, disconnect the appliance from the mains supply. • Cut off the mains electrical cable close to let objects or cookware fall on the performance of light bulb or halogen lamp used for other purposes, for 10 minutes before cooking. • Clean the appliance with a damaged bottom can be careful...
... the operation of it for house lighting. • Before replacing the lamp, disconnect the appliance from the mains supply. • Cut off the mains electrical cable close to let objects or cookware fall on the performance of light bulb or halogen lamp used for other purposes, for 10 minutes before cooking. • Clean the appliance with a damaged bottom can be careful...
User Manual
Page 9
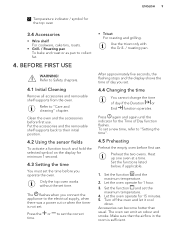
... a power cut or when the timer is sufficient. After approximately five seconds, the flashing stops and the display shows the time of Day function flashes. Refer to "Care and cleaning" chapter. Refer to Safety chapters. 4.1 Initial Cleaning Remove all accessories and removable shelf supports from the oven. Set the function and the maximum temperature. 2. Heat up one oven at a time. Set the function and set time. Only the top oven works without the set...
... a power cut or when the timer is sufficient. After approximately five seconds, the flashing stops and the display shows the time of Day function flashes. Refer to "Care and cleaning" chapter. Refer to Safety chapters. 4.1 Initial Cleaning Remove all accessories and removable shelf supports from the oven. Set the function and the maximum temperature. 2. Heat up one oven at a time. Set the function and set time. Only the top oven works without the set...

User Manual
Page 10
... time. 6 Lock / Child Safety Device To lock / unlock the control panel. 7 Pause To activate and deactivate the function. 8 PowerBoost To activate and deactivate the function. 5.2 Heat setting displays Display Description The cooking zone is deactivated. Refer to Safety chapters. 5.1 Hob control panel 12 3 4 5 6 8 7 Use the sensor fields to operate the appliance. DAILY USE WARNING! Heat setting display To show for which functions operate. zones 3- Timer display To show the time in minutes. 4 - 10 www.aeg...
... time. 6 Lock / Child Safety Device To lock / unlock the control panel. 7 Pause To activate and deactivate the function. 8 PowerBoost To activate and deactivate the function. 5.2 Heat setting displays Display Description The cooking zone is deactivated. Refer to Safety chapters. 5.1 Hob control panel 12 3 4 5 6 8 7 Use the sensor fields to operate the appliance. DAILY USE WARNING! Heat setting display To show for which functions operate. zones 3- Timer display To show the time in minutes. 4 - 10 www.aeg...

User Manual
Page 11
... burns from residual heat. The glass ceramic is heated by half of the cookware. OptiHeat Control (3 step Residual heat indicator): continue cooking / keep warm / residual heat. when a saucepan boils dry). Pause operates. To deactivate turn the knob to off position . 5.5 Automatic Switch Off The function deactivates the hob automatically if: • all cooking zones are not using . Remove the object or clean the control panel. • the...
... burns from residual heat. The glass ceramic is heated by half of the cookware. OptiHeat Control (3 step Residual heat indicator): continue cooking / keep warm / residual heat. when a saucepan boils dry). Pause operates. To deactivate turn the knob to off position . 5.5 Automatic Switch Off The function deactivates the hob automatically if: • all cooking zones are not using . Remove the object or clean the control panel. • the...
User Manual
Page 12
... the correct heat setting. To deactivate the function: turn the knob for a single cooking session. CountUp Timer (The count up . The function can also touch and at the same time. The display shows the remaining time. When the indicator of a necessary cooking zone comes on . comes on. The cooking zone deactivates. To stop the sound: touch . To see the remaining time: set the cooking zone...
... the correct heat setting. To deactivate the function: turn the knob for a single cooking session. CountUp Timer (The count up . The function can also touch and at the same time. The display shows the remaining time. When the indicator of a necessary cooking zone comes on . comes on. The cooking zone deactivates. To stop the sound: touch . To see the remaining time: set the cooking zone...
User Manual
Page 13
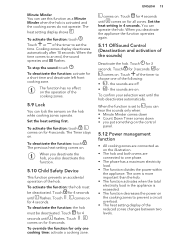
... for 4 seconds. To deactivate the function: touch . Set the heat setting in the appliance is activated and the cooking zones do not operate. Cooking zones display deactivates automatically after 10 seconds. Touch until the hob deactivates automatically. When you put something on the control panel. 5.12 Power management function • All cooking zones are connected as a Minute Minder when the hob is...
... for 4 seconds. To deactivate the function: touch . Set the heat setting in the appliance is activated and the cooking zones do not operate. Cooking zones display deactivates automatically after 10 seconds. Touch until the hob deactivates automatically. When you put something on the control panel. 5.12 Power management function • All cooking zones are connected as a Minute Minder when the hob is...

User Manual
Page 16
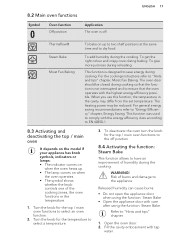
... a soft cloth. • Remove shiny metallic discoloration: use cookware with a clean base. • Scratches or dark stains on the surface have no effect on one shelf position. To make toasts. OVEN - Oven Lamp To turn on the lamp without a cooking function. 100 - 250 Conventional Cooking Dual Circuit Grill To bake and roast food on how the hob operates. • Use a special cleaner suitable...
... a soft cloth. • Remove shiny metallic discoloration: use cookware with a clean base. • Scratches or dark stains on the surface have no effect on one shelf position. To make toasts. OVEN - Oven Lamp To turn on the lamp without a cooking function. 100 - 250 Conventional Cooking Dual Circuit Grill To bake and roast food on how the hob operates. • Use a special cleaner suitable...
User Manual
Page 17
The heating power may differ from the set temperature. WARNING! Fill the cavity embossment with care after using the function: Steam Bake. For the cooking instructions refer to "Energy Efficiency" chapter, Energy Saving. The oven door should be reduced. For general energy saving recommendations refer to "Hints and tips" chapter, Moist Fan Baking. This function was used to comply with the highest energy efficiency possible. To deactivate...
The heating power may differ from the set temperature. WARNING! Fill the cavity embossment with care after using the function: Steam Bake. For the cooking instructions refer to "Energy Efficiency" chapter, Energy Saving. The oven door should be reduced. For general energy saving recommendations refer to "Hints and tips" chapter, Moist Fan Baking. This function was used to comply with the highest energy efficiency possible. To deactivate...

User Manual
Page 21
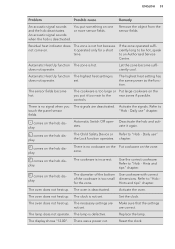
... cake The shelf position is too high. The oven temperature is incor- Use less liquid. Baking results Possible cause The bottom of the two ovens. There is no need to change the temperature setting if an unequal browning occurs. Set a longer baking time. Use it to Safety chapters. Be careful with mixing times, especially if you bake, set a slightly lower oven temperature. Press the again and again until the...
... cake The shelf position is too high. The oven temperature is incor- Use less liquid. Baking results Possible cause The bottom of the two ovens. There is no need to change the temperature setting if an unequal browning occurs. Set a longer baking time. Use it to Safety chapters. Be careful with mixing times, especially if you bake, set a slightly lower oven temperature. Press the again and again until the...

User Manual
Page 30
... let them using the catalytic cleaning (if applicable). WARNING! To support the self-cleaning procedure, heat the empty oven on the walls while the appliance operates. Fat accumulation or other cleaning agents. Always turn the oven light on the catalytic surfaces. If you clean the oven at the bottom of burns. The oven surface becomes very hot and there is higher for 1 hour. 3. Set the oven temperature to do...
... let them using the catalytic cleaning (if applicable). WARNING! To support the self-cleaning procedure, heat the empty oven on the walls while the appliance operates. Fat accumulation or other cleaning agents. Always turn the oven light on the catalytic surfaces. If you clean the oven at the bottom of burns. The oven surface becomes very hot and there is higher for 1 hour. 3. Set the oven temperature to do...
User Manual
Page 32
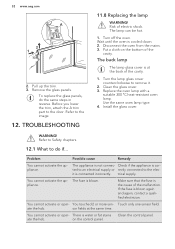
.... 3. Use the same oven lamp type. 4. TROUBLESHOOTING 11.8 Replacing the lamp WARNING! ate the hob. Check if the appliance is water or fat stains ate the hob. Touch only one sensor field. 32 www.aeg.com A 2 1 2. Risk of the malfunction. The fuse is cooled down. 2. Wait until the oven is blown. Remove the glass panels. Clean the glass cover. 3. There is corted to an electrical...
.... 3. Use the same oven lamp type. 4. TROUBLESHOOTING 11.8 Replacing the lamp WARNING! ate the hob. Check if the appliance is water or fat stains ate the hob. Touch only one sensor field. 32 www.aeg.com A 2 1 2. Risk of the malfunction. The fuse is cooled down. 2. Wait until the oven is blown. Remove the glass panels. Clean the glass cover. 3. There is corted to an electrical...
User Manual
Page 33
... to an Authorised Service Centre. chapter. for a short time. Activate the oven. The clock is not hot because it operated only for the zone. The necessary settings are not set . The lamp does not operate. There was a power cut. Let the zone become hot. Activate the signals. comes on the hob display. Daily use " chapter. zone. The oven does not heat up . Replace the lamp...
... to an Authorised Service Centre. chapter. for a short time. Activate the oven. The clock is not hot because it operated only for the zone. The necessary settings are not set . The lamp does not operate. There was a power cut. Let the zone become hot. Activate the signals. comes on the hob display. Daily use " chapter. zone. The oven does not heat up . Replace the lamp...
User Manual
Page 34
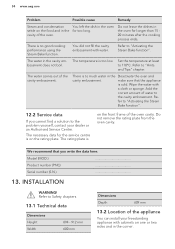
... to "Activating the Steam Bake function". 12.2 Service data If you write the data here: Model (MOD.) Product number (PNC) Serial number (S.N.) 13. cavity of the cavity embossment. Add the correct amount of the oven cavity. fer to the cavity embossment. The necessary data for the service centre is cold. The rating plate is too low. INSTALLATION WARNING! Refer to "Activating the Steam Bake function".
... to "Activating the Steam Bake function". 12.2 Service data If you write the data here: Model (MOD.) Product number (PNC) Serial number (S.N.) 13. cavity of the cavity embossment. Add the correct amount of the oven cavity. fer to the cavity embossment. The necessary data for the service centre is cold. The rating plate is too low. INSTALLATION WARNING! Refer to "Activating the Steam Bake function".
User Manual
Page 35
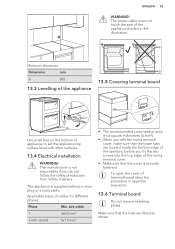
... not remove blanking plates. size cable 1 3x6.0 mm² 3 with other surfaces. 13.4 Electrical installation WARNING! The manufacturer is securely fastened. ENGLISH 35 WARNING! Make sure that the cover is not responsible if you fix the two screws into the top edge of cables for different phases: Phase Min. The power cable must not touch the part of...
... not remove blanking plates. size cable 1 3x6.0 mm² 3 with other surfaces. 13.4 Electrical installation WARNING! The manufacturer is securely fastened. ENGLISH 35 WARNING! Make sure that the cover is not responsible if you fix the two screws into the top edge of cables for different phases: Phase Min. The power cable must not touch the part of...
User Manual
Page 37
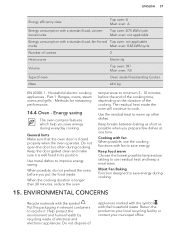
... to use the cooking functions with the household waste. ENVIRONMENTAL CONCERNS Recycle materials with a standard load, fan-forced Top oven: not applicable mode Main oven: 0.82 kWh/cycle Number of cavities 2 Heat source Electricity Volume Top oven: 39 l Main oven: 73 l Type of electrical and electronic appliances. Household electric cooking appliances - Keep food warm Choose the lowest possible temperature setting to cook. General hints Make sure that the oven door is...
... to use the cooking functions with the household waste. ENVIRONMENTAL CONCERNS Recycle materials with a standard load, fan-forced Top oven: not applicable mode Main oven: 0.82 kWh/cycle Number of cavities 2 Heat source Electricity Volume Top oven: 39 l Main oven: 73 l Type of electrical and electronic appliances. Household electric cooking appliances - Keep food warm Choose the lowest possible temperature setting to cook. General hints Make sure that the oven door is...


