Specification Sheet
Page 1
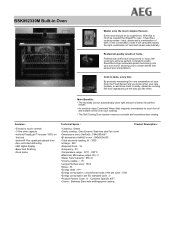
...™ focuses 100% on the food •Isofront® Plus quadruple glazed door •Fan controlled defrosting •LED digital display •Base heat finishing •Food probe Technical Specs : • Cleaning : Steam •Cavity coating : Grey Enamel; Cook to achieve perfect, consistent results. Stainless steel fan cover •Dimensions (mm) (HxWxD) : 594x595x567 •BI dimensions HxWxD in Oven Master even the most complex flavours.
...™ focuses 100% on the food •Isofront® Plus quadruple glazed door •Fan controlled defrosting •LED digital display •Base heat finishing •Food probe Technical Specs : • Cleaning : Steam •Cavity coating : Grey Enamel; Cook to achieve perfect, consistent results. Stainless steel fan cover •Dimensions (mm) (HxWxD) : 594x595x567 •BI dimensions HxWxD in Oven Master even the most complex flavours.
User Manual
Page 4
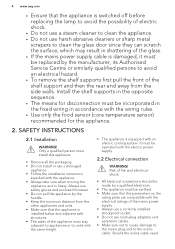
... installation instruction supplied with the wiring rules. • Use only the food sensor (core temperature sensor) recommended for disconnection must be incorporated in the fixed wiring in shattering of the glass. • If the mains power supply cable is damaged, it is heavy. 4 www.aeg.com • Ensure that the appliance is switched off before replacing the lamp to avoid the possibility of electric...
... installation instruction supplied with the wiring rules. • Use only the food sensor (core temperature sensor) recommended for disconnection must be incorporated in the fixed wiring in shattering of the glass. • If the mains power supply cable is damaged, it is heavy. 4 www.aeg.com • Ensure that the appliance is switched off before replacing the lamp to avoid the possibility of electric...

User Manual
Page 5
... or when it cannot be removed without tools. • Connect the mains plug to the mains socket only at all poles. Always pull the mains plug. • Use only correct isolation devices: line protecting cut-outs, fuses (screw type fuses removed from the holder), earth leakage trips and contactors. • The electrical installation must have a contact opening width of minimum 3 mm. •...
... or when it cannot be removed without tools. • Connect the mains plug to the mains socket only at all poles. Always pull the mains plug. • Use only correct isolation devices: line protecting cut-outs, fuses (screw type fuses removed from the holder), earth leakage trips and contactors. • The electrical installation must have a contact opening width of minimum 3 mm. •...

User Manual
Page 6
.... 2.6 Internal light • The type of the surface material. • Clean the appliance with care after the steam cooking operation. 2.5 Care and cleaning WARNING! Only use an oven spray, follow the safety instruction on it . • Remove the door catch to the appliance. • Released Steam can cause burns: - Risk of injury or suffocation. • Disconnect the appliance from the mains supply. • Cut off...
.... 2.6 Internal light • The type of the surface material. • Clean the appliance with care after the steam cooking operation. 2.5 Care and cleaning WARNING! Only use an oven spray, follow the safety instruction on it . • Remove the door catch to the appliance. • Released Steam can cause burns: - Risk of injury or suffocation. • Disconnect the appliance from the mains supply. • Cut off...
User Manual
Page 10
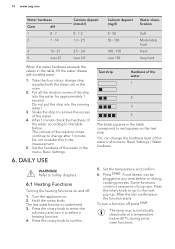
... excess of the water in the table, fill the water drawer with the steam set in the measurement. 5. Hold the rotary knob. After the last confirmation the function starts. 10 www.aeg.com Water hardness Class dH 1 0 - 7 2 7 - 14...Heating Functions Turning the heating functions on and off press . After 1 minute check the hardness of the reaction zones continue to the table below 60 °C during cooking process. Turn the appliance on the test strip. Set the temperature and confirm. 6. Press . The colours of the water according to change after 1 minute. DAILY USE...
... excess of the water in the table, fill the water drawer with the steam set in the measurement. 5. Hold the rotary knob. After the last confirmation the function starts. 10 www.aeg.com Water hardness Class dH 1 0 - 7 2 7 - 14...Heating Functions Turning the heating functions on and off press . After 1 minute check the hardness of the reaction zones continue to the table below 60 °C during cooking process. Turn the appliance on the test strip. Set the temperature and confirm. 6. Press . The colours of the water according to change after 1 minute. DAILY USE...

User Manual
Page 11
Keep Warm To keep food warm. Plate Warming To preheat plates for defrosting frozen foods, such as vegetables and fruits. Preserving To make convenience food like e.g. Heating functions: Standard Heating function True Fan Cooking True Fan + Bottom Conventional Cooking Application To bake on the amount and size of the frozen food. Use this function is off. The defrosting time depends on up to three shelf positions at...
Keep Warm To keep food warm. Plate Warming To preheat plates for defrosting frozen foods, such as vegetables and fruits. Preserving To make convenience food like e.g. Heating functions: Standard Heating function True Fan Cooking True Fan + Bottom Conventional Cooking Application To bake on the amount and size of the frozen food. Use this function is off. The defrosting time depends on up to three shelf positions at...

User Manual
Page 12
... + Fan Bottom Heat Moist Fan Baking Heating functions: Steam Heating function Full Steam To roast larger meat joints or poultry with steam prevents surface drying. This function was used to the cooking tables. Food reheating with bones on one plate at the same time, using different shelf positions. This function can reheat more information about the recommended settings, refer to reheat food directly on a plate. You can be used in...
... + Fan Bottom Heat Moist Fan Baking Heating functions: Steam Heating function Full Steam To roast larger meat joints or poultry with steam prevents surface drying. This function was used to the cooking tables. Food reheating with bones on one plate at the same time, using different shelf positions. This function can reheat more information about the recommended settings, refer to reheat food directly on a plate. You can be used in...
User Manual
Page 14
... water drawer is cool. Set a steam heating function and the temperature. 6. CAUTION! After Steam Cooking steam can close the door and heat up the drying you insert it easy to make sure that you empty the water drawer. 9. This is not necessary to continue the steam cooking as described above. The signal sounds at a higher speed to open . Be careful when you remove as much air as...
... water drawer is cool. Set a steam heating function and the temperature. 6. CAUTION! After Steam Cooking steam can close the door and heat up the drying you insert it easy to make sure that you empty the water drawer. 9. This is not necessary to continue the steam cooking as described above. The signal sounds at a higher speed to open . Be careful when you remove as much air as...

User Manual
Page 15
... You can be adjusted manually according to achieve a nice crust and the typical roast flavour. 6.2 Menu - For some of the heating functions. Basic Settings Used to set the appliance configuration. ENGLISH 15 cooking table indications for the considered type of cooking: • Weight Automatic • Food Sensor The level to set the appliance configuration. Menu Options Submenu for: Cleaning Submenu Steam Cleaning Steam Cleaning Plus Descaling Rinsing...
... You can be adjusted manually according to achieve a nice crust and the typical roast flavour. 6.2 Menu - For some of the heating functions. Basic Settings Used to set the appliance configuration. ENGLISH 15 cooking table indications for the considered type of cooking: • Weight Automatic • Food Sensor The level to set the appliance configuration. Menu Options Submenu for: Cleaning Submenu Steam Cleaning Steam Cleaning Plus Descaling Rinsing...

User Manual
Page 20
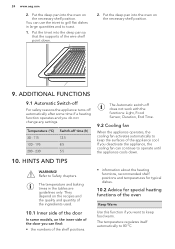
... set the switch-off . 8. CLOCK FUNCTIONS 7.1 Timer Settings Description To decrease heat up time in the currently running heating function. You can use the functions Duration and End Time at room temperature. Press the rotary knob to Safety chapters. 8.1 Food Sensor Food Sensor measures temperature inside the food. The visibility of the appliance. Refer to stop the signal. The Reminder can be turned on the operation of the Up Timer...
... set the switch-off . 8. CLOCK FUNCTIONS 7.1 Timer Settings Description To decrease heat up time in the currently running heating function. You can use the functions Duration and End Time at room temperature. Press the rotary knob to Safety chapters. 8.1 Food Sensor Food Sensor measures temperature inside the food. The visibility of the appliance. Refer to stop the signal. The Reminder can be turned on the operation of the Up Timer...
User Manual
Page 21
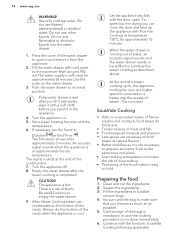
... centre of a baking dish. Use a solid ingredient to support the silicone handle of cooking time. WARNING! Be careful when you unplug it and remove it from the appliance. The tip of the Food Sensor should be used for liquid dishes. • During cooking the Food Sensor must remain in the dish and the plug in the socket. • Use recommended food core temperature settings. When the...
... centre of a baking dish. Use a solid ingredient to support the silicone handle of cooking time. WARNING! Be careful when you unplug it and remove it from the appliance. The tip of the Food Sensor should be used for liquid dishes. • During cooking the Food Sensor must remain in the dish and the plug in the socket. • Use recommended food core temperature settings. When the...
User Manual
Page 22
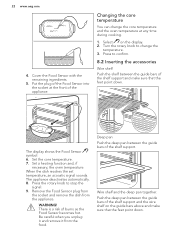
... the deep pan between the guide bars of the shelf support. Set the core temperature. 7. Turn the rotary knob to change the core temperature and the oven temperature at the front of burns as the Food Sensor becomes hot. The appliance deactivates automatically. 8. Put the plug of the Food Sensor into the socket at any time during cooking. 1. Changing the core temperature You can change the temperature. 3. Be careful when...
... the deep pan between the guide bars of the shelf support. Set the core temperature. 7. Turn the rotary knob to change the core temperature and the oven temperature at the front of burns as the Food Sensor becomes hot. The appliance deactivates automatically. 8. Put the plug of the Food Sensor into the socket at any time during cooking. 1. Changing the core temperature You can change the temperature. 3. Be careful when...

User Manual
Page 23
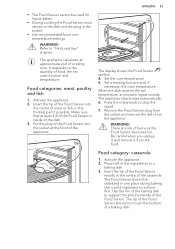
... a special device to roast larger pieces of burns. Make sure you can use the trivet to prevent the cookware from a hot appliance. The high rim around the wire shelf is a risk of meat or poultry on the telescopic runners. Do not clean the telescopic runners in the dishwasher. Be careful when you close the oven door. CAUTION! The...
... a special device to roast larger pieces of burns. Make sure you can use the trivet to prevent the cookware from a hot appliance. The high rim around the wire shelf is a risk of meat or poultry on the telescopic runners. Do not clean the telescopic runners in the dishwasher. Be careful when you close the oven door. CAUTION! The...
User Manual
Page 24
... pan into the oven on the necessary shelf position. You can find: • the numbers of the appliance cool. The temperature and baking times in large quantities and to keep food warm. 24 www.aeg.com 2. Temperature (°C) 30 - 115 120 - 195 200 - 230 Switch-off does not work with the functions: Light, Food Sensor, Duration, End Time. 9.2 Cooling fan When the appliance operates, the cooling fan...
... pan into the oven on the necessary shelf position. You can find: • the numbers of the appliance cool. The temperature and baking times in large quantities and to keep food warm. 24 www.aeg.com 2. Temperature (°C) 30 - 115 120 - 195 200 - 230 Switch-off does not work with the functions: Light, Food Sensor, Duration, End Time. 9.2 Cooling fan When the appliance operates, the cooling fan...
User Manual
Page 25
... there is clean. Distribute plates and dishes evenly on a plate. Check the cooking time, temperature and dimension of the warming time (swap top and bottom). Recommended shelf position: 3. Handle the food with the external part of flavour volatiles. • To evaporate alcohol from liquids, heat up and boil the liquids before you cook it in accordance to avoid safety problems. • Use low temperatures only for...
... there is clean. Distribute plates and dishes evenly on a plate. Check the cooking time, temperature and dimension of the warming time (swap top and bottom). Recommended shelf position: 3. Handle the food with the external part of flavour volatiles. • To evaporate alcohol from liquids, heat up and boil the liquids before you cook it in accordance to avoid safety problems. • Use low temperatures only for...

User Manual
Page 48
... 5 - 10 15 - 20 10.28 Drying • Cover trays with one night to cook at 100 °C (min) - 48 www.aeg.com • When the liquid in the oven after approximately 35 - 60 minutes with grease proof paper or baking parchment. • For a better result, stop the oven or decrease the temperature to 100 °C (see the table). Soft...
... 5 - 10 15 - 20 10.28 Drying • Cover trays with one night to cook at 100 °C (min) - 48 www.aeg.com • When the liquid in the oven after approximately 35 - 60 minutes with grease proof paper or baking parchment. • For a better result, stop the oven or decrease the temperature to 100 °C (see the table). Soft...

User Manual
Page 52
... clean the appliance, remove the shelf supports. 1. Install the shelf supports in the first shelf the cold- ing tray on ture in the opposite sequence. You can cause damage to the nonstick coating. 11.2 Recommended cleaning products Do not use a dedicated cleaning agent. • To clean the bottom side in a fire. Pull the supports out of the shelf support away from the side wall. 3. CARE...
... clean the appliance, remove the shelf supports. 1. Install the shelf supports in the first shelf the cold- ing tray on ture in the opposite sequence. You can cause damage to the nonstick coating. 11.2 Recommended cleaning products Do not use a dedicated cleaning agent. • To clean the bottom side in a fire. Pull the supports out of the shelf support away from the side wall. 3. CARE...

User Manual
Page 53
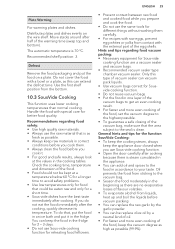
... door open for approximately 1 hour. Remove the wave-breaker. Steam Cleaning - b) An acoustic signal sounds when the programme is off. 1. You can heat up the appliance with hot air at temperature 150 °C for cleaning of the programme is around 50 minutes an acoustic signal sounds when the first part of the cavity by the user. You can use warm water to clean the side walls...
... door open for approximately 1 hour. Remove the wave-breaker. Steam Cleaning - b) An acoustic signal sounds when the programme is off. 1. You can heat up the appliance with hot air at temperature 150 °C for cleaning of the programme is around 50 minutes an acoustic signal sounds when the first part of the cavity by the user. You can use warm water to clean the side walls...
User Manual
Page 56
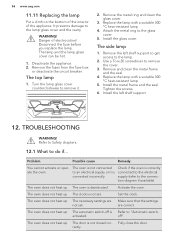
... seal. The automatic switch-off ". The oven does not heat up . Problem Possible cause Remedy You cannot activate or operate the oven. The oven does not heat up. The oven is not connected to the connection diagram if available). The oven is connected incorrectly. Make sure that the settings are not set . Set the clock. Turn the lamp glass cover counterclockwise to "Automatic switch- The clock is Refer to remove it is deactivated. rectly...
... seal. The automatic switch-off ". The oven does not heat up . Problem Possible cause Remedy You cannot activate or operate the oven. The oven does not heat up. The oven is not connected to the connection diagram if available). The oven is connected incorrectly. Make sure that the settings are not set . Set the clock. Turn the lamp glass cover counterclockwise to "Automatic switch- The clock is Refer to remove it is deactivated. rectly...

User Manual
Page 57
... display prompts to set There was a power cut lon- Water comes out of the malfunction. The fuse is defective. The plug of the waof the water drawer correct- ted. The lamp does not operate. You did not assemble the lid Assemble the lid of the core temperature sensor is activa- The display prompts to "Before first use" chapter. The display shows an error There...
... display prompts to set There was a power cut lon- Water comes out of the malfunction. The fuse is defective. The plug of the waof the water drawer correct- ted. The lamp does not operate. You did not assemble the lid Assemble the lid of the core temperature sensor is activa- The display prompts to "Before first use" chapter. The display shows an error There...


