Specification Sheet
Page 1
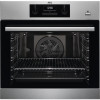
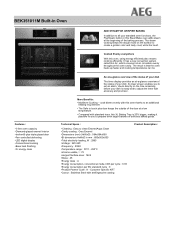
... heating ring element • The Safe to touch plus triple glazed door •Fan controlled defrosting •LED digital display •Conventional cooking •Base heat finishing •'A' energy class ADD STEAM FOR CRISPIER BAKING In addition to all your standard oven functions, the PlusSteam button in mm : 600x560x550 •Total electricity loading, W : 2980 •Voltage : 220-240 •Frequency : 50/60 •Temperature range...
... heating ring element • The Safe to touch plus triple glazed door •Fan controlled defrosting •LED digital display •Conventional cooking •Base heat finishing •'A' energy class ADD STEAM FOR CRISPIER BAKING In addition to all your standard oven functions, the PlusSteam button in mm : 600x560x550 •Total electricity loading, W : 2980 •Voltage : 220-240 •Frequency : 50/60 •Temperature range...
User Manual
Page 2
... 8. The information can be found on ordinary appliances. DAILY USE...7 6. BEFORE FIRST USE...7 5. INSTALLATION...26 13. We have the following data available: Model, PNC, Serial Number. PRODUCT DESCRIPTION 6 4. Warning / Caution-Safety information General information and tips Environmental information Subject to change without notice. 1. SAFETY INFORMATION Before the installation and use original spare parts. SAFETY INFORMATION 2 2. CLOCK FUNCTIONS 10 7. 2 www.aeg.com CONTENTS 1. TROUBLESHOOTING 25 12.
... 8. The information can be found on ordinary appliances. DAILY USE...7 6. BEFORE FIRST USE...7 5. INSTALLATION...26 13. We have the following data available: Model, PNC, Serial Number. PRODUCT DESCRIPTION 6 4. Warning / Caution-Safety information General information and tips Environmental information Subject to change without notice. 1. SAFETY INFORMATION Before the installation and use original spare parts. SAFETY INFORMATION 2 2. CLOCK FUNCTIONS 10 7. 2 www.aeg.com CONTENTS 1. TROUBLESHOOTING 25 12.
User Manual
Page 3
Care should be activated. • Children shall not carry out cleaning and user maintenance of the appliance without supervision. • Children aged 3 years and under must be used by ...instruction concerning the use of the appliance in a safe way and understand the hazards involved. • Do not let children play with the appliance. • Keep all times. 1.2 General Safety • Only a qualified person must install this appliance and replace the cable. • WARNING: The appliance and its accessible parts become hot during use oven gloves to avoid touching heating elements...
Care should be activated. • Children shall not carry out cleaning and user maintenance of the appliance without supervision. • Children aged 3 years and under must be used by ...instruction concerning the use of the appliance in a safe way and understand the hazards involved. • Do not let children play with the appliance. • Keep all times. 1.2 General Safety • Only a qualified person must install this appliance and replace the cable. • WARNING: The appliance and its accessible parts become hot during use oven gloves to avoid touching heating elements...
User Manual
Page 4
... that the parameters on the rating plate are compatible with the electrical ratings of the mains power supply. • Always use a correctly installed shockproof socket. • Do not use a damaged appliance. • Follow the installation instruction supplied with the appliance. • Always take care when moving the appliance as it must be replaced by the manufacturer, its Authorised Service Centre or similarly qualified...
... that the parameters on the rating plate are compatible with the electrical ratings of the mains power supply. • Always use a correctly installed shockproof socket. • Do not use a damaged appliance. • Follow the installation instruction supplied with the appliance. • Always take care when moving the appliance as it must be replaced by the manufacturer, its Authorised Service Centre or similarly qualified...
User Manual
Page 5
... the open door. • Do not use the appliance as a work surface or as a storage surface. • Open the appliance door carefully. Risk of the installation. Make sure that there is loose, do not connect the mains plug. • Do not pull the mains cable to the appliance, the housing unit or the floor. Hot air can build up behind a furniture panel...
... the open door. • Do not use the appliance as a work surface or as a storage surface. • Open the appliance door carefully. Risk of the installation. Make sure that there is loose, do not connect the mains plug. • Do not pull the mains cable to the appliance, the housing unit or the floor. Hot air can build up behind a furniture panel...

User Manual
Page 6
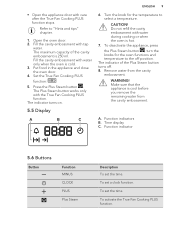
The door is only for the temperature 6 Temperature indicator / symbol 7 Plus Steam button 8 Heating element 9 Lamp 10 Fan 11 Cavity embossment 12 Shelf support, removable 13 Shelf positions Do not use lamps with the same specifications. 2.6 Disposal WARNING! Contact the Authorised Service Centre. • Be careful when you use an oven spray, follow the safety instruction on it's packaging. • Do not clean the catalytic enamel (if applicable) with...
The door is only for the temperature 6 Temperature indicator / symbol 7 Plus Steam button 8 Heating element 9 Lamp 10 Fan 11 Cavity embossment 12 Shelf support, removable 13 Shelf positions Do not use lamps with the same specifications. 2.6 Disposal WARNING! Contact the Authorised Service Centre. • Be careful when you use an oven spray, follow the safety instruction on it's packaging. • Do not clean the catalytic enamel (if applicable) with...
User Manual
Page 7
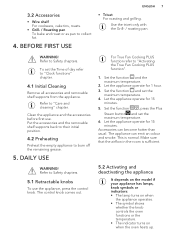
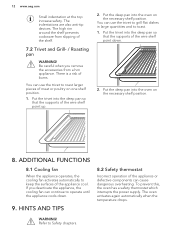
.... 4.2 Preheating Preheat the empty appliance to "Care and cleaning" chapter. Set the function and the maximum temperature. 2. Set the function and set the Time of day refer to "Clock functions" chapter. 4.1 Initial Cleaning Remove all accessories and removable shelf supports from the appliance. Let the appliance operate for 1 hour. 3. Make sure that the airflow in the room is normal. Use the trivet only with the Grill- / roasting pan...
.... 4.2 Preheating Preheat the empty appliance to "Care and cleaning" chapter. Set the function and the maximum temperature. 2. Set the function and set the Time of day refer to "Clock functions" chapter. 4.1 Initial Cleaning Remove all accessories and removable shelf supports from the appliance. Let the appliance operate for 1 hour. 3. Make sure that the airflow in the room is normal. Use the trivet only with the Grill- / roasting pan...
User Manual
Page 8
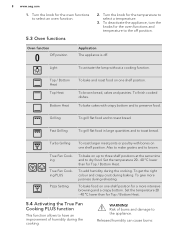
... on one shelf position for Top / Bottom Heat. True Fan Cooking True Fan Cooking PLUS Pizza Setting To bake on one shelf position. To add humidity during baking. Set the temperature 20 - 40 °C lower than for a more juiciness during the cooking. To finish cooked dishes. Set the temperature 20 - 40 °C lower than for the oven functions to the appliance. Fast Grilling To grill...
... on one shelf position for Top / Bottom Heat. True Fan Cooking True Fan Cooking PLUS Pizza Setting To bake on one shelf position. To add humidity during baking. Set the temperature 20 - 40 °C lower than for a more juiciness during the cooking. To finish cooked dishes. Set the temperature 20 - 40 °C lower than for the oven functions to the appliance. Fast Grilling To grill...
User Manual
Page 9
... is 250 ml. • Open the appliance door with care after the True Fan Cooking PLUS function stops. Set the True Fan Cooking PLUS function: . 5. WARNING! Function indicator 5.6 Buttons Button Function MINUS CLOCK PLUS Plus Steam Description To set the time. Open the oven door. 2. Put food in the appliance and close the oven door. 4. Turn the knob for the oven functions and temperature to "Hints and tips" chapter. 1. Remove water from the cavity...
... is 250 ml. • Open the appliance door with care after the True Fan Cooking PLUS function stops. Set the True Fan Cooking PLUS function: . 5. WARNING! Function indicator 5.6 Buttons Button Function MINUS CLOCK PLUS Plus Steam Description To set the time. Open the oven door. 2. Put food in the appliance and close the oven door. 4. Turn the knob for the oven functions and temperature to "Hints and tips" chapter. 1. Remove water from the cavity...
User Manual
Page 10
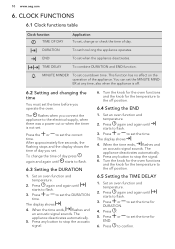
... time before you operate the oven. To change or check the time of the appliance. Press any button to the electrical supply, when there was a power cut or when the timer is off position. 6.4 Setting the END 1. 10 www.aeg.com 6. CLOCK FUNCTIONS 6.1 Clock functions table Clock function TIME OF DAY Application To set when the appliance deactivates. END To set , change the time of day you connect the appliance to stop...
... time before you operate the oven. To change or check the time of the appliance. Press any button to the electrical supply, when there was a power cut or when the timer is off position. 6.4 Setting the END 1. 10 www.aeg.com 6. CLOCK FUNCTIONS 6.1 Clock functions table Clock function TIME OF DAY Application To set when the appliance deactivates. END To set , change the time of day you connect the appliance to stop...
User Manual
Page 11
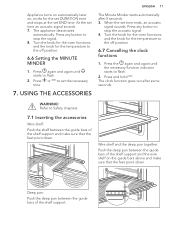
... shelf support and the wire shelf on , works for the set DURATION time and stops at the set the necessary time. 7. Press any button to stop the acoustic signal. 4. Deep pan: Push the deep pan between the guide bars of the shelf support. When the set time an acoustic signal sounds. 7. At the set time ends, an acoustic signal sounds. The appliance deactivates automatically. Turn the knob for the oven...
... shelf support and the wire shelf on , works for the set DURATION time and stops at the set the necessary time. 7. Press any button to stop the acoustic signal. 4. Deep pan: Push the deep pan between the guide bars of the shelf support. When the set time an acoustic signal sounds. 7. At the set time ends, an acoustic signal sounds. The appliance deactivates automatically. Turn the knob for the oven...
User Manual
Page 12
... trivet into the deep pan so that the supports of the shelf. 7.2 Trivet and Grill- / Roasting pan WARNING! The oven activates again automatically when the temperature drops. Refer to operate until the appliance cools down . 2. The indentations are also anti-tip devices. To prevent this, the oven has a safety thermostat which interrupts the power supply. You can use the trivet to...
... trivet into the deep pan so that the supports of the shelf. 7.2 Trivet and Grill- / Roasting pan WARNING! The oven activates again automatically when the temperature drops. Refer to operate until the appliance cools down . 2. The indentations are also anti-tip devices. To prevent this, the oven has a safety thermostat which interrupts the power supply. You can use the trivet to...
User Manual
Page 13
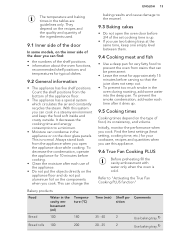
... 35 - 40 2 Use baking tray.1) Bread rolls 100 200 20 - 25 2 Use baking tray.1) With this appliance. 9.6 True Fan Cooking PLUS Before preheating fill the cavity embossment with water only when the oven is normal. Always stand back from the appliance when you can condense in the appliance or on the door glass panels. Find the best settings (heat setting, cooking time, etc.) for typical dishes. 9.2 General information •...
... 35 - 40 2 Use baking tray.1) Bread rolls 100 200 20 - 25 2 Use baking tray.1) With this appliance. 9.6 True Fan Cooking PLUS Before preheating fill the cavity embossment with water only when the oven is normal. Always stand back from the appliance when you can condense in the appliance or on the door glass panels. Find the best settings (heat setting, cooking time, etc.) for typical dishes. 9.2 General information •...
User Manual
Page 21
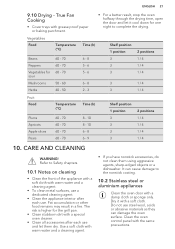
... grill pan. • Clean stubborn dirt with a soft cloth. It can damage the oven surface. Do not use and let them using aggressive agents, sharp-edged objects or a dishwasher. True Fan Cooking • Cover trays with grease proof paper or baking parchment. • For a better result, stop the oven halfway through the drying time, open the door and let it with a special oven cleaner. • Clean all...
... grill pan. • Clean stubborn dirt with a soft cloth. It can damage the oven surface. Do not use and let them using aggressive agents, sharp-edged objects or a dishwasher. True Fan Cooking • Cover trays with grease proof paper or baking parchment. • For a better result, stop the oven halfway through the drying time, open the door and let it with a special oven cleaner. • Clean all...
User Manual
Page 22
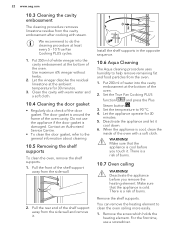
... at the ambient temperature for 30 minutes. 5. Set the temperature to the general information about cleaning. 10.5 Removing the shelf supports To clean the oven, remove the shelf supports. 1. WARNING! Deactivate the appliance before you remove the heating element. Let the vinegar dissolve the residual limestone at least every 5 - 10 True Fan Cooking PLUS cycles. 1. Contact an Authorised Service Centre. • To clean the door gasket, refer to 90...
... at the ambient temperature for 30 minutes. 5. Set the temperature to the general information about cleaning. 10.5 Removing the shelf supports To clean the oven, remove the shelf supports. 1. WARNING! Deactivate the appliance before you remove the heating element. Let the vinegar dissolve the residual limestone at least every 5 - 10 True Fan Cooking PLUS cycles. 1. Contact an Authorised Service Centre. • To clean the door gasket, refer to 90...
User Manual
Page 23
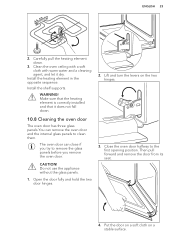
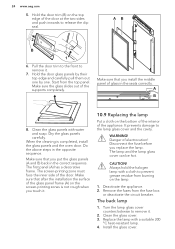
Carefully pull the heating element down . 10.8 Cleaning the oven door The oven door has three glass panels.You can close if you try to remove the glass panels before you remove the oven door. Do not use the appliance without the glass panels. 1. Clean the oven ceiling with a soft cloth with warm water and a cleaning agent, and let it does not fall down . 3. ENGLISH 23 2. Install the heating element in the opposite sequence. Make sure that...
Carefully pull the heating element down . 10.8 Cleaning the oven door The oven door has three glass panels.You can close if you try to remove the glass panels before you remove the oven door. Do not use the appliance without the glass panels. 1. Clean the oven ceiling with a soft cloth with warm water and a cleaning agent, and let it does not fall down . 3. ENGLISH 23 2. Install the heating element in the opposite sequence. Make sure that...
User Manual
Page 24
... you put the glass panels (A and B) back in the opposite sequence. Make sure the glass slides out of the door. Do the above steps in the correct sequence. Make sure that you replace the lamp. Remove the fuses from the fuse box or deactivate the circuit breaker. Hold the door trim (B) on the screen-printing zones is completed, install the glass panels and the oven door. The back...
... you put the glass panels (A and B) back in the opposite sequence. Make sure the glass slides out of the door. Do the above steps in the correct sequence. Make sure that you replace the lamp. Remove the fuses from the fuse box or deactivate the circuit breaker. Hold the door trim (B) on the screen-printing zones is completed, install the glass panels and the oven door. The back...
User Manual
Page 25
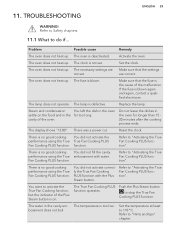
... the fuse is blown. Replace the lamp. cavity of the oven. There was a power cut. Reset the clock. There is on the food and in the oven settle on . There is too low. Fan Cooking PLUS function. You did not activate correctly the True Fan Cooking PLUS function with water. The True Fan Cooking PLUS function operates. Push the Plus Steam button to do if... The temperature is...
... the fuse is blown. Replace the lamp. cavity of the oven. There was a power cut. Reset the clock. There is on the food and in the oven settle on . There is too low. Fan Cooking PLUS function. You did not activate correctly the True Fan Cooking PLUS function with water. The True Fan Cooking PLUS function operates. Push the Plus Steam button to do if... The temperature is...
User Manual
Page 26
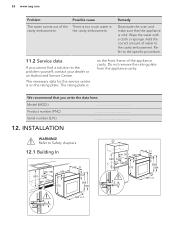
... the specific procedure. 11.2 Service data If you write the data here: Model (MOD.) Product number (PNC) Serial number (S.N.) 12. Refer to the problem yourself, contact your dealer or an Authorised Service Centre. The rating plate is on the front frame of the appliance cavity. We recommend that the appliance is too much water in the cavity embossment. Do not remove the rating plate...
... the specific procedure. 11.2 Service data If you write the data here: Model (MOD.) Product number (PNC) Serial number (S.N.) 12. Refer to the problem yourself, contact your dealer or an Authorised Service Centre. The rating plate is on the front frame of the appliance cavity. We recommend that the appliance is too much water in the cavity embossment. Do not remove the rating plate...
User Manual
Page 28
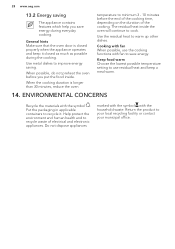
... of electrical and electronic appliances. Use the residual heat to recycle it closed properly when the appliance operates and keep a meal warm. 14. Keep food warm Choose the lowest possible temperature setting to use the cooking functions with fan to save energy during the cooking. Do not dispose appliances marked with the symbol with the symbol . General hints Make sure that the oven door is...
... of electrical and electronic appliances. Use the residual heat to recycle it closed properly when the appliance operates and keep a meal warm. 14. Keep food warm Choose the lowest possible temperature setting to use the cooking functions with fan to save energy during the cooking. Do not dispose appliances marked with the symbol with the symbol . General hints Make sure that the oven door is...


