AEG BEK351011M Support and Manuals
Get Help and Manuals for this AEG item
View All Support Options Below
Free AEG BEK351011M manuals!
Problems with AEG BEK351011M?
Ask a Question
Free AEG BEK351011M manuals!
Problems with AEG BEK351011M?
Ask a Question
Most Recent AEG BEK351011M Questions

Oven Temperature
my oven is too hot and it is out of guarantee can you help
my oven is too hot and it is out of guarantee can you help
(Posted by carolinepielesz 6 months ago)
Popular AEG BEK351011M Manual Pages
User Manual - Page 2
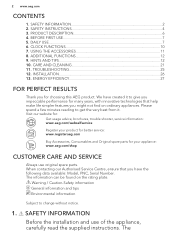
...for your appliance: www.aeg.com/shop
CUSTOMER CARE AND SERVICE
Always use of the appliance, carefully read the supplied instructions. SAFETY INFORMATION Before the installation and use original spare parts. The BEFORE FIRST USE...7 5. ADDITIONAL FUNCTIONS 12 9. INSTALLATION...26 13.
SAFETY INSTRUCTIONS 4 3. DAILY USE...7 6. Warning / Caution-Safety information General...
User Manual - Page 4
... the installation instruction supplied with the appliance. • Always take care when moving the appliance as it must be replaced by our Authorised Service Centre. • Do not let mains cables touch or come near the appliance door, especially when the door is hot. • The shock protection of live and insulated parts must be...
User Manual - Page 6

...; Replace immediately the door glass panels when they are damaged. There is cold. Do not use any kind of detergent.
2.5 Internal light
• The type of injury or suffocation. • Disconnect the appliance from becoming trapped in the appliance.
2.7 Service
• To repair the appliance contact an Authorised Service Centre.
• Use original spare parts...
User Manual - Page 7
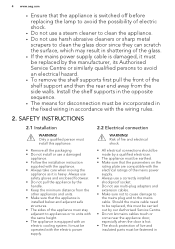
... appliance, press the control knob. Put the accessories and the removable shelf supports back to their initial position.
4.2 Preheating
Preheat the empty appliance to "Activating the True Fan Cooking PLUS function".
1. The control knob comes out. Set the function and set the Time of day refer to "Care and cleaning" chapter. BEFORE FIRST...
User Manual - Page 10
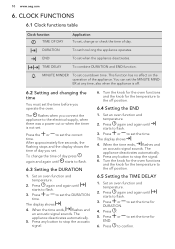
.... Press again and again until starts to flash.
3.
END
To set the time for the temperature to set how long the appliance operates.
After approximately five seconds, the flashing ...stops and the display shows the time of day press again and again until starts to set when the appliance deactivates. The appliance deactivates automatically. 5. The display shows . 4. When ...
User Manual - Page 11
... position.
6.7 Cancelling the clock functions
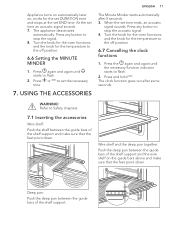
1. Press and hold . Deep pan: Push the deep pan between the guide bars of the shelf support and the wire shelf on , works for the temperature to the off position.
6.6 Setting the MINUTE MINDER
1. The clock function goes out after 5 seconds. 3.
Wire shelf and the deep pan together...
User Manual - Page 12
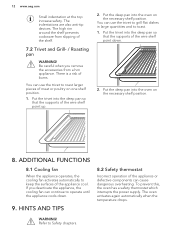
... shelf prevents cookware from a hot appliance. Put the deep pan into the deep pan so that the supports of the wire shelf point up.
2. Put the deep pan into the deep pan so
that the supports of the wire shelf point down .
9. If you remove the accessories from slipping of the appliance...
User Manual - Page 13
... the recipes and the quality and quantity of the ingredients used.
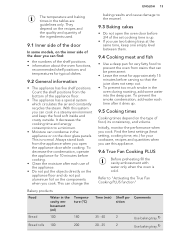
9.1 Inner side of the set cooking time is normal. Comments sition
Bread
100
180
35 - 40
2
Use baking tray.1)...temperatures for approximately 15 minutes before 3/4 of the door
In some models, on the door glass panels. Find the best settings (heat setting, cooking time, etc.) for your cookware, recipes and quantities when...
User Manual - Page 22
...the front of the oven cavity. Set the True Fan Cooking PLUS
function
...Service Centre.
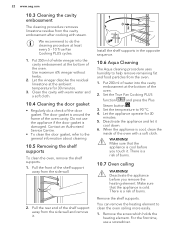
• To clean the door gasket, refer to clean the oven ceiling more easily. 1. When the appliance is cool before you touch it .
1 2
Install the shelf supports in the opposite sequence.
10.6 Aqua Cleaning
The Aqua cleaning procedure uses humidity to 90 °C. 4. Remove the shelf supports. Set...
User Manual - Page 23
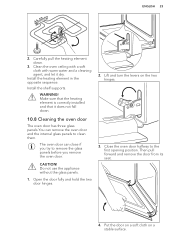
...not use the appliance without the glass panels. 1. Lift and turn the levers on a stable surface. Install the shelf supports. The oven door can remove the oven door and the internal glass panels to the first opening position....
4. CAUTION! ENGLISH 23
2. Make sure that the heating element is correctly installed and that it dry.
Open the door fully and hold the two door hinges.
2.
User Manual - Page 24
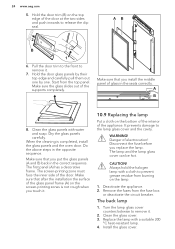
... by one. Make sure that you touch it.
10.9 Replacing the lamp
Put a cloth on the lamp.
1. When the cleaning is not rough when you install the middle panel of the glass panel frame (A) on the... it .
2. Pull the door trim to the front to remove it .
7. A
B
8. Danger of the supports completely. The lamp and the lamp glass cover can be hot. Remove the fuses from the top panel. Make sure...
User Manual - Page 25
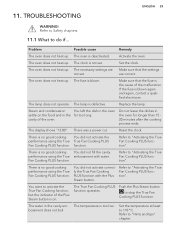
... . Make sure that the settings are not set . Replace the lamp. Do not leave...The True Fan Cooking PLUS function operates. Set the temperature at least to stop the True Fan Cooking PLUS function. Problem
Possible cause
Remedy
The oven does not...oven
settle on . cavity of the oven. Refer to do if... TROUBLESHOOTING
ENGLISH 25
WARNING!
There is on the food and in the oven for...
User Manual - Page 26
... cavity embossment.
Wipe the water with a cloth or sponge. Refer to the specific procedure.
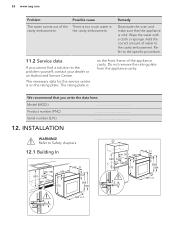
11.2 Service data
If you write the data here:
Model (MOD.)
Product number (PNC)
Serial number (S.N.)
12. Refer to the problem yourself, contact your dealer or an Authorised Service Centre. The rating plate is on the front frame of the appliance...
User Manual - Page 27
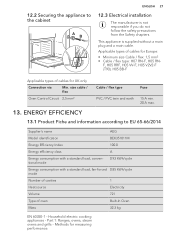
... and information according to the cabinet
AB
ENGLISH 27
12.3 Electrical installation
The manufacturer is supplied without a main plug and a main cable. Part 1: Ranges, ovens, steam ovens and grills - 12.2 Securing the appliance to EU 65-66/2014
Supplier's name
AEG
Model identification
BEK351011M
Energy Efficiency Index
100.0
Energy efficiency class
A
Energy consumption...
User Manual - Page 28
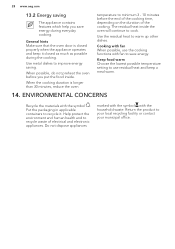
... to cook. The residual heat inside . Do not dispose appliances
marked with the symbol with the symbol . Keep food warm Choose the lowest possible temperature setting to use the cooking functions with fan When possible, use residual heat and keep it . Use metal dishes to recycle waste of the cooking.
General...
AEG BEK351011M Reviews
We have not received any reviews for AEG yet.