
Installation Guide
Page 1
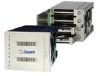
... 5400 rpm and 7200 rpm drives from major OEM's, in addition to component built system towers. 3ware RAID Drive Cage RDC-400 Quick Start Guide: RDC-400 is dependent on the actual chassis, drive, cable and power supply used. Install the box as illustrated in a 3 drive space. The performance of disc...: 3ware has tested the unit in typical tower's from the leading suppliers of this product is an internal drive expansion cage that supports four (4) hot swap drives in figure 1. 720-0091-00 B QUICK START GUIDE, 3W-RDC-400 Rev March 2003 Page 1 of 4 It maximizes storage capacity...
... 5400 rpm and 7200 rpm drives from major OEM's, in addition to component built system towers. 3ware RAID Drive Cage RDC-400 Quick Start Guide: RDC-400 is dependent on the actual chassis, drive, cable and power supply used. Install the box as illustrated in a 3 drive space. The performance of disc...: 3ware has tested the unit in typical tower's from the leading suppliers of this product is an internal drive expansion cage that supports four (4) hot swap drives in figure 1. 720-0091-00 B QUICK START GUIDE, 3W-RDC-400 Rev March 2003 Page 1 of 4 It maximizes storage capacity...
Installation Guide
Page 3
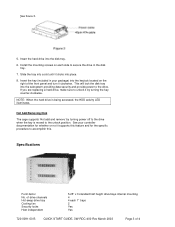
...for whether or not it by turning power off to the drive. If you are replacing a hard drive, make sure to unlock it supports this feature and for the specific procedure to the unlock position. Hot Add/Removing Disk The cage supports 'Hot add and remove' by turning the key counter-clockwise... clockwise. This will lock the disk tray into place. 8. See figure 3. 5. Insert the hard drive into the keylock located on each 1" trays 2 Yes Yes 720-0091-00 B QUICK START GUIDE, 3W-RDC-400 Rev March 2003 Page 3 of the front panel and turn it clicks into the subsystem providing data...
...for whether or not it by turning power off to the drive. If you are replacing a hard drive, make sure to unlock it supports this feature and for the specific procedure to the unlock position. Hot Add/Removing Disk The cage supports 'Hot add and remove' by turning the key counter-clockwise... clockwise. This will lock the disk tray into place. 8. See figure 3. 5. Insert the hard drive into the keylock located on each 1" trays 2 Yes Yes 720-0091-00 B QUICK START GUIDE, 3W-RDC-400 Rev March 2003 Page 3 of the front panel and turn it clicks into the subsystem providing data...
Installation Guide
Page 4
...RDC-400 Rev March 2003 Page 4 of 3ware, Inc., 455 W. All rights reserved. State Law Provisions This warranty gives you specific legal rights and you may not apply. 3ware Technical Support and Services Please call 3ware toll free at (877)883-9273 or email to support@3ware... 94085 Disclaimer 3ware, Inc. Warranty, Technial Support and Service Limited Warranty 1-year hardware warranty: 3ware, Inc. warrants this document, nor does 3ware make any means, electronic, mechanical, photocopying, recording or otherwise, without drives) Copyright ©2003 3ware, Inc. Drive access indicators ...
...RDC-400 Rev March 2003 Page 4 of 3ware, Inc., 455 W. All rights reserved. State Law Provisions This warranty gives you specific legal rights and you may not apply. 3ware Technical Support and Services Please call 3ware toll free at (877)883-9273 or email to support@3ware... 94085 Disclaimer 3ware, Inc. Warranty, Technial Support and Service Limited Warranty 1-year hardware warranty: 3ware, Inc. warrants this document, nor does 3ware make any means, electronic, mechanical, photocopying, recording or otherwise, without drives) Copyright ©2003 3ware, Inc. Drive access indicators ...