

Quick Installation Guide
Page 10
... holder BBU connector and hole for post Ports: 0 1 2 3 4 5 7 6 6 3ware 9550SX Serial ATA RAID Controller Quick Install Guide Oddnumbered ports are usually located below , ports 6 and 7 are both on top. 9550SX 8-Port with Standard SATA Connectors Note: For details about LED connectors, see page 17. On the 8-port controller shown below even-numbered ports. Figure 1. 8-Port 3ware 9550SX-8LP Serial ATA RAID Controller...
... holder BBU connector and hole for post Ports: 0 1 2 3 4 5 7 6 6 3ware 9550SX Serial ATA RAID Controller Quick Install Guide Oddnumbered ports are usually located below , ports 6 and 7 are both on top. 9550SX 8-Port with Standard SATA Connectors Note: For details about LED connectors, see page 17. On the 8-port controller shown below even-numbered ports. Figure 1. 8-Port 3ware 9550SX-8LP Serial ATA RAID Controller...

Quick Installation Guide
Page 11
... Odd-numbered ports 1 and 3 are located below even-numbered ports 0 and 2. Slots for battery holder BBU connector and hole for post www.3ware.com 7 9550SX RAID Controller Cards 9550SX 4-Port with Standard SATA Connectors Figure 3. 12-Port 3ware 9550SX-12 Serial ATA RAID Controller I2C connector Ports 10 and 11 Odd-numbered ports 1 through 11 are located below even-numbered...
... Odd-numbered ports 1 and 3 are located below even-numbered ports 0 and 2. Slots for battery holder BBU connector and hole for post www.3ware.com 7 9550SX RAID Controller Cards 9550SX 4-Port with Standard SATA Connectors Figure 3. 12-Port 3ware 9550SX-12 Serial ATA RAID Controller I2C connector Ports 10 and 11 Odd-numbered ports 1 through 11 are located below even-numbered...

Quick Installation Guide
Page 12
... drives. Ports: 8 to 11 4 to 7 0 to four drives. Installing an AMCC 3ware 9550SX RAID Controller 9550SX 12-Port with Multilane Internal SATA Connectors Figure 5. 16-Port 3ware 9550SX-16ML Serial ATA RAID Controller I2C connector Multi-lane connectors can each handle up to 3 Holes for battery holder connection BBU connector and hole for post 8 3ware 9550SX Serial ATA RAID Controller Quick Install Guide Chapter 1.
... drives. Ports: 8 to 11 4 to 7 0 to four drives. Installing an AMCC 3ware 9550SX RAID Controller 9550SX 12-Port with Multilane Internal SATA Connectors Figure 5. 16-Port 3ware 9550SX-16ML Serial ATA RAID Controller I2C connector Multi-lane connectors can each handle up to 3 Holes for battery holder connection BBU connector and hole for post 8 3ware 9550SX Serial ATA RAID Controller Quick Install Guide Chapter 1.

Quick Installation Guide
Page 13
.... www.3ware.com 9 Installing a Serial ATA RAID Controller Installing a Serial ATA RAID Controller Note: The illustrations in one direction. If you want to which port you have a Battery Backup Unit (BBU), install it can only be slightly different, but the steps are very similar. One edge of the ports will be inserted in this section show a 9550SX-8LP...
.... www.3ware.com 9 Installing a Serial ATA RAID Controller Installing a Serial ATA RAID Controller Note: The illustrations in one direction. If you want to which port you have a Battery Backup Unit (BBU), install it can only be slightly different, but the steps are very similar. One edge of the ports will be inserted in this section show a 9550SX-8LP...
Quick Installation Guide
Page 27
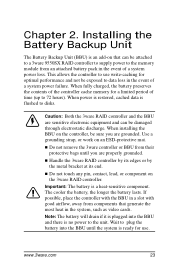
...touch any pin, contact, lead, or component on an ESD-protective mat. „ Do not remove the 3ware controller or BBU from components that can be attached to a 3ware 9550SX RAID controller to supply power to the memory module from an attached battery pack in the system, such as video cards.... If possible, place the controller with the BBU in the event of a system power failure. Important: The battery is ready...
...touch any pin, contact, lead, or component on an ESD-protective mat. „ Do not remove the 3ware controller or BBU from components that can be attached to a 3ware 9550SX RAID controller to supply power to the memory module from an attached battery pack in the system, such as video cards.... If possible, place the controller with the BBU in the event of a system power failure. Important: The battery is ready...
Quick Installation Guide
Page 28
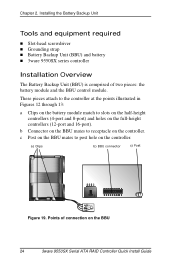
...; Battery Backup Unit (BBU) and battery „ 3ware 9550SX series controller Installation Overview The Battery Backup Unit (BBU) is comprised of connection on the full-height controllers (12-port and 16-port). c Post on the BBU mates to slots on the half-height controllers (4-port and 8-port) and holes on the BBU 24 3ware 9550SX Serial ATA RAID Controller Quick Install Guide These...
...; Battery Backup Unit (BBU) and battery „ 3ware 9550SX series controller Installation Overview The Battery Backup Unit (BBU) is comprised of connection on the full-height controllers (12-port and 16-port). c Post on the BBU mates to slots on the half-height controllers (4-port and 8-port) and holes on the BBU 24 3ware 9550SX Serial ATA RAID Controller Quick Install Guide These...
Quick Installation Guide
Page 29
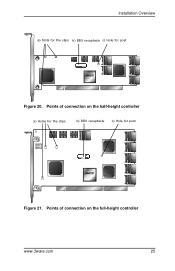
Points of connection on the full-height controller www.3ware.com 25 Installation Overview a) Slots for the clips b) BBU receptacle c) Hole for post Figure 21. Points of connection on the half-height controller a) Holes for the clips b) BBU receptacle c) Hole for post Figure 20.
Points of connection on the full-height controller www.3ware.com 25 Installation Overview a) Slots for the clips b) BBU receptacle c) Hole for post Figure 21. Points of connection on the half-height controller a) Holes for the clips b) BBU receptacle c) Hole for post Figure 20.

Quick Installation Guide
Page 30
... to connect to : „ Mate the connector on the BBU control module with the receptacle on the controller. „ Match the plastic post on the BBU with the hole on the BBU control module and set it aside (you will reattach it soon.) Figure 22. Chapter 2....Backup Unit Installation Instructions 1 Remove the screw head from the plastic post 2 Position the BBU control module above the controller and align the BBU control module and the controller, making sure to the controller 26 3ware 9550SX Serial ATA RAID Controller Quick Install Guide Removing the head from the plastic post on the...
... to connect to : „ Mate the connector on the BBU control module with the receptacle on the controller. „ Match the plastic post on the BBU with the hole on the BBU control module and set it aside (you will reattach it soon.) Figure 22. Chapter 2....Backup Unit Installation Instructions 1 Remove the screw head from the plastic post 2 Position the BBU control module above the controller and align the BBU control module and the controller, making sure to the controller 26 3ware 9550SX Serial ATA RAID Controller Quick Install Guide Removing the head from the plastic post on the...
Quick Installation Guide
Page 31
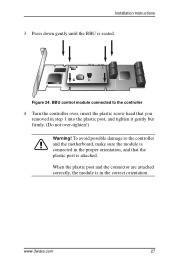
.... Installation Instructions 3 Press down gently until the BBU is in step 1 into the plastic post, and tighten it gently but firmly. (Do not over-tighten!) Warning! To avoid possible damage to the controller 4 Turn the controller over, insert the plastic screw head that the plastic... post is connected in the proper orientation, and that you removed in the correct orientation. BBU control module connected to the controller and the motherboard, make sure the ...
.... Installation Instructions 3 Press down gently until the BBU is in step 1 into the plastic post, and tighten it gently but firmly. (Do not over-tighten!) Warning! To avoid possible damage to the controller 4 Turn the controller over, insert the plastic screw head that the plastic... post is connected in the proper orientation, and that you removed in the correct orientation. BBU control module connected to the controller and the motherboard, make sure the ...

Quick Installation Guide
Page 34
Figure 29. Battery power connector inserted in the lower hole. 3 Insert the battery power connector into the power receptacle on 3ware controllers. 30 3ware 9550SX Serial ATA RAID Controller Quick Install Guide Note: The battery will not be used right away, wait to do this step until the bottom clip snaps into place in ... to install in and there is ready for use. If the system will drain if it is plugged in your system. Figure 23 shows the BBU fully installed on the BBU. Chapter 2.
Figure 29. Battery power connector inserted in the lower hole. 3 Insert the battery power connector into the power receptacle on 3ware controllers. 30 3ware 9550SX Serial ATA RAID Controller Quick Install Guide Note: The battery will not be used right away, wait to do this step until the bottom clip snaps into place in ... to install in and there is ready for use. If the system will drain if it is plugged in your system. Figure 23 shows the BBU fully installed on the BBU. Chapter 2.
Quick Installation Guide
Page 35
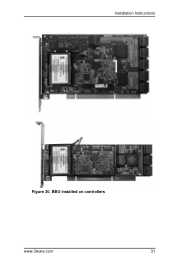
Installation Instructions Figure 30. BBU installed on controllers www.3ware.com 31
Installation Instructions Figure 30. BBU installed on controllers www.3ware.com 31
Quick Installation Guide
Page 36
...free the clip on usage. To obtain a replacement battery module, contact AMCC. Um Ressourcen zur korrekten Entsorgung der Baterie in 3ware 9550SX Serial ATA RAID Controller User Guide. To replace the battery 1 Make sure the system is replaced by an incorrect type. Installing the Battery Backup Unit... Replacing the Battery The Battery Backup Unit (BBU) will last for many years. Vorsicht: Es entsteht Explosionsgefahr bei Auswechslung der Baterie mit ...
...free the clip on usage. To obtain a replacement battery module, contact AMCC. Um Ressourcen zur korrekten Entsorgung der Baterie in 3ware 9550SX Serial ATA RAID Controller User Guide. To replace the battery 1 Make sure the system is replaced by an incorrect type. Installing the Battery Backup Unit... Replacing the Battery The Battery Backup Unit (BBU) will last for many years. Vorsicht: Es entsteht Explosionsgefahr bei Auswechslung der Baterie mit ...

Quick Installation Guide
Page 37
...lift out the bottom of the battery module slightly. 5 Once the bottom of the slot. (If desired, you can remove the BBU control module to facilitate disconnecting the power cable.) www.3ware.com 33 Bottom clip c) Lift up to release the clips on the top. To do so, press down gently. b) Lift ...out the bottom of the battery module to remove the clips on the bottom edge. Removing the battery module 6 Disconnect the battery power cable from the BBU. a) ...
...lift out the bottom of the battery module slightly. 5 Once the bottom of the slot. (If desired, you can remove the BBU control module to facilitate disconnecting the power cable.) www.3ware.com 33 Bottom clip c) Lift up to release the clips on the top. To do so, press down gently. b) Lift ...out the bottom of the battery module to remove the clips on the bottom edge. Removing the battery module 6 Disconnect the battery power cable from the BBU. a) ...

Quick Installation Guide
Page 38
... run the battery test from the BBU module 7 If you remove the BBU control module from the controller. For detailed instructions, see the 3ware 9550SX Serial ATA RAID Controller User Guide and the 3ware 9000 Series Serial ATA RAID Controller CLI Guide. 34 3ware 9550SX Serial ATA RAID Controller Quick Install Guide Figure 32. Removing the power cable from the BBU page of this new battery...
... run the battery test from the BBU module 7 If you remove the BBU control module from the controller. For detailed instructions, see the 3ware 9550SX Serial ATA RAID Controller User Guide and the 3ware 9000 Series Serial ATA RAID Controller CLI Guide. 34 3ware 9550SX Serial ATA RAID Controller Quick Install Guide Figure 32. Removing the power cable from the BBU page of this new battery...