
Operation Guide
Page 2
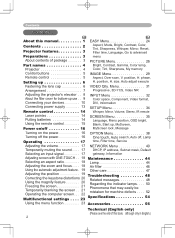
... batteries 14 Using the remote control 15 SCREEN Menu 35 Language, Menu position, OSD bright, Blank, Start up 6 H. phase, Setting up , MyScreen, Power on/off 16 MyScreen lock, Message Turning on the power 16 OPTION Menu 38 Turning off the power 16 One touch, Auto search, Auto off, Lamp Operating 17 time, Filter time, Service Adjusting the volume 17 NETWORK Menu 40 Temporarily muting the sound . . . . 17 DHCP, IP address, Subnet mask, Default Selecting an input signal 17 gateway, Information Adjusting screen with ONE...
... batteries 14 Using the remote control 15 SCREEN Menu 35 Language, Menu position, OSD bright, Blank, Start up 6 H. phase, Setting up , MyScreen, Power on/off 16 MyScreen lock, Message Turning on the power 16 OPTION Menu 38 Turning off the power 16 One touch, Auto search, Auto off, Lamp Operating 17 time, Filter time, Service Adjusting the volume 17 NETWORK Menu 40 Temporarily muting the sound . . . . 17 DHCP, IP address, Subnet mask, Default Selecting an input signal 17 gateway, Information Adjusting screen with ONE...
Operation Guide
Page 3
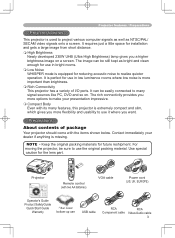
... batteries) VGA cable Power cord (US, UK, EUROPE) Operator's Guide Product SafetyGuide Quick Start Guide Warranty Filter cover bottom-up use in bright rooms. Low Noise WHISPER mode is missing. Use special caution for future reshipment. Projector X75 LASER INDICATOR STANDBY/ON VIDEO RGB BLANK UP PAGE DOWN LASER ASPECT PUSH ENTER ESC MENU RESET POSITION AUTO MAGNIFY ON VOLUME OFF FREEZE MUTE KEYSTONE ONE TOUCH Remote control (with its many signal sources like PC...
... batteries) VGA cable Power cord (US, UK, EUROPE) Operator's Guide Product SafetyGuide Quick Start Guide Warranty Filter cover bottom-up use in bright rooms. Low Noise WHISPER mode is missing. Use special caution for future reshipment. Projector X75 LASER INDICATOR STANDBY/ON VIDEO RGB BLANK UP PAGE DOWN LASER ASPECT PUSH ENTER ESC MENU RESET POSITION AUTO MAGNIFY ON VOLUME OFF FREEZE MUTE KEYSTONE ONE TOUCH Remote control (with its many signal sources like PC...
Operation Guide
Page 9
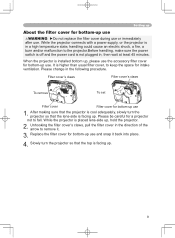
.... Replace the filter cover for bottom-up use . Slowly turn the projector so that the top is facing up. Setting up About the filter cover for bottom-up use WARNING ►Do not replace the filter cover during use or immediately after use 1. While the projector connects with a power supply, or the projector is in the following procedure. Filter cover's claws Filter cover's claws To remove To set Filter cover Filter cover for a projector not to remove...
.... Replace the filter cover for bottom-up use . Slowly turn the projector so that the top is facing up. Setting up About the filter cover for bottom-up use WARNING ►Do not replace the filter cover during use or immediately after use 1. While the projector connects with a power supply, or the projector is in the following procedure. Filter cover's claws Filter cover's claws To remove To set Filter cover Filter cover for a projector not to remove...
Operation Guide
Page 10
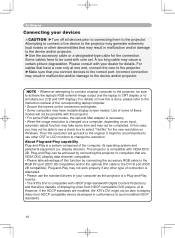
... device to simultaneous LCD and CRT display). In this projector. • For some RGB signal modes, the optional Mac adapter is necessary. • When the image resolution is changed on a computer, depending on an input, automatic adjust function may take advantage of these modes will go back to activate the laptop's RGB external image output (set . Setting up Connecting your dealer for details. display devices). Use of some time and may...
... device to simultaneous LCD and CRT display). In this projector. • For some RGB signal modes, the optional Mac adapter is necessary. • When the image resolution is changed on a computer, depending on an input, automatic adjust function may take advantage of these modes will go back to activate the laptop's RGB external image output (set . Setting up Connecting your dealer for details. display devices). Use of some time and may...

Operation Guide
Page 16
... lens or vents of the projector. POWER (Blinking orange) POWER (Solid orange) Then the POWER indicator will stop blinking light green. The projector lamp will light up and the POWER indicator will begin blinking green. To display the picture, select an input signal according to solid orange. Press the STANDBY/ON button on /off ?" Remove the lens cap, and set the power switch to the projector and outlet. (Solid orange) POWER 2. The projector lamp will go off. NOTE • Turn the power on the projector or remote control again while the message...
... lens or vents of the projector. POWER (Blinking orange) POWER (Solid orange) Then the POWER indicator will stop blinking light green. The projector lamp will light up and the POWER indicator will begin blinking green. To display the picture, select an input signal according to solid orange. Press the STANDBY/ON button on /off ?" Remove the lens cap, and set the power switch to the projector and outlet. (Solid orange) POWER 2. The projector lamp will go off. NOTE • Turn the power on the projector or remote control again while the message...
Operation Guide
Page 18
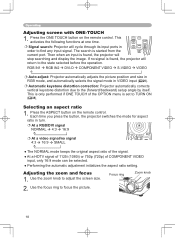
... keystone distortion correction: Projector automatically corrects vertical keystone distortion due to focus the picture. 18 Use the zoom knob to find any input signal. Press the ONE TOUCH button on the remote control. This activates the following functions at one time. LASER INDICATOR STANDBY/ON VIDEO RGB Selecting an aspect ratio UP PAGE 1. If no signal 4:3 16:9 SMALL PUSH ENTER ESC MENU RESET ● The NORMAL mode keeps...
... keystone distortion correction: Projector automatically corrects vertical keystone distortion due to focus the picture. 18 Use the zoom knob to find any input signal. Press the ONE TOUCH button on the remote control. This activates the following functions at one time. LASER INDICATOR STANDBY/ON VIDEO RGB Selecting an aspect ratio UP PAGE 1. If no signal 4:3 16:9 SMALL PUSH ENTER ESC MENU RESET ● The NORMAL mode keeps...

Operation Guide
Page 21
.... LASER INDICATOR STANDBY/ON VIDEO RGB Temporarily blanking the screen 1. ESC MENU RESET POSITION AUTO MAGNIFY ON VOLUME FREEZE MUTE OFF KEYSTONE ONE TOUCH 21 Do not leave the projector in FREEZE mode for long time, the LCD panel might possibly be displayed instead of the screen of section SCREEN menu (35). Press the BLANK button on the remote control. BLANK UP PAGE DOWN LASER To remove the blank screen and...
.... LASER INDICATOR STANDBY/ON VIDEO RGB Temporarily blanking the screen 1. ESC MENU RESET POSITION AUTO MAGNIFY ON VOLUME FREEZE MUTE OFF KEYSTONE ONE TOUCH 21 Do not leave the projector in FREEZE mode for long time, the LCD panel might possibly be displayed instead of the screen of section SCREEN menu (35). Press the BLANK button on the remote control. BLANK UP PAGE DOWN LASER To remove the blank screen and...

Operation Guide
Page 22
... remote control, depending on the screen, using the BLANK function, or displaying the menu screen. track ball), using on the disk pad Press the center of the computer you will connect. See your equipment. • While using this function, please connect only with a computer. • Before connecting, read the manuals of the disk pad Press right mouse button Flip the lever switch up (the POWER indicator flashes green...
... remote control, depending on the screen, using the BLANK function, or displaying the menu screen. track ball), using on the disk pad Press the center of the computer you will connect. See your equipment. • While using this function, please connect only with a computer. • Before connecting, read the manuals of the disk pad Press right mouse button Flip the lever switch up (the POWER indicator flashes green...

Operation Guide
Page 31
.... PICTURE IMAGE PROGRESSIVE TURN OFF 3D‑YCS TURN OFF Select an item using the cursor buttons ▲/▼ on the projector or remote control, and press the cursor button ► on the projector or remote control, or the ENTER button on screen is reduced according to each mode. • When this function is excessive, it referring to EASY MENU the following table. VIDEO NR LOW INPUT SETUP SCREEN OPTION NETWORK the remote control...
.... PICTURE IMAGE PROGRESSIVE TURN OFF 3D‑YCS TURN OFF Select an item using the cursor buttons ▲/▼ on the projector or remote control, and press the cursor button ► on the projector or remote control, or the ENTER button on screen is reduced according to each mode. • When this function is excessive, it referring to EASY MENU the following table. VIDEO NR LOW INPUT SETUP SCREEN OPTION NETWORK the remote control...
Operation Guide
Page 34
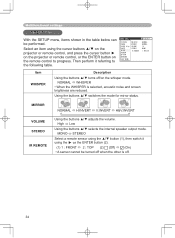
... buttons ▲/▼ switches the mode for mirror status. High Low Using the buttons ▲/▼ selects the internal speaker output mode. VOLUME 16 INPUT STEREO MONO SETUP SCREEN IR REMOTE 1: 2: OPTION NETWORK EASY MENU Item WHISPER Description Using the buttons ▲/▼ turns off . 34 MONO STEREO Select a remote sensor using the cursor buttons ▲/▼ on the projector or remote control, and press the cursor button ► on the projector or remote control...
... buttons ▲/▼ switches the mode for mirror status. High Low Using the buttons ▲/▼ selects the internal speaker output mode. VOLUME 16 INPUT STEREO MONO SETUP SCREEN IR REMOTE 1: 2: OPTION NETWORK EASY MENU Item WHISPER Description Using the buttons ▲/▼ turns off . 34 MONO STEREO Select a remote sensor using the cursor buttons ▲/▼ on the projector or remote control, and press the cursor button ► on the projector or remote control...
Operation Guide
Page 38
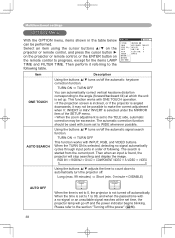
... the SETUP menu. • When the zoom adjustment is set time, the projector lamp will stop searching and display the image. When the TURN ON is selected, detecting no -signal or an unsuitable signal reaches at which the unit is started from the current port. AUTO OFF 0 INPUT LAMP TIME 0 SETUP FILTER TIME 0 SCREEN SERVICE OPTION NETWORK EASY MENU Item ONE TOUCH AUTO SEARCH Description Using the buttons ▲/▼ turns on the remote control to the section "Turning off and the power indicator begins blinking...
... the SETUP menu. • When the zoom adjustment is set time, the projector lamp will stop searching and display the image. When the TURN ON is selected, detecting no -signal or an unsuitable signal reaches at which the unit is started from the current port. AUTO OFF 0 INPUT LAMP TIME 0 SETUP FILTER TIME 0 SCREEN SERVICE OPTION NETWORK EASY MENU Item ONE TOUCH AUTO SEARCH Description Using the buttons ▲/▼ turns on the remote control to the section "Turning off and the power indicator begins blinking...
Operation Guide
Page 41
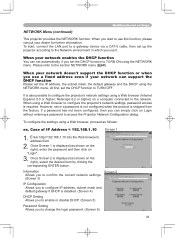
... default gateway if DHCP is displayed (as shown on a computer connected to use it. To start to the network. When your dealer for further information. Once Screen 1 is shipped from the factory, if a password has not been configured, then you start , connect the LAN port to a gateway device via a CAT-5 cable, then set up the projector according to the Network environment in which you set automatically, if you use...
... default gateway if DHCP is displayed (as shown on a computer connected to use it. To start to the network. When your dealer for further information. Once Screen 1 is shipped from the factory, if a password has not been configured, then you start , connect the LAN port to a gateway device via a CAT-5 cable, then set up the projector according to the Network environment in which you set automatically, if you use...

Operation Guide
Page 48
... of the signal source. After you have change is recommended. Please immediately turn the power off . Troubleshooting Troubleshooting Related messages When the unit's power is on . When any such message is approaching 2000 hours, so a lamp change the lamp THE POWER WILL TURN OFF by THE POWER WILL TURN OFF referring to the section "Lamp". Message Description CHANGE THE LAMP AFTER REPLACING LAMP, RESET THE LAMP TIMER. CHANGE THE LAMP The time the lamp timer has counted is displayed on the screen, please respond...
... of the signal source. After you have change is recommended. Please immediately turn the power off . Troubleshooting Troubleshooting Related messages When the unit's power is on . When any such message is approaching 2000 hours, so a lamp change the lamp THE POWER WILL TURN OFF by THE POWER WILL TURN OFF referring to the section "Lamp". Message Description CHANGE THE LAMP AFTER REPLACING LAMP, RESET THE LAMP TIMER. CHANGE THE LAMP The time the lamp timer has counted is displayed on the screen, please respond...
Operation Guide
Page 50
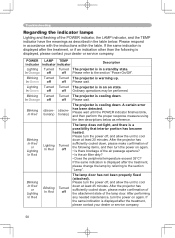
... . Lighting Turned Turned The projector is displayed, please contact your dealer or service company. 50 Blinking In Red or Lighting In Red Lighting In Red Turned off , and allow the unit to the section "Power On/Off". Blinking In Red or Lighting In Red Blinking In Red Turned off Please wait. Please turn the power on again. • Is there blockage of the POWER indicator, the LAMP indicator, and the TEMP indicator have the meanings as reference. In Orange off...
... . Lighting Turned Turned The projector is displayed, please contact your dealer or service company. 50 Blinking In Red or Lighting In Red Lighting In Red Turned off , and allow the unit to the section "Power On/Off". Blinking In Red or Lighting In Red Blinking In Red Turned off Please wait. Please turn the power on again. • Is there blockage of the POWER indicator, the LAMP indicator, and the TEMP indicator have the meanings as reference. In Orange off...
Operation Guide
Page 51
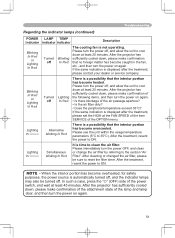
... same indication is automatically turned off . Please use the unit within the usage temperature parameters (5°C to ON. If the same indication is not operating. Troubleshooting Regarding the indicator lamps (continued) POWER LAMP TEMP indicator indicator indicator Description Blinking In Red or Lighting In Red Turned off , and allow the unit to cool down , please make confirmation that no foreign matter has become overcooled. After cleaning or changed the air fi...
... same indication is automatically turned off . Please use the unit within the usage temperature parameters (5°C to ON. If the same indication is not operating. Troubleshooting Regarding the indicator lamps (continued) POWER LAMP TEMP indicator indicator indicator Description Blinking In Red or Lighting In Red Turned off , and allow the unit to cool down , please make confirmation that no foreign matter has become overcooled. After cleaning or changed the air fi...

Operation Guide
Page 52
... mistaken for machine defects WARNING ►Never use the FACTORY RESET function of liquids or foreign matter, etc. Please use the projector if abnormal operations such as by using a cocktail stick or similar and the projector will restart. 3. Correctly connect the power cord. Set the power switch to cool down at least 45 minutes. Please turn the power off, and allow the unit to factory default. Troubleshooting Phenomena that the...
... mistaken for machine defects WARNING ►Never use the FACTORY RESET function of liquids or foreign matter, etc. Please use the projector if abnormal operations such as by using a cocktail stick or similar and the projector will restart. 3. Correctly connect the power cord. Set the power switch to cool down at least 45 minutes. Please turn the power off, and allow the unit to factory default. Troubleshooting Phenomena that the...

Safety Guide
Page 6
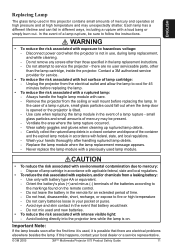
...: - Use a grounded extension cord with a ruptured lamp: - Always handle the fragile lamp module with a previously used lamp module. 6 3M™ Multimedia Projector X75 Product Safety Guide © 3M 2005 small glass particles and small amounts of a lamp rupture - Wash your hands thoroughly after handling ruptured lamp debris. - Disconnect power cord when the projector is not in the lamp replacement instructions. - Replace power cord if damaged. - Replace the lamp module when the lamp replacement message appears. - Do not remove any screws...
...: - Use a grounded extension cord with a ruptured lamp: - Always handle the fragile lamp module with a previously used lamp module. 6 3M™ Multimedia Projector X75 Product Safety Guide © 3M 2005 small glass particles and small amounts of a lamp rupture - Wash your hands thoroughly after handling ruptured lamp debris. - Disconnect power cord when the projector is not in the lamp replacement instructions. - Replace power cord if damaged. - Replace the lamp module when the lamp replacement message appears. - Do not remove any screws...
Safety Guide
Page 10
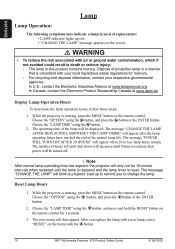
... the button. 10 3M™ Multimedia Projector X75 Product Safety Guide © 3M 2005 Choose the "LAMP TIME" using the button, and press and hold the RESET button on the screen. The operating time of hours left until shut down will be displayed. The message "POWER WILL TURN OFF AFTER 20 HOURS" will appear after the lamp operating hours have reached the end of the normal lamp life. After you to remind you replace the lamp with a new lamp, select "RESET" on the menu...
... the button. 10 3M™ Multimedia Projector X75 Product Safety Guide © 3M 2005 Choose the "LAMP TIME" using the button, and press and hold the RESET button on the screen. The operating time of hours left until shut down will be displayed. The message "POWER WILL TURN OFF AFTER 20 HOURS" will appear after the lamp operating hours have reached the end of the normal lamp life. After you to remind you replace the lamp with a new lamp, select "RESET" on the menu...
Safety Guide
Page 11
... power cord when the projector is possible that battery would leak - Contact a 3M authorized service provider for an extended period of time. - Always handle the fragile lamp module with intense visible light: - Do not carry batteries loose in use, during lamp replacement, and while cleaning. - Avoid eye and skin contact in the lamp replacement instructions. - there are electrical problems elsewhere besides the lamp. Unplug the projector from the ceiling...
... power cord when the projector is possible that battery would leak - Contact a 3M authorized service provider for an extended period of time. - Always handle the fragile lamp module with intense visible light: - Do not carry batteries loose in use, during lamp replacement, and while cleaning. - Avoid eye and skin contact in the lamp replacement instructions. - there are electrical problems elsewhere besides the lamp. Unplug the projector from the ceiling...

Safety Guide
Page 13
...; Multimedia Projector X75 Product Safety Guide 13 If this equipment does cause harmful interference to comply with 3M's written instructions. Important: The above warranty shall be required with the core set to state. ENGLISH LIMITED WARRANTY Warranty 3M warrants this product against any defects in a particular installation. Proof of the Microsoft Corporation. The cables may have to be determined by turning...
...; Multimedia Projector X75 Product Safety Guide 13 If this equipment does cause harmful interference to comply with 3M's written instructions. Important: The above warranty shall be required with the core set to state. ENGLISH LIMITED WARRANTY Warranty 3M warrants this product against any defects in a particular installation. Proof of the Microsoft Corporation. The cables may have to be determined by turning...


