Safety Guide
Page 1
All Rights Reserved. 3 Digital Board Product Safety Guide Including Installation Instructions December 2005 • 78-6970-9435-3 • Copyright © 2005, 3M Company.
All Rights Reserved. 3 Digital Board Product Safety Guide Including Installation Instructions December 2005 • 78-6970-9435-3 • Copyright © 2005, 3M Company.
Safety Guide
Page 3
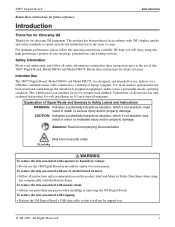
... Safety Labels and Instructions WARNING: Indicates a potentially hazardous situation, which if not avoided, may result in accordance with muscle strain: • Always use the 3M Digital Board in the years to a desktop or laptop computer. To reduce the risk associated with use of this 3M™ Digital Board, Model DB565 and Model DB578. We hope you for wall installation on the...
... Safety Labels and Instructions WARNING: Indicates a potentially hazardous situation, which if not avoided, may result in accordance with muscle strain: • Always use the 3M Digital Board in the years to a desktop or laptop computer. To reduce the risk associated with use of this 3M™ Digital Board, Model DB565 and Model DB578. We hope you for wall installation on the...
Safety Guide
Page 4
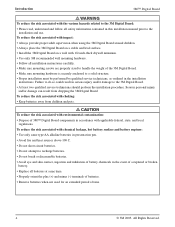
... this installation manual prior to recharge batteries. • Do not break or disassemble batteries. • Avoid eye and skin contact, ingestion and inhalation of battery chemicals in the event of a ruptured or broken battery. • Replace all installation instructions carefully. • Make sure mounting screws are properly sized to handle the weight of the 3M Digital Board. •...
... this installation manual prior to recharge batteries. • Do not break or disassemble batteries. • Avoid eye and skin contact, ingestion and inhalation of battery chemicals in the event of a ruptured or broken battery. • Replace all installation instructions carefully. • Make sure mounting screws are properly sized to handle the weight of the 3M Digital Board. •...

Safety Guide
Page 5
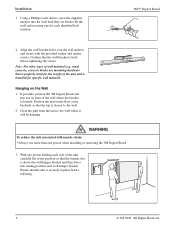
Remove the Digital Board, pen tray and accessories from the shipping container. Installation WARNING To reduce the risk associated with 1/2-inch-thick drywall minimum. • Use only 3M recommended wall mounting hardware. • Follow all installation instructions carefully. • Make sure mounting screws are behind the hole locations. Determine the desired location of the shipping container. 3. one at each end...
Remove the Digital Board, pen tray and accessories from the shipping container. Installation WARNING To reduce the risk associated with 1/2-inch-thick drywall minimum. • Use only 3M recommended wall mounting hardware. • Follow all installation instructions carefully. • Make sure mounting screws are behind the hole locations. Determine the desired location of the shipping container. 3. one at each end...
Safety Guide
Page 6
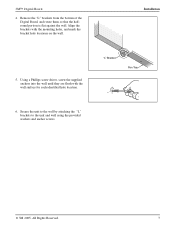
... surface using one for specific wall material. Confirm that the bracket slot is above the wall hanger bracket and then lower into mating position onto wall hanger bracket. If possible, position the 3M Digital Board and pen tray in place before tightening the screws. WARNING To reduce the risk associated with muscle strain: • Always use mounting...
... surface using one for specific wall material. Confirm that the bracket slot is above the wall hanger bracket and then lower into mating position onto wall hanger bracket. If possible, position the 3M Digital Board and pen tray in place before tightening the screws. WARNING To reduce the risk associated with muscle strain: • Always use mounting...
Safety Guide
Page 7
...location. 6. 3M™ Digital Board 4. Remove the "L" brackets from the bottom of the Digital Board, and rotate them so that the halfround portion is flat against the wall. Using a Phillips screw driver, screw the supplied anchors into the wall until they are flush with the mounting holes, ...and mark the bracket hole locations on the wall. All Rights Reserved. 7 Installation ...
...location. 6. 3M™ Digital Board 4. Remove the "L" brackets from the bottom of the Digital Board, and rotate them so that the halfround portion is flat against the wall. Using a Phillips screw driver, screw the supplied anchors into the wall until they are flush with the mounting holes, ...and mark the bracket hole locations on the wall. All Rights Reserved. 7 Installation ...
Safety Guide
Page 8
Any statements related to replace or repair the 3M product or refund the purchase price of the 3M product. If this product is not guaranteed. A All other components and software will be free from defects in material and manufacture for a period of 2 years from...You assume all risks and liability associated with such use or implementation. Except where prohibited by an authorized officer of 3M. Limited Remedy; Limited Liability The 3M Digital Board writing surface, side panel, pen tray and electronic pod cover will not be reliable, but the ...
Any statements related to replace or repair the 3M product or refund the purchase price of the 3M product. If this product is not guaranteed. A All other components and software will be free from defects in material and manufacture for a period of 2 years from...You assume all risks and liability associated with such use or implementation. Except where prohibited by an authorized officer of 3M. Limited Remedy; Limited Liability The 3M Digital Board writing surface, side panel, pen tray and electronic pod cover will not be reliable, but the ...