
Getting Started Guide
Page 4
... Panel Port 45 Viewing Automatically Configured IP Information 49 Using 3Com Network Director 49 Connecting to the Console Port 49 Setting Up Command Line Interface Management 51 User Interface Overview 51 CLI Management using the Console Port 51 CLI Management over the Network 51 Setting Up Command Line Interface Management using SSH 52 Setting Up Web Interface Management 52 Prerequisites 52 Web Management Over the Network 53 Setting Up SNMP Management V1 or V2 54 Prerequisites 54 Default Users and Passwords 55 4 PROBLEM SOLVING Solving Problems Indicated by LEDs 58 Solving Hardware Problems...
... Panel Port 45 Viewing Automatically Configured IP Information 49 Using 3Com Network Director 49 Connecting to the Console Port 49 Setting Up Command Line Interface Management 51 User Interface Overview 51 CLI Management using the Console Port 51 CLI Management over the Network 51 Setting Up Command Line Interface Management using SSH 52 Setting Up Web Interface Management 52 Prerequisites 52 Web Management Over the Network 53 Setting Up SNMP Management V1 or V2 54 Prerequisites 54 Default Users and Passwords 55 4 PROBLEM SOLVING Solving Problems Indicated by LEDs 58 Solving Hardware Problems...
Getting Started Guide
Page 8
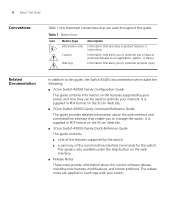
... Table 1 lists important conventions that are supplied in PDF format on the 3Com Web site. ■ 3Com Switch 4500G Family Quick Reference Guide This guide contains: ■ a list of the features supported by your switch. This guide is supplied in hard copy with your switch and how they can be used throughout this guide, the Switch 4500G documentation set includes the following: ■ 3Com Switch 4500G Family Configuration Guide This guide contains information on the features supported by the switch. ■ a summary of the command line interface commands...
... Table 1 lists important conventions that are supplied in PDF format on the 3Com Web site. ■ 3Com Switch 4500G Family Quick Reference Guide This guide contains: ■ a list of the features supported by your switch. This guide is supplied in hard copy with your switch and how they can be used throughout this guide, the Switch 4500G documentation set includes the following: ■ 3Com Switch 4500G Family Configuration Guide This guide contains information on the features supported by the switch. ■ a summary of the command line interface commands...

Getting Started Guide
Page 10
Table 2 Hardware Features Feature Addresses Auto-negotiation Forwarding Modes Duplex Modes Auto MDI/MDIX Flow Control Traffic Prioritization Ethernet, Fast Ethernet, and Gigabit Ethernet Ports Switch 4500G Up to the "Command Reference Guide" and the "Configuration Guide". Supported (using the software features of receiving, but not sending pause frames. Summary of Table 2 summarizes the hardware features that are capable of the Switch, refer to 8,000 supported Supported on all ports Store and Forward Half and full duplex on all front panel ports Supported on all ports are used, Auto ...
Table 2 Hardware Features Feature Addresses Auto-negotiation Forwarding Modes Duplex Modes Auto MDI/MDIX Flow Control Traffic Prioritization Ethernet, Fast Ethernet, and Gigabit Ethernet Ports Switch 4500G Up to the "Command Reference Guide" and the "Configuration Guide". Supported (using the software features of receiving, but not sending pause frames. Summary of Table 2 summarizes the hardware features that are capable of the Switch, refer to 8,000 supported Supported on all ports Store and Forward Half and full duplex on all front panel ports Supported on all ports are used, Auto ...
Getting Started Guide
Page 11
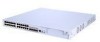
... rack or standalone mounting Up to 32 (0-31) units can be linked together (31 members and 1 commander) Switch 4500G 24-Port and Switch 4500G 48-Port-Front and Rear Panel Detail Figure 1 describes the front panel of the Switch 4500G 24-Port unit. Figure 1 Switch 4500G 24-Port-front panel (1) 10/100/1000 BASE-T autosensing Ethernet port status LED (3) Console port (5) Power LED (7) LED for extended slot 1 (9) Mode LED (2) Gigabit SFP Combo port status LED (4) 7-segment digitron display (8) LED for extended slot 2 (10) Mode switching button...
... rack or standalone mounting Up to 32 (0-31) units can be linked together (31 members and 1 commander) Switch 4500G 24-Port and Switch 4500G 48-Port-Front and Rear Panel Detail Figure 1 describes the front panel of the Switch 4500G 24-Port unit. Figure 1 Switch 4500G 24-Port-front panel (1) 10/100/1000 BASE-T autosensing Ethernet port status LED (3) Console port (5) Power LED (7) LED for extended slot 1 (9) Mode LED (2) Gigabit SFP Combo port status LED (4) 7-segment digitron display (8) LED for extended slot 2 (10) Mode switching button...
Getting Started Guide
Page 23
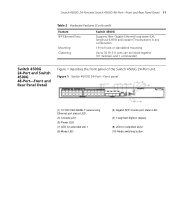
... power consumption and 370 W of PoE power 870 W when RPS is connected, with 130 W of system power consumption and 740 W of the Switch 4500G series switches (Continued) Item Power consumption (full load) Switch 4500G 24-Port 3CR17761-91 80 W Switch 4500G 48-Port 3CR17762-91 120 W Operating 0°C to 45°C (32°F to 113°F) temperature Relative 10% to 90% humidity (noncondens- System Specifications of the Switch 4500G Series 23 Table 5 System specifications of PoE power...
... power consumption and 370 W of PoE power 870 W when RPS is connected, with 130 W of system power consumption and 740 W of the Switch 4500G series switches (Continued) Item Power consumption (full load) Switch 4500G 24-Port 3CR17761-91 80 W Switch 4500G 48-Port 3CR17762-91 120 W Operating 0°C to 45°C (32°F to 113°F) temperature Relative 10% to 90% humidity (noncondens- System Specifications of the Switch 4500G Series 23 Table 5 System specifications of PoE power...

Getting Started Guide
Page 35
... Configuration Guide that resides on the lost password procedure please refer to manage a switch. This is supplied with your network. This chapter explains the initial set up of the switch and the different methods of Managing a Switch ■ Setting Up Overview ■ Manually Configuring IP Information ■ Viewing Automatically Configured IP Information ■ Setting Up Command Line Interface Management ■ Setting Up Command Line Interface Management using SSH ■ Setting Up Web Interface Management ■ Setting Up SNMP Management V1 or V2 ■ Default Users...
... Configuration Guide that resides on the lost password procedure please refer to manage a switch. This is supplied with your network. This chapter explains the initial set up of the switch and the different methods of Managing a Switch ■ Setting Up Overview ■ Manually Configuring IP Information ■ Viewing Automatically Configured IP Information ■ Setting Up Command Line Interface Management ■ Setting Up Command Line Interface Management using SSH ■ Setting Up Web Interface Management ■ Setting Up SNMP Management V1 or V2 ■ Default Users...
Getting Started Guide
Page 37
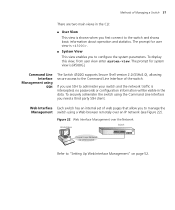
... 22 Web Interface Management over the Network Workstation Switch Connect over an IP network (see Figure 22). If you to administer your switch and the network traffic is intercepted, no passwords or configuration information will be visible in the CLI: ■ User View This view is [4500G]. To securely administer the switch using the Command Line Interface you to manage the Management switch using SSH The Switch 4500G supports Secure Shell version 2.0 (SSHv2.0), allowing secure access to "Setting Up Web Interface Management" on page 52. Web Interface Each switch...
... 22 Web Interface Management over the Network Workstation Switch Connect over an IP network (see Figure 22). If you to administer your switch and the network traffic is intercepted, no passwords or configuration information will be visible in the CLI: ■ User View This view is [4500G]. To securely administer the switch using the Command Line Interface you to manage the Management switch using SSH The Switch 4500G supports Secure Shell version 2.0 (SSHv2.0), allowing secure access to "Setting Up Web Interface Management" on page 52. Web Interface Each switch...

Getting Started Guide
Page 39
... connect to manage your switch. For more information on default users and changing default passwords, see "Default Users and Passwords" on page 55. See page 36 Command Line Interface SNMP See page 54 Connect using DHCP See page 40 Do you want to the console port and use the Command Line Inter- No How do you want to the Switch? Connect to manually Yes configure the IP information? face. See page 51 Web Interface Connect over the network using Telnet. Plug and Play Setup...
... connect to manage your switch. For more information on default users and changing default passwords, see "Default Users and Passwords" on page 55. See page 36 Command Line Interface SNMP See page 54 Connect using DHCP See page 40 Do you want to the console port and use the Command Line Inter- No How do you want to the Switch? Connect to manually Yes configure the IP information? face. See page 51 Web Interface Connect over the network using Telnet. Plug and Play Setup...

Getting Started Guide
Page 42
...network). You can then manually enter IP information using the command line interface (CLI). ■ Connecting to a front panel port Connect a workstation using the console port directly. ■ Documentation supplied with the terminal emulation software. ■ The console cable (RJ-45) supplied with the switch using an Ethernet cable to a front panel port of the switch. Prerequisites ■ A workstation with IP information: ■ IP address ■ subnet mask ■ default gateway ■ management VLAN ID, normally set to the default value (1) You can manually set...
...network). You can then manually enter IP information using the command line interface (CLI). ■ Connecting to a front panel port Connect a workstation using the console port directly. ■ Documentation supplied with the terminal emulation software. ■ The console cable (RJ-45) supplied with the switch using an Ethernet cable to a front panel port of the switch. Prerequisites ■ A workstation with IP information: ■ IP address ■ subnet mask ■ default gateway ■ management VLAN ID, normally set to the default value (1) You can manually set...

Getting Started Guide
Page 45
... use the command line interface using the console port to "Viewing Automatically Configured IP Information" on page 53. ■ A Network Interface Card (NIC). Manually Configuring IP Information 45 3 Enter the system-view command and press Return. The procedure described in the System View, the following should be displayed: [4500G] Enter interface vlan 1 and Enter. 4 Enter the IP address and subnet mask for the switch as the configuration is not saved automatically when the switch...
... use the command line interface using the console port to "Viewing Automatically Configured IP Information" on page 53. ■ A Network Interface Card (NIC). Manually Configuring IP Information 45 3 Enter the system-view command and press Return. The procedure described in the System View, the following should be displayed: [4500G] Enter interface vlan 1 and Enter. 4 Enter the IP address and subnet mask for the switch as the configuration is not saved automatically when the switch...

Getting Started Guide
Page 46
... Ethernet cable with a Network Interface Card installed) Ethernet Cable Front Panel Port Connection To connect the cable: a Attach an RJ-45 connector at one of the front panel ports on page 53. ■ Existing IP address of the switch. ■ You need to have the following so that you can manually set up the switch with IP information: ■ IP address ■ subnet mask ■ default gateway ■ management VLAN ID, normally set...
... Ethernet cable with a Network Interface Card installed) Ethernet Cable Front Panel Port Connection To connect the cable: a Attach an RJ-45 connector at one of the front panel ports on page 53. ■ Existing IP address of the switch. ■ You need to have the following so that you can manually set up the switch with IP information: ■ IP address ■ subnet mask ■ default gateway ■ management VLAN ID, normally set...

Getting Started Guide
Page 47
... IP address of Managing a Switch" on page 36. Manually Configuring IP Information 47 Setting Up the Switch with IP information. Using the Web Interface 1 Power-up message appears displaying download and install simplified Chinese information, click Cancel. 3 At the login and password prompts, enter admin as your switch in Microsoft Windows 95/98/2000/NT/XP. If there is connected to the unit, click Start in the Address field. Using Command Line Interface using telnet. If...
... IP address of Managing a Switch" on page 36. Manually Configuring IP Information 47 Setting Up the Switch with IP information. Using the Web Interface 1 Power-up message appears displaying download and install simplified Chinese information, click Cancel. 3 At the login and password prompts, enter admin as your switch in Microsoft Windows 95/98/2000/NT/XP. If there is connected to the unit, click Start in the Address field. Using Command Line Interface using telnet. If...

Getting Started Guide
Page 48
... the login and password prompts, enter admin as shown in the example in Figure 28. See "Methods of the default gateway) 8 Enter the save command to save the configuration to open a login prompt. The initial set up of your switch is now complete and the switch is ready for the switch: ip route-static 0.0.0.0 0.0.0.0 xxx.xxx.xxx.xxx (where xxx.xxx.xxx.xxx is the IP address of Managing a Switch...
... the login and password prompts, enter admin as shown in the example in Figure 28. See "Methods of the default gateway) 8 Enter the save command to save the configuration to open a login prompt. The initial set up of your switch is now complete and the switch is ready for the switch: ip route-static 0.0.0.0 0.0.0.0 xxx.xxx.xxx.xxx (where xxx.xxx.xxx.xxx is the IP address of Managing a Switch...

Getting Started Guide
Page 50
... information using the command line interface. 1 Connect your switch to view a summary of allocated IP addresses. Figure 29 User View Login 4 Enter display ip interface br to the network using the console port to its console port. If you do not intend to use the command line interface using the Ethernet cable. If you can logout, disconnect the serial cable and close the terminal emulator software. See "Methods of Managing a Switch" on correctly, is made the switch begins the automatic IP configuration process...
... information using the command line interface. 1 Connect your switch to view a summary of allocated IP addresses. Figure 29 User View Login 4 Enter display ip interface br to the network using the console port to its console port. If you do not intend to use the command line interface using the Ethernet cable. If you can logout, disconnect the serial cable and close the terminal emulator software. See "Methods of Managing a Switch" on correctly, is made the switch begins the automatic IP configuration process...

Getting Started Guide
Page 52
Setting Up Command Line Interface Management using SSH In order to set up command line interface management using a Category 5 twisted pair Ethernet cable with IP information as described in Figure 26 on page 36. ■ Ensure that software. 5 At the login and password prompts, enter admin as shown in "Methods of your choice if you have logged on correctly, the switch you want to manage is connected to the network using SSH, refer to the "3Com® Switch 4500G Family Configuration Guide", chapter...
Setting Up Command Line Interface Management using SSH In order to set up command line interface management using a Category 5 twisted pair Ethernet cable with IP information as described in Figure 26 on page 36. ■ Ensure that software. 5 At the login and password prompts, enter admin as shown in "Methods of your choice if you have logged on correctly, the switch you want to manage is connected to the network using SSH, refer to the "3Com® Switch 4500G Family Configuration Guide", chapter...

Getting Started Guide
Page 54
... configuration of your workstation. If you use the 3Com Network Director application that is private. Prerequisites Documentation supplied with the SNMP network management application software. In order to remove a community string, enter undo snmp-agent community (the string to the switch using a port in VLAN 1 (the Default VLAN). 54 CHAPTER 3: SETTING UP FOR MANAGEMENT 4 At the login and password prompts, enter admin as your user name and press Return at the password prompt (or the password...
... configuration of your workstation. If you use the 3Com Network Director application that is private. Prerequisites Documentation supplied with the SNMP network management application software. In order to remove a community string, enter undo snmp-agent community (the string to the switch using a port in VLAN 1 (the Default VLAN). 54 CHAPTER 3: SETTING UP FOR MANAGEMENT 4 At the login and password prompts, enter admin as your user name and press Return at the password prompt (or the password...

Getting Started Guide
Page 55
.... Default Users and Passwords 55 To manage your switch using an SNMP network management application, you need to log in with a valid user name and password. You can access and change all manageable parameters Use the admin default user name (no password) to the command line interface section of access. Refer to login and carry out initial switch setup. CAUTION: To protect your switch. The switch has three default user names, and each user name has a different password and level of the "SuperStack 4 Switch Command Reference Guide" for the users...
.... Default Users and Passwords 55 To manage your switch using an SNMP network management application, you need to log in with a valid user name and password. You can access and change all manageable parameters Use the admin default user name (no password) to the command line interface section of access. Refer to login and carry out initial switch setup. CAUTION: To protect your switch. The switch has three default user names, and each user name has a different password and level of the "SuperStack 4 Switch Command Reference Guide" for the users...
Getting Started Guide
Page 60
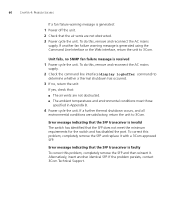
... identical SFP. Error message indicating that the SFP transceiver is generated using the Command Line Interface or the Web interface, return the unit to 3Com. To correct this , remove and reconnect the AC mains supply. 2 Check the command line interface (display logbuffer command) to 3Com. If a further thermal shutdown occurs, and all environmental conditions are satisfactory, return the unit to determine whether a thermal shutdown has occurred. 3 If no SNMP fan...
... identical SFP. Error message indicating that the SFP transceiver is generated using the Command Line Interface or the Web interface, return the unit to 3Com. To correct this , remove and reconnect the AC mains supply. 2 Check the command line interface (display logbuffer command) to 3Com. If a further thermal shutdown occurs, and all environmental conditions are satisfactory, return the unit to determine whether a thermal shutdown has occurred. 3 If no SNMP fan...

Getting Started Guide
Page 77
.... Set TFTP protocol parameter 2. Return Enter your download baudrate: 1. 9600 2.*19200 3. 38400 4. 57600 5. 115200 0. Yes or No(Y/N) 4 Enter y and the following information is displayed to indicate the file is downloading: Attached TCP/IP interface to update your bootrom? Bootrom Upgrade 77 2 Select option 2 to display the following: Load File name: Switch IP address: Server IP address: FTP User Name: FTP User Password: 3 Enter the file name, Switch IP address, Server...
.... Set TFTP protocol parameter 2. Return Enter your download baudrate: 1. 9600 2.*19200 3. 38400 4. 57600 5. 115200 0. Yes or No(Y/N) 4 Enter y and the following information is displayed to indicate the file is downloading: Attached TCP/IP interface to update your bootrom? Bootrom Upgrade 77 2 Select option 2 to display the following: Load File name: Switch IP address: Server IP address: FTP User Name: FTP User Password: 3 Enter the file name, Switch IP address, Server...

Getting Started Guide
Page 90
... 3Com product. To access these services for your region, use the appropriate telephone number, URL, or e-mail address from the table in this software, you need to this appendix. 90 APPENDIX : OBTAINING SUPPORT FOR YOUR 3COM PRODUCTS the success of your authorized 3Com reseller or 3Com for additional product and support information. Access Software Downloads You are available for the version of your warranty and other service Support and Repair...
... 3Com product. To access these services for your region, use the appropriate telephone number, URL, or e-mail address from the table in this software, you need to this appendix. 90 APPENDIX : OBTAINING SUPPORT FOR YOUR 3COM PRODUCTS the success of your authorized 3Com reseller or 3Com for additional product and support information. Access Software Downloads You are available for the version of your warranty and other service Support and Repair...


