
Installation Guide
Page 1
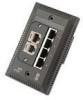
Installation Guide NJ100 Network Jack 3CNJ100 4-port 10/100 Mbps Unmanaged Ethernet Switch http://www.3com.com/ http://www.3com.com/productreg 09-2141-000 Published September 2001
Installation Guide NJ100 Network Jack 3CNJ100 4-port 10/100 Mbps Unmanaged Ethernet Switch http://www.3com.com/ http://www.3com.com/productreg 09-2141-000 Published September 2001
Installation Guide
Page 3
... Jack 8 Setting up the Power Supply 10 Using an Integrated Switch with Power Over Ethernet 10 Using a Multi-port Ethernet Power Supply 10 Using a Single-port Ethernet Power Supply 12 Using the 3Com Local Power Supply 12 Setting the Power Over Ethernet Dip Switches 13 Installing the Adapter Plate and Pass-Through Ports 15 Planning the Installation 17 Setting up the Network Cabling at Your Site 19 Connecting the Network Jack to the Network 19 Mounting the Network Jack 22 Connecting the Local Power Supply (Optional) 23 Connecting Devices to the Network Jack 23 Checking the LEDs 24 Troubleshooting...
... Jack 8 Setting up the Power Supply 10 Using an Integrated Switch with Power Over Ethernet 10 Using a Multi-port Ethernet Power Supply 10 Using a Single-port Ethernet Power Supply 12 Using the 3Com Local Power Supply 12 Setting the Power Over Ethernet Dip Switches 13 Installing the Adapter Plate and Pass-Through Ports 15 Planning the Installation 17 Setting up the Network Cabling at Your Site 19 Connecting the Network Jack to the Network 19 Mounting the Network Jack 22 Connecting the Local Power Supply (Optional) 23 Connecting Devices to the Network Jack 23 Checking the LEDs 24 Troubleshooting...
Installation Guide
Page 5
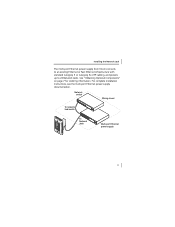
... both data and power from the same network cable. Power to the network via one of the following ways: I Over the network via an integrated switch that fits into any single port on an Ethernet network by allowing up to two additional devices to be provided one Ethernet port. See "Setting up the Power Supply" on page 12 for 10 Mbps or 100 Mbps connections automatically. Installation Guide The 3Com Network Jack...
... both data and power from the same network cable. Power to the network via one of the following ways: I Over the network via an integrated switch that fits into any single port on an Ethernet network by allowing up to two additional devices to be provided one Ethernet port. See "Setting up the Power Supply" on page 12 for 10 Mbps or 100 Mbps connections automatically. Installation Guide The 3Com Network Jack...
Installation Guide
Page 7
... to set up to two pass-through port connector Can be used for voice or other networking applications. See "Installing the Adapter Plate and Pass-Through Ports" on a network that uses IEEE 802.3af-compatible Power Over Ethernet. 2 Slot for more information. 4 LEDs Indicates network connection status. Indicates power status. 5 Power socket Can be used to power the Network Jack with installed pass-through ports. 3 Adapter plate with a local power supply (available for purchase from 3Com. About the Network Jack 1 Switched ports...
... to set up to two pass-through port connector Can be used for voice or other networking applications. See "Installing the Adapter Plate and Pass-Through Ports" on a network that uses IEEE 802.3af-compatible Power Over Ethernet. 2 Slot for more information. 4 LEDs Indicates network connection status. Indicates power status. 5 Power socket Can be used to power the Network Jack with installed pass-through ports. 3 Adapter plate with a local power supply (available for purchase from 3Com. About the Network Jack 1 Switched ports...
Installation Guide
Page 9
... instructions. 5 See "Setting the Power Over Ethernet Dip Switches" on the network switch to which can plate be fitted with installed pass-through port connector Connects the installed pass-through port to the network. About the Network Jack 1 Ethernet uplink Connects the Network Jack to the network. 4 Dip switches Determine the type of Power Over Ethernet (Capacitive Power Discovery Process 24V or 48V or IEEE 802.3af) the Network Jack uses. port Make sure the port on page 13 for adapter...
... instructions. 5 See "Setting the Power Over Ethernet Dip Switches" on the network switch to which can plate be fitted with installed pass-through port connector Connects the installed pass-through port to the network. About the Network Jack 1 Ethernet uplink Connects the Network Jack to the network. 4 Dip switches Determine the type of Power Over Ethernet (Capacitive Power Discovery Process 24V or 48V or IEEE 802.3af) the Network Jack uses. port Make sure the port on page 13 for adapter...

Installation Guide
Page 10
... you begin the installation, make sure you begin installation, register your network cable is available in single- Before you have the following items are included with the Network Jack: I RJ-45 coupler cable (1 per Network Jack) for installing connectors to the Network Jack. 6 The Network Jack is terminated with the single pack: I Installation guide (1 per Network Jack) for mounting the adapter plate to use as passthrough ports. I Adapter plates for connecting the Ethernet cable from the manufacturer...
... you begin the installation, make sure you begin installation, register your network cable is available in single- Before you have the following items are included with the Network Jack: I RJ-45 coupler cable (1 per Network Jack) for installing connectors to the Network Jack. 6 The Network Jack is terminated with the single pack: I Installation guide (1 per Network Jack) for mounting the adapter plate to use as passthrough ports. I Adapter plates for connecting the Ethernet cable from the manufacturer...
Installation Guide
Page 11
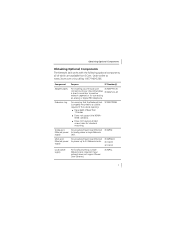
... Components The Network Jack works with the following optional components, all of fewer than 1.5 inches. required if the cubicle opening: I Does not support the NEMAWD6 standard. Extension ring For ensuring that allow a direct connection to a cubicle; Order online at www.3com.com or by calling 1-877-949-3266. Component Purpose 3C Number(s) Adapter plates For installing pass-through port 3CNJAP-PA...
... Components The Network Jack works with the following optional components, all of fewer than 1.5 inches. required if the cubicle opening: I Does not support the NEMAWD6 standard. Extension ring For ensuring that allow a direct connection to a cubicle; Order online at www.3com.com or by calling 1-877-949-3266. Component Purpose 3C Number(s) Adapter plates For installing pass-through port 3CNJAP-PA...
Installation Guide
Page 12
...). 6 Connect the Network Jack to the network (page 19). 7 Mount the Network Jack to the wall or of the following steps: 1 Set up the network cabling at your network supports Power Over Ethernet or if you are using a single-port or multi-port power supply). 3 Install the adapter plate and pass-through ports (page 15; Network Jack Tester For verifying the Network Jack installation; Installation Guide Component Purpose 3C Number(s) VoIP telephone power cable For powering a VoIP telephone on a Check the 3Com network that uses Capacitive Power web site...
...). 6 Connect the Network Jack to the network (page 19). 7 Mount the Network Jack to the wall or of the following steps: 1 Set up the network cabling at your network supports Power Over Ethernet or if you are using a single-port or multi-port power supply). 3 Install the adapter plate and pass-through ports (page 15; Network Jack Tester For verifying the Network Jack installation; Installation Guide Component Purpose 3C Number(s) VoIP telephone power cable For powering a VoIP telephone on a Check the 3Com network that uses Capacitive Power web site...
Installation Guide
Page 14
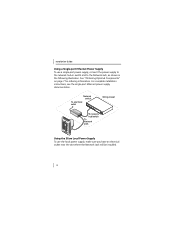
Before you begin the installation, determine which type of power supply the Network Jack will use a multi-port Ethernet power supply, you must connect the power supply to www.3com.com/. Using a Multi-port Ethernet Power Supply To use . I Over the network via a single-port Ethernet power supply. You must then determine if it is compatible with Power Over Ethernet To use Power Over Ethernet, you must have a switch on page 11. 10 Installation Guide Setting up the Power Supply Power to the Network Jack can be supplied one of the following ways...
Before you begin the installation, determine which type of power supply the Network Jack will use a multi-port Ethernet power supply, you must connect the power supply to www.3com.com/. Using a Multi-port Ethernet Power Supply To use . I Over the network via a single-port Ethernet power supply. You must then determine if it is compatible with Power Over Ethernet To use Power Over Ethernet, you must have a switch on page 11. 10 Installation Guide Setting up the Power Supply Power to the Network Jack can be supplied one of the following ways...
Installation Guide
Page 15
Network switch Wiring closet To network hub/switch To Network Jack Multi-port Ethernet 1 2 power supply 3 4 11 See "Obtaining Optional Components" on page 7 for ordering information. Installing the Network Jack The multi-port Ethernet power supply from 3Com connects to an existing Ethernet or Fast Ethernet infrastructure with standard Category 5 or Category 5e UTP cabling, and powers up to 24 Network Jacks. For complete installation instructions, see the multi-port Ethernet power supply documentation.
Network switch Wiring closet To network hub/switch To Network Jack Multi-port Ethernet 1 2 power supply 3 4 11 See "Obtaining Optional Components" on page 7 for ordering information. Installing the Network Jack The multi-port Ethernet power supply from 3Com connects to an existing Ethernet or Fast Ethernet infrastructure with standard Category 5 or Category 5e UTP cabling, and powers up to 24 Network Jacks. For complete installation instructions, see the multi-port Ethernet power supply documentation.
Installation Guide
Page 16
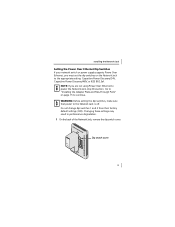
... electrical outlet Wiring closet To network hub/switch To Network Jack 1 2 3 4 Using the 3Com Local Power Supply To use a single-port power supply, connect the power supply to the network hub or switch and to the Network Jack, as shown in the following illustration. For complete installation instructions, see the single-port Ethernet power supply documentation. Installation Guide Using a Single-port Ethernet Power Supply To use the local power supply, make sure you have an electrical outlet near the site where the Network Jack will be installed. 12 See "Obtaining Optional...
... electrical outlet Wiring closet To network hub/switch To Network Jack 1 2 3 4 Using the 3Com Local Power Supply To use a single-port power supply, connect the power supply to the network hub or switch and to the Network Jack, as shown in the following illustration. For complete installation instructions, see the single-port Ethernet power supply documentation. Installation Guide Using a Single-port Ethernet Power Supply To use the local power supply, make sure you have an electrical outlet near the site where the Network Jack will be installed. 12 See "Obtaining Optional...
Installation Guide
Page 17
... Ethernet Dip Switches If your network switch or power supply supports Power Over Ethernet, you are not using Power Over Ethernet to power the Network Jack, skip this section. NMAeSotSdweEolMr3kBCIL3nE0teD0r0fIaNceU.NSo.Ad.e wTeitshteFdCtCo SCtoamndpalyrds C US Dip switch cover 13 Do not change dip switches 1 and 2 from their factory default settings (OFF). NOTE: If you must set the dip switches on page 15 to the Network Jack is off. Go to "Installing the Adapter Plate and Pass-Through Ports...
... Ethernet Dip Switches If your network switch or power supply supports Power Over Ethernet, you are not using Power Over Ethernet to power the Network Jack, skip this section. NMAeSotSdweEolMr3kBCIL3nE0teD0r0fIaNceU.NSo.Ad.e wTeitshteFdCtCo SCtoamndpalyrds C US Dip switch cover 13 Do not change dip switches 1 and 2 from their factory default settings (OFF). NOTE: If you must set the dip switches on page 15 to the Network Jack is off. Go to "Installing the Adapter Plate and Pass-Through Ports...

Installation Guide
Page 19
NOTE: If you want to install the blank adapter plate, or if you are supported with the Network Jack adapter plates, go to www.3com.com. available for setting up a connection to a separate network segment, purchase supported connectors and install them on installing the adapter plate and pass-through ports for connecting an analog or PBX digital telephone or for purchase separately with the single pack; Go to...
NOTE: If you want to install the blank adapter plate, or if you are supported with the Network Jack adapter plates, go to www.3com.com. available for setting up a connection to a separate network segment, purchase supported connectors and install them on installing the adapter plate and pass-through ports for connecting an analog or PBX digital telephone or for purchase separately with the single pack; Go to...

Installation Guide
Page 23
... section, "Setting up the Network Cabling at Your Site The network cabling at your site (from the wiring closet to the network is determined by how your network. CAUTION: It is terminated (as a standard MDI-X port. 19 CAUTION: Make sure the port on the network switch to the connector manufacturer's instructions for connecting the Network Jack to the wall or cubicle opening) may already be installed. If...
... section, "Setting up the Network Cabling at Your Site The network cabling at your site (from the wiring closet to the network is determined by how your network. CAUTION: It is terminated (as a standard MDI-X port. 19 CAUTION: Make sure the port on the network switch to the connector manufacturer's instructions for connecting the Network Jack to the wall or cubicle opening) may already be installed. If...
Installation Guide
Page 27
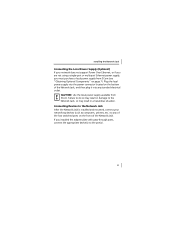
... are not using a single-port or multi-port Ethernet power supply, you installed the adapter plate with pass-through ports, connect the appropriate device(s) to the Network Jack, or may result in a hazardous situation. If you must purchase a local power supply from 3Com. Plug the local power supply into any of the Network Jack, and then plug it into the power connector located on the bottom of the four switched ports on...
... are not using a single-port or multi-port Ethernet power supply, you installed the adapter plate with pass-through ports, connect the appropriate device(s) to the Network Jack, or may result in a hazardous situation. If you must purchase a local power supply from 3Com. Plug the local power supply into any of the Network Jack, and then plug it into the power connector located on the bottom of the four switched ports on...

Installation Guide
Page 28
... checking the LEDs. Troubleshooting the Network Jack If you encounter problems with the Network Jack: I Off-There is connected to the network. I Verify the Network Jack is receiving power (local or via the network). I Off-The Network Jack is not lit, make sure the: I On-The Network Jack is no connection to the network and a link has been established. Installation Guide Checking the LEDs You can verify the Network Jack installation by viewing the Power LED (it should be lit). See "Setting...
... checking the LEDs. Troubleshooting the Network Jack If you encounter problems with the Network Jack: I Off-There is connected to the network. I Verify the Network Jack is receiving power (local or via the network). I Off-The Network Jack is not lit, make sure the: I On-The Network Jack is no connection to the network and a link has been established. Installation Guide Checking the LEDs You can verify the Network Jack installation by viewing the Power LED (it should be lit). See "Setting...
Installation Guide
Page 29
...'s instructions for your network does not support Power Over Ethernet. Refer to the network properly by viewing the Link LED (it should be lit). I Local power supply is plugged into the Network Jack and into a working . I Has a valid connection to which the Network Jack is connected is configured as a standard MDI-X port. 25 If the Link LED is not lit, make sure the other end of the network cable is plugged into a switch...
...'s instructions for your network does not support Power Over Ethernet. Refer to the network properly by viewing the Link LED (it should be lit). I Local power supply is plugged into the Network Jack and into a working . I Has a valid connection to which the Network Jack is connected is configured as a standard MDI-X port. 25 If the Link LED is not lit, make sure the other end of the network cable is plugged into a switch...
Installation Guide
Page 32
... a network that you access the 3Com Corporation World Wide Web site. One-Year Free Installation Support 3Com provides free installation and troubleshooting telephone support for networks that do not support Power Over Ethernet Compatible with VoIP standard. Hours of services. Installation Guide Features Power Over Ethernet Local power supply Voice Over IP (VoIP) Power forwarding Compatible with IEEE 802.3af and Capacitive Power Discovery Process Required for this appendix is correct at time of purchase. Port number 1 can be used...
... a network that you access the 3Com Corporation World Wide Web site. One-Year Free Installation Support 3Com provides free installation and troubleshooting telephone support for networks that do not support Power Over Ethernet Compatible with VoIP standard. Hours of services. Installation Guide Features Power Over Ethernet Local power supply Voice Over IP (VoIP) Power forwarding Compatible with IEEE 802.3af and Capacitive Power Discovery Process Required for this appendix is correct at time of purchase. Port number 1 can be used...
Installation Guide
Page 33
... following online systems: I World Wide Web site I 3Com Knowledgebase Web Services I 3Com FTP site World Wide Web Site To access the latest networking information on the 3Com Corporation World Wide Web site, enter this URL into your Internet browser: http://www.3com.com/ This service provides access to online support information, such as technical documentation and a software library, as well as support options that range from technical education...
... following online systems: I World Wide Web site I 3Com Knowledgebase Web Services I 3Com FTP site World Wide Web Site To access the latest networking information on the 3Com Corporation World Wide Web site, enter this URL into your Internet browser: http://www.3com.com/ This service provides access to online support information, such as technical documentation and a software library, as well as support options that range from technical education...

Installation Guide
Page 34
... the following information ready: I Product model name, part number, and serial number I A list of services, including network planning, installation, hardware maintenance, application training, and support services. Installation Guide 3Com FTP Site Download drivers, patches, software, and MIBs across the Internet from Your Network Supplier If you are qualified to consult your network supplier, see the following information into your network supplier. To connect to the 3Com FTP site, enter the following...
... the following information ready: I Product model name, part number, and serial number I A list of services, including network planning, installation, hardware maintenance, application training, and support services. Installation Guide 3Com FTP Site Download drivers, patches, software, and MIBs across the Internet from Your Network Supplier If you are qualified to consult your network supplier, see the following information into your network supplier. To connect to the 3Com FTP site, enter the following...


