User Guide
Page 3
... Rack-Mounting or Free-Standing 14 Using the Mounting Kit 14 Montagesatz Anweisungen 15 Placing Units On Top of Each Other 16 Supplying Power to the Switch 16 Checking for Correct Operation 16 Connecting a Network Device 17 Using SFP Transceivers 18 Approved SFP Transceivers 18 Inserting an SFP Transceiver 18 Removing an SFP Transceiver 19 Performing Spot Checks 19 3 CONNECTING TO THE WEB INTERFACE Requirements for Accessing the Web Interface 21 Running the Discovery Application 21 Logging...
... Rack-Mounting or Free-Standing 14 Using the Mounting Kit 14 Montagesatz Anweisungen 15 Placing Units On Top of Each Other 16 Supplying Power to the Switch 16 Checking for Correct Operation 16 Connecting a Network Device 17 Using SFP Transceivers 18 Approved SFP Transceivers 18 Inserting an SFP Transceiver 18 Removing an SFP Transceiver 19 Performing Spot Checks 19 3 CONNECTING TO THE WEB INTERFACE Requirements for Accessing the Web Interface 21 Running the Discovery Application 21 Logging...
User Guide
Page 4
... VLAN Configurations 40 Spanning Tree 41 IGMP Snooping 42 IGMP Query 42 Broadcast Storm 43 Configuring Port Settings 43 Administration 43 Speed/Duplex for 1000 Mbps Connections 45 Link Aggregation 45 Spanning Tree per Port 47 Port Mirroring 49 QoS VoIP Traffic Settings 50 Security 53 RADIUS Client 53 802.1X Settings 54 Monitoring 56 Address Table 56 Cable Diagnostics 56 5 TROUBLESHOOTING Resetting to Factory Defaults 59 Forgotten Password 59 Forgotten Static IP Address 60 Solving LED...
... VLAN Configurations 40 Spanning Tree 41 IGMP Snooping 42 IGMP Query 42 Broadcast Storm 43 Configuring Port Settings 43 Administration 43 Speed/Duplex for 1000 Mbps Connections 45 Link Aggregation 45 Spanning Tree per Port 47 Port Mirroring 49 QoS VoIP Traffic Settings 50 Security 53 RADIUS Client 53 802.1X Settings 54 Monitoring 56 Address Table 56 Cable Diagnostics 56 5 TROUBLESHOOTING Resetting to Factory Defaults 59 Forgotten Password 59 Forgotten Static IP Address 60 Solving LED...
User Guide
Page 8
... the normal or high priority channel. This offers you can configure 3Com Baseline Switch 2250 Plus to forward or to block and discard bridge protocol data unit (BPDU) packets to ensure that high priority traffic is forwarded on a different queue from lower priority traffic, and is given preference over another switch. 8 CHAPTER 1: INTRODUCING THE BASELINE SWITCH SFP Ports The two SFP ports support fiber Gigabit Ethernet short-wave (SX) and long...
... the normal or high priority channel. This offers you can configure 3Com Baseline Switch 2250 Plus to forward or to block and discard bridge protocol data unit (BPDU) packets to ensure that high priority traffic is forwarded on a different queue from lower priority traffic, and is given preference over another switch. 8 CHAPTER 1: INTRODUCING THE BASELINE SWITCH SFP Ports The two SFP ports support fiber Gigabit Ethernet short-wave (SX) and long...
User Guide
Page 10
... a configuration, you use straight-through or crossover cables for all network connections to workstations or servers, or to color. If an SFP transceiver (purchased separately) is installed in full-duplex mode). When an SFP port is disabled. The 1000BASE-T RJ-45 ports support automatic MDI/MDI-X operation, so you the flexibility of the connected device. This offers you can be connected to create a high-capacity aggregated link backbone connection. SFP ports are...
... a configuration, you use straight-through or crossover cables for all network connections to workstations or servers, or to color. If an SFP transceiver (purchased separately) is installed in full-duplex mode). When an SFP port is disabled. The 1000BASE-T RJ-45 ports support automatic MDI/MDI-X operation, so you the flexibility of the connected device. This offers you can be connected to create a high-capacity aggregated link backbone connection. SFP ports are...
User Guide
Page 12
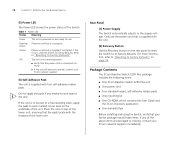
... not operate, contact your 3Com network supplier immediately. Only use Flashing Power-on self-test is supplied with the unit. (8) Recovery Button Use the Recovery button on the underside of a free-standing stack, apply the pads to each marked corner area on the rear panel to reset the Switch to factory defaults. Table 7 Power LED Status Meaning Green The unit is powered on and ready for use the power cord that your Switch package has all these...
... not operate, contact your 3Com network supplier immediately. Only use Flashing Power-on self-test is supplied with the unit. (8) Recovery Button Use the Recovery button on the underside of a free-standing stack, apply the pads to each marked corner area on the rear panel to reset the Switch to factory defaults. Table 7 Power LED Status Meaning Green The unit is powered on and ready for use the power cord that your Switch package has all these...
User Guide
Page 17
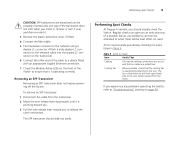
... ports fail when the Switch was successfully completed. ■ Reset the Switch. Check the Power LED and see if POST was powered on the Switch again ■ If the Switch still does not operate, contact your settings. To visit the 3Com Knowledgebase Web site, start your Web browser, and then enter http://knowledgebase.3com.com ■ Contact your 3Com network supplier for 10 Mbps connections). CAUTION: Resetting the Switch to Factory Defaults" on self-test...
... ports fail when the Switch was successfully completed. ■ Reset the Switch. Check the Power LED and see if POST was powered on the Switch again ■ If the Switch still does not operate, contact your settings. To visit the 3Com Knowledgebase Web site, start your Web browser, and then enter http://knowledgebase.3com.com ■ Contact your 3Com network supplier for 10 Mbps connections). CAUTION: Resetting the Switch to Factory Defaults" on self-test...
User Guide
Page 19
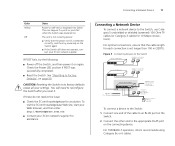
To remove an SFP transceiver: 1 Disconnect the cable from the front). any problems operating the Switch, refer to "Troubleshooting" starting on page 59. Performing Spot Checks At frequent intervals, you to release the catch mechanism. If you insert it, remove it, turn it over, and then re-insert it. 3 Remove the plastic protective cover, if fitted. 4 Connect the fiber cable. 5 The transceiver connects to the network using a duplex LC...
To remove an SFP transceiver: 1 Disconnect the cable from the front). any problems operating the Switch, refer to "Troubleshooting" starting on page 59. Performing Spot Checks At frequent intervals, you to release the catch mechanism. If you insert it, remove it, turn it over, and then re-insert it. 3 Remove the plastic protective cover, if fitted. 4 Connect the fiber cable. 5 The transceiver connects to the network using a duplex LC...
User Guide
Page 24
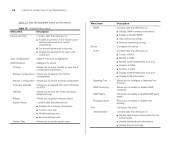
... you to : ■ Create a VLAN. ■ Modify a VLAN. ■ Modify VLAN membership for a port. ■ Rename a VLAN. ■ Remove a VLAN. ■ Display VLAN membership for a port. ■ Display VLAN information. 24 CHAPTER 3: CONNECTING TO THE WEB INTERFACE Table 10 lists the available items on the menu. IP Setup Allows you to setup, modify, or view the IP configuration parameters. Allows you to enable or disable IGMP query mode. Menu Item SNMP Device VLAN Spanning Tree IGMP...
... you to : ■ Create a VLAN. ■ Modify a VLAN. ■ Modify VLAN membership for a port. ■ Rename a VLAN. ■ Remove a VLAN. ■ Display VLAN membership for a port. ■ Display VLAN information. 24 CHAPTER 3: CONNECTING TO THE WEB INTERFACE Table 10 lists the available items on the menu. IP Setup Allows you to setup, modify, or view the IP configuration parameters. Allows you to enable or disable IGMP query mode. Menu Item SNMP Device VLAN Spanning Tree IGMP...
User Guide
Page 25
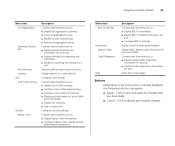
... changes Configures QoS settings. Buttons Depending on the screen that you have made ■ Cancel - Navigating the Web Interface 25 Menu Item Link Aggregation Spanning Tree per Port Port Mirroring Statistics QoS VoIP Traffic Setting Security Radius Client Description Contains tabs that allow you to: ■ Display Voice VLAN summary. ■ Configure Voice VLAN global settings. ■ Configure Voice VLAN port settings. ■ Display port information for Voice VLAN and Trunk details. ■ Display OUI summary. ■ Add or remove OUI. Monitor traffic...
... changes Configures QoS settings. Buttons Depending on the screen that you have made ■ Cancel - Navigating the Web Interface 25 Menu Item Link Aggregation Spanning Tree per Port Port Mirroring Statistics QoS VoIP Traffic Setting Security Radius Client Description Contains tabs that allow you to: ■ Display Voice VLAN summary. ■ Configure Voice VLAN global settings. ■ Configure Voice VLAN port settings. ■ Display port information for Voice VLAN and Trunk details. ■ Display OUI summary. ■ Add or remove OUI. Monitor traffic...
User Guide
Page 26
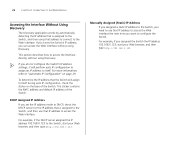
... Switch's IP address, you set the IP address mode to DHCP, check the DHCP server for the IP address that is assigned to the Switch, and then using that IP address to the Switch, start your Web browser, and then type http://192.168.0.123. This sticker contains the MAC address and default IP address of the Switch. For example, if you need to use that address to connect to access the interface directly, without using Discovery. Manually Assigned (Static) IP Address...
... Switch's IP address, you set the IP address mode to DHCP, check the DHCP server for the IP address that is assigned to the Switch, and then using that IP address to the Switch, start your Web browser, and then type http://192.168.0.123. This sticker contains the MAC address and default IP address of the Switch. For example, if you need to use that address to connect to access the interface directly, without using Discovery. Manually Assigned (Static) IP Address...

User Guide
Page 29
... MAC address by assigning a static IP address. Once you gain access to the Web interface, you power on the Switch for the first time, it - This sticker contains the MAC address and default IP address of the Switch. Administration Settings The Administration menu includes eight administration items: ■ IP Setup ■ Backup Configuration ■ Restore Configuration ■ Firmware Upgrade ■ Initialize ■ Reboot ■ System Access ■ System Time ■ SNMP Modifying the IP Address Settings To enable devices on the network...
... MAC address by assigning a static IP address. Once you gain access to the Web interface, you power on the Switch for the first time, it - This sticker contains the MAC address and default IP address of the Switch. Administration Settings The Administration menu includes eight administration items: ■ IP Setup ■ Backup Configuration ■ Restore Configuration ■ Firmware Upgrade ■ Initialize ■ Reboot ■ System Access ■ System Time ■ SNMP Modifying the IP Address Settings To enable devices on the network...
User Guide
Page 31
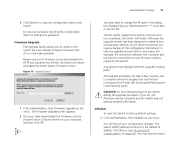
... the Switch. A progress screen displays while the upgrade is permanently green. Initialize To reset the Switch to install on your configuration settings, 3Com recommends that 3Com may need to change the password. Administration Settings 31 3 Click Restore to copy the configuration back to the Switch, and once this has completed, the Switch will restart. The file will revert to the default IP address 169.254.x.y. (see the file. The Switch LAN IP address will...
... the Switch. A progress screen displays while the upgrade is permanently green. Initialize To reset the Switch to install on your configuration settings, 3Com recommends that 3Com may need to change the password. Administration Settings 31 3 Click Restore to copy the configuration back to the Switch, and once this has completed, the Switch will restart. The file will revert to the default IP address 169.254.x.y. (see the file. The Switch LAN IP address will...
User Guide
Page 36
... Web interface. ID of VLAN 1 (the management VLAN). CAUTION: At least one port must specify a VLAN ID for each VLAN. If you choose to connect all ports to create VLANs on the Switch. Modify VLAN Use the Modify VLAN screen to change the VLAN to which a port belongs, and configure the port to communicate with seven tabs that include: ■ Setup ■ Modify VLAN ■ Modify Port ■ Rename ■ Remove ■ Port Detail ■ VLAN Detail Setup Use...
... Web interface. ID of VLAN 1 (the management VLAN). CAUTION: At least one port must specify a VLAN ID for each VLAN. If you choose to connect all ports to create VLANs on the Switch. Modify VLAN Use the Modify VLAN screen to change the VLAN to which a port belongs, and configure the port to communicate with seven tabs that include: ■ Setup ■ Modify VLAN ■ Modify Port ■ Rename ■ Remove ■ Port Detail ■ VLAN Detail Setup Use...
User Guide
Page 45
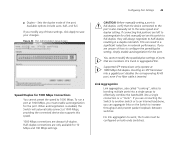
... a trunk or aggregated link. Link Aggregation Link aggregation, also called "trunking", refers to bonding multiple ports into a single group to effectively combine the bandwidth into a gigabit port disables the corresponding RJ-45 port, even if no fiber cable is also manually set on this speed. 1000 Mbps connections are connecting the Switch to another switch or to an Internet backbone, you modify any of the port. Sets the duplex mode of these settings, click Apply to work, the trunks must enable...
... a trunk or aggregated link. Link Aggregation Link aggregation, also called "trunking", refers to bonding multiple ports into a single group to effectively combine the bandwidth into a gigabit port disables the corresponding RJ-45 port, even if no fiber cable is also manually set on this speed. 1000 Mbps connections are connecting the Switch to another switch or to an Internet backbone, you modify any of the port. Sets the duplex mode of these settings, click Apply to work, the trunks must enable...

User Guide
Page 53
... user or group that uses software running on a central server to control access to RADIUS-aware devices on the network. The IP address of sending authentication requests. ■ Timeout - An authentication server contains a database of multiple user name/password pairs with associated privilege levels for authentication messages. ■ Key - Security Using the Web interface, you have filled in User Service (RADIUS) is a logon authentication protocol that require management access to configure the RADIUS settings. The RADIUS Client...
... user or group that uses software running on a central server to control access to RADIUS-aware devices on the network. The IP address of sending authentication requests. ■ Timeout - An authentication server contains a database of multiple user name/password pairs with associated privilege levels for authentication messages. ■ Key - Security Using the Web interface, you have filled in User Service (RADIUS) is a logon authentication protocol that require management access to configure the RADIUS settings. The RADIUS Client...

User Guide
Page 59
.... After you may encounter while installing, using, and managing the Switch, with suggested courses of the Administration menu. Forgotten Password If you forget the password to the Web interface after you reset it , you can reset the Switch to obtain support for your settings. See "Resetting to Factory Defaults" on how to factory defaults. See Figure 1 for instructions. admin ■ Password - blank (no password) See "Automatic IP Configuration" on the Initialize tab of...
.... After you may encounter while installing, using, and managing the Switch, with suggested courses of the Administration menu. Forgotten Password If you forget the password to the Web interface after you reset it , you can reset the Switch to obtain support for your settings. See "Resetting to Factory Defaults" on how to factory defaults. See Figure 1 for instructions. admin ■ Password - blank (no password) See "Automatic IP Configuration" on the Initialize tab of...

User Guide
Page 60
A fiber cable is connected, but the Module Active LED is configured for half-duplex operation only. If the connected device does not support autonegotiation, ensure that it is off . 60 CHAPTER 5: TROUBLESHOOTING Forgotten Static IP Address If you forget the static IP address that you assigned to the Switch and you need to access the Web interface, use the Discovery application to automatically detect the IP address and connect to the following...
A fiber cable is connected, but the Module Active LED is configured for half-duplex operation only. If the connected device does not support autonegotiation, ensure that it is off . 60 CHAPTER 5: TROUBLESHOOTING Forgotten Static IP Address If you forget the static IP address that you assigned to the Switch and you need to access the Web interface, use the Discovery application to automatically detect the IP address and connect to the following...
User Guide
Page 64
... get full use the appropriate telephone number, URL or e-mail address from the date of purchase, so it is registered and under the Product Support heading at http://eSupport.3com.com/. Telephone numbers are the software releases that follow the software version included with your product ■ A list of system hardware and software, including revision level ■ Diagnostic error messages ■ Details about recent configuration changes...
... get full use the appropriate telephone number, URL or e-mail address from the date of purchase, so it is registered and under the Product Support heading at http://eSupport.3com.com/. Telephone numbers are the software releases that follow the software version included with your product ■ A list of system hardware and software, including revision level ■ Diagnostic error messages ■ Details about recent configuration changes...

User Guide
Page 74
... an open standard that enables hot swapping of various types of rules for "registered jack." subnet address An extension of exchanging information or sharing resources. however they connect more sophisticated. It is used to connect Ethernet networks. protocol A set of four numbers configured like an IP address. TCP/IP Transmission Control Protocol/Internet Protocol. MAC addresses are generally more LANs than a bridge and are 6 bytes long. 74 GLOSSARY Most devices that connect to a LAN have a MAC address...
... an open standard that enables hot swapping of various types of rules for "registered jack." subnet address An extension of exchanging information or sharing resources. however they connect more sophisticated. It is used to connect Ethernet networks. protocol A set of four numbers configured like an IP address. TCP/IP Transmission Control Protocol/Internet Protocol. MAC addresses are generally more LANs than a bridge and are 6 bytes long. 74 GLOSSARY Most devices that connect to a LAN have a MAC address...
User Guide
Page 78
... rear panel power supply 12 Recovery button 12 resetting to factory defaults 59 RJ-45 defined 74 ports 11 S server defined 74 SFP ports 8, 10 SFP transceivers 18 approved (supported) 18 inserting 18 removing 19 spot checks 19 subnet mask 74 switch defined 74 T TCP/IP 73 defined 74 traffic 75 monitoring 49 troubleshooting 59 forgotten IP address 59 forgotten password 59 LED-related issues 60 POST failed 17 trunking See link aggregation U user name default 32 V viewing status...
... rear panel power supply 12 Recovery button 12 resetting to factory defaults 59 RJ-45 defined 74 ports 11 S server defined 74 SFP ports 8, 10 SFP transceivers 18 approved (supported) 18 inserting 18 removing 19 spot checks 19 subnet mask 74 switch defined 74 T TCP/IP 73 defined 74 traffic 75 monitoring 49 troubleshooting 59 forgotten IP address 59 forgotten password 59 LED-related issues 60 POST failed 17 trunking See link aggregation U user name default 32 V viewing status...


